


 本文详细介绍如何使用Scrapy框架及Scrapy-Splash进行京东商品价格爬取,包括环境配置、项目搭建、数据抓取与存储至MySQL数据库的全过程。
版本:scrapy-2.2.0,Python-2.7.5
基于scrapy-splash:3.5.0,没有装这个的请先安装。这个只有镜像。拉取镜像直接运行容器就可以。
1 安装pymysql
执行命令:pip3 install pymysql
2 创建项目
执行命令:scrapy startproject jdproject
3 生成spider
cd jdproject
scrapy genspider jd www.jd.com
4.编辑items.py
# Define here the models for your scraped items
#
# See documentation in:
# https://docs.scrapy.org/en/latest/topics/items.html

import scrapy


class JdprojectItem(scrapy.Item):
    # define the fields for your item here like:
    # name = scrapy.Field()
    #pass
    type = scrapy.Field()
    val = scrapy.Field()
    pass
5.编辑settings.py
# Scrapy settings for jdproject project
#
# For simplicity, this file contains only settings considered important or
# commonly used. You can find more settings consulting the documentation:
#
#     https://docs.scrapy.org/en/latest/topics/settings.html
#     https://docs.scrapy.org/en/latest/topics/downloader-middleware.html
#     https://docs.scrapy.org/en/latest/topics/spider-middleware.html

BOT_NAME = 'jdproject'

SPIDER_MODULES = ['jdproject.spiders']
NEWSPIDER_MODULE = 'jdproject.spiders'


# Crawl responsibly by identifying yourself (and your website) on the user-agent
#USER_AGENT = 'jdproject (+http://www.yourdomain.com)'

# Obey robots.txt rules
ROBOTSTXT_OBEY = True

# Configure maximum concurrent requests performed by Scrapy (default: 16)
#CONCURRENT_REQUESTS = 32

# Configure a delay for requests for the same website (default: 0)
# See https://docs.scrapy.org/en/latest/topics/settings.html#download-delay
# See also autothrottle settings and docs
#DOWNLOAD_DELAY = 3
# The download delay setting will honor only one of:
#CONCURRENT_REQUESTS_PER_DOMAIN = 16
#CONCURRENT_REQUESTS_PER_IP = 16

# Disable cookies (enabled by default)
#COOKIES_ENABLED = False

# Disable Telnet Console (enabled by default)
#TELNETCONSOLE_ENABLED = False

# Override the default request headers:
#DEFAULT_REQUEST_HEADERS = {
#   'Accept': 'text/html,application/xhtml+xml,application/xml;q=0.9,*/*;q=0.8',
#   'Accept-Language': 'en',
#}

# Enable or disable spider middlewares
# See https://docs.scrapy.org/en/latest/topics/spider-middleware.html
SPIDER_MIDDLEWARES = {
    'jdproject.middlewares.JdprojectSpiderMiddleware': 100,
}

# Enable or disable downloader middlewares
# See https://docs.scrapy.org/en/latest/topics/downloader-middleware.html
DOWNLOADER_MIDDLEWARES = {
   # 'jdproject.middlewares.JdprojectDownloaderMiddleware': 543,
   'scrapy_splash.SplashCookiesMiddleware': 123,
    'scrapy_splash.SplashMiddleware': 125,
    'scrapy.downloadermiddlewares.httpcompression.HttpCompressionMiddleware': 210,
}

# Enable or disable extensions
# See https://docs.scrapy.org/en/latest/topics/extensions.html
#EXTENSIONS = {
#    'scrapy.extensions.telnet.TelnetConsole': None,
#}

# Configure item pipelines
# See https://docs.scrapy.org/en/latest/topics/item-pipeline.html
ITEM_PIPELINES = {
    'jdproject.pipelines.JdprojectPipeline':300,
}

# Enable and configure the AutoThrottle extension (disabled by default)
# See https://docs.scrapy.org/en/latest/topics/autothrottle.html
#AUTOTHROTTLE_ENABLED = True
# The initial download delay
#AUTOTHROTTLE_START_DELAY = 5
# The maximum download delay to be set in case of high latencies
#AUTOTHROTTLE_MAX_DELAY = 60
# The average number of requests Scrapy should be sending in parallel to
# each remote server
#AUTOTHROTTLE_TARGET_CONCURRENCY = 1.0
# Enable showing throttling stats for every response received:
#AUTOTHROTTLE_DEBUG = False

# Enable and configure HTTP caching (disabled by default)
# See https://docs.scrapy.org/en/latest/topics/downloader-middleware.html#httpcache-middleware-settings
HTTPCACHE_ENABLED = True
HTTPCACHE_EXPIRATION_SECS = 0
HTTPCACHE_DIR = 'httpcache'
SPLASH_URL = "http://172.17.0.4:8050"
#HTTPCACHE_IGNORE_HTTP_CODES = []
HTTPCACHE_STORAGE = 'scrapy.extensions.httpcache.FilesystemCacheStorage'

mysql_jd = {
    "host":"192.168.8.21",
    "port":3306,
    'user':"root",
    "password":"123456",
    "db":"scrapy"
}
6.编辑pipelines.py
# Define your item pipelines here
#
# Don't forget to add your pipeline to the ITEM_PIPELINES setting
# See: https://docs.scrapy.org/en/latest/topics/item-pipeline.html


# useful for handling different item types with a single interface
from itemadapter import ItemAdapter
import pymysql
import pymysql.cursors
from .settings import mysql_jd
class JdprojectPipeline:
    def __init__(self):
        print('进入了pipeline')
        super().__init__()
        db='scrapy'
        host='192.168.8.21'
        user='root'
        passwd='123456'
        port=3306
        self.db_conn=pymysql.connect(host=host,port=port,user=user,passwd=passwd,db=db,charset='utf8')
        self.db_cur=self.db_conn.cursor()
        print('连接数据库成功')
    def process_item(self, item, spider):
        print('准备插入数据')
        sql='''insert into jd_phone (type,val) values('%s','%s')''' % (item["type"],item["val"])
        try:
            print('开始执行sql')
            self.db_cur.execute(sql)
            self.db_conn.commit()
            print('执行sql成功:'+sql)
        except Exception as e:
            print(e)
            self.db_conn.rollback()
        return item
7.编辑spiders/jd.py
# -*- coding: utf-8 -*-
import scrapy
from scrapy.http import Request, FormRequest
from scrapy.selector import Selector
from scrapy_splash.request import SplashRequest, SplashFormRequest
from jdproject.items import JdprojectItem

class JdSpider(scrapy.Spider):
    name = "jd"
    def start_requests(self):
        splash_args = {"lua_source": """
                    --splash.response_body_enabled = true
                    splash.private_mode_enabled = false
                    splash:set_user_agent("Mozilla/5.0 (Windows NT 6.1; Win64; x64) AppleWebKit/537.36 (KHTML, like Gecko) Chrome/64.0.3282.186 Safari/537.36")
                    assert(splash:go("https://item.jd.com/100003429677.html"))
                    splash:wait(3)
                    return {html = splash:html()}
                    """}
        yield SplashRequest("https://item.jd.com/100003429677.html", endpoint='run', args=splash_args, callback=self.onSave)
    def prase(self,response):
        print('进入了prase')
        for sel in response.xpath('//span[@class="p-price"]//text()').extract():
           item=JdprojectItem()
           item['val']=sel[0]
           item['type']=sel[1]
           print('价格:'+sel[1])
           yield item
    def onSave(self, response):
        print('进入了onSave')
        item=JdprojectItem()
        value = response.xpath('//span[@class="p-price"]//text()').extract()
        type = value[0]
        val = value[1]
        item['val']=val
        item['type']=type
        print('价格:'+val)
        yield item
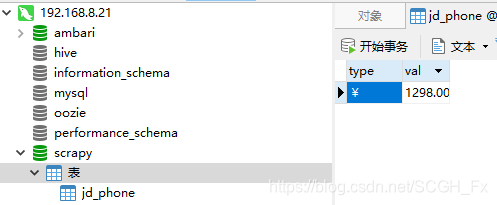
8.创建数据库和表
这里charset设置为utf8。
9.执行爬虫命令
在jdproject目录下执行命令。
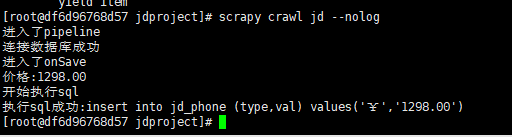
10.查看数据库
问题解决:
(1)不执行pipeline.py文件,无法进入管道的问题
找到setting.py文件,去掉注释就行啦
ITEM_PIPELINES = {
'testspider.pipelines.TestspiderPipeline': 300,
}
遇到这个问题时还应该注意 pipeLine中间件在settIng里面设置的序号。如果你写了下载器中间件 ,那么下载器中间件在setting序号要小于 pipeline的序号
(2)不执行pipeline.py中的process_item方法。
确定spider中的jd.py中有没有prase或者onSave方法。如果有,在它们的最后加上yield item
我的2.2.0版本没有prase方法,是onSave方法。


 1710
1710

 被折叠的 条评论
为什么被折叠?
被折叠的 条评论
为什么被折叠?
 到【灌水乐园】发言


