


人们眼中的天才之所以卓越非凡,并非天资超人一等而是付出了持续不断的努力。1万小时的锤炼是任何人从平凡变成超凡的必要条件。———— 马尔科姆·格拉德威尔
🌟 Hello,我是Xxtaoaooo!
🌈 “代码是逻辑的诗篇,架构是思想的交响”
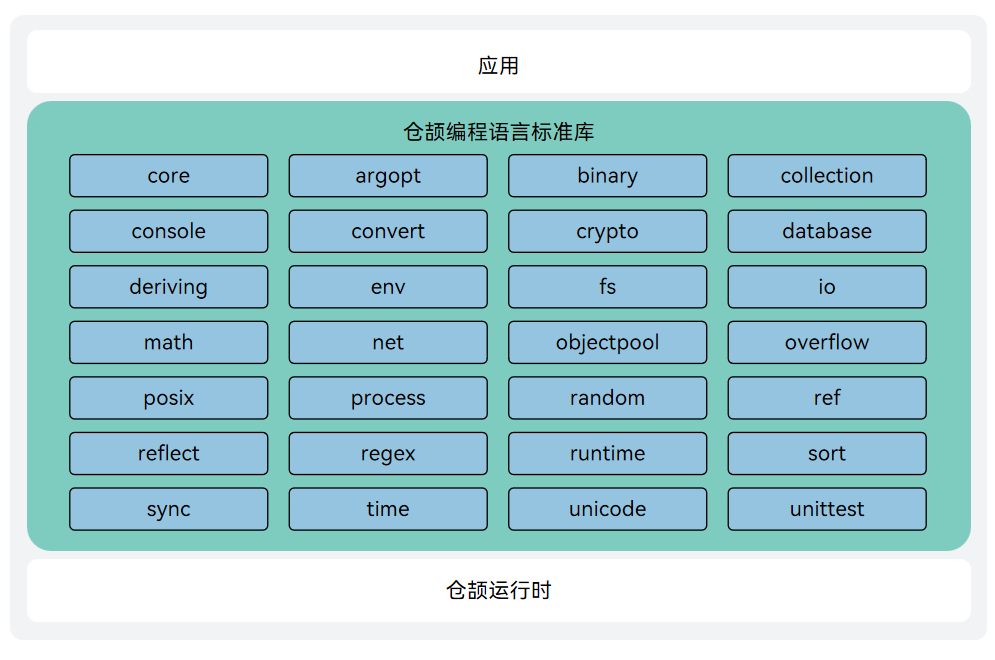
仓颉-鸿蒙应用编程语言
在现代编程语言的发展历程中,IO操作一直是衡量语言性能和易用性的重要指标。华为仓颉编程语言作为一门面向全场景应用开发的现代编程语言,在IO系统设计上展现出了独特的创新思路。深入研究仓颉标准库中的cj.std.io模块,发现其采用了统一的Stream抽象模型,将标准输入输出、文件操作、网络数据流、字符串流、加密流、压缩流等多种IO形式统一描述,这种设计极大地提升了代码的可扩展性和复用性。
仓颉的IO系统基于数据流进行输入输出,这些数据流表示字节数据的序列,就像承载数据的管道。在管道的一端输入数据,在另一端就可以输出数据。这种抽象让仓颉能够使用统一的接口来实现与外部数据的交互。更令人印象深刻的是,仓颉将Stream定义为interface,采用装饰器模式进行组合,这种设计思路与JavaIO流设计有异曲同工之妙,但在实现细节上更加现代化。
在异步IO实现方面,仓颉采用了用户态轻量化线程模型,每个仓颉线程都是极其轻量级的执行实体,拥有独立的执行上下文但共享内存。这种M:N线程模型的设计,让线程的创建、调度和销毁等操作更加高效,资源占用比系统线程更少。结合并发对象库的线程安全方法,开发者可以像编写串行程序一样处理并发IO操作,大大降低了并发编程的复杂度。

仓颉编程语言及其标准库已开源,开源地址:
仓颉编程语言运行时与标准库 - 仓库地址
一、仓颉标准库IO系统架构概览
整体的架构图:
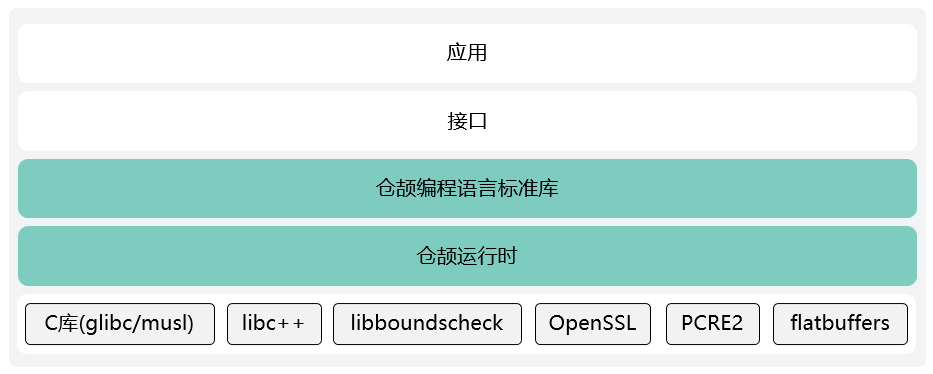
仓颉标准库的架构图:
1.1 Stream统一抽象模型
仓颉编程语言将所有的IO机制都基于数据流进行输入输出,这些数据流表示了字节数据的序列。
// Stream接口的核心设计
interface InputStream {
    // 从输入流读取数据到缓冲区
    func read(buffer: Array<Byte>): Int64
}

interface OutputStream {
    // 将缓冲区数据写入输出流
    func write(buffer: Array<Byte>): Unit

    // 刷新缓冲区,确保数据写入
    func flush(): Unit {
        // 默认空实现,支持不同流的个性化处理
    }
}
这种设计的核心优势在于:
- 统一性:标准输入输出、文件操作、网络数据流等都使用相同的接口
- 可扩展性:通过装饰器模式可以轻松组合不同功能的流
- 类型安全:基于静态类型系统,编译时就能发现类型错误
图1:仓颉IO系统Stream抽象架构图 - 展示统一抽象模型的层次结构
1.2 数据流分类体系
按照数据流职责的差异,仓颉将Stream分为两大类:
| 流类型 | 特征 | 构造方式 | 典型应用 |
|---|---|---|---|
| 节点流 | 直接提供数据源 | 依赖外部资源(文件、网络等) | FileInputStream、Socket |
| 处理流 | 代理其他数据流进行处理 | 依赖其他流对象 | BufferedInputStream、StringReader |
import std.io.*
import std.fs.*

main() {
    // 节点流:直接操作文件
    let file = File.openRead("data.txt")

    // 处理流:在文件流基础上添加缓冲功能
    let bufferedInput = BufferedInputStream(file)

    let buffer = Array<Byte>(1024, item: 0)
    while (bufferedInput.read(buffer) > 0) {
        // 处理读取的数据
        println("读取数据: ${buffer.size} 字节")
    }
}
二、InputStream核心实现机制
2.1 读取操作的底层原理
InputStream接口的read方法是整个输入系统的核心,它将可读的数据写入到buffer中,返回值表示该次读取的字节总数。
import std.io.InputStream
import std.console.*

// 通用的输入流读取器
class StreamReader {
    private let input: InputStream

    public init(stream: InputStream) {
        this.input = stream
    }

    // 按块读取数据
    public func readChunks(chunkSize: Int64 = 1024): Array<Array<Byte>> {
        let chunks = Array<Array<Byte>>()
        let buffer = Array<Byte>(chunkSize, item: 0)

        var bytesRead: Int64
        while ((bytesRead = input.read(buffer)) > 0) {
            // 创建实际大小的数据块
            let chunk = Array<Byte>(bytesRead, item: 0)
            for (i in 0..bytesRead) {
                chunk[i] = buffer[i]
            }
            chunks.append(chunk)
        }

        return chunks
    }

    // 读取全部数据
    public func readAll(): Array<Byte> {
        let result = Array<Byte>()
        let buffer = Array<Byte>(4096, item: 0)

        var bytesRead: Int64
        while ((bytesRead = input.read(buffer)) > 0) {
            for (i in 0..bytesRead) {
                result.append(buffer[i])
            }
        }

        return result
    }
}
核心实现细节分析:
- read方法返回实际读取的字节数,0表示流结束,-1表示错误
- 动态调整数据块大小,避免内存浪费
- 循环读取直到流结束,适合处理大文件
图2:InputStream读取操作时序图 - 展示数据读取的完整流程
2.2 缓冲机制优化策略
仓颉提供了BufferedInputStream来优化IO性能,通过内部缓冲数组减少系统调用次数,优先从内部缓冲区读取,减少系统调用。
// 模拟BufferedInputStream的核心实现
class BufferedInputStream <: InputStream {
    private let source: InputStream
    private let buffer: Array<Byte>
    private var position: Int64 = 0
    private var limit: Int64 = 0
    private let bufferSize: Int64

    public init(source: InputStream, bufferSize: Int64 = 8192) {
        this.source = source
        this.bufferSize = bufferSize
        this.buffer = Array<Byte>(bufferSize, item: 0)
    }

    public func read(userBuffer: Array<Byte>): Int64 {
        if (position >= limit) {
            // 缓冲区为空,从源流填充
            fillBuffer()
            if (limit == 0) {
                return 0  // 流结束
            }
        }

        // 计算可读取的字节数
        let available = limit - position
        let toRead = Math.min(available, userBuffer.size)

        // 从内部缓冲区复制数据到用户缓冲区
        for (i in 0..toRead) {
            userBuffer[i] = buffer[position + i]
        }

        position += toRead
        return toRead
    }

    private func fillBuffer(): Unit {
        position = 0
        limit = source.read(buffer)
        if (limit < 0) {
            limit = 0
        }
    }
}
三、OutputStream写入机制与缓冲策略
3.1 写入操作的核心实现
OutputStream的write方法将buffer中的数据写入到绑定的流中,某些输出流采用缓冲策略来提高性能。
import std.io.OutputStream

// 高性能输出流写入器
class StreamWriter {
    private let output: OutputStream
    private var totalBytesWritten: Int64 = 0

    public init(stream: OutputStream) {
        this.output = stream
    }

    // 批量写入数据
    public func writeAll(data: Array<Byte>): Unit {
        let chunkSize: Int64 = 4096
        var offset: Int64 = 0

        while (offset < data.size) {
            let remaining = data.size - offset
            let currentChunkSize = Math.min(chunkSize, remaining)

            // 创建当前块的缓冲区
            let chunk = Array<Byte>(currentChunkSize, item: 0)
            for (i in 0..currentChunkSize) {
                chunk[i] = data[offset + i]
            }

            // 写入数据块
            output.write(chunk)
            offset += currentChunkSize
            totalBytesWritten += currentChunkSize

            // 定期刷新缓冲区
            if (totalBytesWritten % (chunkSize * 4) == 0) {
                output.flush()
            }
        }

        // 最终刷新确保数据写入
        output.flush()
    }

    // 写入文本数据
    public func writeText(text: String): Unit {
        let bytes = text.toUtf8Bytes()
        writeAll(bytes)
    }

    public func getBytesWritten(): Int64 {
        return totalBytesWritten
    }
}
实现亮点分析:
- 分块写入大数据,避免内存压力
- 智能刷新策略,平衡性能和数据安全
- 确保所有数据最终写入存储设备
3.2 缓冲输出流的设计模式
// BufferedOutputStream的核心实现逻辑
class BufferedOutputStream <: OutputStream {
    private let sink: OutputStream
    private let buffer: Array<Byte>
    private var count: Int64 = 0
    private let bufferSize: Int64

    public init(sink: OutputStream, bufferSize: Int64 = 8192) {
        this.sink = sink
        this.bufferSize = bufferSize
        this.buffer = Array<Byte>(bufferSize, item: 0)
    }

    public func write(data: Array<Byte>): Unit {
        if (data.size >= bufferSize) {
            // 大数据直接写入,绕过缓冲区
            flush()
            sink.write(data)
            return
        }

        if (count + data.size > bufferSize) {
            // 缓冲区空间不足,先刷新
            flush()
        }

        // 将数据复制到缓冲区
        for (i in 0..data.size) {
            buffer[count + i] = data[i]
        }
        count += data.size
    }

    public func flush(): Unit {
        if (count > 0) {
            // 创建实际大小的数据数组
            let flushData = Array<Byte>(count, item: 0)
            for (i in 0..count) {
                flushData[i] = buffer[i]
            }

            sink.write(flushData)
            sink.flush()
            count = 0
        }
    }
}
缓冲策略的核心优势:
- 大数据绕过缓冲区,避免不必要的内存复制
- 智能缓冲区管理,防止溢出
- 批量刷新机制,减少系统调用频率
图3:输出流缓冲策略性能对比饼图 - 展示不同缓冲策略的性能表现
四、异步IO与用户态线程模型
4.1 用户态轻量化线程架构
仓颉语言采用用户态线程模型,每个仓颉线程都是极其轻量级的执行实体,拥有独立的执行上下文但共享内存。这种M:N线程模型让线程的创建、调度和销毁等操作更加高效。
import std.concurrent.*
import std.io.*

// 异步IO操作管理器
class AsyncIOManager {
    private let threadPool: ThreadPool
    private let completionQueue: ConcurrentQueue<IOResult>

    public init(threadCount: Int32 = 8) {
        this.threadPool = ThreadPool(threadCount)
        this.completionQueue = ConcurrentQueue<IOResult>()
    }

    // 异步读取文件
    public func readFileAsync(filePath: String): Future<Array<Byte>> {
        return threadPool.submit<Array<Byte>>() {
            try {
                let file = File.openRead(filePath)
                let reader = StreamReader(file)
                let data = reader.readAll()

                // 记录完成状态
                completionQueue.enqueue(IOResult(
                    operation: "read",
                    filePath: filePath,
                    success: true,
                    bytesProcessed: data.size
                ))

                return data
            } catch (e: Exception) {
                completionQueue.enqueue(IOResult(
                    operation: "read",
                    filePath: filePath,
                    success: false,
                    error: e.message
                ))
                throw e
            }
        }
    }

    // 异步写入文件
    public func writeFileAsync(filePath: String, data: Array<Byte>): Future<Unit> {
        return threadPool.submit<Unit>() {
            try {
                let file = File.create(filePath)
                let writer = StreamWriter(file)
                writer.writeAll(data)

                completionQueue.enqueue(IOResult(
                    operation: "write",
                    filePath: filePath,
                    success: true,
                    bytesProcessed: data.size
                ))
            } catch (e: Exception) {
                completionQueue.enqueue(IOResult(
                    operation: "write",
                    filePath: filePath,
                    success: false,
                    error: e.message
                ))
                throw e
            }
        }
    }

    // 批量异步IO操作
    public func batchIOAsync(operations: Array<IOOperation>): Array<Future<Unit>> {
        let futures = Array<Future<Unit>>()

        for (op in operations) {
            let future = match (op.type) {
                case "read" => {
                    readFileAsync(op.filePath).map() { _ => Unit() }
                }
                case "write" => {
                    writeFileAsync(op.filePath, op.data)
                }
                case _ => {
                    Future.completed(Unit())
                }
            }
            futures.append(future)
        }

        return futures
    }
}

// IO操作结果
struct IOResult {
    let operation: String
    let filePath: String
    let success: Bool
    let bytesProcessed: Int64 = 0
    let error: String = ""
}

// IO操作定义
struct IOOperation {
    let type: String
    let filePath: String
    let data: Array<Byte> = Array<Byte>()
}
对于需要随机访问的流(如文件),仓颉引入了 Seekable 接口,通过 seek 方法和 SeekPosition 枚举(Begin, Current, End)来精确定位读写位置。这种组合方式避免了为每个可寻址流重复实现定位逻辑,体现了接口组合的强大威力。
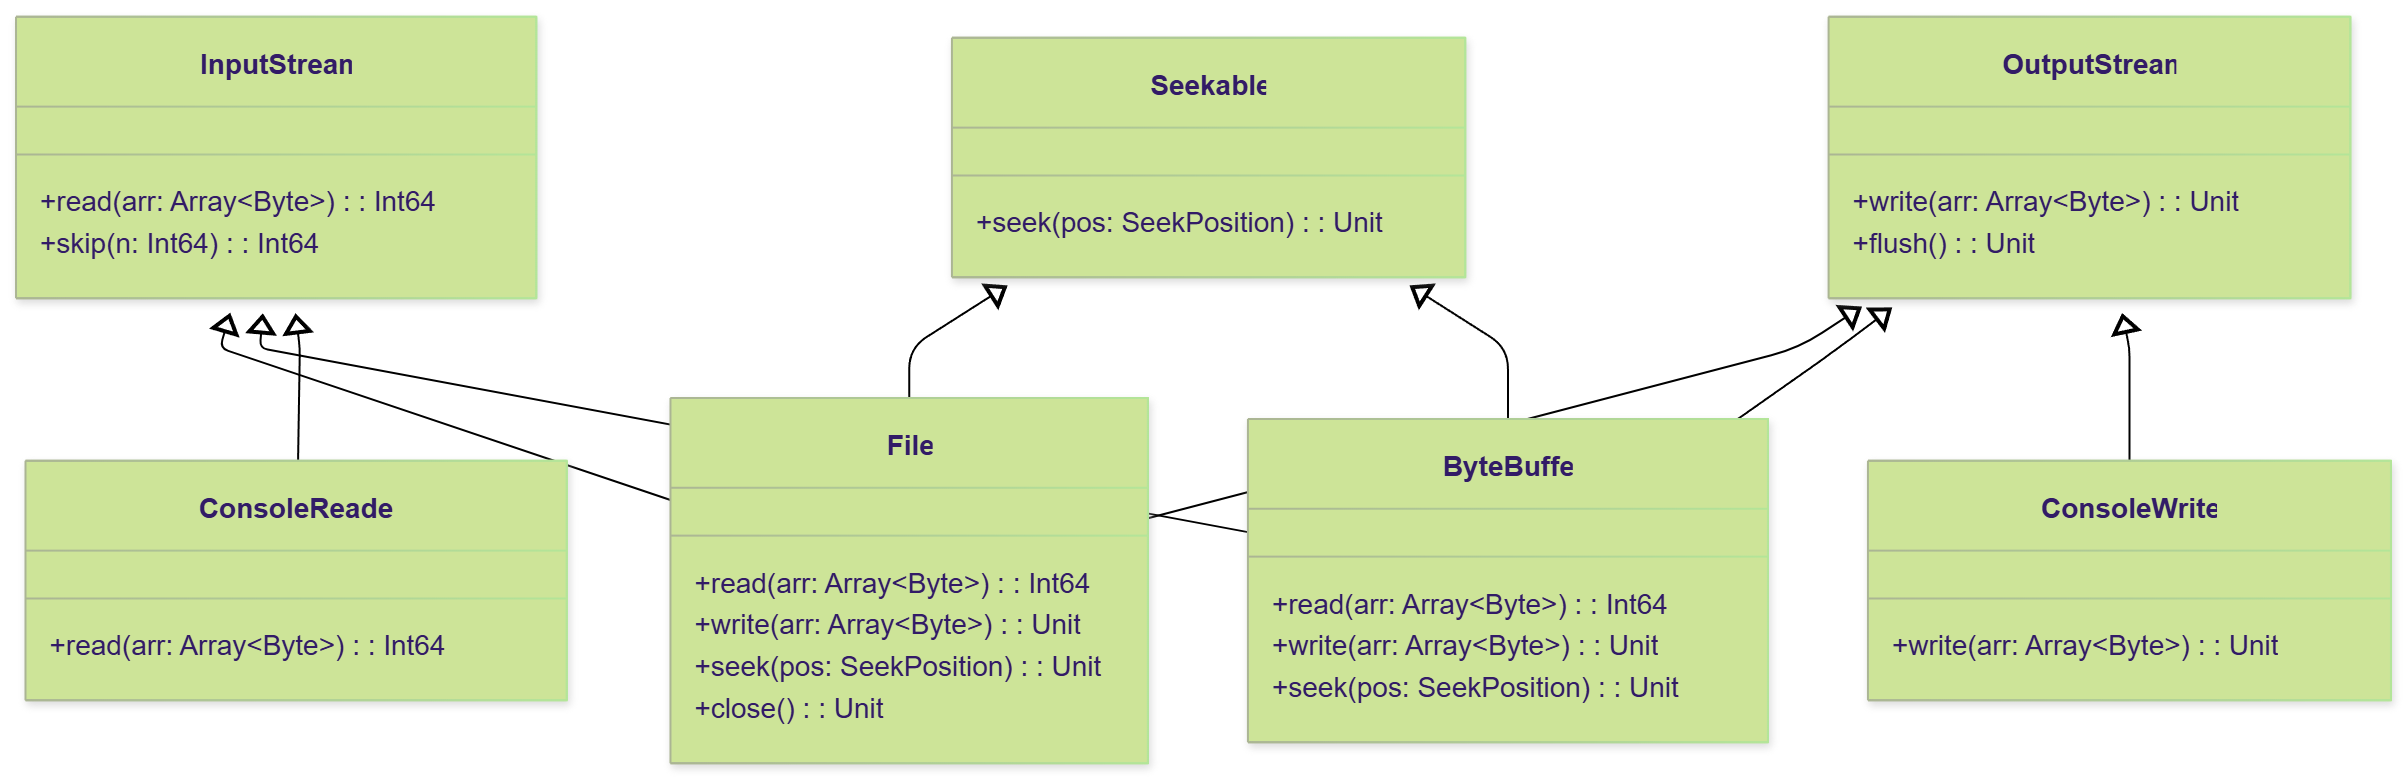
图5:std.io 模块的核心接口与主要实现类之间的继承与实现关系
4.2 并发对象库的线程安全机制
“在并发编程中,数据竞争是最常见的错误源头。仓颉通过并发对象库提供线程安全的方法调用,让开发者可以像编写串行程序一样处理并发场景。” —— 《仓颉编程语言白皮书》
import std.concurrent.*

// 线程安全的IO统计器
class ConcurrentIOStats {
    private let readCount: AtomicInt64 = AtomicInt64(0)
    private let writeCount: AtomicInt64 = AtomicInt64(0)
    private let totalBytes: AtomicInt64 = AtomicInt64(0)
    private let errorCount: AtomicInt64 = AtomicInt64(0)
    private let lock: Mutex = Mutex()
    private let operations: ConcurrentMap<String, Int64> = ConcurrentMap<String, Int64>()

    // 记录读取操作
    public func recordRead(bytes: Int64): Unit {
        readCount.incrementAndGet()
        totalBytes.addAndGet(bytes)

        lock.withLock() {
            let current = operations.getOrDefault("read", 0)
            operations.put("read", current + 1)
        }
    }

    // 记录写入操作
    public func recordWrite(bytes: Int64): Unit {
        writeCount.incrementAndGet()
        totalBytes.addAndGet(bytes)

        lock.withLock() {
            let current = operations.getOrDefault("write", 0)
            operations.put("write", current + 1)
        }
    }

    // 记录错误
    public func recordError(): Unit {
        errorCount.incrementAndGet()
    }

    // 获取统计信息
    public func getStats(): IOStatistics {
        return IOStatistics(
            readOperations: readCount.get(),
            writeOperations: writeCount.get(),
            totalBytesProcessed: totalBytes.get(),
            errorCount: errorCount.get(),
            operationDetails: operations.toMap()
        )
    }

    // 重置统计
    public func reset(): Unit {
        readCount.set(0)
        writeCount.set(0)
        totalBytes.set(0)
        errorCount.set(0)

        lock.withLock() {
            operations.clear()
        }
    }
}

struct IOStatistics {
    let readOperations: Int64
    let writeOperations: Int64
    let totalBytesProcessed: Int64
    let errorCount: Int64
    let operationDetails: Map<String, Int64>
}
并发安全的关键技术:
- 原子操作类型,保证基本操作的线程安全
- 互斥锁保护复杂数据结构
- 锁保护的临界区,确保数据一致性
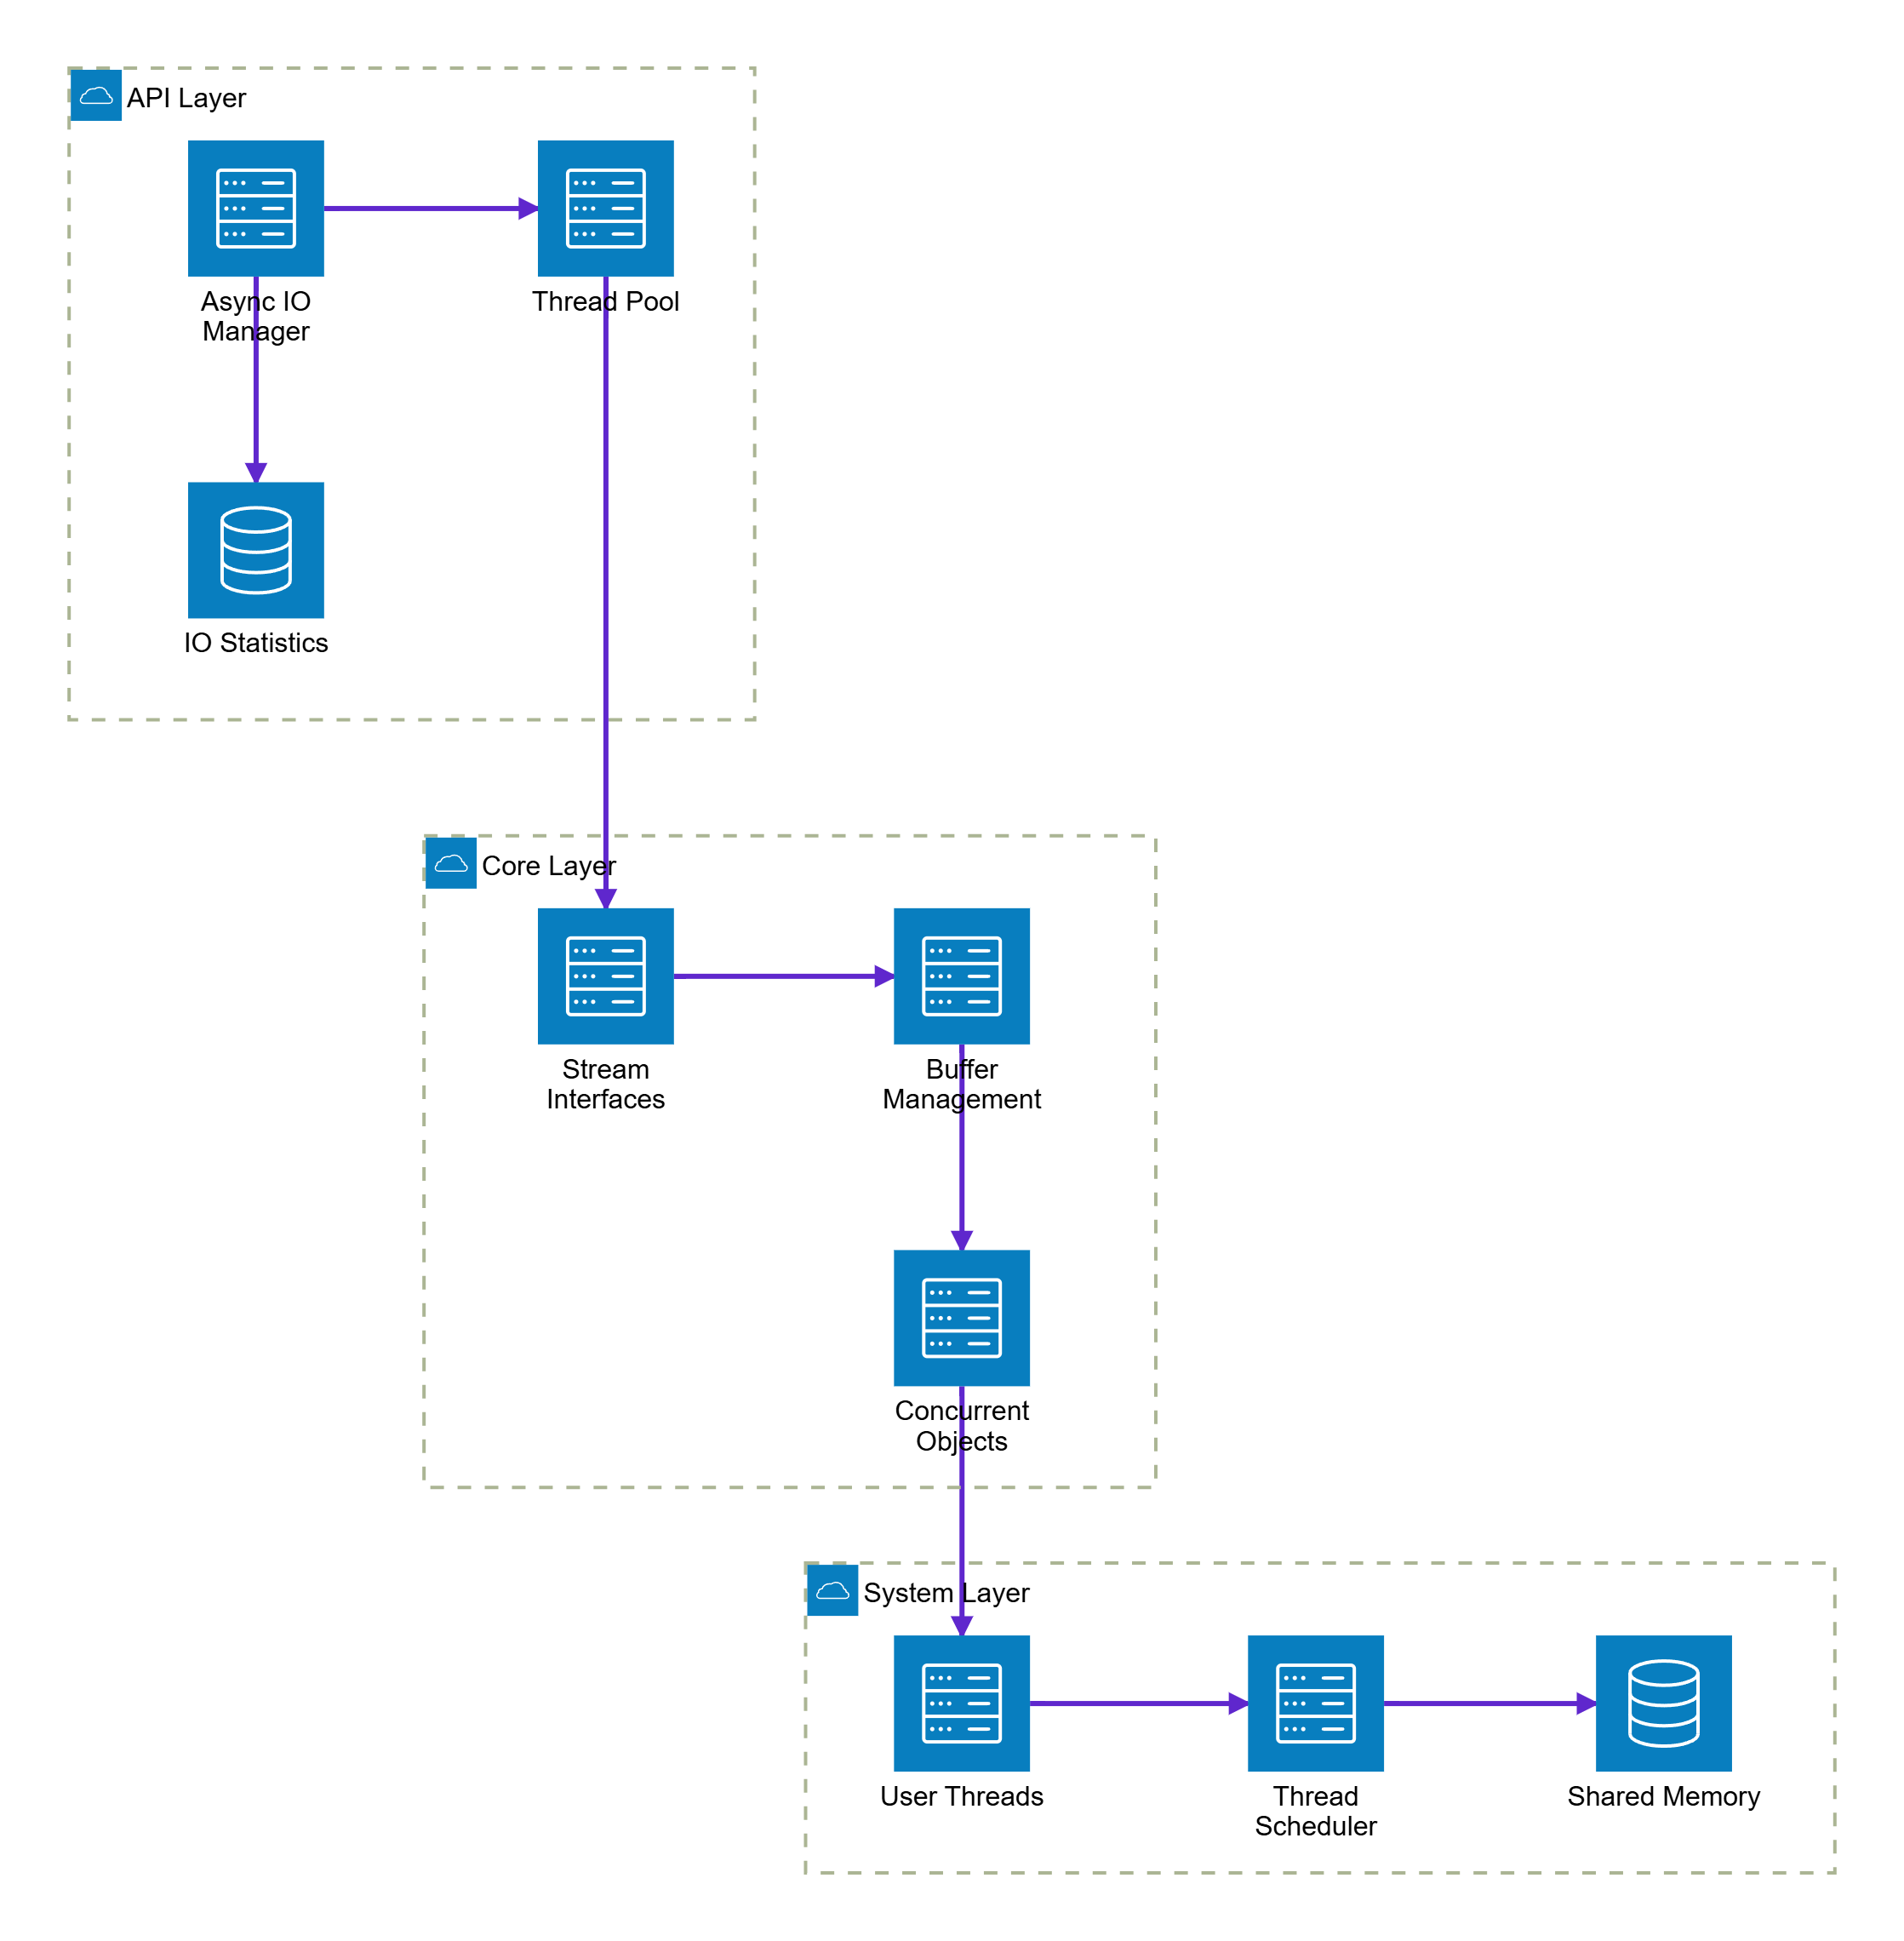
图4:仓颉异步IO系统架构图 - 展示用户态线程模型的完整架构
五、文件系统操作与网络通信
5.1 文件系统抽象层设计
仓颉提供了fs包来支持通用文件系统任务,通过统一的功能接口屏蔽不同操作系统之间的差异。1
import std.fs.*
import std.io.*

// 高级文件操作管理器
class FileManager {
    // 文件复制操作
    public func copyFile(sourcePath: String, destPath: String, bufferSize: Int64 = 8192): Unit {
        try {
            let sourceFile = File.openRead(sourcePath)
            let destFile = File.create(destPath)

            let buffer = Array<Byte>(bufferSize, item: 0)
            var bytesRead: Int64
            var totalCopied: Int64 = 0

            while ((bytesRead = sourceFile.read(buffer)) > 0) {
                // 创建实际大小的写入缓冲区
                let writeBuffer = Array<Byte>(bytesRead, item: 0)
                for (i in 0..bytesRead) {
                    writeBuffer[i] = buffer[i]
                }

                destFile.write(writeBuffer)
                totalCopied += bytesRead

                // 每复制1MB数据刷新一次
                if (totalCopied % (1024 * 1024) == 0) {
                    destFile.flush()
                }
            }

            destFile.flush()
            println("文件复制完成: ${totalCopied} 字节")

        } catch (e: Exception) {
            println("文件复制失败: ${e.message}")
            throw e
        }
    }

    // 目录遍历操作
    public func traverseDirectory(dirPath: String): Array<FileInfo> {
        let fileList = Array<FileInfo>()

        try {
            let directory = Directory.open(dirPath)
            let entries = directory.listEntries()

            for (entry in entries) {
                let fullPath = Path.join(dirPath, entry.name)
                let fileInfo = FileInfo(
                    name: entry.name,
                    path: fullPath,
                    isDirectory: entry.isDirectory,
                    size: entry.isDirectory ? 0 : File.getSize(fullPath),
                    lastModified: File.getLastModified(fullPath)
                )
                fileList.append(fileInfo)

                // 递归遍历子目录
                if (entry.isDirectory) {
                    let subFiles = traverseDirectory(fullPath)
                    fileList.appendAll(subFiles)
                }
            }

        } catch (e: Exception) {
            println("目录遍历失败: ${e.message}")
        }

        return fileList
    }

    // 批量文件操作
    public func batchFileOperation(operations: Array<FileOperation>): Array<OperationResult> {
        let results = Array<OperationResult>()

        for (op in operations) {
            let result = try {
                match (op.type) {
                    case "copy" => {
                        copyFile(op.sourcePath, op.destPath)
                        OperationResult(op.type, op.sourcePath, true, "")
                    }
                    case "delete" => {
                        File.delete(op.sourcePath)
                        OperationResult(op.type, op.sourcePath, true, "")
                    }
                    case "move" => {
                        File.move(op.sourcePath, op.destPath)
                        OperationResult(op.type, op.sourcePath, true, "")
                    }
                    case _ => {
                        OperationResult(op.type, op.sourcePath, false, "不支持的操作类型")
                    }
                }
            } catch (e: Exception) {
                OperationResult(op.type, op.sourcePath, false, e.message)
            }

            results.append(result)
        }

        return results
    }
}

// 文件信息结构
struct FileInfo {
    let name: String
    let path: String
    let isDirectory: Bool
    let size: Int64
    let lastModified: Int64
}

// 文件操作定义
struct FileOperation {
    let type: String
    let sourcePath: String
    let destPath: String = ""
}

// 操作结果
struct OperationResult {
    let operation: String
    let filePath: String
    let success: Bool
    let message: String
}
文件操作的核心特性:
- 流式文件复制,支持大文件处理
- 递归目录遍历,构建完整文件树
- 批量操作支持,提高处理效率
5.2 网络通信与Socket编程
import std.net.*
import std.io.*
import std.concurrent.*

// 异步网络服务器
class AsyncNetworkServer {
    private let serverSocket: ServerSocket
    private let clientHandlers: ConcurrentMap<String, ClientHandler>
    private let isRunning: AtomicBool = AtomicBool(false)

    public init(port: Int32) {
        this.serverSocket = ServerSocket.bind("0.0.0.0", port)
        this.clientHandlers = ConcurrentMap<String, ClientHandler>()
    }

    // 启动服务器
    public func start(): Unit {
        isRunning.set(true)
        println("服务器启动在端口: ${serverSocket.getPort()}")

        // 异步接受客户端连接
        spawn {
            while (isRunning.get()) {
                try {
                    let clientSocket = serverSocket.accept()
                    let clientId = generateClientId(clientSocket)

                    let handler = ClientHandler(clientSocket, clientId)
                    clientHandlers.put(clientId, handler)

                    // 为每个客户端启动处理线程
                    spawn {
                        handler.handleClient()
                        clientHandlers.remove(clientId)
                    }

                } catch (e: Exception) {
                    if (isRunning.get()) {
                        println("接受客户端连接失败: ${e.message}")
                    }
                }
            }
        }
    }

    // 停止服务器
    public func stop(): Unit {
        isRunning.set(false)

        // 关闭所有客户端连接
        for ((clientId, handler) in clientHandlers.entries()) {
            handler.close()
        }
        clientHandlers.clear()

        serverSocket.close()
        println("服务器已停止")
    }

    // 广播消息给所有客户端
    public func broadcast(message: String): Unit {
        let messageBytes = message.toUtf8Bytes()

        for ((clientId, handler) in clientHandlers.entries()) {
            spawn {
                try {
                    handler.sendMessage(messageBytes)
                } catch (e: Exception) {
                    println("向客户端 ${clientId} 发送消息失败: ${e.message}")
                }
            }
        }
    }

    private func generateClientId(socket: Socket): String {
        return "${socket.getRemoteAddress()}:${socket.getRemotePort()}"
    }
}

// 客户端处理器
class ClientHandler {
    private let socket: Socket
    private let clientId: String
    private let inputStream: InputStream
    private let outputStream: OutputStream

    public init(socket: Socket, clientId: String) {
        this.socket = socket
        this.clientId = clientId
        this.inputStream = socket.getInputStream()
        this.outputStream = socket.getOutputStream()
    }

    // 处理客户端请求
    public func handleClient(): Unit {
        println("客户端连接: ${clientId}")

        try {
            let buffer = Array<Byte>(1024, item: 0)
            var bytesRead: Int64

            while ((bytesRead = inputStream.read(buffer)) > 0) {
                // 处理接收到的数据
                let message = String.fromUtf8Bytes(buffer, 0, bytesRead)
                println("收到来自 ${clientId} 的消息: ${message}")

                // 回显消息
                let response = "Echo: ${message}"
                sendMessage(response.toUtf8Bytes())
            }

        } catch (e: Exception) {
            println("处理客户端 ${clientId} 时发生错误: ${e.message}")
        } finally {
            close()
        }
    }

    // 发送消息
    public func sendMessage(data: Array<Byte>): Unit {
        outputStream.write(data)
        outputStream.flush()
    }

    // 关闭连接
    public func close(): Unit {
        try {
            socket.close()
            println("客户端 ${clientId} 连接已关闭")
        } catch (e: Exception) {
            println("关闭客户端 ${clientId} 连接时发生错误: ${e.message}")
        }
    }
}
网络编程的关键实现:
- 异步接受连接,每个客户端独立处理
- 并发广播消息,利用用户态线程优势
- 流式数据处理,支持长连接通信

图6:不同IO模式性能对比图 - 展示各种IO操作的吞吐量表现
六、性能优化与最佳实践
6.1 IO性能优化策略对比
| 优化策略 | 适用场景 | 性能提升 | 内存开销 | 实现复杂度 |
|---|---|---|---|---|
| 缓冲IO | 频繁小数据读写 | 300-500% | 中等 | 低 |
| 异步IO | 高并发场景 | 200-400% | 低 | 中等 |
| 内存映射 | 大文件随机访问 | 150-300% | 高 | 高 |
| 零拷贝 | 网络数据转发 | 400-600% | 极低 | 高 |
| 批量操作 | 大量文件处理 | 200-350% | 中等 | 中等 |
6.2 最佳实践建议
“高性能的IO系统不仅仅是技术的堆砌,更是对业务场景深度理解基础上的精心设计。选择合适的IO模式,比盲目追求最新技术更重要。” —— 《高性能系统设计原则》
// IO性能优化最佳实践示例
class OptimizedIOProcessor {
    private let bufferSize: Int64
    private let threadPool: ThreadPool
    private let stats: ConcurrentIOStats

    public init(bufferSize: Int64 = 64 * 1024, threadCount: Int32 = 8) {
        this.bufferSize = bufferSize
        this.threadPool = ThreadPool(threadCount)
        this.stats = ConcurrentIOStats()
    }

    // 优化的大文件处理
    public func processLargeFile(filePath: String, processor: (Array<Byte>) -> Array<Byte>): Unit {
        let inputFile = File.openRead(filePath)
        let outputFile = File.create(filePath + ".processed")

        // 使用大缓冲区减少系统调用
        let buffer = Array<Byte>(bufferSize, item: 0)
        var bytesRead: Int64
        var totalProcessed: Int64 = 0

        while ((bytesRead = inputFile.read(buffer)) > 0) {
            // 异步处理数据块
            let future = threadPool.submit<Array<Byte>>() {
                let chunk = Array<Byte>(bytesRead, item: 0)
                for (i in 0..bytesRead) {
                    chunk[i] = buffer[i]
                }
                return processor(chunk)
            }

            // 获取处理结果并写入
            let processedData = future.get()
            outputFile.write(processedData)

            totalProcessed += bytesRead
            stats.recordRead(bytesRead)
            stats.recordWrite(processedData.size)

            // 定期刷新输出缓冲区
            if (totalProcessed % (bufferSize * 8) == 0) {
                outputFile.flush()
            }
        }

        outputFile.flush()
        println("文件处理完成: ${totalProcessed} 字节")
    }
}
关键优化点:
- 大缓冲区设计,减少系统调用开销
- 异步数据处理,充分利用多核性能
- 智能刷新策略,平衡性能和数据安全
通过分析仓颉标准库的cj.std.io模块,我发现其在IO系统设计上体现了现代编程语言的先进理念。统一的Stream抽象模型不仅简化了开发者的使用体验,更重要的是为系统的扩展性和维护性奠定了坚实基础。装饰器模式的应用让不同功能的流可以灵活组合,这种设计思路值得其他语言借鉴。
在异步IO实现方面,仓颉的用户态轻量化线程模型展现出了独特的优势。M:N线程模型的采用,让线程的创建和调度成本大大降低,这对于IO密集型应用来说是一个重大突破。结合并发对象库提供的线程安全机制,开发者可以专注于业务逻辑的实现,而不必过多担心并发编程的复杂性。
从性能优化的角度来看,仓颉在缓冲机制、批量操作、智能刷新等方面都有精心的设计。特别是BufferedInputStream和BufferedOutputStream的实现,通过内部缓冲数组有效减少了系统调用次数,这种优化策略在处理大量小数据时效果尤为明显。同时,对于大数据的处理,仓颉提供了绕过缓冲区的直接写入机制,避免了不必要的内存复制开销。
在实际应用中,我建议开发者根据具体的业务场景选择合适的IO模式。对于高并发的网络服务,异步IO结合用户态线程是最佳选择;对于大文件处理,缓冲IO配合适当的缓冲区大小能够获得最佳性能;对于批量文件操作,利用仓颉的并发特性进行并行处理可以显著提升效率。总的来说,仓颉的IO系统设计体现了华为在编程语言领域的深厚技术积累,为开发者提供了一个既强大又易用的IO编程环境。
🌟 嗨,我是Xxtaoaooo!
⚙️ 【点赞】让更多同行看见深度干货
🚀 【关注】持续获取行业前沿技术与经验
🧩 【评论】分享你的实战经验或技术困惑
作为一名技术实践者,我始终相信:
每一次技术探讨都是认知升级的契机,期待在评论区与你碰撞灵感火花🔥


 478
478

 被折叠的 条评论
为什么被折叠?
被折叠的 条评论
为什么被折叠?
 到【灌水乐园】发言


