


 本文深入讲解了人脸检测的常见模型,如Haar级联分类器和LBP级联分类器,以及OpenCV库的使用方法。同时,介绍了dlib和MTCNN两种高级人脸检测算法,包括它们的识别精度和应用实例。
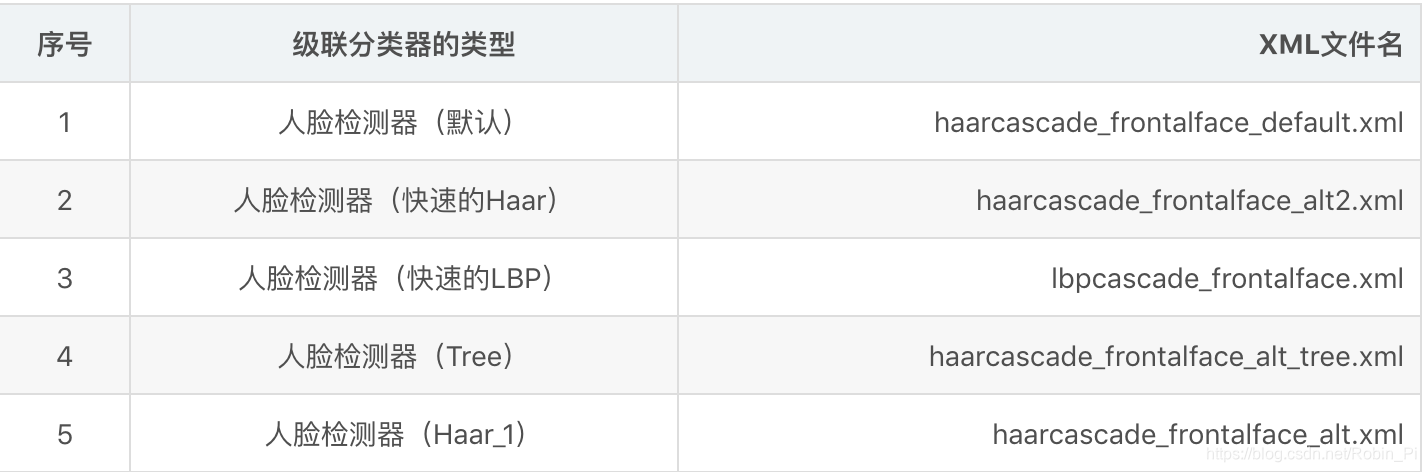
1. 最常用的人脸检测模型
- haarcascade_files/haarcascade_frontalface_default.xml
在使用OpenCV的人脸检测之前,需要一个人脸训练模型,格式是xml的,OpenCV已经提供了很多人脸分类模型xml。
2. 人脸检测
流程
- 读取图片
- 将图片转换成灰色(降低为一维的灰度,减低计算强度)
- 利用Haar特征检测图片中的人脸
- 绘制人脸的矩形区域
- 显示人脸检测后的图片
代码
# -*- coding: utf-8 -*-
import cv2
import logging

# 设置日志
logging.basicConfig(level = logging.INFO, format='%(asctime)s - %(levelname)s: %(message)s')
logger = logging.getLogger(__name__)

# 待检测的图片路径
ImagePath = 'E://zhoujielun.jpg'

# 读取图片
logger.info('Reading image...')
image = cv2.imread(ImagePath)
# 把图片转换为灰度模式
gray = cv2.cvtColor(image, cv2.COLOR_BGR2GRAY)

# 探测图片中的人脸
logger.info('Detect faces...')
# 获取训练好的人脸的参数数据,进行人脸检测
face_cascade = cv2.CascadeClassifier(r'./haarcascade_frontalface_default.xml')
faces = face_cascade.detectMultiScale(gray,scaleFactor=1.15,minNeighbors=5,minSize=(3, 3))

search_info = "Find %d face."%len(faces) if len(faces) <= 1 else "Find %d faces."%len(faces)
logger.info(search_info)

# 绘制人脸的矩形区域(红色边框)
for (x, y, w, h) in faces:
    cv2.rectangle(image, (x,y), (x+w,y+h), (0,0,255), 2)

# 显示图片
cv2.imshow('Find faces!', image)
cv2.waitKey(0)
3. OpenCV 人脸检测库
-
关于人脸检测
-
全部

人脸检测器(默认):haarcascade_frontalface_default.xml
人脸检测器(快速Harr):haarcascade_frontalface_alt2.xml
人脸检测器(侧视):haarcascade_profileface.xml
眼部检测器(左眼):haarcascade_lefteye_2splits.xml
眼部检测器(右眼):haarcascade_righteye_2splits.xml
嘴部检测器:haarcascade_mcs_mouth.xml
鼻子检测器:haarcascade_mcs_nose.xml
身体检测器:haarcascade_fullbody.xml
人脸检测器(快速LBP):lbpcascade_frontalface.xml
4. 其它人脸检测算法
dlib
识别精准度:Dlib >= OpenCV
Dlib更多的人脸识别模型,可以检测脸部68甚至更多的特征点
#coding=utf-8

import cv2
import dlib

path = "img/meinv.png"
img = cv2.imread(path)
gray = cv2.cvtColor(img, cv2.COLOR_BGR2GRAY)

#人脸分类器
detector = dlib.get_frontal_face_detector()
# 获取人脸检测器
predictor = dlib.shape_predictor(
    "C:\\Python36\\Lib\\site-packages\\dlib-data\\shape_predictor_68_face_landmarks.dat"
)

dets = detector(gray, 1)
for face in dets:
    shape = predictor(img, face)  # 寻找人脸的68个标定点
    # 遍历所有点,打印出其坐标,并圈出来
    for pt in shape.parts():
        pt_pos = (pt.x, pt.y)
        cv2.circle(img, pt_pos, 2, (0, 255, 0), 1)
    cv2.imshow("image", img)

cv2.waitKey(0)
cv2.destroyAllWindows()
MTCNN
def detection_face(img):
    minsize = 20  # minimum size of face
    threshold = [0.6, 0.7, 0.7]  # three steps's threshold
    factor = 0.709  # scale factor
    print('Creating networks and loading parameters')
    with tf.Graph().as_default():
        # gpu_memory_fraction = 1.0
        # gpu_options = tf.GPUOptions(per_process_gpu_memory_fraction=gpu_memory_fraction)
        # sess = tf.Session(config=tf.ConfigProto(gpu_options=gpu_options, log_device_placement=False))
        sess = tf.Session()
        with sess.as_default():
            pnet, rnet, onet = detect_face.create_mtcnn(sess, None)
            bboxes, landmarks = detect_face.detect_face(img, minsize, pnet, rnet, onet, threshold, factor)
    landmarks = np.transpose(landmarks)
    bboxes = bboxes.astype(int)
    bboxes = [b[:4] for b in bboxes]
    landmarks_list=[]
    for landmark in landmarks:
        face_landmarks = [[landmark[j], landmark[j + 5]] for j in range(5)]
        landmarks_list.append(face_landmarks)
    return bboxes,landmarks_list
封装成类:
class Facedetection:
    def __init__(self):
        self.minsize = 30  # minimum size of face
        self.threshold = [0.6, 0.7, 0.7]  # three steps's threshold
        self.factor = 0.709  # scale factor
        print('Creating networks and loading parameters')
        with tf.Graph().as_default():
            # gpu_memory_fraction = 1.0
            # gpu_options = tf.GPUOptions(per_process_gpu_memory_fraction=gpu_memory_fraction)
            # sess = tf.Session(config=tf.ConfigProto(gpu_options=gpu_options, log_device_placement=False))
            sess = tf.Session()
            with sess.as_default():
                self.pnet, self.rnet, self.onet = detect_face.create_mtcnn(sess, None)
    def detect_face(self,image,fixed=None):
        '''
        mtcnn人脸检测,
        PS:人脸检测获得bboxes并不一定是正方形的矩形框,参数fixed指定等宽或者等高的bboxes
        :param image:
        :param fixed:
        :return:
        '''
        bboxes, landmarks = detect_face.detect_face(image, self.minsize, self.pnet, self.rnet, self.onet, self.threshold, self.factor)
        landmarks_list = []
        landmarks=np.transpose(landmarks)
        bboxes=bboxes.astype(int)
        bboxes = [b[:4] for b in bboxes]
        for landmark in landmarks:
            face_landmarks = [[landmark[j], landmark[j + 5]] for j in range(5)]
            landmarks_list.append(face_landmarks)
        if fixed is not None:
            bboxes,landmarks_list=self.get_square_bboxes(bboxes, landmarks_list, fixed)
        return bboxes,landmarks_list

    def get_square_bboxes(self, bboxes, landmarks, fixed="height"):
        '''
        获得等宽或者等高的bboxes
        :param bboxes:
        :param landmarks:
        :param fixed: width or height
        :return:
        '''
        new_bboxes = []
        for bbox in bboxes:
            x1, y1, x2, y2 = bbox
            w = x2 - x1
            h = y2 - y1
            center_x, center_y = (int((x1 + x2) / 2), int((y1 + y2) / 2))
            if fixed == "height":
                dd = h / 2
            elif fixed == 'width':
                dd = w / 2
            x11 = int(center_x - dd)
            y11 = int(center_y - dd)
            x22 = int(center_x + dd)
            y22 = int(center_y + dd)
            new_bbox = (x11, y11, x22, y22)
            new_bboxes.append(new_bbox)
        return new_bboxes, landmarks


 5590
5590


 到【灌水乐园】发言


