


 本文详细介绍了Android中的Fragment,包括Fragment的生命周期、静态与动态加载方式,以及Fragment与Activity之间的值传递,提供了多种传值方法的示例代码。
1、Fragment生命周期
官方Fragment生命周期图
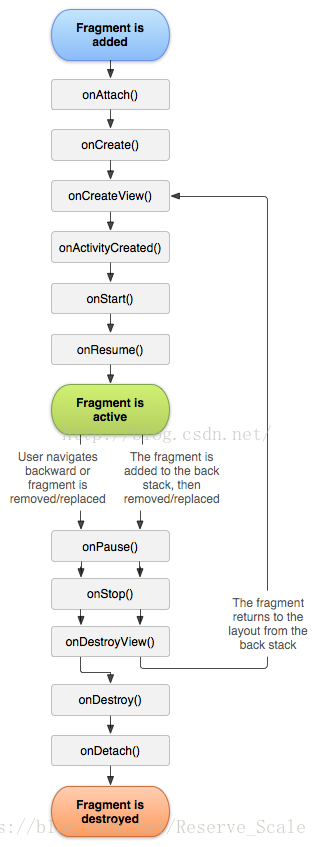
方法:
1. onAttach( ) : Fragment已经关联了一个Activity,通过getActitivty()方法可以获取Activity。
2. onCreate( ) :系统初始化Fragment。
3. onCreateView( ):初始化Fragment布局
4. onActivityCreated( ):当Activity的onCreated执行结束后,被调用
5. onStart( ):Fragment可见。
6. onResume( ):Fragment可交互。
7. onPause( ):Fragment处于暂停状态,但依然可见,用户不能与之交互。
8. onStop( ):Fragment完全不可见。
9. onDestoryView( ):销毁与Fragment有关的视图,但未与Activity解除绑定
10. onDestory( ):销毁Fragment。
11. onDetach( ):取消Fragment与Acitivity间的关联。
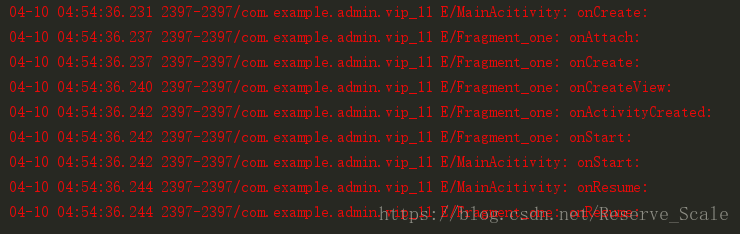
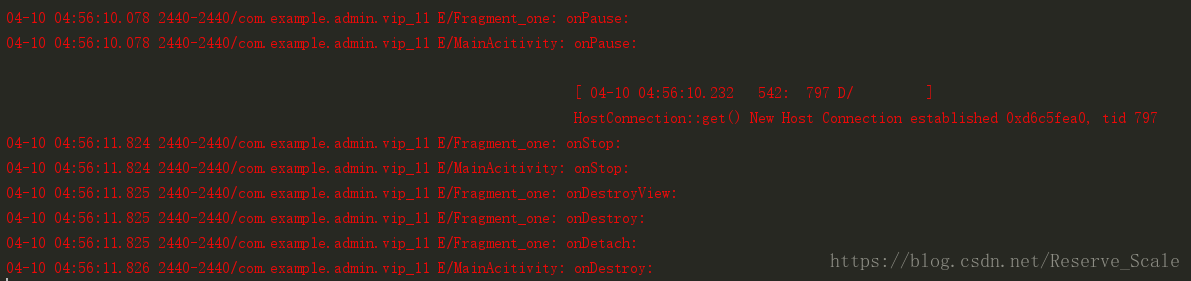
验证方式与验证Acitivity生命周期的方法一样。
2、加载Fragment

2.1 静态加载Fragment
activity_main.xml
<?xml version="1.0" encoding="utf-8"?>
<LinearLayout xmlns:android="http://schemas.android.com/apk/res/android"
    xmlns:tools="http://schemas.android.com/tools"
    android:layout_width="match_parent"
    android:layout_height="match_parent"
    android:id="@+id/line1"
    android:orientation="vertical"
    tools:context="com.example.admin.vip_11.MainActivity">

    <fragment
        android:layout_width="wrap_content"
        android:layout_height="wrap_content"
        <!--需要加载的布局-->
        tools:layout="@layout/layout_fragment_one"
        <!--包名.类名-->
        android:name="com.example.admin.vip_11.Fragment_one"
        />

</LinearLayout>
注意导包问题与最后的commit()!!!
MainActivity.java
public class MainActivity extends AppCompatActivity {

    @Override
    protected void onCreate(Bundle savedInstanceState) {
        super.onCreate(savedInstanceState);
        setContentView(R.layout.activity_main);
    }

}
layout_fragment_one.xml
<?xml version="1.0" encoding="utf-8"?>
<LinearLayout xmlns:android="http://schemas.android.com/apk/res/android"
    android:layout_width="match_parent"
    android:layout_height="match_parent">

    <TextView
        android:layout_width="wrap_content"
        android:layout_height="wrap_content"
        android:text="我是Fragment_one"
        android:textSize="25sp"
        />

</LinearLayout>
Fragment_one.java
public class Fragment_one extends Fragment{
     @Nullable
    @Override
    public View onCreateView(LayoutInflater inflater, @Nullable ViewGroup container, @Nullable Bundle savedInstanceState) {
        View view = inflater.inflate(R.layout.layout_fragment_one, null);
        return view;
    }

}
2.2 动态加载Fragment
activity_main.xml
<?xml version="1.0" encoding="utf-8"?>
<LinearLayout xmlns:android="http://schemas.android.com/apk/res/android"
    xmlns:tools="http://schemas.android.com/tools"
    android:layout_width="match_parent"
    android:layout_height="match_parent"
    android:id="@+id/line1"
    android:orientation="vertical"
    tools:context="com.example.admin.vip_11.MainActivity">

</LinearLayout>
注意导包问题与最后的commit()!!!
MainActivity.java
public class MainActivity extends AppCompatActivity {

    @Override
    protected void onCreate(Bundle savedInstanceState) {
        super.onCreate(savedInstanceState);
        setContentView(R.layout.activity_main);
        //Fragment管理
        FragmentManager fragmentManager = getSupportFragmentManager();
        //开启个事务
        FragmentTransaction fragmentTransaction = fragmentManager.beginTransaction();
        //创建Fragment对象
        Fragment_one fragment = new Fragment_one();
        //把fragment添加进事务中
        fragmentTransaction.add(R.id.line1, fragment, "1");
        //提交事务
        fragmentTransaction.commit();
    }

}
其余两个文件不变。
静态加载可以直接将结果显示在activity_main.xml的布局中,而动态加载必须运行在模拟器上才可以看到最终的显示结果。
3、Fragment与Acitivity间的传值
3.1 Framgent给Acitivity传值
这里的传值,使用接口回调来实现。
先修改一下layout_mian.xml与layout_fragment_one中的布局,以便于清晰的看到传值。
<?xml version="1.0" encoding="utf-8"?>
<LinearLayout xmlns:android="http://schemas.android.com/apk/res/android"
    xmlns:tools="http://schemas.android.com/tools"
    android:layout_width="match_parent"
    android:layout_height="match_parent"
    android:orientation="vertical"
    tools:context="com.example.admin.vip_11.MainActivity">


    <TextView
        android:layout_width="match_parent"
        android:layout_height="wrap_content"
        android:text="MainActivity"
        android:textSize="25sp"
        android:background="@color/colorAccent"
        />

    <LinearLayout
        android:orientation="vertical"
        android:layout_width="match_parent"
        android:layout_height="match_parent"
        android:id="@+id/fragmentLayout"
        >

        <Button
            android:layout_width="wrap_content"
            android:layout_height="wrap_content"
            android:text="Fragment"
            android:textAllCaps="false" />

    </LinearLayout>

</LinearLayout>
<?xml version="1.0" encoding="utf-8"?>
<LinearLayout xmlns:android="http://schemas.android.com/apk/res/android"
android:layout_width="match_parent"
android:layout_height="match_parent"
android:id="@+id/fragment_one"
>
<Button
android:id="@+id/button"
android:layout_width="wrap_content"
android:layout_height="wrap_content"
android:text="Fragment"
android:textAllCaps="false" />
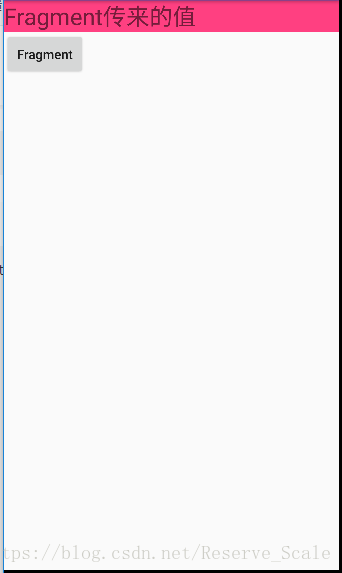
</LinearLayout>第一步,现在Fragment_one.java中创建一个接口,用于传值。并在类中实现该接口,并传入一个String对象。
public class Fragment_one extends Fragment{
    private CallBackValue mCallBackValue;

    @Override
    public void onAttach(Context context) {
        super.onAttach(context);
        mCallBackValue = (CallBackValue) getActivity();
    }

    @Nullable
    @Override
    public View onCreateView(LayoutInflater inflater, @Nullable ViewGroup container, @Nullable Bundle savedInstanceState) {
        View view = inflater.inflate(R.layout.layout_fragment_one, null);
        mCallBackValue.sendValue("Fragment传来的值");
        return view;
    }
}

interface CallBackValue {
    public void sendValue(String s);
}
第二步,在MainActivity.java中实现接口,并接收从Fragment传来的值。
public class MainActivity extends AppCompatActivity implements CallBackValue{
    @Override
    public void sendValue(String s) {
        TextView textView = findViewById(R.id.text);
        textView.setText(s);
    }

    @Override
    protected void onCreate(Bundle savedInstanceState) {
        super.onCreate(savedInstanceState);
        setContentView(R.layout.activity_main);
        FragmentToActovity();
    }

    public void FragmentToActovity() {

        FragmentManager fragmentManager = getSupportFragmentManager();
        //开启个事务
        FragmentTransaction fragmentTransaction = fragmentManager.beginTransaction();
        //创建Fragment对象
        Fragment_one fragment = new Fragment_one();

        fragmentTransaction.replace(R.id.fragmentLayout, fragment);
        //提交事务
        fragmentTransaction.commit();
    }
}
3.2 Activity给Fragment传值
MainActivity.java 添加函数并在onCreate( )中调用。
public void ActivityToFragment() {
        //Fragment管理
        FragmentManager fragmentManager = getSupportFragmentManager();
        //开启个事务
        FragmentTransaction fragmentTransaction = fragmentManager.beginTransaction();
        //创建Fragment对象
        Fragment_one fragment = new Fragment_one();
        Bundle bundle = new Bundle();
        bundle.putString("key", "MainActivity传来的值");
        fragment.setArguments(bundle);
        //替换会把容器中的所以内容全都替换掉,保持只有一个fragment在显
        //示,减少了界面的层级关系。
        fragmentTransaction.replace(R.id.fragmentLayout, fragment);
        //提交事务
        fragmentTransaction.commit();
    }
layout_main.xml
<?xml version="1.0" encoding="utf-8"?>
<LinearLayout xmlns:android="http://schemas.android.com/apk/res/android"
    xmlns:tools="http://schemas.android.com/tools"
    android:layout_width="match_parent"
    android:layout_height="match_parent"
    android:id="@+id/fragmentLayout"
    android:orientation="vertical"
    tools:context="com.example.admin.vip_11.MainActivity">

</LinearLayout>
layout_fragment_one.xml
<?xml version="1.0" encoding="utf-8"?>
<LinearLayout xmlns:android="http://schemas.android.com/apk/res/android"
    android:layout_width="match_parent"
    android:layout_height="match_parent"
    android:id="@+id/fragment_one"
    >

    <TextView
        android:id="@+id/text"
        android:layout_width="wrap_content"
        android:layout_height="wrap_content"
        android:text="我是Fragment_one"
        android:textSize="25sp"
        />

</LinearLayout>
Fragment_one.java
public class Fragment_one extends Fragment{
     @Nullable
    @Override
    public View onCreateView(LayoutInflater inflater, @Nullable ViewGroup container, @Nullable Bundle savedInstanceState) {
        View view = inflater.inflate(R.layout.layout_fragment_one, null);
        TextView textView = view.findViewById(R.id.text);
        //getArguments()方法获得存入的Bundle对象,并用get()方法放
        //入关键字,最终获取到Object对象。
        textView.setText((String) getArguments().get("key"));
        return view;
    }

}
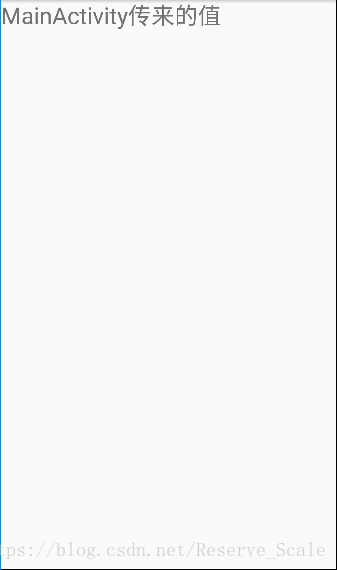
运行程序后,可以看到TextView中的内容变成从Activity中传来的值。
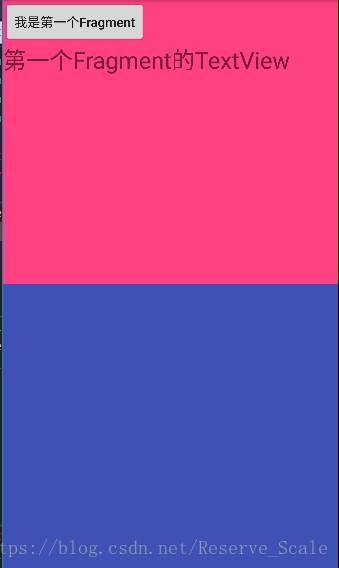
3.3 Fragment给Fragment传值
3.3.1第一种方法
直接把上面的两个方法结合起来就可以。
第一步:这里需要再创建一个Fragment_two.java与layout_fragment_two.xml。
public class Fragment_two extends Fragment{
    @Nullable
    @Override
    public View onCreateView(LayoutInflater inflater, @Nullable ViewGroup container, @Nullable Bundle savedInstanceState) {
        View view = inflater.inflate(R.layout.layout_fragment_two, null);
        TextView textView = view.findViewById(R.id.text2);
        if(getArguments().get("key") != null) {
            textView.setText((String) getArguments().get("key"));
        }
        return view;
    }
}
<?xml version="1.0" encoding="utf-8"?>
<LinearLayout xmlns:android="http://schemas.android.com/apk/res/android"
android:layout_width="match_parent"
android:layout_height="match_parent"
android:orientation="vertical"
android:id="@+id/fragment_two"
>
<TextView
android:id="@+id/text2"
android:layout_width="wrap_content"
android:layout_height="wrap_content"
android:text="第二个Fragment的TextView"
android:textSize="25sp"
/>
</LinearLayout>
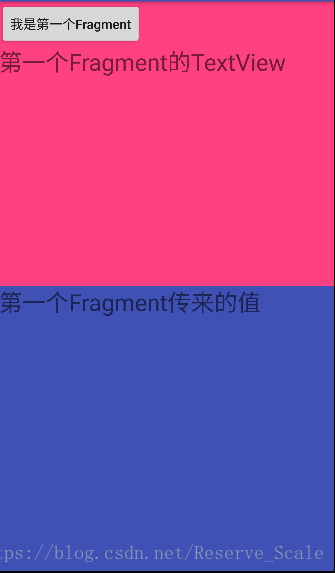
第二步:当Fragment_one.java中按钮被点击后,将值存入Bundle中。
public class Fragment_one extends Fragment{
    private CallBackValue mCallBackValue;

    @Override
    public void onAttach(Context context) {
        super.onAttach(context);
        mCallBackValue = (CallBackValue) getActivity();
    }

    @Nullable
    @Override
    public View onCreateView(LayoutInflater inflater, @Nullable ViewGroup container, @Nullable Bundle savedInstanceState) {
        View view = inflater.inflate(R.layout.layout_fragment_one, null);
        view.findViewById(R.id.buttonOne).setOnClickListener(new View.OnClickListener() {
            @Override
            public void onClick(View v) {
                mCallBackValue.sendValue("第一个Fragment传来的值");
            }
        });
        return view;
    }
}

interface CallBackValue {
    public void sendValue(String s);
}
layout_fragmant_one.xml
<?xml version="1.0" encoding="utf-8"?>
<LinearLayout xmlns:android="http://schemas.android.com/apk/res/android"
    android:layout_width="match_parent"
    android:layout_height="match_parent"
    android:id="@+id/fragment_one"
    android:orientation="vertical"
    >

    <Button
        android:id="@+id/buttonOne"
        android:layout_width="wrap_content"
        android:layout_height="wrap_content"
        android:text="我是第一个Fragment"
        android:textAllCaps="false"
        />

    <TextView
        android:id="@+id/text1"
        android:layout_width="wrap_content"
        android:layout_height="wrap_content"
        android:text="第一个Fragment的TextView"
        android:textSize="25sp"
        />

</LinearLayout>
第三步:在Fragment_two.java中获取存入Bundle的值,并展示。
MainActivity.java
public class MainActivity extends AppCompatActivity implements CallBackValue{
    private String s;
    @Override
    public void sendValue(String s) {
        this.s = s;
        ActivityToFragment();
    }

    @Override
    protected void onCreate(Bundle savedInstanceState) {
        super.onCreate(savedInstanceState);
        setContentView(R.layout.activity_main);
        FragmentToActovity();
    }

    public void ActivityToFragment() {
        //Fragment管理
        FragmentManager fragmentManager = getSupportFragmentManager();
        //开启个事务
        FragmentTransaction fragmentTransaction = fragmentManager.beginTransaction();
        //创建Fragment对象
        Fragment_two fragment = new Fragment_two();

        Bundle bundle = new Bundle();
        bundle.putString("key", s);
        fragment.setArguments(bundle);
        fragmentTransaction.replace(R.id.fragmentLayoutTwo, fragment);
        //提交事务
        fragmentTransaction.commit();
    }

    public void FragmentToActovity() {
        FragmentManager fragmentManager = getSupportFragmentManager();
        //开启个事务
        FragmentTransaction fragmentTransaction = fragmentManager.beginTransaction();
        //创建Fragment对象
        Fragment_one fragment = new Fragment_one();

        fragmentTransaction.replace(R.id.fragmentLayoutOne, fragment);
        //提交事务
        fragmentTransaction.commit();
    }

}
activity_main.xml
<?xml version="1.0" encoding="utf-8"?>
<LinearLayout xmlns:android="http://schemas.android.com/apk/res/android"
    xmlns:tools="http://schemas.android.com/tools"
    android:layout_width="match_parent"
    android:layout_height="match_parent"
    android:orientation="vertical"
    tools:context="com.example.admin.vip_11.MainActivity">


    <LinearLayout
        android:id="@+id/fragmentLayoutOne"
        android:layout_width="match_parent"
        android:layout_height="match_parent"
        android:layout_weight="1"
        android:background="@color/colorAccent"
        android:orientation="vertical">

    </LinearLayout>

    <LinearLayout
        android:id="@+id/fragmentLayoutTwo"
        android:layout_width="match_parent"
        android:layout_height="match_parent"
        android:layout_weight="1"
        android:background="@color/colorPrimary"
        android:orientation="vertical">

    </LinearLayout>

</LinearLayout>
3.3.2 第二种方法
activity_main.xml
<?xml version="1.0" encoding="utf-8"?>
<LinearLayout xmlns:android="http://schemas.android.com/apk/res/android"
    xmlns:tools="http://schemas.android.com/tools"
    android:layout_width="match_parent"
    android:layout_height="match_parent"
    android:orientation="horizontal"
    tools:context="com.example.admin.vip_13.MainActivity">

    <fragment
        android:id="@+id/fragment1"
        android:layout_width="0dp"
        android:layout_height="match_parent"
        android:layout_weight="1"
        android:name="com.example.admin.vip_13.FragmentOne"
        />

    <LinearLayout
        android:orientation="vertical"
        android:id="@+id/fragment2"
        android:layout_width="0dp"
        android:layout_height="match_parent"
        android:layout_weight="1"
        android:gravity="center"
        android:background="@color/colorAccent"
        >

    </LinearLayout>

</LinearLayout>
layout_fragment_one.xml
<?xml version="1.0" encoding="utf-8"?>
<LinearLayout xmlns:android="http://schemas.android.com/apk/res/android"
    android:layout_width="match_parent"
    android:layout_height="match_parent"
    android:orientation="vertical"
    android:gravity="center"
    >

    <EditText
        android:id="@+id/editText"
        android:layout_width="match_parent"
        android:layout_height="wrap_content"
        android:textSize="20sp"
        />

    <Button
        android:id="@+id/button"
        android:layout_width="match_parent"
        android:layout_height="wrap_content"
        android:text="确定"
        />

</LinearLayout>
layout_fragment_two.xml
<?xml version="1.0" encoding="utf-8"?>
<LinearLayout xmlns:android="http://schemas.android.com/apk/res/android"
    android:layout_width="match_parent"
    android:layout_height="match_parent"
    android:orientation="vertical"
    android:gravity="center"
    >

    <TextView
        android:id="@+id/text"
        android:layout_width="match_parent"
        android:layout_height="wrap_content"
        android:textSize="25sp"
        android:layout_gravity="center"
        android:layout_marginLeft="10dp"
        />
</LinearLayout>
FragmentOne.java
public class FragmentOne extends Fragment {
    private EditText mEditText;

    @Nullable
    @Override
    public View onCreateView(LayoutInflater inflater, @Nullable ViewGroup container, @Nullable Bundle savedInstanceState) {
        View view = inflater.inflate(R.layout.layout_fragment_one, null);
        Button button = view.findViewById(R.id.button);
        mEditText = view.findViewById(R.id.editText);
        button.setOnClickListener(new View.OnClickListener() {
            @Override
            public void onClick(View v) {
                String s = mEditText.getText().toString();
                FragmentTwo fragmentTwo = (FragmentTwo) getFragmentManager().findFragmentById(R.id.fragment2);
                fragmentTwo.setData(s);
            }
        });
        return view;
    }
}
FragmentTwo.java
public class FragmentTwo extends Fragment{

    private TextView mTextView;

    @Nullable
    @Override
    public View onCreateView(LayoutInflater inflater, @Nullable ViewGroup container, @Nullable Bundle savedInstanceState) {
        View view = inflater.inflate(R.layout.layout_fragment_two, null);
        mTextView = view.findViewById(R.id.text);
        return view;
    }

    public void setData(String s) {
        mTextView.setText(s);
    }
}
MainActivity.java
public class MainActivity extends AppCompatActivity {

    @Override
    protected void onCreate(Bundle savedInstanceState) {
        super.onCreate(savedInstanceState);
        setContentView(R.layout.activity_main);
        FragmentTransaction fragmentTransaction = getSupportFragmentManager().beginTransaction();
        FragmentTwo fragmentTwo = new FragmentTwo();
        fragmentTransaction.replace(R.id.fragment2, fragmentTwo);
        fragmentTransaction.commit();
    }
}
首先,要先在MainAcitivity中动态绑定FragmentTwo,否则将会产生空指针异常。在FragmentTwo中定义setData方法,用于传入FragmentOne中输入的String值。调用getFragmentManager().findFragmentById(R.id.fragment2)方法并进行强转,获取到FragmentTwo对象。在调用其setData方法,传值成功。
3.3.3 第三种方法
将次代码
FragmentTwo fragmentTwo = (FragmentTwo) getFragmentManager().findFragmentById(R.id.fragment2);
                fragmentTwo.setData(s);
替换为
TextView textView = getActivity().findViewById(R.id.text);
                textView.setText(s);
其余不变。
第三种方法是直接获取到FragmentTwo中的TextView对象,并对其直接赋值。


 3462
3462

 被折叠的 条评论
为什么被折叠?
被折叠的 条评论
为什么被折叠?
 到【灌水乐园】发言


