


 本文介绍了如何使用Maven导入相关jar包,包括Junit、数据库驱动、连接池、Servlet-JSP、MyBatis和Spring等,并详细讲解了模块划分、资源过滤配置、Spring Bean的注入以及MyBatis的配置,涵盖了从数据库连接到业务层实现的全过程。
1、环境的搭建
使用maven导入相应的jar包,涉及到的依赖如下
<dependencies>
        <!--Junit-->
        <dependency>
            <groupId>junit</groupId>
            <artifactId>junit</artifactId>
            <version>4.12</version>
        </dependency>
        <!--数据库驱动-->
        <dependency>
            <groupId>mysql</groupId>
            <artifactId>mysql-connector-java</artifactId>
            <version>5.1.47</version>
        </dependency>
        <!-- 数据库连接池 -->
        <dependency>
            <groupId>com.mchange</groupId>
            <artifactId>c3p0</artifactId>
            <version>0.9.5.2</version>
        </dependency>

        <!--Servlet - JSP -->
        <dependency>
            <groupId>javax.servlet</groupId>
            <artifactId>servlet-api</artifactId>
            <version>2.5</version>
        </dependency>
        <dependency>
            <groupId>javax.servlet.jsp</groupId>
            <artifactId>jsp-api</artifactId>
            <version>2.2</version>
        </dependency>
        <dependency>
            <groupId>javax.servlet</groupId>
            <artifactId>jstl</artifactId>
            <version>1.2</version>
        </dependency>

        <!--Mybatis-->
        <dependency>
            <groupId>org.mybatis</groupId>
            <artifactId>mybatis</artifactId>
            <version>3.5.2</version>
        </dependency>
        <dependency>
            <groupId>org.mybatis</groupId>
            <artifactId>mybatis-spring</artifactId>
            <version>2.0.2</version>
        </dependency>

        <!--Spring-->
        <dependency>
            <groupId>org.springframework</groupId>
            <artifactId>spring-webmvc</artifactId>
            <version>5.1.9.RELEASE</version>
        </dependency>
        <dependency>
            <groupId>org.springframework</groupId>
            <artifactId>spring-jdbc</artifactId>
            <version>5.1.9.RELEASE</version>
        </dependency>
        <!--Lombok自动构建get set。。方法-->
        <dependency>
            <groupId>org.projectlombok</groupId>
            <artifactId>lombok</artifactId>
            <version>1.16.10</version>
        </dependency>
    </dependencies>
为了资源可以更好的加载,设置这个资源过滤
    <build>
        <resources>
            <resource>
                <directory>src/main/java</directory>
                <includes>
                    <include>**/*.properties</include>
                    <include>**/*.xml</include>
                </includes>
                <filtering>false</filtering>
            </resource>
            <resource>
                <directory>src/main/resources</directory>
                <includes>
                    <include>**/*.properties</include>
                    <include>**/*.xml</include>
                </includes>
                <filtering>false</filtering>
            </resource>
        </resources>
    </build>
相关的jar包导入完成后,接下来就是创建模块让不同的包完成各自的任务
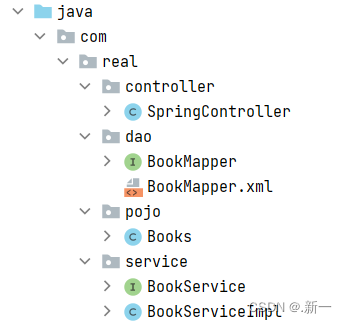
简单的创建了四个包,首先controller包负责servlet即接收前端数据然后对应调用service层。
dao包负责操作数据库的任务 ,我们创建一个接口BookMapper封装着各种操作数据库的方法,然后把接口绑定到BookMapper.xml中实现与具体sql的映射。接下来是pojo包用来存放实体类(其属性与数据库字段对应)实体类也就是更加方便的封装一个从数据库中取出的对象 有了这个对象就可以更加方便的去操作他。最后就是service层也就是业务层,业务层负责通过整合dao层的各种方法来实现前端的各种需求。
人———>前端——>controller——>service——>dao——>数据库 然后再逐层封装递交给前端
2、相关配置文件的编写
在resource目录下我们需要把相关的bean注入以及mybatis的配置
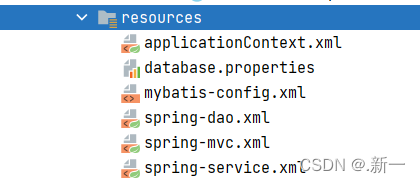
1. applicationContext中import了其他三个的bean(spring-dao,spring-mvc,spring-service)
database.properties存放用于链接MySQL的相关属性

注意:useSSL=false 不知道为什么之前写useSSL=true老是报错
mybatis-config 中是mybatis的配置
<?xml version="1.0" encoding="UTF-8" ?>
<!DOCTYPE configuration
        PUBLIC "-//mybatis.org//DTD Config 3.0//EN"
        "http://mybatis.org/dtd/mybatis-3-config.dtd">
<!-- 配置文件的根元素 -->
<configuration>
<!--    配置数据源,交给spring去做-->
<typeAliases>
    <package name="com.real.pojo"/>
<!--    <typeAlias type="com.real.pojo.Books" alias="Books"/>-->
</typeAliases>
<mappers>
    <mapper class="com.real.dao.BookMapper"/>
</mappers>
</configuration>
dao,mvc,service 分别是:
<?xml version="1.0" encoding="UTF-8"?>
<beans xmlns="http://www.springframework.org/schema/beans"
       xmlns:xsi="http://www.w3.org/2001/XMLSchema-instance"
       xmlns:context="http://www.springframework.org/schema/context"
       xsi:schemaLocation="
       http://www.springframework.org/schema/beans
       http://www.springframework.org/schema/beans/spring-beans-3.0.xsd
        http://www.springframework.org/schema/context
       http://www.springframework.org/schema/context/spring-context-3.0.xsd">

<!--关联数据库配置文件-->
    <context:property-placeholder location="classpath:database.properties"/>
    <!--创建连接池,让链接停留在池中不用每次都要请求,提升效率-->
    <bean id="dataSource" class="com.mchange.v2.c3p0.ComboPooledDataSource">
        <property name="driverClass" value="${jdbc.driver}"/>
        <property name="jdbcUrl" value="${jdbc.url}"/>
        <property name="user" value="${jdbc.username}"/>
        <property name="password" value="${jdbc.password}"/>
        <!-- c3p0连接池的私有属性 -->
        <property name="maxPoolSize" value="30"/>
        <property name="minPoolSize" value="10"/>
        <!-- 关闭连接后不自动commit -->
        <property name="autoCommitOnClose" value="false"/>
        <!-- 获取连接超时时间 -->
        <property name="checkoutTimeout" value="10000"/>
        <!-- 当获取连接失败重试次数 -->
        <property name="acquireRetryAttempts" value="2"/>

    </bean>
<!--创建sqlSessionFactory,由此来创建SqlSession对象-->
    <bean id="sqlSessionFactory" class="org.mybatis.spring.SqlSessionFactoryBean">
        <property name="dataSource" ref="dataSource"/>
    <!--    绑定mybatis配置文件-->
        <property name="configLocation" value="classpath:mybatis-config.xml"/>
    </bean>

    <!--实现dao接口扫描包,动态的将dao接口注入spring中-->
    <bean class="org.mybatis.spring.mapper.MapperScannerConfigurer">
        <!--注入sqlSessionFactory-->
        <property name="sqlSessionFactoryBeanName" value="sqlSessionFactory"/>
        <!--要扫描的dao包-->
        <property name="basePackage" value="com.real.dao"/>
    </bean>
</beans>
dao的主要目的就是 连接数据库创建SqlSessionFactory 在通过这个工厂创建sqlsession实例
sqlsession实例就可以执行相应的sql语句
<?xml version="1.0" encoding="UTF-8"?>
<beans xmlns="http://www.springframework.org/schema/beans"
       xmlns:xsi="http://www.w3.org/2001/XMLSchema-instance"
       xmlns:context="http://www.springframework.org/schema/context"
       xmlns:mvc="http://www.springframework.org/schema/mvc"
       xsi:schemaLocation="
       http://www.springframework.org/schema/beans
       http://www.springframework.org/schema/beans/spring-beans-3.0.xsd
        http://www.springframework.org/schema/context
       http://www.springframework.org/schema/context/spring-context-3.0.xsd
        http://www.springframework.org/schema/mvc
       http://www.springframework.org/schema/mvc/spring-mvc-3.0.xsd">
<!--添加注解驱动(让controller中的注解可以被检查到)-->
    <mvc:annotation-driven/>
<!--    静态资源过滤-->
    <mvc:default-servlet-handler/>
<!--扫描包(对于类中的上下文进行扫描)-->
    <context:component-scan base-package="com.real.controller"/>
<!--视图解析器(通过拼接实现完整的jsp路径)-->
    <bean class="org.springframework.web.servlet.view.InternalResourceViewResolver">
        <property name="prefix" value="/WEB-INF/jsp/"/>
        <property name="suffix" value=".jsp"/>
    </bean>

    <context:component-scan base-package="com.real.controller" />

</beans>
mvc主要就是解析servlet中返回的string 并且将其拼接成完整的jsp路径
<?xml version="1.0" encoding="UTF-8"?>
<beans xmlns="http://www.springframework.org/schema/beans"
       xmlns:xsi="http://www.w3.org/2001/XMLSchema-instance"
       xmlns:context="http://www.springframework.org/schema/context"
       xsi:schemaLocation="
       http://www.springframework.org/schema/beans
       http://www.springframework.org/schema/beans/spring-beans-3.0.xsd
        http://www.springframework.org/schema/context
       http://www.springframework.org/schema/context/spring-context-3.0.xsd">
    <!--扫描service下的包,确保service包里的注解可以使用-->
    <context:component-scan base-package="com.real.service"/>
<!--将我们的所有业务注入到spring中,用配置或者注解-->
    <bean id="bookServiceImpl" class="com.real.service.BookServiceImpl">
        <property name="bookMapper" ref="bookMapper"/>
    </bean>
<!--声明式事务-->
    <bean id="transactionManager" class="org.springframework.jdbc.datasource.DataSourceTransactionManager">
        <!--注入数据源-->
        <property name="dataSource" ref="dataSource"/>
    </bean>

</beans>
整体的流程大概就是这样,每个包创建完成 再把每个包分别交给spring去托管
controller包托管给spring-mvc就是为了添加其中的注解驱动,扫描其下面的类,将返回的jsp名称拼接成完整的jsp路径 实现成功跳转
dao包托管给spring-dao 创建数据库的连接池连接到数据库,通过sprin中自带的org.mybatis.spring.SqlSessionFactoryBean来创建SQLSessionFactory以此创建各自的sqlsession实例来执行sql语句
service包托管给spring-service就是托管其中的类并且添加注解驱动 最后声明其事务注入数据源
@Controller 自动绑定到这个servlet
@RequestMapping() 自动添加url的访问路径
@Autowired 自动把这个属性或者对象注入到spring中
@Qualifier() 为这个属性或对象自动赋值


 1036
1036

 被折叠的 条评论
为什么被折叠?
被折叠的 条评论
为什么被折叠?
 到【灌水乐园】发言


