


在 C/C++ 语言中直接使用操作系统提供的多线程资源同步 API 虽然功能强大,但毕竟存在诸多限制,且同样的代码却不能同时兼容 Windows 和 Linux 两个平台;再者 C/C++ 这种传统语言的使用份额正在被 Java、python、go 等语言慢慢蚕食,很大一部分原因是 C/C++ 这门编程语言在一些功能上缺少“完备性”,如对线程同步技术的支持,而这些功能在像 Java、python、go 中是标配。因此 C++ 11 标准新加入了很多现代语言标配的东西,其中线程资源同步对象就是其中很重要的一部分。本文将讨论 C++ 11 标准中新增的用于线程同步的 std::mutex 和 std::condition_variable 对象的用法,有了它们我们就可以写出跨平台的多线程程序了。
7.1 std::mutex 系列
关于 mutex 的基本概念上文已经介绍过了,这里不再赘述。
C++ 11/14/17 中提供了如下 mutex 系列类型:
| 互斥量 | 版本 | 作用 |
|---|---|---|
| mutex | C++11 | 最基本的互斥量 |
| timed_mutex | C++11 | 有超时机制的互斥量 |
| recursive_mutex | C++11 | 可重入的互斥量 |
| recursive_timed_mutex | C++11 | 结合 timed_mutex 和 recursive_mutex 特点的互斥量 |
| shared_timed_mutex | C++14 | 具有超时机制的可共享互斥量 |
| shared_mutex | C++17 | 共享的互斥量 |
这个系列的对象均提供了加锁(lock)、尝试加锁(trylock)和解锁(unlock)的方法,我们以 std::mutex 为例来看一段示例代码:
#include <iostream>
#include <chrono>
#include <thread>
#include <mutex>
// protected by g_num_mutex
int g_num = 0;
std::mutex g_num_mutex;
void slow_increment(int id)
{
for (int i = 0; i < 3; ++i) {
g_num_mutex.lock();
++g_num;
std::cout << id << " => " << g_num << std::endl;
g_num_mutex.unlock();
//sleep for 1 second
std::this_thread::sleep_for(std::chrono::seconds(1));
}
}
int main()
{
std::thread t1(slow_increment, 0);
std::thread t2(slow_increment, 1);
t1.join();
t2.join();
return 0;
}上述代码中,创建了两个线程 t1 和 t2,在线程函数的 for 循环中调用 std::mutex.lock() 和 std::mutex.unlock() 对全局变量 g_num 进行保护。编译程序并输出结果如下:
[root@localhost testmultithread]# g++ -g -o mutex c11mutex.cpp -std=c++0x -lpthread
[root@localhost testmultithread]# ./mutex
0 => 1
1 => 2
0 => 3
1 => 4
1 => 5
0 => 6
注意:如果你在 Linux 下编译和运行程序,在编译时你需要链接 pthread 库,否则能够正常编译但是运行时程序会崩溃,崩溃原因: terminate called after throwing an instance of 'std::system_error' what(): Enable multithreading to use std::thread: Operation not permitted
为了避免死锁, std::mutex::lock() 和 std::mutex::unlock() 方法需要成对使用,但是如上文介绍的如果一个函数中有很多出口,而互斥体对象又是需要在整个函数作用域保护的资源,那么在编码时因为忘记在某个出口处调用 std::mutex::unlock() 而造成死锁,上文中推荐使用利用 RAII 技术封装这两个接口,其实 C++ 11 标准也想到了整个问题,因为已经为我们提供了如下封装:
| 互斥量管理 | 版本 | 作用 |
|---|---|---|
| lock_guard | C++11 | 基于作用域的互斥量管理 |
| unique_lock | C++11 | 更加灵活的互斥量管理 |
| shared_lock | C++14 | 共享互斥量的管理 |
| scope_lock | C++17 | 多互斥量避免死锁的管理 |
我们这里以 std::lock_guard 为例:
void func()
{
  std::lock_guard<std::mutex> guard(mymutex);
  //在这里放被保护的资源操作
}
mymutex 的类型是 std::mutex,在 guard 对象的构造函数中,会自动调用 mymutex.lock() 方法加锁,当该函数出了作用域后,调用 guard 对象时析构函数时会自动调用 mymutex.unlock() 方法解锁。
注意: mymutex 生命周期必须长于函数 func 的作用域,很多人在初学这个利用 RAII 技术封装的 std::lock_guard 对象时,可能会写出这样的代码:
//错误的写法,这样是没法在多线程调用该函数时保护指定的数据的。
void func()
{
  std::mutex m;
  std::lock_guard<std::mutex> guard(m);
  //在这里放被保护的资源操作
}
另外,如果某个线程已经对一个std::mutex对象调用了lock方法,该线程再次调用lock方法对这个std::mutex进行加锁时,其行为是未定义的,这是一个错误的做法。所谓“行为未定义”即在不同平台上可能会有不同的行为。
#include <mutex>
int main()
{
std::mutex m;
m.lock();
m.lock();
m.unlock();
return 0;
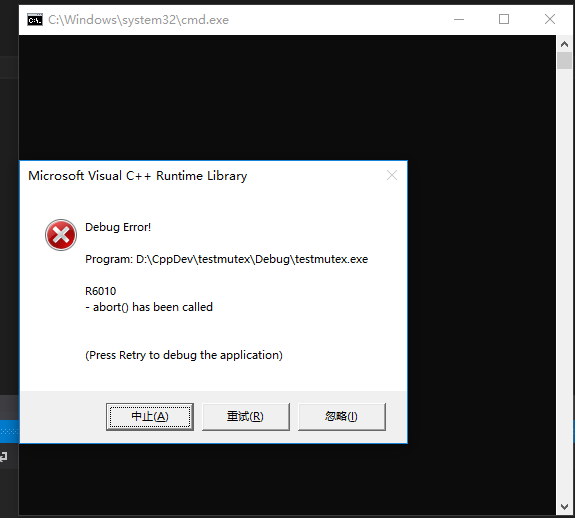
}实际测试时,上述代码重复调用 std::mutex.lock() 方法在 Windows 平台上会引起程序崩溃。如下图所示:
上述代码在 Linux 系统上运行时会阻塞在第二次调用 std::mutex.lock() 处,验证结果如下:
[root@localhost testmultithread]# g++ -g -o mutexlock mutexlock.cpp -std=c++0x -lpthread
[root@localhost testmultithread]# gdb mutexlock
Reading symbols from /root/testmultithread/mutexlock...done.
(gdb) r
Starting program: /root/testmultithread/mutexlock
[Thread debugging using libthread_db enabled]
Using host libthread_db library "/lib64/libthread_db.so.1".
^C
Program received signal SIGINT, Interrupt.
0x00007ffff7bcd4ed in __lll_lock_wait () from /lib64/libpthread.so.0
Missing separate debuginfos, use: debuginfo-install glibc-2.17-260.el7.x86_64 libgcc-4.8.5-36.el7.x86_64 libstdc++-4.8.5-36.el7.x86_64
(gdb) bt
#0  0x00007ffff7bcd4ed in __lll_lock_wait () from /lib64/libpthread.so.0
#1  0x00007ffff7bc8dcb in _L_lock_883 () from /lib64/libpthread.so.0
#2  0x00007ffff7bc8c98 in pthread_mutex_lock () from /lib64/libpthread.so.0
#3  0x00000000004006f7 in __gthread_mutex_lock (__mutex=0x7fffffffe3e0)
    at /usr/include/c++/4.8.2/x86_64-redhat-linux/bits/gthr-default.h:748
#4  0x00000000004007a2 in std::mutex::lock (this=0x7fffffffe3e0) at /usr/include/c++/4.8.2/mutex:134
#5  0x0000000000400777 in main () at mutexlock.cpp:7
(gdb) f 5
#5  0x0000000000400777 in main () at mutexlock.cpp:7
7     m.lock();
(gdb) l
2
3 int main()
4 {
5     std::mutex m;
6     m.lock();
7     m.lock();
8     m.unlock();
9
10      return 0;
11  }
(gdb)
我们使用 gdb 运行程序,然后使用 bt 命令看到程序确实阻塞在第二个m.lock() 的地方(代码第 7 行)。
总结起来,实际开发中,我们应该尽量避免同一个线程对一个已经调用lock方法的std::mutex对象再次调用lock方法。
//错误的做法
线程A对mutexM加锁 => 线程A对mutexM加锁
//正确的做法
线程A对mutexM加锁 => 线程A对mutexM解锁 => 线程A对mutexM加锁
//正确的做法
线程A对mutexM加锁 => 线程B对mutexM加锁(会阻塞)7.2 std::shared_mutex
C++ 11 标准让很多开发者诟病的原因之一是,C++ 新标准借鉴 boost 库的 boost::mutex、boost::shared_mutex 而引入 std::mutex 和 std::shared_mutex,但是在 C++11 中只引入了 std::mutex,直到 C++ 17 才有 std::shared_mutex,这让只能使用仅支持 C++11 标准的编译器(例如 Visual Studio 2013,gcc/g++ 4.8)的开发者非常不方便。
商业项目中一般不会轻易升级编译器,因为商业项目一般牵涉的代码范围较大,升级编译器后可能导致大量旧的文件需要修改,例如对于被广泛使用的 CentOS 7.0,其自带的 gcc 编译器是 4.8,升级 gcc 的同时会导致系统自带的 glibc 库发生变化,导致系统中大量其他程序无法运行。因此,实际的商业项目中,升级旧的开发环境是非常慎重的。
std::shared_mutex 底层实现主要原理是操作系统提供的读写锁,也就是说,在存在多个线程对共享资源读、少许线程对共享资源写的情况下,std::shared_mutex 比 std::mutex 效率更高。
std::shared_mutex 提供了 lock() 和 unlock() 方法获取写锁和解除写锁,提供了 lock_shared() 和 unlock_shared() 方法获取读锁和解除读锁,写锁模式我们称为排他锁(Exclusive Locking),读锁模式我们称为共享锁(Shared Locking)。
另外,C++ 新标准中引入与 std::shared_mutex 配合使用的两个对象—— std::unique_lock和std::shared_lock ,这两个对象在构造时自动对std::shared_mutex进行加锁、在析构时自动对std::shared_mutex进行解锁,前者用于加解 std::shared_mutex 的写锁,后者用于加解 std::shared_mutex 的读锁。
std::unique_lock 在 C++11 引入,std::shared_lock 在 C++14 引入。
下面是对共享资源存在多个读线程和一个写线程,分别使用 std::mutex 和 std::shared_mutex 做的一个性能测试,测试代码如下:
/**
* std::shared_mutex与std::mutex的性能对比
* zhangyl 2016.11.10
*/
//读线程数量
#define READER_THREAD_COUNT 8
//最大循环次数
#define LOOP_COUNT 5000000
#include <iostream>
#include <mutex>
#include <shared_mutex>
#include <thread>
class shared_mutex_counter
{
public:
shared_mutex_counter() = default;
~shared_mutex_counter() = default;
//使用std::shared_mutex,同一时刻多个读线程可以同时访问value_值
unsigned int get() const
{
//注意:这里使用std::shared_lock
std::shared_lock<std::shared_mutex> lock(mutex_);
return value_;
}
//使用std::shared_mutex,同一个时刻仅有一个写线程可以修改value_值
void increment()
{
//注意:这里使用std::unique_lock
std::unique_lock<std::shared_mutex> lock(mutex_);
value_++;
}
//使用std::shared_mutex,同一个时刻仅有一个写线程可以重置value_值
void reset()
{
//注意:这里使用std::unique_lock
std::unique_lock<std::shared_mutex> lock(mutex_);
value_ = 0;
}
private:
mutable std::shared_mutex mutex_;
//value_是多个线程的共享资源
unsigned int value_ = 0;
};
class mutex_counter
{
public:
mutex_counter() = default;
~mutex_counter() = default;
//使用std::mutex,同一时刻仅有一个线程可以访问value_的值
unsigned int get() const
{
std::unique_lock<std::mutex> lk(mutex_);
return value_;
}
//使用std::mutex,同一时刻仅有一个线程可以修改value_的值
void increment()
{
std::unique_lock<std::mutex> lk(mutex_);
value_++;
}
private:
mutable std::mutex mutex_;
//value_是多个线程的共享资源
unsigned int value_ = 0;
};
//测试std::shared_mutex
void test_shared_mutex()
{
shared_mutex_counter counter;
int temp;
//写线程函数
auto writer = [&counter](./) {
for (int i = 0; i < LOOP_COUNT; i++)
{
counter.increment();
}
};
//读线程函数
auto reader = [&counter, &temp](./) {
for (int i = 0; i < LOOP_COUNT; i++)
{
temp = counter.get();
}
};
//存放读线程对象指针的数组
std::thread** tarray = new std::thread * [READER_THREAD_COUNT];
//记录起始时间
clock_t start = clock();
//创建READER_THREAD_COUNT个读线程
for (int i = 0; i < READER_THREAD_COUNT; i++)
{
tarray[i] = new std::thread(reader);
}
//创建一个写线程
std::thread tw(writer);
for (int i = 0; i < READER_THREAD_COUNT; i++)
{
tarray[i]->join();
}
tw.join();
//记录起始时间
clock_t end = clock();
printf("[test_shared_mutex]\n");
printf("thread count: %d\n", READER_THREAD_COUNT);
printf("result: %d cost: %dms temp: %d \n", counter.get(), end - start, temp);
}
//测试std::mutex
void test_mutex()
{
mutex_counter counter;
int temp;
//写线程函数
auto writer = [&counter](./) {
for (int i = 0; i < LOOP_COUNT; i++)
{
counter.increment();
}
};
//读线程函数
auto reader = [&counter, &temp](./) {
for (int i = 0; i < LOOP_COUNT; i++)
{
temp = counter.get();
}
};
//存放读线程对象指针的数组
std::thread** tarray = new std::thread * [READER_THREAD_COUNT];
//记录起始时间
clock_t start = clock();
//创建READER_THREAD_COUNT个读线程
for (int i = 0; i < READER_THREAD_COUNT; i++)
{
tarray[i] = new std::thread(reader);
}
//创建一个写线程
std::thread tw(writer);
for (int i = 0; i < READER_THREAD_COUNT; i++)
{
tarray[i]->join();
}
tw.join();
//记录结束时间
clock_t end = clock();
printf("[test_mutex]\n");
printf("thread count:%d\n", READER_THREAD_COUNT);
printf("result:%d cost:%dms temp:%d \n", counter.get(), end - start, temp);
}
int main()
{
//为了排除测试程序的无关因素,测试时只开启一个
test_mutex();
//test_shared_mutex();
return 0;
}以下是我在 Windows 上 Visual Studio 2019 的测试结果:

在 Linux 机器上,由于 std::shared_mutex 是 C++17 才引入的(gcc 7.0 及以上,我使用的是 gcc 7.3),因此编译时需要加上编译参数 --std=c++17,测试结果如下:
[root@myaliyun testmutexbenchmark]# g++ -g -o test_shared_mutex TestSharedMutexBenchmark.cpp -std=c++17 -lpthread
[root@myaliyun testmutexbenchmark]# vi TestSharedMutexBenchmark.cpp
[root@myaliyun testmutexbenchmark]# g++ -g -o test_mutex TestSharedMutexBenchmark.cpp -std=c++17 -lpthread
[root@myaliyun testmutexbenchmark]# ll
total 416
-rwxr-xr-x 1 root root 205688 Nov 10 22:35 test_mutex
-rwxr-xr-x 1 root root 205688 Nov 10 22:35 test_shared_mutex
-rw-r--r-- 1 root root   4112 Nov 10 22:35 TestSharedMutexBenchmark.cpp
[root@myaliyun testmutexbenchmark]# ./test_mutex
[test_mutex]
thread count:8
result:5000000 cost:2460000ms temp:4341759
[root@myaliyun testmutexbenchmark]# ./test_shared_mutex
[test_shared_mutex]
thread count: 8
result: 5000000 cost: 2620000ms temp: 735375
由于我的 Linux 机器配置不高,所以在 Linux 机器上的测试结果 std::shared_mutex 比 std::mutex 差别并不明显,读者可以尝试修改 READER_THREAD_COUNT 的值来测试不同数量的读线程的输出结果。
std::mutex 和 std::shared_mutex 分别对应 java jdk 中的 ReentrantLock 和 ReentrantReadWriteLock。
如果条件允许,建议读者认真甄别实际场景,可以使用 std::shared_mutex 去替代部分 std::mutex,以提高程序执行效率。
7.3 std::condition_variable
C++ 11 提供了 std::condition_variable 这个类代表条件变量,与 Linux 系统原生的条件变量一样,同时提供了等待条件变量满足的 wait 系列方法(wait、wait_for、wait_until 方法),发送条件信号使用 notify 方法(notify_one 和 notify_all 方法),当然使用 std::condition_variable 对象时需要绑定一个 std::unique_lock 或 std::lock_guard 对象。
C++ 11 中 std::condition_variable 不再需要显式调用方法初始化和销毁。
我们将上文中介绍 Linux 条件变量的例子改写成 C++ 11 版本:
#include <thread>
#include <mutex>
#include <condition_variable>
#include <list>
#include <iostream>

class Task
{
public:
	Task(int taskID)
	{
		this->taskID = taskID;
	}

	void doTask()
	{
		std::cout << "handle a task, taskID: " << taskID << ", threadID: " << std::this_thread::get_id() << std::endl;
	}

private:
	int taskID;
};

std::mutex                mymutex;
std::list<Task*>          tasks;
std::condition_variable   mycv;

void* consumer_thread()
{
	Task* pTask = NULL;
	while (true)
	{
		std::unique_lock<std::mutex> guard(mymutex);
		while (tasks.empty())
		{
			//如果获得了互斥锁,但是条件不合适的话,pthread_cond_wait会释放锁,不往下执行。
			//当发生变化后,条件合适,pthread_cond_wait将直接获得锁。
			mycv.wait(guard);
		}

		pTask = tasks.front();
		tasks.pop_front();

		if (pTask == NULL)
			continue;

		pTask->doTask();
		delete pTask;
		pTask = NULL;
	}

	return NULL;
}

void* producer_thread()
{
	int taskID = 0;
	Task* pTask = NULL;

	while (true)
	{
		pTask = new Task(taskID);

		//使用括号减小guard锁的作用范围
		{
			std::lock_guard<std::mutex> guard(mymutex);
			tasks.push_back(pTask);
			std::cout << "produce a task, taskID: " << taskID << ", threadID: " << std::this_thread::get_id() << std::endl;
		}

		//释放信号量,通知消费者线程
		mycv.notify_one();

		taskID ++;

		//休眠1秒
		std::this_thread::sleep_for(std::chrono::seconds(1));
	}

	return NULL;
}

int main()
{
	//创建5个消费者线程
	std::thread consumer1(consumer_thread);
	std::thread consumer2(consumer_thread);
	std::thread consumer3(consumer_thread);
	std::thread consumer4(consumer_thread);
	std::thread consumer5(consumer_thread);

	//创建一个生产者线程
	std::thread producer(producer_thread);

	producer.join();
	consumer1.join();
	consumer2.join();
	consumer3.join();
	consumer4.join();
	consumer5.join();

	return 0;
}
编译并执行程序输出结果如下所示:
[root@localhost testmultithread]# g++ -g -o cpp11cv cpp11cv.cpp -std=c++0x -lpthread
[root@localhost testmultithread]# ./cpp11cv
produce a task, taskID: 0, threadID: 140427590100736
handle a task, taskID: 0, threadID: 140427623671552
produce a task, taskID: 1, threadID: 140427590100736
handle a task, taskID: 1, threadID: 140427632064256
produce a task, taskID: 2, threadID: 140427590100736
handle a task, taskID: 2, threadID: 140427615278848
produce a task, taskID: 3, threadID: 140427590100736
handle a task, taskID: 3, threadID: 140427606886144
produce a task, taskID: 4, threadID: 140427590100736
handle a task, taskID: 4, threadID: 140427598493440
produce a task, taskID: 5, threadID: 140427590100736
handle a task, taskID: 5, threadID: 140427623671552
produce a task, taskID: 6, threadID: 140427590100736
handle a task, taskID: 6, threadID: 140427632064256
produce a task, taskID: 7, threadID: 140427590100736
handle a task, taskID: 7, threadID: 140427615278848
produce a task, taskID: 8, threadID: 140427590100736
handle a task, taskID: 8, threadID: 140427606886144
produce a task, taskID: 9, threadID: 140427590100736
handle a task, taskID: 9, threadID: 140427598493440
...更多输出结果省略...
需要注意的是,如果在 Linux 平台上,std::condition_variable 也存在虚假唤醒这一现象,如何解决这个问题,已经在前面章节介绍 Linux 原生的条件变量时介绍过。
更多的专题参见:cppguide.cn
C/C++岗位内推、技术交流与求职群:加微信 cppxiaofang,备注加微信群。


 1万+
1万+

 被折叠的 条评论
为什么被折叠?
被折叠的 条评论
为什么被折叠?
 到【灌水乐园】发言


