nginx实现目录索引

本文介绍了如何通过连接xshell,搭建yum环境,然后在虚拟机中安装nginx,进行路径优化,修改配置文件,最后启动服务并关闭防火墙,以实现nginx的目录索引功能。

nginx实现目录索引

连接xshell,搭建yum。
安装nginx依赖环境。

[root@localhost ~]#yum -y install gcc gcc-c++
[root@localhost ~]#yum -y install pcre-devel
[root@localhost ~]#yum -y install zlib-devel

将nginx安装包传送到虚拟机。

[root@localhost ~]# mkdir -p /data/server
[root@localhost ~]# cd /usr/local/src/
[root@localhost src]# rz
[root@localhost src]# ls
nginx-1.11.5.tar.gz

安装nginx。

[root@localhost src]# tar zxf nginx-1.11.5.tar.gz -C /data/server/
[root@localhost src]# cd /data/server/nginx-1.11.5/
[root@localhost nginx-1.11.5]# groupadd nginx
[root@localhost nginx-1.11.5]# useradd -s /sbin/nologin -M -g nginx nginx
[root@localhost nginx-1.11.5]# ./configure --prefix=/data/server/nginx --user=nginx --group=nginx
[root@localhost nginx-1.11.5]# make && make install

切换路径,做路径优化。

[root@localhost nginx-1.11.5]# cd /data/server/nginx/conf/
[root@localhost conf]# ln -s /data/server/nginx/sbin/nginx /usr/local/sbin/
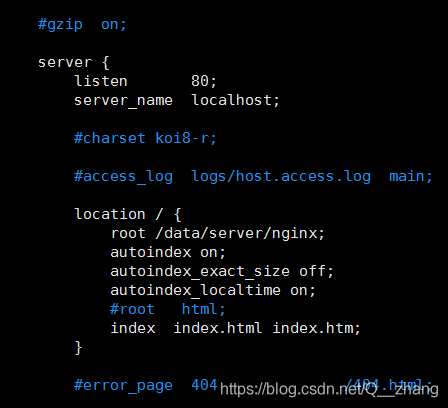
修改配置文件,保存并退出。

[root@localhost conf]# vim nginx.conf
            root /data/server/nginx;
            autoindex on;
            autoindex_exact_size off;
            autoindex_localtime on;

在这里插入图片描述
启动服务,关闭防火墙。

[root@localhost conf]# cd /data/server/nginx/sbin/
[root@localhost sbin]# ./nginx
[root@localhost sbin]# netstat -anput | grep nginx
tcp        0      0 0.0.0.0:80              0.0.0.0:*               LISTEN      13400/nginx: master 
[root@localhost sbin]# systemctl stop firewalld
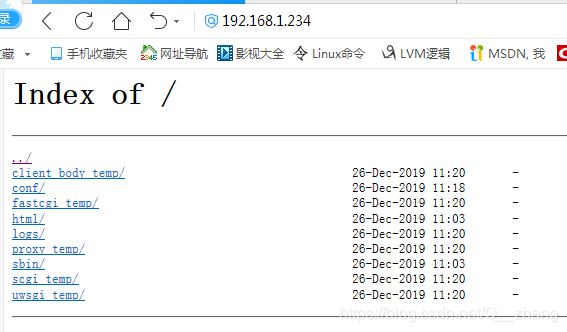
打开浏览器,输入IP。
在这里插入图片描述

### 使用 Nginx 和 Fancyindex 模块实现美化目录索引 Nginx 的 Fancyindex 模块可以用于美化和增强目录索引的功能,提供更友好的用户体验。以下是实现这一功能的详细方法: #### 1. 安装 Fancyindex 模块 为了使用 Fancyindex 模块,需要重新编译 Nginx 并添加该模块。以下是安装步骤: - 下载 Fancyindex 模块源码: ```bash wget -O fancyindex.zip https://github.com/aperezdc/ngx-fancyindex/archive/v0.4.3.zip unzip fancyindex.zip ``` - 下载 Nginx 源码并进行编译: ```bash tar -zxvf nginx-1.16.0.tar.gz cd nginx-1.16.0 ./configure --prefix=/data1/nginx --add-module=/root/ngx-fancyindex-0.4.3/ --user=root --group=root && make && make install ``` 完成上述操作后,Fancyindex 模块将被集成到 Nginx 中[^3]。 #### 2. 配置 Nginx 配置文件 编辑 Nginx 配置文件(通常位于 `/etc/nginx/nginx.conf` 或 `/data1/nginx/conf/nginx.conf`),添加以下内容以启用 Fancyindex 模块: ```nginx http { include mime.types; default_type application/octet-stream; sendfile on; keepalive_timeout 65; server { listen 80; server_name localhost; # 设置字符编码,支持中文 charset utf-8; # 启用 Fancyindex 模块 fancyindex on; fancyindex_exact_size off; # 显示文件大小为人类可读格式 fancyindex_localtime on; # 显示本地时间 fancyindex_header "/Nginx-Fancyindex-Theme-light/header.html"; # 自定义头部文件 fancyindex_footer "/Nginx-Fancyindex-Theme-light/footer.html"; # 自定义尾部文件 fancyindex_ignore "examplefile.html"; # 忽略特定文件 fancyindex_ignore "Nginx-Fancyindex-Theme-light"; # 忽略特定目录 # 设置根目录 root /www/files; location / { fancyindex on; # 启用 FancyIndex 模块 fancyindex_exact_size off; # 不显示精确大小 fancyindex_localtime off; # 不显示本地时间 fancyindex_header "/fancyindex/header.html"; # 自定义头部 HTML 文件 fancyindex_footer "/fancyindex/footer.html"; # 自定义尾部 HTML 文件 fancyindex_hide_symlinks on; # 隐藏符号链接 fancyindex_default_sort date; # 默认按日期排序 fancyindex_ignore "fancyindex"; # 忽略名为 "fancyindex" 的文件或目录 } } } ``` 上述配置中,`fancyindex_header` 和 `fancyindex_footer` 是自定义主题文件的路径[^2]。 #### 3. 下载并配置主题 为了进一步美化目录索引,可以使用响应式主题 Nginx-Fancyindex-Theme。下载并解压主题文件: ```bash git clone https://github.com/fraoustin/Nginx-Fancyindex-Theme.git /www/files/ ``` 确保主题文件夹中的 `header.html` 和 `footer.html` 被正确引用到 Nginx 配置文件中[^4]。 #### 4. 测试与重启服务 完成配置后,测试 Nginx 配置文件是否正确: ```bash nginx -t ``` 如果没有错误,重启 Nginx 服务以应用更改: ```bash nginx -s reload ``` 通过以上步骤,Nginx目录索引将被美化,并具备现代、简洁的设计风格[^1]。 ### 注意事项 - 确保 Nginx 已正确编译 Fancyindex 模块。 - 根据实际需求调整 `fancyindex_header` 和 `fancyindex_footer` 的路径。 - 如果需要访问控制,可以启用 `auth_basic` 功能。
评论 1
添加红包

请填写红包祝福语或标题

红包个数最小为10个

红包金额最低5元

当前余额3.43前往充值 >
需支付:10.00
成就一亿技术人!
领取后你会自动成为博主和红包主的粉丝 规则
hope_wisdom
发出的红包
实付
使用余额支付
点击重新获取
扫码支付
钱包余额 0

抵扣说明:

1.余额是钱包充值的虚拟货币,按照1:1的比例进行支付金额的抵扣。
2.余额无法直接购买下载,可以购买VIP、付费专栏及课程。

余额充值