


 本文通过多个实战案例介绍MP在查询、更新、删除等操作中的应用,包括动态SQL的编写技巧及SpringBoot整合Web资源的方法。
1.MP案例学习
/**
	 * MP练习1: 查询
	 * 1. 根据Id查询数据 id=5的用
	 * 2. 根据name="唐僧" age=30    Sql: where name=xxx and age=xxx
	 */
	@Test
	public void testSelect01(){

		User user = userMapper.selectById(5);
		System.out.println(user);

		User user2 = new User();
		user2.setName("唐僧").setAge(30);
		//条件构造器 动态拼接where条件 原则: 根据对象中不为null的属性动态拼接where条件.
		QueryWrapper queryWrapper = new QueryWrapper(user2);
		//Sql: select xxx,xxx,xx from user where name="唐僧" and age=30
		User user3 = userMapper.selectOne(queryWrapper);
		System.out.println(user3);
	}

	/**
	 * 需求: 查询age>18岁的 性别为女的用户  sex='女'
	 * 特殊符号:  特殊符号: > gt; < lt; = eq; >= ge; <= le;
	 */
	@Test
	public void testSelect02(){
		QueryWrapper queryWrapper = new QueryWrapper();
		queryWrapper.gt("age", 18);
		queryWrapper.eq("sex", "女");
		List<User> userList = userMapper.selectList(queryWrapper);
		System.out.println(userList);
	}

   /**
     * 案例3:查询name中包含"精"字的用户,并且性别为女
     * like %精% like
     * like 精% likeRight
     * like %精 likeLeft
     */
	@Test
	public void testSelect03(){
		QueryWrapper queryWrapper = new QueryWrapper();
		queryWrapper.like("name", "精");
		queryWrapper.eq("sex", "女");
		List<User> userList = userMapper.selectList(queryWrapper);
		System.out.println(userList);
	}

	/**
	 * 案例4: 要求age>18岁, 并且name字段不为null的用户. 按照年龄降序排列.
	 *  > gt;  不为空 isNotNull;  降序 orderByDesc;
	 */
	@Test
	public void testSelect04(){
		QueryWrapper queryWrapper = new QueryWrapper();
		queryWrapper.gt("age", 18);
		queryWrapper.isNotNull("name");
		queryWrapper.orderByDesc("age");

		List<User> userList = userMapper.selectList(queryWrapper);
		System.out.println(userList);
	}

	/**
	 * 案例5:
	 * 		 查询用户信息  有2个参数,但是2个参数可能部分为null 动态查询
	 * 		 根据sex和age查询  sex  和 age 可能为null???
	 * 		 逻辑运算符  age > 18  and sex="女"
	 *
	 */
	@Test
	public void testSelect05(){
		User user = new User();	//模拟用户传参
		user.setAge(18);
		//user.setSex("女");

		QueryWrapper queryWrapper = new QueryWrapper();

		//动态sql写法 condition如何条件为true时,该条件才拼接.
		queryWrapper.gt(user.getAge() !=null && user.getAge()>0, "age", user.getAge());
		queryWrapper.eq(!"".equals(user.getSex()) && user.getSex() !=null,"sex",user.getSex());

		List<User> userList = userMapper.selectList(queryWrapper);
		System.out.println(userList);
	}

	/**
	 * 案例6:
	 * 		查询用户Id = 1,3,5,6,7
	 * Sql: select * from user where id in (1,3,5,6,7)
	 */
	@Test
	public void testSelect06(){
		//规则: 如果数组需要转化集合则使用包装类型
		Integer[] ids = {1,3,5,6,7};
		//将数组转化为集合
		List<Integer> idList = Arrays.asList(ids);
		QueryWrapper queryWrapper = new QueryWrapper();
		queryWrapper.in("id",idList);
		List<User> userList = userMapper.selectList(queryWrapper);
		//方法2:
		List<User> userList2 = userMapper.selectBatchIds(idList);
		System.out.println(userList);
		System.out.println(userList2);
	}

	/**
	 * 删除name为null的数据
	 */
	@Test
	public void delete(){
		QueryWrapper queryWrapper = new QueryWrapper();
		queryWrapper.isNull("name");
		userMapper.delete(queryWrapper);
		System.out.println("删除成功!!!");
	}

	/**
	 * 更新操作
	 * 案例1:  将id=74的用户的名称改为 你好SpringBoot age=18 sex="其他"
	 * 案例2:  将name="测试Mybatis" 的数据改为 age=100 sex=男
	 */
	@Test
	public void update(){
		User user = new User();
		user.setId(74).setName("你好SpringBoot").setAge(18).setSex("其他");
		//Sql: update user set name="xxx", age=18,sex='xx' where id=xx
		//Sql形成的原则 根据对象中不为null的属性当做  set条件. 并且将Id当做where条件
		userMapper.updateById(user);

		//无主键id,查询方法
		User userTemp = new User();
		userTemp.setAge(100).setSex("男");
		UpdateWrapper<User> updateWrapper = new UpdateWrapper<>();
		updateWrapper.eq("name", "测试Mybatis");
		userMapper.update(userTemp,updateWrapper);
		System.out.println("更新成功!!!");
	}
    <!--案例5: xml写法-->
	<!--测试动态sql 万能的转义字符标签<![CDATA[xxx数据]]-->
	<select id="xxx" resultType="User">
		select * from user
        <where>
			<![CDATA[
			<if test="age !=null and age !=0 ">
				age < #{age},
			</if>
			<if test="sex !=null and sex !=''">
				and sex = #{sex}
			</if>
				 ]]>
		</where>
	</select>
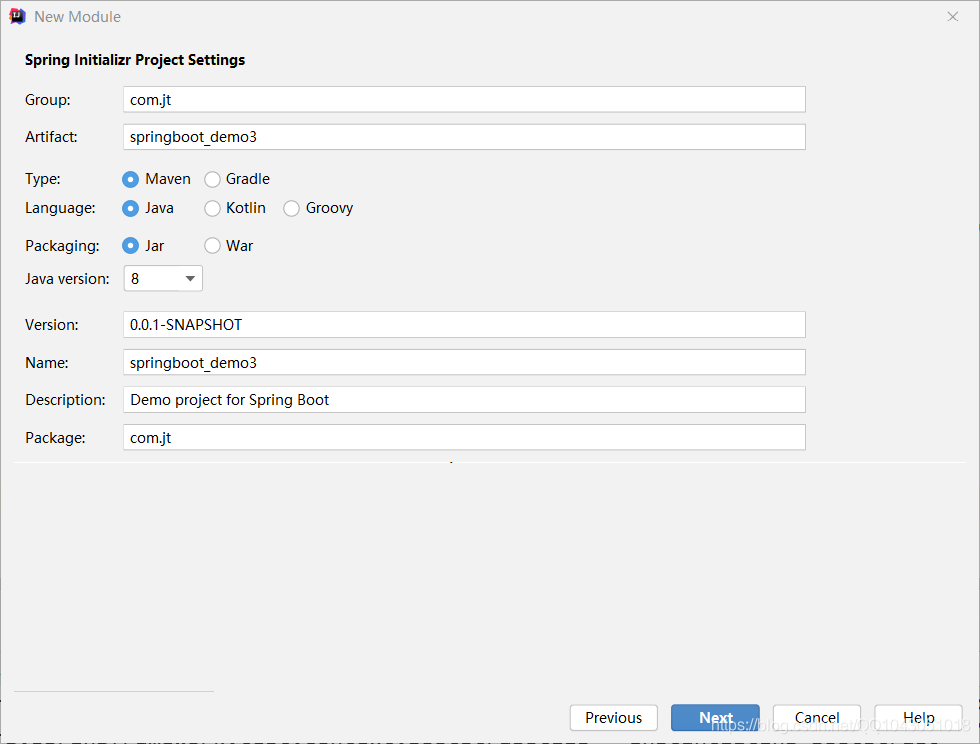
2.SpringBoot整合Web资源
2.1 创建项目

    <dependencies>
        <dependency>
            <groupId>org.springframework.boot</groupId>
            <artifactId>spring-boot-starter-data-jdbc</artifactId>
        </dependency>

        <dependency>
            <groupId>org.springframework.boot</groupId>
            <artifactId>spring-boot-starter-web</artifactId>
        </dependency>

        <dependency>
            <groupId>org.springframework.boot</groupId>
            <artifactId>spring-boot-devtools</artifactId>
            <scope>runtime</scope>
            <optional>true</optional>
        </dependency>

        <dependency>
            <groupId>mysql</groupId>
            <artifactId>mysql-connector-java</artifactId>
            <scope>runtime</scope>
        </dependency>

        <dependency>
            <groupId>org.projectlombok</groupId>
            <artifactId>lombok</artifactId>
            <optional>true</optional>
        </dependency>

        <dependency>
            <groupId>org.springframework.boot</groupId>
            <artifactId>spring-boot-starter-test</artifactId>
            <scope>test</scope>
        </dependency>

        <!--引入MybatisPlus配置   删除原有Mybatisjar包  不然造成冲突 -->
        <dependency>
            <groupId>com.baomidou</groupId>
            <artifactId>mybatis-plus-boot-starter</artifactId>
            <version>3.4.2</version>
        </dependency>
    </dependencies>

    <build>
        <plugins>
            <plugin>
                <groupId>org.springframework.boot</groupId>
                <artifactId>spring-boot-maven-plugin</artifactId>
                <configuration>
                    <excludes>
                        <exclude>
                            <groupId>org.projectlombok</groupId>
                            <artifactId>lombok</artifactId>
                        </exclude>
                    </excludes>
                </configuration>
            </plugin>
        </plugins>
    </build>
2.2 添加新jar包文件
动态的web资源
<!--springBoot整合JSP添加依赖  -->
		<!--servlet依赖 -->
		<dependency>
			<groupId>javax.servlet</groupId>
			<artifactId>javax.servlet-api</artifactId>
		</dependency>

		<!--jstl依赖 -->
		<dependency>
			<groupId>javax.servlet</groupId>
			<artifactId>jstl</artifactId>
		</dependency>

		<!--使jsp页面生效 html jsp-->
		<dependency>
			<groupId>org.apache.tomcat.embed</groupId>
			<artifactId>tomcat-embed-jasper</artifactId>
		</dependency>
2.3 添加web资源页面
说明: 在springBoot项目的根目录中添加webapp文件目录.格式如下
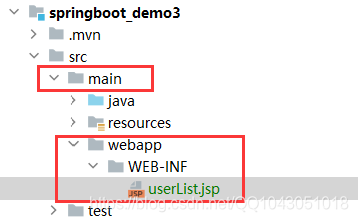
知识盲区
1)WEB-INF 是什么?
保护页面资源 所有的请求都必须经过Controller中转, 用户不能直接访问页面
userList.jsp
<%@ page language="java" contentType="text/html; charset=utf-8" pageEncoding="utf-8"%>
<%@ taglib uri="http://java.sun.com/jsp/jstl/core" prefix="c"%>
<!DOCTYPE html PUBLIC "-//W3C//DTD HTML 4.01 Transitional//EN" "http://www.w3.org/TR/html4/loose.dtd">
<html>
<head>
<title>您好Springboot</title>
</head>
<body>
	<table border="1px" width="65%" align="center">
		<tr>
			<td colspan="6" align="center"><h3>学生信息</h3></td>
		</tr>
		<tr>
			<th>编号</th>
			<th>姓名</th>
			<th>年龄</th>
			<th>性别</th>
		</tr>

        <!--c标签是用来获取request域中的数据   items="key获取的数据"  var="代表一个一个数据" -->
		<c:forEach items="${userList}" var="u">
			<tr><!--行级标签-->
				<th>${u.id}</th><!--列级标签-->
				<th>${u.name}</th>
				<th>${u.age}</th>
				<th>${u.sex}</th>
			</tr>
		</c:forEach>
	</table>
</body>
</html>
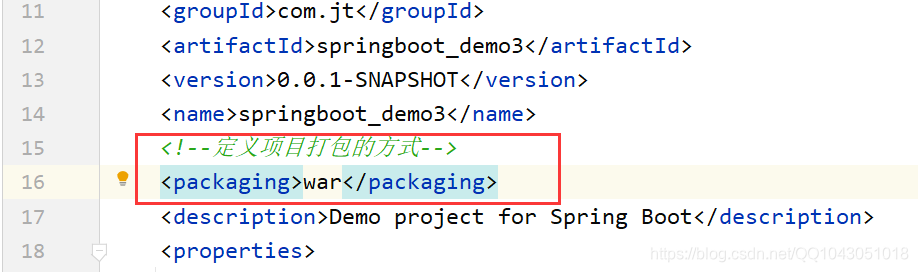
2).修改打包方式
2.4 编辑YML配置文件
application.yml
server:
  port: 8090
  servlet:
    context-path: /

spring:
  datasource:
    driver-class-name: com.mysql.cj.jdbc.Driver
    url: jdbc:mysql://127.0.0.1:3306/jtdb?serverTimezone=GMT%2B8&useUnicode=true&characterEncoding=utf8&autoReconnect=true&allowMultiQueries=true
    username: root
    password: root

#配置SpringMVC的视图解析器
  mvc:
    view:
      prefix: /WEB-INF/     # /默认代表根目录 src/main/webapp
      suffix: .jsp

#mybatis-plush配置
mybatis-plus:
  #定义别名包 作用: 以后封装POJO对象时自动进行拼接
  type-aliases-package: com.jt.pojo
  #引入mapper配置文件
  mapper-locations: classpath:/mybatis/mappers/*.xml
  #开启驼峰映射
  configuration:
    map-underscore-to-camel-case: true

#打印MybatisPlus执行sql日志
logging:
  level:
    com.jt.mapper: debug
2.5 业务需求说明
-
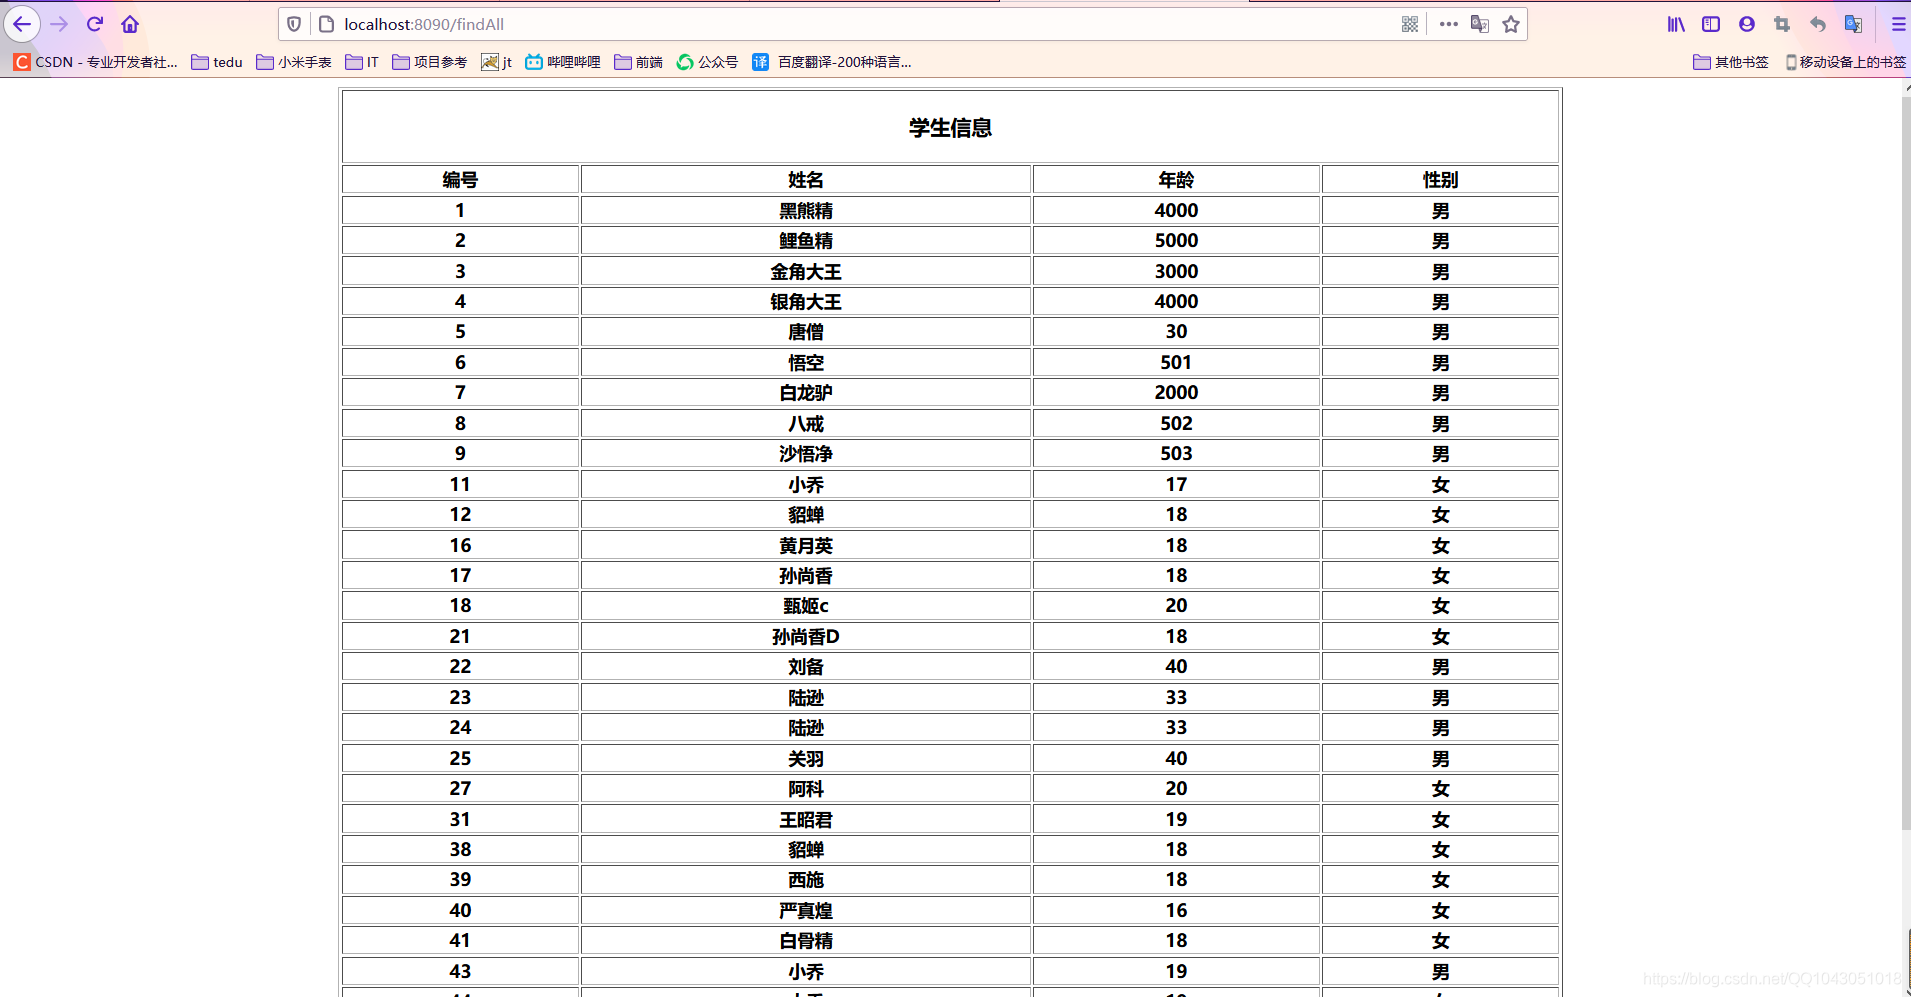
用户通过网址: http://localhost:8090/findAll
-
要求跳转到userList.jsp页面中 之后展现数据库user表所有记录
2.6 创建pojo实体类
User
@Data
@Accessors(chain = true)  //引入链式加载方式,重写set方法
@TableName
public class User {
    @TableId(type = IdType.AUTO) //设定主键自增
    private Integer id;
    private String name;
    private Integer age;
    private String sex;

}
2.7 创建mapper接口层
UserMapper
public interface UserMapper extends BaseMapper<User> {
}
给主启动类加上MapperScan注解
@SpringBootApplication
@MapperScan("com.jt.mapper")
public class SpringbootDemo3Application {

    public static void main(String[] args) {
        SpringApplication.run(SpringbootDemo3Application.class, args);
    }
}
2.8 创建Service层
UserService
public interface UserService {

    List<User> findAll();
}
UserServiceImpl
@Service
public class UserServiceImpl implements UserService{

    @Autowired
    private UserMapper userMapper;

    @Override
    public List<User> findAll() {

        return userMapper.selectList(null);
    }
}
2.9 创建Controller控制层
UserController
//@RestController //1.返回数据是JSON数据  2.表示Ajax请求的结束 3.返回值的是字符串本身
                  // 4.不会执行SpringMVC中的组件 视图解析器

@Controller //跳转到指定的页面中 会执行视图解析器 进行路径的拼接 前缀+后缀
public class UserController {

    @Autowired
    private UserService userService;
    /**
     * 请求用户请求: http://localhost:8090/findAll
     * 参数:  暂时没有
     * 返回值: 特定页面名称
     * 前缀:  /WEB-INF/
     * 页面名称: userList
     *  后缀: .jsp
     */
    //方式: 页面同步请求的方法
    @RequestMapping("/findAll")
    public String findAll(Model model){
        List<User> userList = userService.findAll();
        //目的:需要通过request对象将数据带到页面中进行展现
        //request.setAttribute("userList",userList);

        model.addAttribute("userList",userList);
        //springMVC中采用视图解析器的形式 添加 前缀+后缀
        return "userList";  //返回页面逻辑名称
    }
}
2.10 扩展 控制页面回显
userList.jsp
<%@ page language="java" contentType="text/html; charset=utf-8" pageEncoding="utf-8"%>
<%@ taglib uri="http://java.sun.com/jsp/jstl/core" prefix="c"%>
<!DOCTYPE html PUBLIC "-//W3C//DTD HTML 4.01 Transitional//EN" "http://www.w3.org/TR/html4/loose.dtd">
<html>
<head>
<title>您好Springboot</title>
</head>
<body>

   <div align="center">
	   <p>获取服务器响应的信息MSG:${msg}</p>
	   <br/>
	   <p>获取列表信息:${ids}</p>
	   获取列表结构数据:
	   <c:forEach items="${ids}" var="id">
		   ${id}
	   </c:forEach>
   </div>
   <br/>

	<table border="1px" width="65%" align="center">
		<tr>
			<td colspan="6" align="center"><h3>学生信息</h3></td>
		</tr>
		<tr>
			<th>编号</th>
			<th>姓名</th>
			<th>年龄</th>
			<th>性别</th>
		</tr>

        <!--c标签是用来获取request域中的数据   items="key获取的数据"  var="代表一个一个数据" -->
		<c:forEach items="${userList}" var="u">
			<tr><!--行级标签-->
				<th>${u.id}</th><!--列级标签-->
				<th>${u.name}</th>
				<th>${u.age}</th>
				<th>${u.sex}</th>
			</tr>
		</c:forEach>
	</table>
</body>
</html>
UserController
//@RestController //1.返回数据是JSON数据  2.表示Ajax请求的结束 3.返回值的是字符串本身
                  // 4.不会执行SpringMVC中的组件 视图解析器
@Controller //跳转到指定的页面中 会执行视图解析器 进行路径的拼接 前缀+后缀
public class UserController {

    @Autowired
    private UserService userService;
    /**
     * 请求用户请求: http://localhost:8090/findAll
     * 参数:  暂时没有
     * 返回值: 特定页面名称
     * 前缀:  /WEB-INF/
     * 页面名称: userList
     *  后缀: .jsp
     */

    //方式: 页面同步请求的方法
    @RequestMapping("/findAll")
    public String findAll(Model model){
        List<User> userList = userService.findAll();
        ArrayList<Integer> ids = new ArrayList<>();
        ids.add(1);
        ids.add(2);
        ids.add(3);
        //目的:需要通过request对象将数据带到页面中进行展现
        //request.setAttribute("userList",userList);


        model.addAttribute("userList",userList);
        model.addAttribute("msg", "你好springboot");
        model.addAttribute("ids", ids);
        //springMVC中采用视图解析器的形式 添加 前缀+后缀
        return "userList";  //返回页面逻辑名称
    }
}
2.11 修改工作目录

运行测试:
3 Web资源异步调用
3.1 业务说明
1.要求用户通过http://localhost:8090/toAjax请求,实现页面的跳转 ajax.jsp页面中
ajax.jsp
<%@ page language="java" contentType="text/html; charset=utf-8" pageEncoding="utf-8"%>
<%@ taglib uri="http://java.sun.com/jsp/jstl/core" prefix="c"%>
<!DOCTYPE html PUBLIC "-//W3C//DTD HTML 4.01 Transitional//EN" "http://www.w3.org/TR/html4/loose.dtd">
<html>
<head>
<title>您好AJAX</title>
</head>
<body>
	<table border="1px" width="65%" align="center">
		<tr>
			<td colspan="6" align="center"><h3>学生信息</h3></td>
		</tr>
		<tr>
			<th>编号</th>
			<th>姓名</th>
			<th>年龄</th>
			<th>性别</th>
		</tr>

	</table>
</body>
</html>
3.2 编辑UserController
说明:编辑UserController 实现页面跳转
 /**
     * 异步请求: 多次请求 多次响应
     * 实现页面跳转
     * URL网址: http://localhost:8090/toAjax
     * 跳转页面名称: ajax.jsp
     */
    @RequestMapping("/toAjax")
    public String toAjax(){

        //返回的应该是页面的逻辑名称
        return "ajax";
    }
3.3 关于Ajax说明
问题: 为什么Ajax可以实现异步调用呢???
同步和异步加载机制区别
核心部件: Ajax引擎
同步:
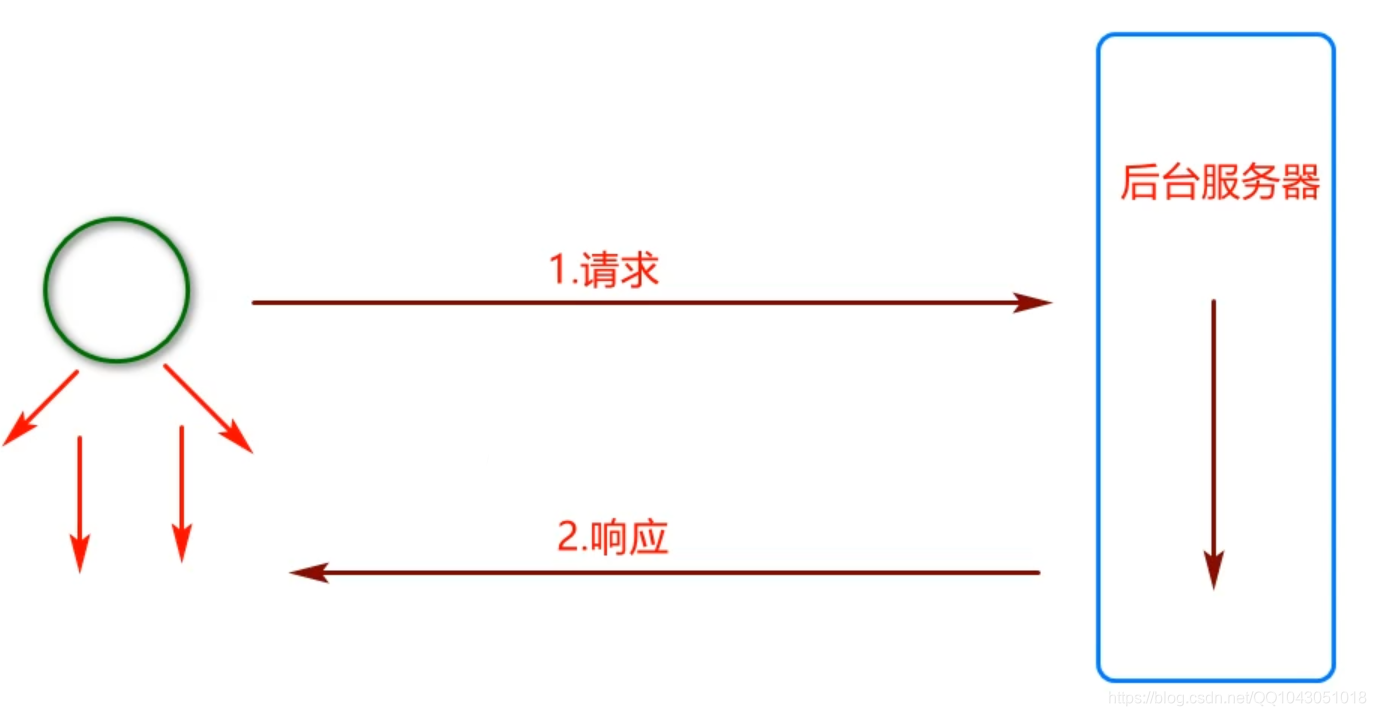
异步:

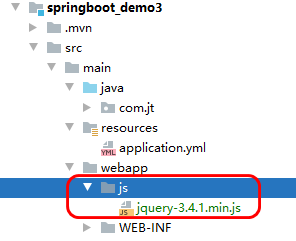
3.3 导入函数类库
1).复制JS到指定的目录中
3.4 编辑ajax.jsp页面
<%@ page language="java" contentType="text/html; charset=utf-8" pageEncoding="utf-8"%>
<%@ taglib uri="http://java.sun.com/jsp/jstl/core" prefix="c"%>
<!DOCTYPE html PUBLIC "-//W3C//DTD HTML 4.01 Transitional//EN" "http://www.w3.org/TR/html4/loose.dtd">
<html>
<head>
	<!-- 导入函数类库 -->
	<script src="../js/jquery-3.4.1.min.js"></script>

	<!-- 编辑页面JS -->
	<script>
		//让页面加载完成之后 再执行
		$(function(){

			/**
			 * 常见ajax种类:
			 * 		$.get("url地址","传递的参数",回调函数,返回值类型)
			 * 		$.post("url地址","传递的参数",回调函数,返回值类型)
			 * 		$.getJSON("url地址","传递的参数",回调函数)
			 * 		$.ajax({.....})
			 */

			/* 1.ajax常规用法 get请求

				参数说明:
					1.url地址     写法1: http://host:port/xxxx请求路径 跨域请求方式(别人的服务器)
								  写法2:	/xxxx		同域请求  访问的自己的服务器

					2.参数写法
								  写法1:	 {key1:value1,key2:value2}  {"id":1000}
								  写法2:  key1=value1&key2=value2    "id=1000&name=tomcat"
					3.回调函数
			 */
			$.get("/ajaxUser","id=1000&name=tomcat",function(result){
				//console.log(result)
				//alert("回调函数执行成功!!!!")
				//将返回值结果进行处理

				/* 基础for循环
				//var全局作用域、//let 局部作用域 出了for循环就失效了
				for(let i=0;i<result.length; i++){
					console.log(result[i])
				} */

				/* 增强for循环 in 表示将小标传递给index  */
				/* for(let index in result){
					console.log(result[index])
				} */

				/* of 将result集合的元素赋值给user */
				for(let user of result){
					let id = user.id
					let name = user.name
					let age = user.age
					let sex = user.sex
					let tr = "<tr align='center'><td>"+id+"</td><td>"+name+"</td><td>"+age+"</td><td>"+sex+"</td></tr>"
					//将tr元素追加到表格中
					$("#tab1").append(tr)
				}
			})
		})
	</script>

<title>您好Springboot</title>
</head>
<body>
	<table  id="tab1" border="1px" width="65%" align="center">
		<tr>
			<td colspan="6" align="center"><h3>学生信息</h3></td>
		</tr>
		<tr>
			<th>编号</th>
			<th>姓名</th>
			<th>年龄</th>
			<th>性别</th>
		</tr>
	</table>
</body>
</html>
3.5 编辑UserController
说明:实现页面ajax数据请求
 /**
     * 实现ajax业务调用
     * URL地址:  /ajaxUser
     * 参数:     id/name属性
     * 返回值:   List<User>
     */
    @RequestMapping("/ajaxUser")
    @ResponseBody
    public List<User> ajaxUser(Integer id,String name){
        System.out.println("id参数:"+id);
        System.out.println("name参数:"+name);
        return userService.findAll();
    }


 被折叠的 条评论
为什么被折叠?
被折叠的 条评论
为什么被折叠?
 到【灌水乐园】发言


