


wireshark解析自定义协议
1.自定义的lua放入路径
一般是自己软件的安装位置,也可以通过wireshark查看,这里我是直接放到init.lua同一路径就行

2.修改init.lua
2.1 开启lua

2.2 init.lua文件最后加入自己的lua文件位置,这里需要确保与自己的文件名相同

3.编写lua
--  这里custom_protocol 就是下一步在wireshark 新增协议的名字
-- 注册协议名称
local proto_custom = Proto("custom_protocol", "Custom Protocol")  -- 创建一个名为 "custom_protocol" 的协议,显示名称为 "Custom Protocol"

--下面的格式就是协议解析出来输出的格式,理论上前两个字段必填,base.DEC为输出的格式,DEC:十进制  HEX:十六进制 BIN:二进制
-- 定义协议字段
local f_dest_mac = ProtoField.bytes("custom_protocol.dest_mac", "Destination MAC")  -- 目标MAC地址字段
local f_src_mac = ProtoField.bytes("custom_protocol.src_mac", "Source MAC")  -- 源MAC地址字段
local f_eth_type = ProtoField.uint16("custom_protocol.eth_type", "Ethernet Type")  -- 以太网类型字段
local f_three_bit = ProtoField.uint8("custom_protocol.three_bit", "3-bit Field", base.DEC, nil, 0xE0)  -- 3位字段,位掩码为0xE0
local f_five_bit = ProtoField.uint8("custom_protocol.five_bit", "5-bit Field", base.DEC, nil, 0x1F)  -- 5位字段,位掩码为0x1F
local f_version = ProtoField.uint8("custom_protocol.version", "IP Version")  -- IP版本字段
local f_type = ProtoField.uint8("custom_protocol.type", "Type")  -- 类型字段
local f_length = ProtoField.uint16("custom_protocol.length", "Packet Length")  -- 包长度字段
local f_src_ip = ProtoField.ipv4("custom_protocol.src_ip", "Source IP")  -- 源IP地址字段
local f_dest_ip = ProtoField.ipv4("custom_protocol.dest_ip", "Destination IP")  -- 目标IP地址字段
local f_ttl = ProtoField.uint8("custom_protocol.ttl", "TTL")  -- 生存时间(TTL)字段
local f_flags = ProtoField.uint8("custom_protocol.flags", "Flags")  -- 标志字段
local f_proto_type = ProtoField.uint16("custom_protocol.proto_type", "Protocol Type")  -- 协议类型字段
local f_data_len = ProtoField.uint16("custom_protocol.data_len", "Data Length")  -- 数据长度字段
local f_data = ProtoField.string("custom_protocol.data", "Data")  -- 数据字段

-- 将字段添加到协议
proto_custom.fields = {  -- 将所有定义的字段添加到协议字段列表中
    f_dest_mac,
    f_src_mac,
    f_eth_type,
    f_three_bit,
    f_five_bit,
    f_version,
    f_type,
    f_length,
    f_src_ip,
    f_dest_ip,
    f_ttl,
    f_flags,
    f_proto_type,
    f_data_len,
    f_data
}

--buffer(offset, 1):bitfield(0, 3)  offset代表起始地址,1代表从起始地址开始的1字节  bitfield中0代表从这个字节的0bit开始, 3代表取三位(也就是取1字节的前3位)
--buffer(offset, 3):bitfield(4, 16)	这个就是取三字节中的4--20位
-- 解析函数
function proto_custom.dissector(buffer, pinfo, tree)
    -- 设置协议名称
    pinfo.cols.protocol = proto_custom.name  -- 将协议名称显示在协议列中

    -- 检查缓冲区长度是否足够
    local packet_len = buffer:len()
    if packet_len < 14 then  -- 如果包长度小于14字节,则退出解析
        return
    end

    -- 解析以太网头部
    local eth_dst_mac = buffer(0, 6)  -- 获取前6字节为目标MAC地址
    local eth_src_mac = buffer(6, 6)  -- 接下来的6字节为源MAC地址
    local eth_type = buffer(12, 2):uint()  -- 接下来的2字节为以太网类型

    -- 解析自定义二层字段
    local offset = 14  -- 偏移量设置为14,跳过以太网头部
    local three_bit = buffer(offset, 1):bitfield(0, 3)  -- 提取自定义字段的前3位
    local five_bit = buffer(offset, 1):bitfield(3, 5)  -- 提取剩下的5位

    -- 解析三层协议
    offset = offset + 1  -- 更新偏移量
    local version = buffer(offset, 1):uint()  -- 读取IP版本字段
    local type = buffer(offset + 1, 1):uint()  -- 读取类型字段
    local length = buffer(offset + 2, 2):uint()  -- 读取包长度字段
    local src_ip = buffer(offset + 4, 4):ipv4()  -- 读取源IP地址字段
    local dest_ip = buffer(offset + 8, 4):ipv4()  -- 读取目标IP地址字段
    local ttl = buffer(offset + 12, 1):uint()  -- 读取TTL字段
    local flags = buffer(offset + 13, 1):uint()  -- 读取标志字段

    -- 解析四层协议
    offset = offset + 14  -- 更新偏移量
    local proto_type = buffer(offset, 2):uint()  -- 读取协议类型字段
    local data_len = buffer(offset + 2, 2):uint()  -- 读取数据长度字段
    local data = buffer(offset + 4, data_len):string()  -- 读取数据字段

    -- 在树形视图中添加协议
    local custom_tree = tree:add(proto_custom, buffer(), "USLP")  -- 添加自定义协议的根节点到树形视图
    custom_tree:add(f_dest_mac, eth_dst_mac)  -- 显示目标MAC地址
    custom_tree:add(f_src_mac, eth_src_mac)  -- 显示源MAC地址
    custom_tree:add(f_eth_type, eth_type)  -- 显示以太网类型

    -- 添加 Layer 2 协议字段
    local layer2_tree = tree:add(proto_custom, buffer(), "TFDZ")  -- 添加自定义二层协议节点到树形视图
    layer2_tree:add(f_three_bit, buffer(14, 1))  -- 显示3位字段
    layer2_tree:add(f_five_bit, buffer(14, 1))  -- 显示5位字段

    -- 添加 Layer 3 协议字段
    local layer3_tree = tree:add(proto_custom, buffer(), "EPP")  -- 添加自定义三层协议节点到树形视图
    layer3_tree:add(f_version, version)  -- 显示IP版本
    layer3_tree:add(f_type, type)  -- 显示类型字段
    layer3_tree:add(f_length, length)  -- 显示包长度
    layer3_tree:add(f_src_ip, src_ip)  -- 显示源IP地址
    layer3_tree:add(f_dest_ip, dest_ip)  -- 显示目标IP地址
    layer3_tree:add(f_ttl, ttl)  -- 显示TTL
    layer3_tree:add(f_flags, flags)  -- 显示标志

    -- 添加 Layer 4 协议字段
	-- 假如这里需要将layer4_tree 假如到layer3_tree去,而不是单独显示则
	-- local layer4_tree = layer3_tree:add(proto_custom, buffer(), "IPE")
    local layer4_tree = tree:add(proto_custom, buffer(), "IPE")  -- 添加自定义四层协议节点到树形视图
    layer4_tree:add(f_proto_type, proto_type)  -- 显示协议类型
    layer4_tree:add(f_data_len, data_len)  -- 显示数据长度
    layer4_tree:add(f_data, data)  -- 显示数据字段
end

-- 147 要与抓包是写入的值相等
-- 注册 dissector 并绑定到 DLT 147
local wtap_encap_table = DissectorTable.get("wtap_encap")  -- 获取用于注册自定义协议的封装类型表
wtap_encap_table:add(147, proto_custom)  -- 将自定义协议绑定到封装类型147,用于指定的捕获文件格式
4.编写c抓包
这里需要注意的就是147一定与lua中的值相等
#include <sys/time.h>
#include <unistd.h>
#include <fcntl.h>
#include <stdio.h>
#include <stdlib.h>
#include <stdint.h>
#include <string.h>
#include <arpa/inet.h>

struct _timeval {
    uint32_t tv_sec;
    uint32_t tv_usec;
};

struct _pcap_pkthdr {
    struct _timeval ts;
    uint32_t caplen;
    uint32_t len;
};

struct pcap_global_header {
    uint32_t magic_number;
    uint16_t version_major;
    uint16_t version_minor;
    int32_t thiszone;
    uint32_t sigfigs;
    uint32_t snaplen;
    uint32_t network;
};

struct layer2_header {
    uint8_t dest_mac[6];
    uint8_t src_mac[6];
    uint16_t eth_type;
    uint8_t custom_field1:3;  // 3-bit 字段
    uint8_t custom_field2:5;  // 5-bit 字段
};

struct layer3_header {
    uint8_t version;
    uint8_t type;
    uint16_t length;
    uint32_t src_ip;
    uint32_t dest_ip;
    uint8_t ttl;
    uint8_t flags;
};

struct layer4_header {
    uint16_t proto_type;
    uint16_t data_len;
    uint8_t data[256];
};

int writePcap(int fd, char *buf, int len, struct timeval tv) {
    struct _pcap_pkthdr h;
    h.ts.tv_sec = (uint32_t)tv.tv_sec;
    h.ts.tv_usec = (uint32_t)tv.tv_usec;
    h.caplen = len;
    h.len = len;

    write(fd, &h, sizeof(h));
    write(fd, buf, len);

    return 0;
}

int writeGlobalHeader(int fd) {
    struct pcap_global_header global_header;
    global_header.magic_number = 0xa1b2c3d4;
    global_header.version_major = 2;
    global_header.version_minor = 4;
    global_header.thiszone = 0;
    global_header.sigfigs = 0;
    global_header.snaplen = 65535;
    global_header.network = 147;  // 自定义协议类型编号

    return write(fd, &global_header, sizeof(global_header)) == sizeof(global_header) ? 0 : -1;
}

int main() {
    int fd = open("./custom_protocol.pcap", O_CREAT | O_WRONLY | O_TRUNC, S_IRUSR | S_IWUSR);
    if (fd == -1) {
        perror("打开文件失败");
        return 1;
    }

    if (writeGlobalHeader(fd) != 0) {
        close(fd);
        return 1;
    }

    struct layer2_header l2 = {
        .dest_mac = {0xff, 0xff, 0xff, 0xff, 0xff, 0xff},
        .src_mac = {0x01, 0x02, 0x03, 0x04, 0x05, 0x06},
        .eth_type = htons(0x1234),
        .custom_field1 = 2,
        .custom_field2 = 8
    };

    struct layer3_header l3 = {
        .version = 4,
        .type = 1,
        .length = htons(20),
        .src_ip = htonl(0xC0A80001),
        .dest_ip = htonl(0xC0A80002),
        .ttl = 64,
        .flags = 2
    };

    struct layer4_header l4 = {
        .proto_type = htons(0x5678),
        .data_len = htons(5),
        .data = "hello"
    };

    uint8_t packet[1024];
    int len = 0;
    memcpy(packet, &l2, sizeof(l2));
    len += sizeof(l2);
    memcpy(packet + len, &l3, sizeof(l3));
    len += sizeof(l3);
    memcpy(packet + len, &l4, sizeof(l4));
    len += sizeof(l4);

    struct timeval tv;
    gettimeofday(&tv, NULL);

    writePcap(fd, (char*)packet, len, tv);

    close(fd);
    printf("Custom protocol pcap file generated successfully.\n");
    return 0;
}
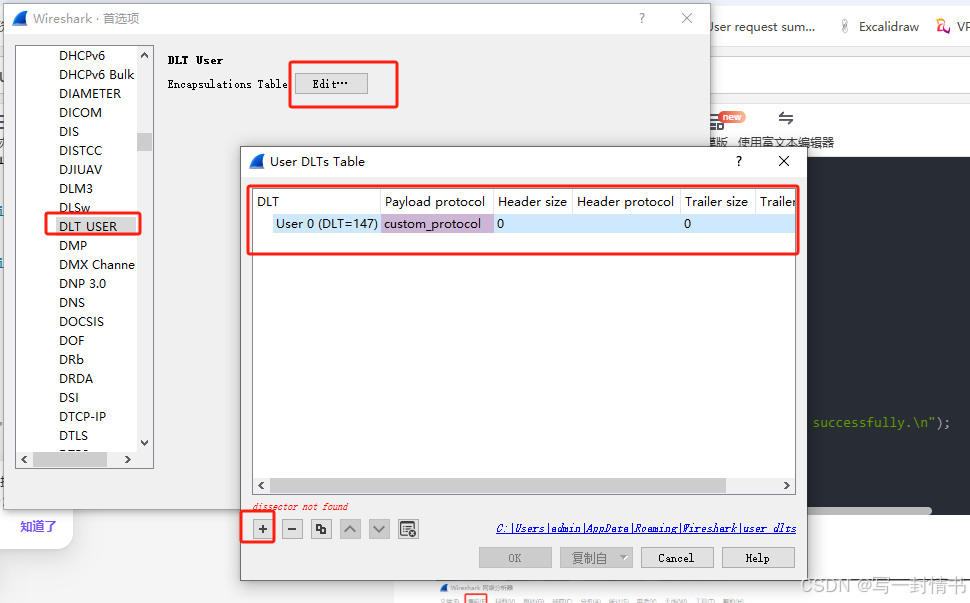
5.wireshark添加自定义协议

这里header size 写0 代表从开始解析协议
PS:lua中不要定义名字相同的变量
如何加调试信息
直接print(“value:”, value)
需要再lua console中查看
工具 --> lua -->console
这里需要打开后双击某个具体的数据包,才会打印解析函数中的print,如果是要打印解析函数外的print,则直接cmd执行wireshark.exe
简单记录方法,方便以后回顾,具体lua语法有需要自己百度一下~


 438
438

 被折叠的 条评论
为什么被折叠?
被折叠的 条评论
为什么被折叠?
 到【灌水乐园】发言


