


 本文介绍了ALWIP技术,该技术全称Affine linear weighted intra prediction,仅用于帧内亮度预测。其核心是训练矩阵,通过平均操作、矩阵向量乘法和双线性插值得到最终预测值。文中详细阐述了各步骤技术细节,还提及不同亮度块的预测模式及代码框架。
ALWIP技术全称是Affine linear weighted intra prediction
该技术是HHI在N次会议上提出的,在目前新发布的VTM5.0软件中已经更新。
该技术的核心就是训练矩阵,通过当前的亮度预测块的相邻采样点首先进行平均操作减少采样点数目,构成一个向量然后通过该向量和视频序列集去训练出一个参数矩阵,通过该矩阵和相邻采样点向量相乘得到一个部分预测值的散点阵列,最后通过双线性插值恢复出最终的预测值。
下面我要详细的给大家讲一下该技术的技术细节以及代码的分析
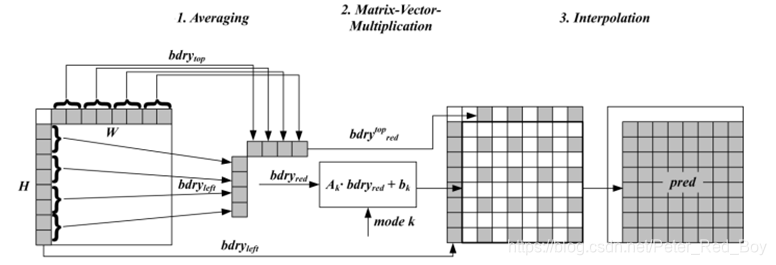
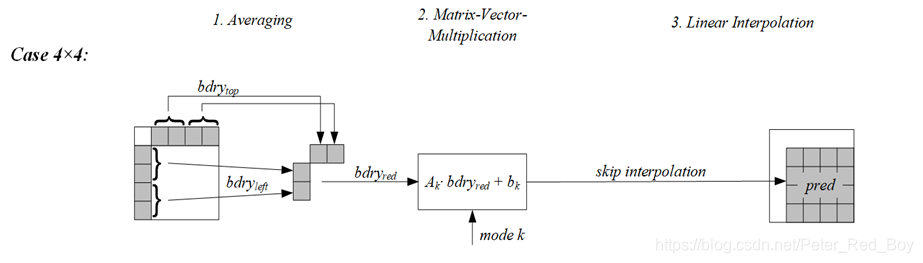
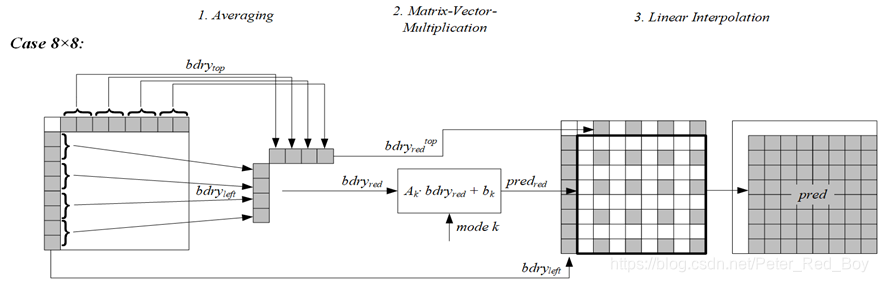
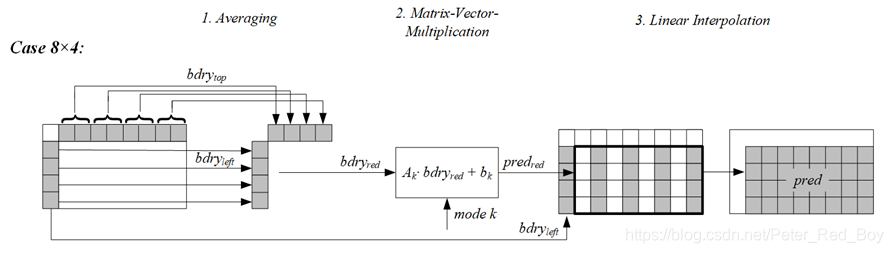
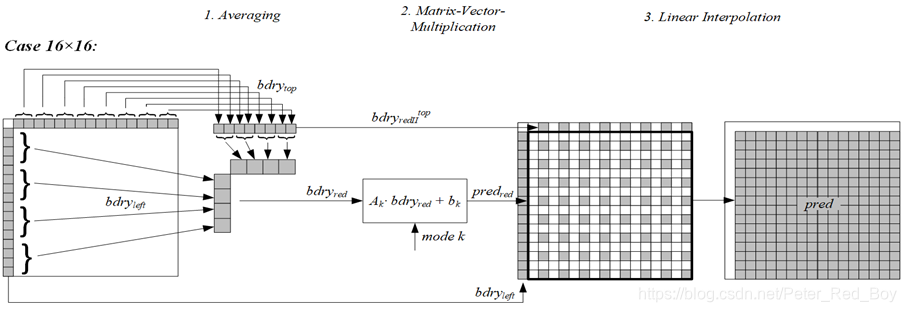
该技术的整体框架(分为三步):
(1) 对亮度块上和左参考行进行平均操作获得采样点(4或8个)
(2) 对得到的样本进行矩阵向量乘法 ,并加上一个偏移,得到部分预测值(4×4,4×8,8×4,8×8).
(3) 进行双线性插值获得最终亮度预测值
概述:
ALWIP技术只运用于帧内的亮度预测,在VTM5.0代码中的模式名称叫Mip模式
对于不同的W*H的亮度块,提出不同种预测模式(modes):
4×4的块增加35种模式;
8×4,4×8,8×8 增加19种模式;
其他的块增加11种模式。
int getNumModesMip(const Size& block)
{
  if (block.width > (4 * block.height) || block.height > (4 * block.width))
  {
    return 0;//如果预测块的宽高比过于大,超过4的话则不用Mip模式。模式数目为0
  }

  if( block.width == 4 && block.height == 4 )
  {
    return 35;//如果是4*4的块,有35种模式
  }
  else if (block.width <= 8 && block.height <= 8)
  {
    return 19;//如果是4*8或者8*4的块,有19种模式
  }
  else
  {
    return 11;//如果是8*8及以上的的块,有11种模式
  }
}
这里需要注意的是:亮度所允许的最大预测块是64×64,长和宽均不能超出这个限制
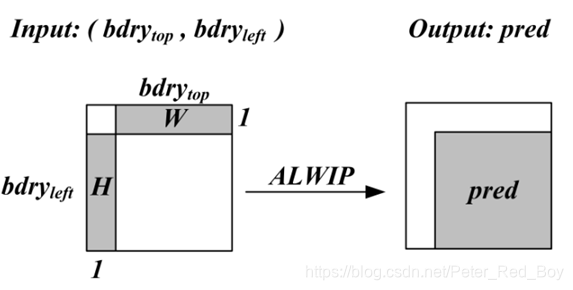
将当前编码块上一行和左一列的参考像素作为输入,输出为当前编码块的预测值:
一、ALWIP的平均操作

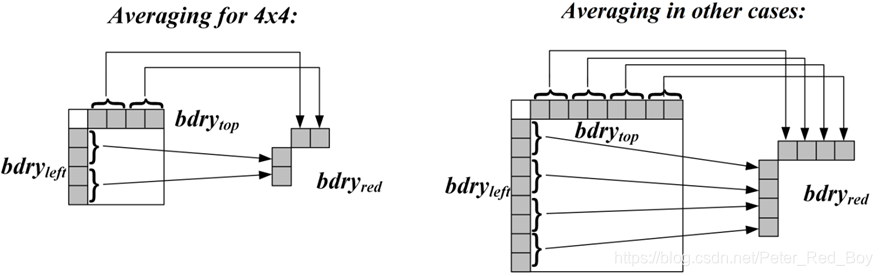
// 初始化缩减后的边界尺寸,即进行平均操作后的相邻参考行的尺寸
    if (m_blockSize.width > 4 || m_blockSize.height > 4)
    {
      m_reducedBoundarySize = Size(4, 4);//对于其他尺寸的块,每边各取4个点
    }
    else
    {
      m_reducedBoundarySize = Size(2, 2);//对于原始大小为4*4的块,每边各取2个点
    }

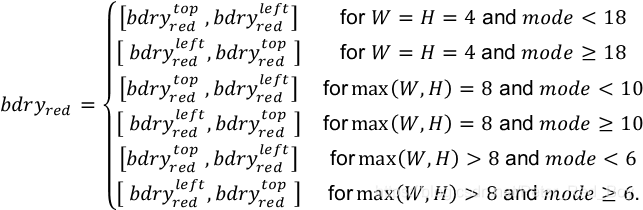
两小的向量组成一个一维的列向量用于后面的矩阵相乘运算
这里所谓的转置操作,实际就是将两个小的边界向量的前后位置调换一下。这种转置的具体步骤如下:
除此之外,如果块的宽和高都大于等于8的话,还需要对长边(两边相等时对W)进行另一个版本的平均操作以获取插值时需要的边界值。即对长边取8个平均值。
4×4的块 :4×4个预测值
4×8,8×4,8×8的块 : 4×4个预测值
其他尺寸的块 : 4×8;8×4;8×8个预测值
这里生成4×8;8×4的预测值的情况是种特殊处理的情况,在下面我会讲到
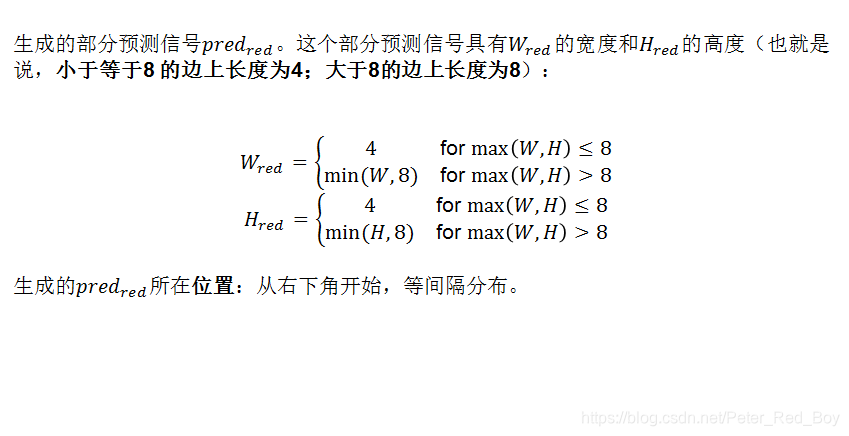
// 初始化缩减后的预测块尺寸
    if (m_blockSize.width <= 8 && m_blockSize.height <= 8)//对于当前为4*4,4*8,8*4的块,经过初步预测后的缩减预测块的尺寸为固定的4*4
    {
      m_reducedPredictionSize = Size(4, 4);
    }
    else//对于当前其余尺寸的块,经过初步预测后的缩减预测块的尺寸为4*8、8*4或者8*8
    {
      m_reducedPredictionSize = Size(std::min<SizeType>(m_blockSize.width, 8), std::min<SizeType>(m_blockSize.height, 8));
    }
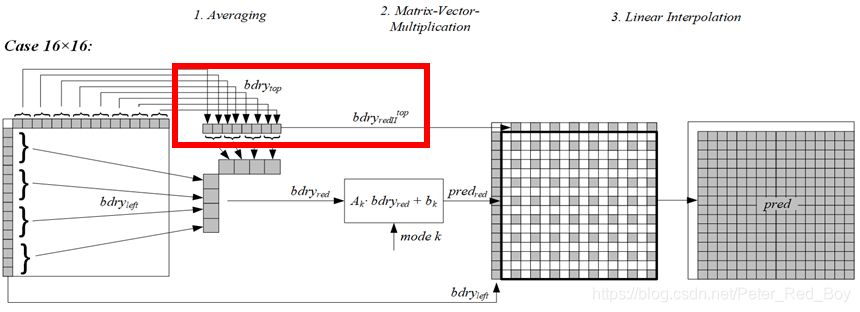
这里的红框所标记的地方就是上面所说的进行另一个版本的平均操作,因为对于大于8的长边只能是大于等于16的边,因此第一种平均操作后只能下采样为4个点,显然只用这4个点是无法进行最后如上图所示的插值操作,因此需要一个程度小一些的平均操作将长边下采样成8个点的边界值。
初步预测的预测块的大小之所以按照以上的规则进行分配,这和训练出来的参数具有不可分割的关系!
这是求平均操作的具体函数的入口以及详细的代码步骤,我都有详细的注释!!
boundaryDownsampling1D函数是最初的入口
void PredictorMIP::boundaryDownsampling1D( int* reducedDst, int* fullSrcAndIntermediateDst,
                                              const SizeType srcLen, const SizeType dstLen,
                                              const bool saveIntermediate, const SizeType intermediateLen )
  {
    SizeType currLen = srcLen;//srcLen表示当前块的长度
							  //dstLen表示目标所要的长度
    // Create intermediate boundary if needed.
    if( saveIntermediate && intermediateLen < srcLen )
    {
      CHECKD( intermediateLen < dstLen, "Intermediate length must not be less than target length." );
      doDownsampling( fullSrcAndIntermediateDst, fullSrcAndIntermediateDst, currLen, intermediateLen );
      currLen = intermediateLen;
    }

    if( dstLen < currLen )
    {
	  //通过下采样得到缩减的边界值,这里是真正下采样的入口
      doDownsampling( reducedDst, fullSrcAndIntermediateDst, currLen, dstLen );
    }
    else
    {
	  // 如果不需要下采样的话,则直接将边界值付给缩减的边界向量中
      for( SizeType i = 0; i < dstLen; ++i )
      {
        reducedDst[ i ] = fullSrcAndIntermediateDst[ i ];
      }
    }
  }
doDownsampling函数是真正进行计算的入口
void PredictorMIP::doDownsampling( int* dst, const int* src, const SizeType srcLen, const SizeType dstLen )
  {
	  //src是原始未下采样的边界亮度值
	  //dst是下采样后的边界亮度值

    // TODO: Check if src and dst can ever be negative. If not assign unsigned type and simplify rounding.
    const SizeType downsmpFactor = srcLen / dstLen;//下采样因子等于(原始边界长度/目标边界长度),即是采样间隔
    CHECKD( srcLen != dstLen * downsmpFactor, "Need integer downsampling factor." );//原始边界长度和目标边界长度之间必须满足能整除
    CHECKD( ( downsmpFactor & ( downsmpFactor - 1 ) ) != 0, "Need power of two downsampling factor." );//需要两个下采样因子的权重
    const int log2DownsmpFactor = g_aucLog2[ downsmpFactor ];//对下采样因子取对数,方便移位
	const int roundingOffsetPositive = (1 << (log2DownsmpFactor - 1));
	//如果边长为8,downsmpFactor=2,log2DownsmpFactor=1,roundingOffsetPositive=1
	//如果边长为16,downsmpFactor=4,log2DownsmpFactor=2,roundingOffsetPositive=2
	//如果边长为32,downsmpFactor=8,log2DownsmpFactor=3,roundingOffsetPositive=4
	//如果边长为64,downsmpFactor=16,log2DownsmpFactor=4,roundingOffsetPositive=8


    for( SizeType srcIdx = 0, dstIdx = 0; dstIdx < dstLen; ++dstIdx )
    {
      int sum = 0;
	  //downsmpFactor是采样间隔,每隔downsmpFactor个点,将前downsmpFactor个点的 亮度值相加,之后求均值得到下采样后的平均点
      for( SizeType blockIdx = 0; blockIdx < downsmpFactor; ++blockIdx, ++srcIdx )
      {
        sum += src[ srcIdx ];
      }
      const int roundingOffset = roundingOffsetPositive - ( sum < 0 ? 1 : 0 );//这个roundingOffset作用就是用于四舍五入的
      dst[ dstIdx ] = ( sum + roundingOffset ) >> log2DownsmpFactor;//这里求平均操作
    }
  }
接下来我讲一下矩阵相称的部分,大家就能进一步理解平均操作了
二、ALWIP的矩阵向量乘法
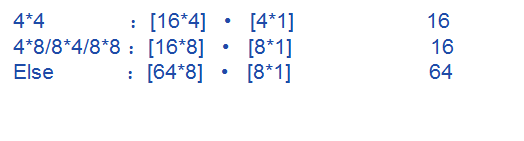
矩阵和偏移矢量根据块大小分为三组S_0,S_1,S_2。所有矩阵的偏移向量都是线下训练出来的:
集合S_0由18个矩阵?_0^?, ?∈{0, …, 17}组成,每个矩阵具有16行和4列以及18个偏移向量?_0^?, ?∈{0, …, 17},用于大小为4×4的块。
集合S_1由10个矩阵?_1^?, ?∈{0, …, 9}组成,每个矩阵具有16行和8列以及10个偏移向量?_1^?, ?∈{0, …, 9},用于大小为4×8,8×4和8×8的块。
集合S_2由6个矩阵?_2^?, ?∈{0, …, 5}组成,每个矩阵具有64行和8列以及6个偏移向量?_2^?, ?∈{0, …, 5},用于所有其他块形状。
int PredictorMIP::getWeightIdx( const int modeIdx ) const
  {
	  //m_numModes是每种形状的块的最大模式数量
	  //对于模式号大于m_numModes / 2 的需要进行折叠和小于m_numModes / 2 的使用相同矩阵
    if( modeIdx > m_numModes / 2 )
    {
      return modeIdx - m_numModes / 2;
    }
    else
    {
      return modeIdx;
    }
  }


 void PredictorMIP::getMatrixBias( const short*& matrix, const short*& bias, const int modeIdx ) const
  {
    const int idx = getWeightIdx( modeIdx );//得到当前块所需矩阵的索引号

    if( m_blockSize.width == 4 && m_blockSize.height == 4 )//对于4*4的块,共有18个参数矩阵和偏移矩阵
    {
      matrix = &mipMatrix4x4[idx][0][0];
      bias   = &mipBias4x4  [idx][0];
    }
    else if( m_blockSize.width <= 8 && m_blockSize.height <= 8 )//对于4*8,8*4,8*8的块,共有10个参数矩阵和偏移矩阵
    {
      matrix = &mipMatrix8x8[idx][0][0];
      bias   = &mipBias8x8  [idx][0];
    }
    else//其余大小的块,共有6个参数矩阵和偏移矩阵
    {
      matrix = &mipMatrix16x16[idx][0][0];
      bias   = &mipBias16x16  [idx][0];
    }
  }
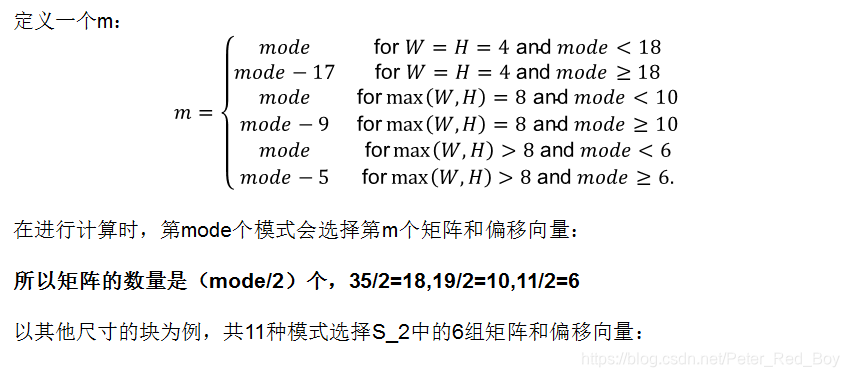
这里大家可能会疑惑,之前不是讲4×4的块有35种模式,4×8,8×4和8×8的块有19种模式,所有其他块形状有11种模式嘛,这里的矩阵数为啥减半了,难道不是一个模式对应一个矩阵吗?
对,没错,这里并不是一个模式对应一个矩阵,而是减半,不然的话训练代价和内存代价太大了!

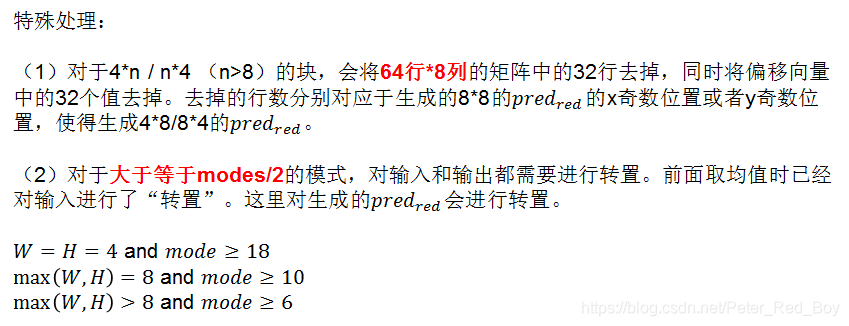
需要注意的是:当块尺寸为4×n(n>8)时会有特殊处理;此时生成4×8=32个预测值,这也是上面所提到的其余尺寸的块会生成三种预测块的大小
对于8×8及以上的块,可以使用全部的[64×8]矩阵和边界向量相乘后会生成8×8的预测值,而且在进行插值的时候每个边界都有足够的采样点去支持插值操作
但是对于4×n(n>8),如果使用全部的64×8]矩阵和边界向量相乘,也会得到一个8×8的预测值缓存,但是由于原始块有一边是4,初步的预测块的边长都比原始块的最小边长大,因此根本无法进行插值操作。因此仅需要使用[64×8]矩阵的一般去和边界向量相乘得到4×8=32个预测值!!

即,4×4的块,生成4×4的部分预测值;
4×8/8×4/8×8的块,生成4×4的部分预测值;
4×n(n>8)的块,生成4×8的部分预测值;
n×4(n>8)的块,生成8×4的部分预测值;
其他尺寸的块,生成8×8的部分预测值。
xComputeMatrixTimesRedBndryPlusBias函数是矩阵相乘的入口函数
  void PredictorMIP::xComputeMatrixTimesRedBndryPlusBias( int*const result, const int* const input,
                                                          const short*matrix, const short*bias,
                                                          const bool leaveHorOut, const bool leaveVerOut,
                                                          const int shiftMatrix, const int shiftBias,
                                                          const bool transpose, const bool needUpsampling )
  {
	//输入的缩减后的边界值的长度=上边界+左边界
    const int inputSize = m_reducedBoundarySize.width + m_reducedBoundarySize.height;

    // Use local buffer for transposed result if no upsampling will be done.
	//如果不进行上采样,则对转置结果使用本地的缓存亮度值。
    static_vector<int, MIP_MAX_REDUCED_OUTPUT_SAMPLES> resBufTransposed( m_reducedPredictionSize.area() );
    int*const resPtr = (transpose && !needUpsampling) ? resBufTransposed.data() : result;

    const int offset = 1 << (shiftMatrix - 1);
	//要求缩减后的边界长度必须是能被4整除
    CHECK(inputSize != 4 * (inputSize >> 2), "Error, input size not divisible by four");

    const short *weight = matrix;

    const int intermediateWidth  = transpose ? m_reducedPredictionSize.height : m_reducedPredictionSize.width;
    const int intermediateHeight = transpose ? m_reducedPredictionSize.width : m_reducedPredictionSize.height;
    const int xStep = leaveHorOut ? 2 : 1;
    const int yStep = leaveVerOut ? intermediateWidth : 0;

    int posRes  = 0;
    int posBias = 0;
	//具体的矩阵相乘步骤,可以忽略不做深入研究
    for (int y = 0; y < intermediateHeight; y++)
    {
      for (int x = 0; x < intermediateWidth; x++)
      {
        int tmp0 = 0;
        int tmp1 = 0;
        int tmp2 = 0;
        int tmp3 = 0;
        for (int i = 0; i < inputSize - 1; i += 4)
        {
          tmp0 += input[i]     * weight[i];
          tmp1 += input[i + 1] * weight[i + 1];
          tmp2 += input[i + 2] * weight[i + 2];
          tmp3 += input[i + 3] * weight[i + 3];
        }
        resPtr[posRes++] = ((tmp0 + tmp1 + tmp2 + tmp3) + (bias[posBias] << shiftBias) + offset) >> shiftMatrix;

        weight  += xStep * inputSize;
        posBias += xStep;
      }
      weight  += yStep * inputSize;
      posBias += yStep;
    }

    // 如果不进行上采样,则重新转置。
    if( transpose && !needUpsampling )
    {
      for( int y = 0; y < m_reducedPredictionSize.height; y++ )
      {
        for( int x = 0; x < m_reducedPredictionSize.width; x++ )
        {
          CHECKD( x * m_reducedPredictionSize.height + y >= m_reducedPredictionSize.area(), "error" );
          result[ y * m_reducedPredictionSize.width + x ] = resPtr[ x * m_reducedPredictionSize.height + y ];
        }
      }
    }
  }


} // namespace Mip
三、ALWIP的双线性插值
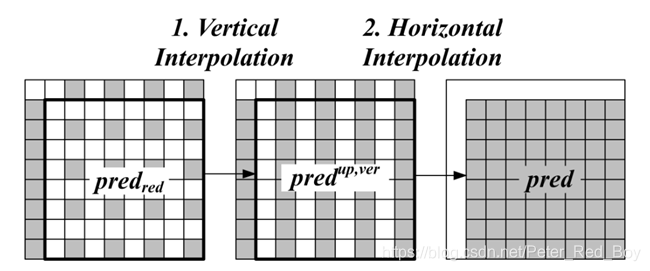
predictionUpsampling函数是双线性插值(即上采样过程)
void PredictorMIP::predictionUpsampling( int* const dst, const int* const src, const bool transpose ) const
{
// shorter side is upsampled first
//短边先向上采样
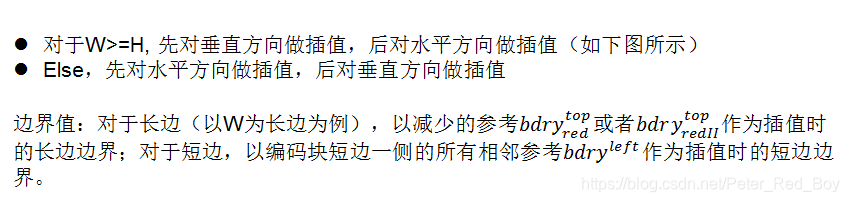
if( m_blockSize.height > m_blockSize.width )//若是块的高大于宽,则先对水平方向做插值
{
//垂直原始亮度
const int* verSrc = nullptr;
SizeType verSrcStep = 0;
SizeType verSrcStride = 0;
if( m_upsmpFactorHor > 1 )//上采样水平因子
{
const SizeType horSrcStep = transpose ? m_reducedPredictionSize.height : 1;
const SizeType horSrcStride = transpose ? 1 : m_reducedPredictionSize.width;
int* const horDst = dst + ( m_upsmpFactorVer - 1 ) * m_blockSize.width;
const SizeType horDstStride = m_upsmpFactorVer * m_blockSize.width;
//具体的插值计算函数入口
predictionUpsampling1D( horDst, src, m_boundaryForUpsamplingLeft.data(),
m_reducedPredictionSize.width, m_reducedPredictionSize.height,
horSrcStep, horSrcStride, 1, horDstStride,
m_upsmpFactorHor );
verSrc = horDst;
verSrcStep = horDstStride;
verSrcStride = 1;
}
else
{
verSrc = src;
verSrcStep = transpose ? 1 : m_blockSize.width;
verSrcStride = transpose ? m_reducedPredictionSize.height : 1;
}
predictionUpsampling1D( dst, verSrc, m_boundaryForUpsamplingTop.data(),
m_reducedPredictionSize.height, m_blockSize.width,
verSrcStep, verSrcStride, m_blockSize.width, 1,
m_upsmpFactorVer );
}
else//若是块的宽大于等于高,则先对垂直方向做插值
{
const int* horSrc = nullptr;
SizeType horSrcStep = 0;
SizeType horSrcStride = 0;
if( m_upsmpFactorVer > 1 )
{
const SizeType verSrcStep = transpose ? 1 : m_reducedPredictionSize.width;
const SizeType verSrcStride = transpose ? m_reducedPredictionSize.height : 1;
int* const verDst = dst + ( m_upsmpFactorHor - 1 );
const SizeType verDstStep = m_blockSize.width;
const SizeType verDstStride = m_upsmpFactorHor;
predictionUpsampling1D( verDst, src, m_boundaryForUpsamplingTop.data(),
m_reducedPredictionSize.height, m_reducedPredictionSize.width,
verSrcStep, verSrcStride, verDstStep, verDstStride,
m_upsmpFactorVer );
horSrc = verDst;
horSrcStep = verDstStride;
horSrcStride = verDstStep;
}
else
{
horSrc = src;
horSrcStep = transpose ? m_blockSize.height : 1;
horSrcStride = transpose ? 1 : m_reducedPredictionSize.width;
}
predictionUpsampling1D( dst, horSrc, m_boundaryForUpsamplingLeft.data(),
m_reducedPredictionSize.width, m_blockSize.height,
horSrcStep, horSrcStride, 1, m_blockSize.width,
m_upsmpFactorHor );
}
}
四、ALWIP的流程举例
五、ALWIP的代码总框架
void MatrixIntraPrediction::prepareInputForPred(const CPelBuf &src, const Area& puArea, const int bitDepth, const AvailableInfo &availInfo)
{
	//推导边界数据,是为后续的预测所做的一些准备工作
  m_predictorMip.deriveBoundaryData(src, puArea, bitDepth, availInfo);
}

void MatrixIntraPrediction::predBlock( const Size &puSize, const int intraMode, PelBuf& dst, const int bitDepth )
{
  static_vector<int, MIP_MAX_WIDTH * MIP_MAX_HEIGHT> predMip(puSize.area());
  int* const resultMip = predMip.data();
  //这是真正开始Mip预测的入口函数
  m_predictorMip.getPrediction(resultMip, intraMode, bitDepth);

  for (int y = 0; y < puSize.height; y++)
  {
    for (int x = 0; x < puSize.width; x++)
    {
	//对每一个上采样后的预测值进行最后的嵌位,Mip预测结束
      dst.at(x, y) = Pel(ClipBD<int>(resultMip[y * puSize.width + x], bitDepth));
    }
  }
}
deriveBoundaryData(),这是为后续的预测所做的一些准备工作的函数入口
void PredictorMIP::deriveBoundaryData(const CPelBuf& src, const Area& block, const int bitDepth, const AvailableInfo &availInfo)
  {
	  //Step 1: 保存块的尺寸,并且计算对应的值,初始化预测块的各种参数
    initPredBlockParams(block);

    // Step 2: Get the input data (left and top reference samples)
	// Step 2: 得到输入的数据(左相邻和上相邻的样本数)
    const int defaultPad = int(1 << (bitDepth - 1));

    // TOP (save top boundary since we might need it for upsampling)
	// Top(保存上边界,因为我们可能需要去用它做上采样插值操作)
    m_boundaryForUpsamplingTop.resize( block.width );
    const int availPosTop = availInfo.maxPosTop;
    CHECKD(availPosTop > block.width, "Error: availPosTop out of range");

    if (availPosTop > 0)
    {
      // top available
      const Position posT0(block.x, block.y - 1);
      for (int x = 0; x < availPosTop; x++)
      {
        m_boundaryForUpsamplingTop[ x ] = src.at( posT0.offset( x, 0 ) );//存入用于上采样用的上边界值
      }
      // top unavailable
      const int padVal = m_boundaryForUpsamplingTop[ availPosTop - 1 ];
      for( int x = availPosTop; x < m_boundaryForUpsamplingTop.size(); x++ )
      {
        m_boundaryForUpsamplingTop[ x ] = padVal;
      }
    }
    else
    {
      std::fill( m_boundaryForUpsamplingTop.begin(), m_boundaryForUpsamplingTop.end(), defaultPad );
    }

    // LEFT (save left boundary since we might need it for upsampling)
	// LEFT(保存左边界,因为我们可能需要去用它做上采样插值操作)
    m_boundaryForUpsamplingLeft.resize( block.height );
    const int availPosLeft = availInfo.maxPosLeft;
    CHECKD(availPosLeft > block.height, "Error: availPosLeft out of range");

    if (availPosLeft > 0)
    {
      // left available
      const Position posL0(block.x - 1, block.y);
      for (int y = 0; y < availPosLeft; y++)
      {
        m_boundaryForUpsamplingLeft[ y ] = src.at( posL0.offset( 0, y ) );//存入用于上采样用的左边界值
      }
      // left unavailable
      const int padVal = m_boundaryForUpsamplingLeft[ availPosLeft - 1 ];
      for( int y = availPosLeft; y < m_boundaryForUpsamplingLeft.size(); y++ )
      {
        m_boundaryForUpsamplingLeft[ y ] = padVal;
      }
    }
    else
    {
      std::fill( m_boundaryForUpsamplingLeft.begin(), m_boundaryForUpsamplingLeft.end(), defaultPad );
    }

    // Step 3: Compute the reduced boundary via Haar-downsampling (input for the prediction and intermediate boundary for upsampling)
	// Step 3: 通过HAAR下采样(用于预测的输入和上采样的中间边界)计算缩减边界
	m_reducedBoundary          .resize( m_reducedBoundarySize.width + m_reducedBoundarySize.height );
    m_reducedBoundaryTransposed.resize( m_reducedBoundarySize.width + m_reducedBoundarySize.height );

    const bool needVerticalUpsampling = ( m_upsmpFactorVer > 1 );
    int* const topReduced = m_reducedBoundary.data();
	//该函数就是进入边界下采样的函数入口
    boundaryDownsampling1D( topReduced, m_boundaryForUpsamplingTop.data(), block.width, m_reducedBoundarySize.width, needVerticalUpsampling, m_boundarySizeForUpsampling.width );
    m_boundaryForUpsamplingTop.resize( needVerticalUpsampling ? m_boundarySizeForUpsampling.width : 0 );

    const bool needHorizontalUpsampling = ( m_upsmpFactorHor > 1 );
    int* const leftReduced = m_reducedBoundary.data() + m_reducedBoundarySize.width;
    boundaryDownsampling1D( leftReduced, m_boundaryForUpsamplingLeft.data(), block.height, m_reducedBoundarySize.height, needHorizontalUpsampling, m_boundarySizeForUpsampling.height );
    m_boundaryForUpsamplingLeft.resize( needHorizontalUpsampling ? m_boundarySizeForUpsampling.height : 0 );

    int* const leftReducedTransposed = m_reducedBoundaryTransposed.data();
    int* const topReducedTransposed  = m_reducedBoundaryTransposed.data() + m_reducedBoundarySize.height;
    for( int x = 0; x < m_reducedBoundarySize.width; x++ )
    {
      topReducedTransposed[ x ] = topReduced[ x ];
    }
    for( int y = 0; y < m_reducedBoundarySize.height; y++ )
    {
      leftReducedTransposed[ y ] = leftReduced[ y ];
    }
  }
这是正式预测的函数总入口:
void PredictorMIP::getPrediction(int* const result, const int modeIdx, const int bitDepth)
  {
    const bool transpose = isTransposed( modeIdx );//根据模式号判断是否需要对边界向量进行转置
    const bool needUpsampling = ( m_upsmpFactorHor > 1 ) || ( m_upsmpFactorVer > 1 );//进行上采样插值的条件

    const short* matrix;//选用的矩阵
    const short* bias;//参数矩阵的偏移
    getMatrixBias( matrix, bias, modeIdx );//此函数是通过模式号来得到相应的相乘矩阵

    int shiftMatrix = 0;//移位矩阵
    int shiftBias = 0;//移位矩阵的偏移

	//此函数是通过模式号来得到相应的移位矩阵
    getShifts(shiftMatrix, shiftBias, modeIdx, bitDepth );

	//对于4×n(n>8)的块需要进行特殊处理,将参数矩阵减少一半
    bool leaveHorOut = ( m_blockSize.width == 4 && m_blockSize.height >= 16 );//如果宽为4,则将矩阵水平截断
    bool leaveVerOut = ( m_blockSize.height == 4 && m_blockSize.width >= 16 );//如果高为4,则将矩阵垂直截断
    if (transpose)
    {
      std::swap(leaveHorOut, leaveVerOut);
    }

	//bufReducedPred保存初步预测后缩减的预测值的buff
    static_vector<int, MIP_MAX_REDUCED_OUTPUT_SAMPLES> bufReducedPred( m_reducedPredictionSize.area() );
    int* const       reducedPred     = needUpsampling ? bufReducedPred.data() : result;//缩减的预测值
    const int* const reducedBoundary = transpose ? m_reducedBoundaryTransposed.data() : m_reducedBoundary.data();//缩减的边界值

	//这是矩阵相乘的函数入口
    xComputeMatrixTimesRedBndryPlusBias( reducedPred, reducedBoundary, matrix, bias,
                                         leaveHorOut, leaveVerOut,
                                         shiftMatrix, shiftBias,
                                         transpose, needUpsampling );
    // Reduced prediction is transposed if ( transpose && needUpsampling ).

    if( needUpsampling )//如果需要上采样
    {
      predictionUpsampling( result, reducedPred, transpose );
    }
  }


 1019
1019

 被折叠的 条评论
为什么被折叠?
被折叠的 条评论
为什么被折叠?
 到【灌水乐园】发言


