


目录
1.请求转发的实例
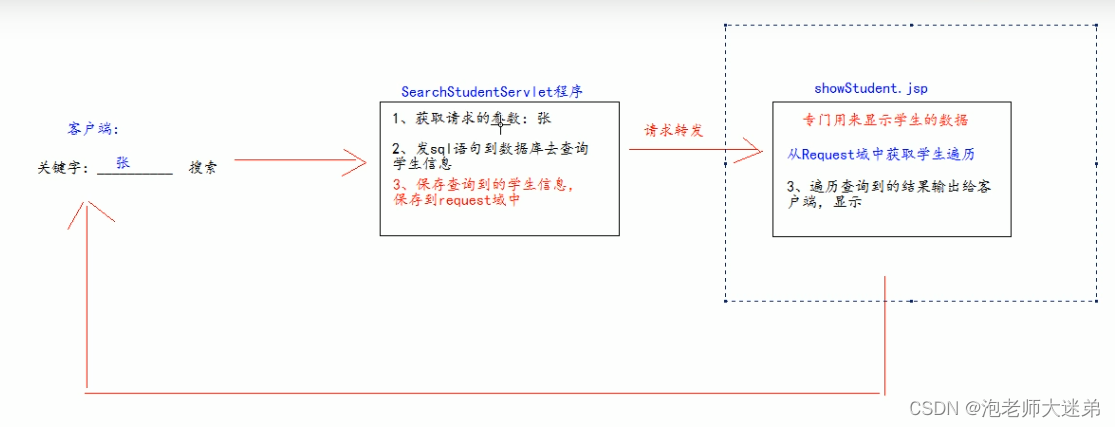
1.SearchStudentServlet程序
package com.atguigu.servlet;

import com.atguigu.pojo.Student;

import javax.servlet.ServletException;
import javax.servlet.http.HttpServlet;
import javax.servlet.http.HttpServletRequest;
import javax.servlet.http.HttpServletResponse;
import java.io.IOException;
import java.util.ArrayList;
import java.util.List;

public class SearchStudentServlet extends HttpServlet {
    @Override
    protected void doGet(HttpServletRequest req, HttpServletResponse resp) throws ServletException, IOException {
        //获取请求参数

        //发sql语句查询学生的信息
        //使用for循环生成查询到的数据做模拟
        List<Student> studentList = new ArrayList<Student>();
        for(int i=0;i<10;i++){
            int t=i+1;
            studentList.add(new Student(t,"name"+t,18+t,"phone"+t));
        }

        //保存查询的结果(学生信息)到request域中
        req.setAttribute("stuList",studentList);
        //请求转发到showStudent.jsp页面
        req.getRequestDispatcher("/test/showStudent.jsp").forward(req,resp);


    }


}
2.showStudent.jsp页面
<%@ page import="com.atguigu.pojo.Student" %>
<%@ page import="java.util.List" %>
<%@ page import="java.util.ArrayList" %><%--
  Created by IntelliJ IDEA.
  User: Administrator
  Date: 2021/12/9
  Time: 20:47
  To change this template use File | Settings | File Templates.
--%>
<%@ page contentType="text/html;charset=UTF-8" language="java" %>
<html>
<head>
    <title>Title</title>
    <style>
        table{
            width: 600px;
            border: 1px red solid;
            border-collapse: collapse;
        }
        td,th{
            width: 600px;
            border: 1px red solid;
            border-collapse: collapse;
         }
    </style>
</head>
<body>
<%-- jsp输出一个表格,里面有10个学生的信息   --%>

    <%
        List<Student> studentList = (List<Student>) request.getAttribute("stuList");

    %>

    <table>
        <tr>
            <td>编号</td>
            <td>姓名</td>
            <td>年龄</td>
            <td>电话</td>
            <td>操作</td>
        </tr>
    <% for(Student student: studentList){ %>
        <tr>
            <td><%=student.getId() %></td>
            <td><%=student.getName() %></td>
            <td><%=student.getAge()%></td>
            <td><%=student.getPhone()%></td>
            <td>删除,修改</td>
        </tr>
    <% } %>
    </table>

</body>
</html>
3.配置web.xml文件
<?xml version="1.0" encoding="UTF-8"?>
<web-app xmlns="http://xmlns.jcp.org/xml/ns/javaee"
         xmlns:xsi="http://www.w3.org/2001/XMLSchema-instance"
         xsi:schemaLocation="http://xmlns.jcp.org/xml/ns/javaee http://xmlns.jcp.org/xml/ns/javaee/web-app_4_0.xsd"
         version="4.0">

    <servlet>
        <servlet-name>SearchStudentServlet</servlet-name>
        <servlet-class>com.atguigu.servlet.SearchStudentServlet</servlet-class>
    </servlet>
    <servlet-mapping>
        <servlet-name>SearchStudentServlet</servlet-name>
        <url-pattern>/searchStudentServlet</url-pattern>
    </servlet-mapping>
</web-app>4.访问的地址:http://localhost:8080/08_jsp/searchStudentServlet
2.什么是Listener监听器
1.Listener监听器它是javaWeb的三大组件之一。JavaWeb三大组件分别是:Servlet程序, Filter过滤器,Listener监听器。
2.Listener它是javaEE的规范,就是接口;
3.监听器的作用是,监听某种事物的变化。然后通过回调函数,反馈给客户(程序)去做
一些相应的处理。
2.1ServletContextListener监听器
ServletContextListener 它可以监听ServletContext对象的创建和销毁。
ServletContext对象 在web工程启动的时候创建,在web工程停止的时候销毁。
监听到创建和销毁之后会分别调用ServletContextListener 监听器方法反馈。
两个方法分别是:
public interface ServletContextListener extends EventListener {
    default void contextInitialized(ServletContextEvent sce) {

// 在ServletContext 对象创建之后马上调用,做初始化

    }

    default void contextDestroyed(ServletContextEvent sce) {

//在ServletContext 对象销毁之后调用
    }
}
如何使用ServletContextListener 监听器监听ServletContext对象。
使用步骤:
1.编写一个类去实现ServletContextListener;
2. 实现其两个回调方法;
3.到web.xml中配置监听器;
package com.atguigu.listener;

import javax.servlet.ServletContextEvent;
import javax.servlet.ServletContextListener;

public class MyServletContextListenerImpl implements ServletContextListener {
    @Override
    public void contextInitialized(ServletContextEvent sce) {
        System.out.println("ServletContext 对象被创建了");
    }

    @Override
    public void contextDestroyed(ServletContextEvent sce) {
        System.out.println("ServletContext 对象被销毁了");
    }
}
在web.xml文件中配置即可
    <listener>
        <listener-class>com.atguigu.listener.MyServletContextListenerImpl</listener-class>
    </listener>


 3921
3921

 被折叠的 条评论
为什么被折叠?
被折叠的 条评论
为什么被折叠?
 到【灌水乐园】发言


