


 本文介绍了Mybatis-Plus的基本概念,解释了为何在Spring Boot项目中使用它以简化开发。通过分析源码,揭示了Mybatis-Plus的工作流程。接着,详细展示了从配置依赖、设置实体类到实现CRUD操作的整合步骤,帮助读者快速上手。
Mybatis-plus简介
什么是Mybatis-Plus
MyBatis-Plus(简称 MP)是一个 MyBatis 的增强工具,在 MyBatis 的基础上只做增强不做改变,为简化开发、提高效率而生。
为什么要学习Mybatis-Plus
我们已经学习过Mybatis这个框架,我们只需要在dao层定义抽象接口,基于Mybatis零实现的特性,就可以实现对数据库的crud操作。在业务类型比较多的时候,我们需要重复的定义一堆功能类似的接口方法。
使用Mybatis-plus工具,我们只需要将我们定义的抽象接口,继承一个公用的 BaseMapper<T> 接口,就可以获得一组通用的crud方法,来操作数据库。使用Mybatis-plus时,甚至都不需要任何的xml映射文件或者接口方法注解,真正的dao层零实现。
源码分析
基于映射的原理MyBatis-plus 必然要解决两个问题
1、Mapper中的方法与 SQL 语句的对应转化
2、Mapper 如何 操作数据库
可以从以下两个类的源码来分析Mybatis-plus执行流程
- 自动配置类 :
MybatisPlusAutoConfiguration
@EnableConfigurationProperties({MybatisPlusProperties.class})
public class MybatisPlusAutoConfiguration implements InitializingBean {
	...
}
- 配置项绑定==》 mybatis-plus: xxx 就是对mybatis-plus的配置
@ConfigurationProperties(
    prefix = "mybatis-plus"
)
public class MybatisPlusProperties {
	...
}
整合查询Demo
准备工作
- idea推荐安装
MybatisX插件,这样可以方便mapper文件和接口的跳转
第一步:导入Mybatis plus依赖
Mybatis-Plus并没有提供单独的jar包,而是通过Maven(或者gradle)来管理jar依赖。
Mybatis-Plus是基于Spring框架实现的,因此使用Mybatis-Plus,必须导入Spring相关依赖。
<dependency>
	<groupId>com.baomidou</groupId>
	<artifactId>mybatis-plus-boot-starter</artifactId>
	<version>3.4.2</version>
</dependency>
第二步:配置application.yaml文件
#关闭模板引擎缓存
spring:
  thymeleaf:
    cache: false
  #国际化配置
  messages:
    basename: i18n.login
  #数据库配置
  datasource:
    #使用druid数据源
    type: com.alibaba.druid.pool.DruidDataSource
    username: root
    password: root
    url: jdbc:mysql://localhost:3306/blogverson1?serverTimezone=UTC&useUnicode=true&characterEncoding=utf-8
#配置端口号
server:
  port: 8080

#整合mybatis plus
mybatis-plus:
  type-aliases-package: com.loki.pojo
  mapper-locations: classpath:mapper/*.xml
  #关闭属性名大写自动转换
  configuration:
    map-underscore-to-camel-case: false
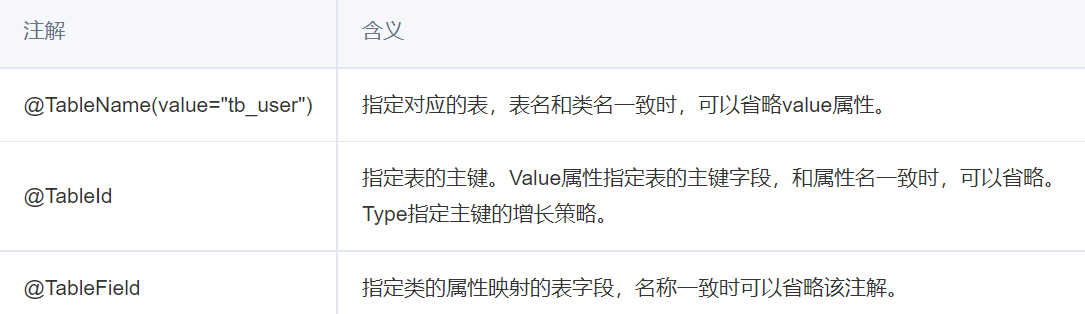
第三步:创建实体类
Mybatis-Plus基于一组注解来解决实体类和数据库表的映射问题
@Data
@AllArgsConstructor
@NoArgsConstructor
//指定对应的表,表名和类名一致时,可以省略value属性。
@TableName("user")
public class User {
    //指定类的属性映射的表字段,名称一致时可以省略该注解。
    @TableId("username")
    private String username;
    @TableField("password")
    private String password;
}
第四步:创建UserMapper接口
只需要继承BaseMapper公共接口
public interface UserMapper extends BaseMapper<User> {
    /**
     * 自定义方法,展示所有用户的用户名
     * @return 用户名集合
     */
    @Select("select u_name from tb_user")
    List<String> listAllUsername();
}
第五步:编写service层
mybatis-plus 还提供了 Service 层的快速实现。同样不需要写任何实现方法,即可轻松构建 Service 层
//泛型中写入要操作的pojo类
public interface UserService extends IService<User> {
}
第六步:编写service接口的实现类
/**
 * 继承 ServiceImpl,实现 UserService 接口
 *      ServiceImpl:该类实现了 IService 接口,需要两个泛型参数
 *          参数1:对应的 Mapper 类
 *          参数2:对应的 Pojo 类
 */
@Service
public class UserServiceImpl extends ServiceImpl<UserMapper, User> implements UserService {
}
第六步:Controller层
在启动类中使用
@MapperScan(basePackages= "com.loki.mapper")批量扫描Mapper接口
//测试代码
@Test
public void serviceTest() {
    IPage iPage = userService.page(new Page(1L, 2), null);
    System.out.println("current page: " + iPage.getCurrent());//当前页
    System.out.println("total pages: " + iPage.getPages());//总页数
    System.out.println("total records: " + iPage.getTotal());//总记录数
    System.out.println("page size: " + iPage.getSize());
    System.out.println("records: " + iPage.getRecords());
}
@Controller
public class TestController {
    @Autowired
    BookService bookService;//创建一个service层对象
    @RequestMapping("/test01")
    //从前端传入参数--当前页码,默认值为1
    public String test01(@RequestParam(value = "pn",defaultValue = "1")Integer pn,Model model){
        //参数:当前页码,每页几条记录
        Page<Books> bookPage = new Page<>(pn, 5);
        Page<Books> page = bookService.page(bookPage,null);
        model.addAttribute("page",page);
        return "test";
    }
}
前端部分代码
<!-- 搭建显示页面 -->
<div class="container">
    <!-- 标题 -->
    <div class="row">
        <div class="col-md-12">
            <h1>员工信息管理系统</h1>
        </div>
    </div>
    <!-- 显示表格数据 -->
    <div class="row">
        <div class="col-md-12">
            <table class="table table-striped">
                <tr>
                    <th>ID</th>
                    <th>书名</th>
                    <th>数量</th>
                    <th>内容</th>
                </tr>
                <tr th:each="book:${page.records}">
                    <td th:text="${book.bookID}"></td>
                    <td th:text="${book.bookName}"></td>
                    <td th:text="${book.bookCounts}"></td>
                    <td th:text="${book.detail}"></td>
                </tr>
            </table>
        </div>
    </div>
     <!-- 显示分页信息 -->
    <div class="row">
        <!-- 分页文字信息 -->
        <div class="col-md-6">
            当前第 [[${page.current}]] 页,总 [[${page.pages}]] 页,总共有 [[${page.total}]] 条记录
        </div>
        <!-- 分页条信息 -->
        <div class="col-md-6">
            <nav aria-label="Page navigation example">
                <ul class="pagination justify-content-end">
                    <li class="page-item disabled">
                        <a class="page-link" href="#" tabindex="-1" aria-disabled="true">上一页</a>
                    </li>
                    <li th:class="${num==page.current?'page-item active':'page-item'}" th:each="num:${#numbers.sequence(1,page.pages)}">
                        <a class="page-link" th:href="@{/test01(pn=${num})}">[[${num}]]</a>
                    </li>

                    <li class="page-item">
                        <a class="page-link" href="#">下一页</a>
                    </li>
                </ul>
            </nav>
        </div>
    </div>
</div>


 838
838

 被折叠的 条评论
为什么被折叠?
被折叠的 条评论
为什么被折叠?
 到【灌水乐园】发言


