


 本文介绍了Linux系统下的常用操作技巧,包括文件拷贝、数据挂载、虚拟环境拷贝等,并提供了Conda环境下解决特定问题的方法。
LINUX/CONDA操作
1.不同服务器之间的文件拷贝
scp命令
https://www.linuxcool.com/scp
格式
scp -r [source file] [name]@[IP]:[target file]
例子
将本地的file1文件传输到主机:10.10.109.xxx小明账户的file2文件夹下。
-r表示递归复制
scp -r file1/ xiaoming@10.10.109.xxx:file2
2.linux数据挂载
mount命令
https://www.linuxcool.com/mount
格式
mount [设备] [挂载点]
例子
将设备/dev/cdrom挂载到本地/media/cdrom下进行访问
将远程主机10.10.100.xxx的数据挂载到本地进行访问
mount /dev/cdrom /media/cdrom
mount 10.10.100.xxx:data/ data/
3.利用CONDA对虚拟环境进行拷贝
conda pack命令
- 克隆需要打包的环境并且激活
conda create -n [新环境的名称] --clone [老环境名称]
conda activate [新环境的名称]
- 安装打包工具conda-forge和conda-pack
conda install -c conda-forge conda-pack
- 打包虚拟环境
conda pack -n [新环境名称] -o [新环境名称].tar.gz
若出现BUG:CondaPackError: Cannot pack an environment with editable packages
修改命令如下:
conda pack -n [新环境名称] -o [新环境名称].tar.gz --ignore-editable-packages
- 复制虚拟环境到相应主机的
ananconda/envs下
可以使用scp命令 - 解压虚拟环境
在目标主机的ananconda/envs下,新建文件夹,文件夹名为环境名,再解压到该文件夹
mkdir ~/ananconda/envs/[虚拟环境名]
tar -xf [新环境名称].tar.gz -C ~/ananconda/envs/[虚拟环境名]
- 激活环境
conda activate [虚拟环境名]
4.利用axel替代wget多线程加速文件下载
axel命令
https://www.linuxcool.com/axel
格式
axel -n [线程数] -o [文件存储位置] [下载连接]
例子
以5个链接数下载testfile.zip,并另存为/tmp/目录下的filetest.zip 文件。
axel -n 5 -o /tmp/filetest.zip http://www.Linuxcool.com/testfile.zip
以20个线程循环下载xxx.txt文件中的连接到/temp文件夹下
DATA_DIR="/temp"
for line in $(cat xxx.txt)
do
  axel -n 20 -o ${DATA_DIR} $line
done
5.挂载U盘到linux
fdisk命令
https://www.linuxcool.com/fdisk
格式
fdisk -l
例子
查看挂载U盘名
[root@localhost ~]# fdisk -l
Disk /dev/sda: 21.5GB, 21474836480 bytes
#系统硬盘
…省略部分输出…
Disk/dev/sdb: 8022 MB, 8022654976 bytes
#这就是识别的U盘,大小为8GB
94 heads, 14 sectors/track, 11906 cylinders
Units = cylinders of 1316 * 512 = 673792 bytes
Sector size (logical/physical): 512 bytes / 512 bytes
I/O size (minimum/optimal): 512 bytes / 512 bytes
Disk identifier: 0x00000000
Device Boot Start End Blocks Id System
/dev/sdb1 1 11907 7834608 b W95 FAT32
#系统给U盘分配的设备文件名
mkdir命令
https://www.linuxcool.com/mkdir
格式
mkdir [文件夹名]
例子
创建挂载的空文件
mkdir /mnt/usb
挂载;mount命令见2
[root@localhost ~]# mount -t vfat /dev/sdb1 /mnt/usb/
挂载U盘。因为是Windows分区,所以是vfat文件系统格式
[root@localhost ~]# cd /mnt/usb/
#去挂载点访问U盘数据
[root@localhost usb]# ls
#输出为乱码
#之所以出现乱码,是因为编码格式不同
指定编码
[root@localhost ~]# mount -t vfat -o iocharset=utf8 /dev/sdb1 /mnt/usb/
#挂载U盘,指定中文编码格式为UTF-8
[root@localhost ~]# cd /mnt/usb/
[root@localhost usb]# ls
1111111年度总结及计划表.xls ZsyqlHL7osKSPBoGshZBr6.mp4 协议书
12月21日.doc 恭喜发财(定).mp4 新年VCR(定).mp4
#可以正确地查看中文了
pytorch
环境配置
1.No local packages or working download links found for certifi>=2017.4.17
具体情况说明:
在配置detectron2环境时,编译环节出现的问题。使用conda list查看虚拟环境,发现存在certifi包,切版本大于2017.4.17。
解决方案
pip install certifi==2017.4.17
2.Warning: grad and param do not obey the gradient layout contract. This is not an error, but may impair performance.
具体情况说明:
修改模型后出现该warning,往往是新增的模块的输入或者是使用了transpose或者permute或者切片操作出现tensor不连续的情况。
解决方案
在该操作后面加上.contiguous()
x = self.conv1(x.contiguous())
3.结束进程后GPU显存未释放问题
具体情况说明:
在重新运行程序时,出现RuntimeError: CUDA out of memory错误,使用nvidia-smi查看GPU使用情况,发现显存被假线程占用。
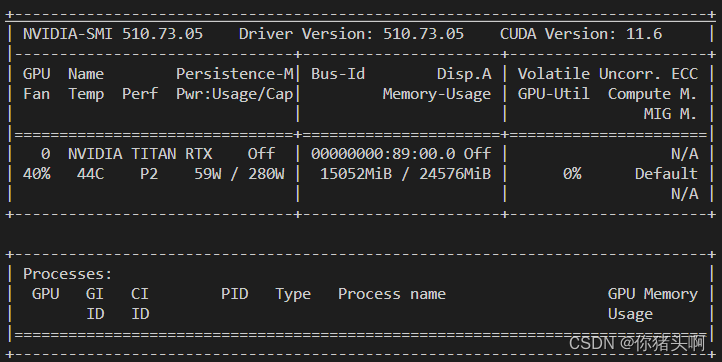
解决方案
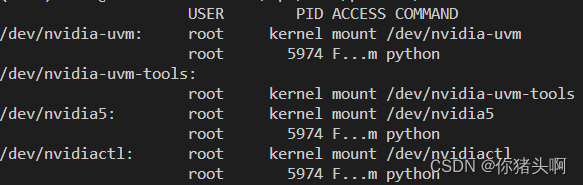
- 查看占用显卡的进程
fuser -v /dev/nvidia*
- 杀死对应进程
kill -9 xxxx
4.RuntimeError: CUDA error: device-side assert triggered /opt/conda/conda-bld/pytorch_1607370193460/work/aten/src/ATen/native/cuda/Loss.cu:102: operator(): block: [0,0,0], thread: [0,0,0] Assertion input_val >= zero && input_val <= one failed.
具体情况说明:
在确认网络分类数量与标签范围都正确的情况下,出现上述错误,有可能是自己写的网络中存在未迭代或回归的参数造成的。
解决方案
仔细查看自己的forward()函数,特别是有循环的地方,看是否正确迭代。
错误例子
def forward(self, x):
	for i in range(self.num):
		out = self.c1(x)	#每次迭代均在使用初值x,导致out未进入迭代,出现参数与动态图不一致的情况。
		out = self.c2(out)
	return out
正确例子
def forward(self, x):
	out = x
	for i in range(self.num):
		out = self.c1(out)
		out = self.c2(out)
	return out
5. RuntimeError: Expected to have finished reduction in the prior iteration before starting a new one. This error indicates that your module has parameters that were not used in producing loss. You can enable unused parameter detection by (1) passing the keyword argument find_unused_parameters=True to torch.nn.parallel.DistributedDataParallel; (2) making sure all forward function outputs participate in calculating loss. If you already have done the above two steps, then the distributed data parallel module wasn’t able to locate the output tensors in the return value of your module’s forward function. Please include the loss function and the structure of the return value of forward of your module when reporting this issue (e.g. list, dict, iterable)
具体情况说明:
单卡不报错,多卡报上述错误,主要有以下几种常见情况:
- 定义了网络层却没在
forward()中使用 forward()返回的参数未用于梯度计算- 使用了不进行梯度回归的参数进行优化
解决方案
首先确实是否是属于上述情况中的某种情况。
可以在定义优化器的代码前后后使用下面的代码进行验证。
for name,p in net.named_parameters():#net是你的网络 net = model()
	if p.requires_grad == False:
		print(name)
optimizer = ...#优化器定义
for p in optimizer.parameters():
	if p.requires_grad == False:
		print(p)
若属于,设置find_unused_parameters=True
net = DistributedDataParallel(net, device_ids=[local_rank], broadcast_buffers=False, find_unused_parameters=True)
若发现forward()返回值以及网络参数定义都没问题,请参照第4个BUG的解决方案排查代码。
6. TypeError: list indices must be integers or slices, not tuple
具体情况说明:
自己转换成所需格式后,观察源、目标文件格式一致。在代码计算时出现上述错误。原因是list与np.array索引规则不同,但是在打印输出或其他可视化方式下,无法看到具体的数组格式。
解决方案:
将所有list转换成np.array格式
new_tube = np.asarray(new_tube)


 3279
3279

 被折叠的 条评论
为什么被折叠?
被折叠的 条评论
为什么被折叠?
 到【灌水乐园】发言


