


 本文介绍Flume通过netcat采集网络数据、spooldir监控目录文件、taildir断点续传及多级agent级联的四种采集方案。
Flume非常灵活,日常工作中可以根据实际需求配置。
如果大家不知道Flume支持哪些配置,那么可以关注Flume官网。
在Configuration标签下有Flume Source,Flume Sinks,Flume Channels,分别对source、sink、channel组件的配置做了详细介绍。
我们在配置的时候参考官网,稍加改动即可。
下面就对常见配置方式举例分析:
1.网络采集
agent分析
(1) Source
source类型我们选择NetCat TCP Source
A netcat-like source that listens on a given port and turns each line of text into an event.
(2) Sink
此处为了便于观察,我们把信息打印在屏幕,所以在sink上选择Logger Sink。
Logs event at INFO level. Typically useful for testing/debugging purpose
(3) Channel
channel选择Memory Channel。值得注意的是,memory类型在flume报错重启后,原本存在channel中的数据会丢失。如果对数据安全性要求比较高,可以选择file类型。
The events are stored in an in-memory queue with configurable max size.
1.1 编辑配置文件
[hadoop@node03 ~]$ cd /kkb/install/apache-flume-1.6.0-cdh5.14.2-bin/conf/
[hadoop@node03 conf]$ vi netcat-logger.conf
# 定义这个agent中各组件的名字
a1.sources = r1
a1.sinks = k1
a1.channels = c1

# 描述和配置source组件:r1
a1.sources.r1.type = netcat
a1.sources.r1.bind = 192.168.52.120
a1.sources.r1.port = 44444

# 描述和配置sink组件:k1
a1.sinks.k1.type = logger

# 描述和配置channel组件,此处使用是内存缓存的方式
a1.channels.c1.type = memory
a1.channels.c1.capacity = 1000
a1.channels.c1.transactionCapacity = 100

# 描述和配置source  channel   sink之间的连接关系
a1.sources.r1.channels = c1
a1.sinks.k1.channel = c1
1.2 安装telnet准备测试
sudo yum -y install telnet
#连接ip和端口
telnet  192.168.52.120  44444
1.3 启动flume采集数据
[hadoop@node03 ~]$ cd /kkb/install/apache-flume-1.6.0-cdh5.14.2-bin
[hadoop@node03 ~]$ bin/flume-ng agent -c conf -f conf/netcat-logger.conf -n a1  -Dflume.root.logger=INFO,console
1.4 当telnet端发送数据时,agent端会有日志打印
[hadoop@node03 ~]$ telnet 192.168.52.120 44444
Trying 192.168.52.120...
Connected to 192.168.52.120.
Escape character is '^]'.
hello world
OK
nihao
OK
2020-02-19 00:04:47,319 (lifecycleSupervisor-1-4) [INFO - org.apache.flume.source.NetcatSource.start(NetcatSource.java:166)] Created serverSocket:sun.nio.ch.ServerSocketChannelImpl[/192.168.52.120:44444]
2020-02-19 00:05:25,322 (SinkRunner-PollingRunner-DefaultSinkProcessor) [INFO - org.apache.flume.sink.LoggerSink.process(LoggerSink.java:95)] Event: { headers:{} body: 68 65 6C 6C 6F 20 77 6F 72 6C 64 0D hello world. }
2020-02-19 00:05:26,425 (SinkRunner-PollingRunner-DefaultSinkProcessor) [INFO - org.apache.flume.sink.LoggerSink.process(LoggerSink.java:95)] Event: { headers:{} body: 6E 69 68 61 6F 0D nihao. }2. 采集目录下文件到HDFS
agent分析
(1) Source
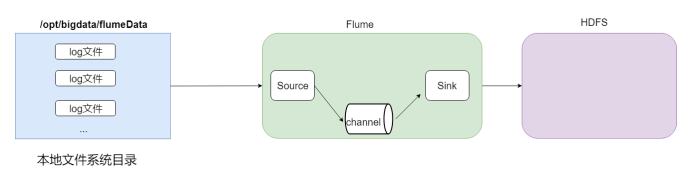
因source端需要监控某一目录,且目录下只要有新文件产生就会被flume采集走,所以选择Spooling Directory Source。注意:文件不能重名
This source lets you ingest data by placing files to be ingested into a “spooling” directory on disk. This source will watch the specified directory for new files, and will parse events out of new files as they appear.
(2) Sink
采集的数据需要下沉到HDFS,所以选用HDFS Sink。
This sink writes events into the Hadoop Distributed File System (HDFS)
(3) Channel
Memory 和File均可,此文中选择Memory Channel
2.1 编辑配置文件
[hadoop@node03 ~]$ cd /kkb/install/apache-flume-1.6.0-cdh5.14.2-bin/conf/
[hadoop@node03 conf]$ vi spooldir.conf
#agent命名
a1.sources = src-1
a1.sinks = k1
a1.channels = c1

#source配置
a1.sources.src-1.type = spooldir
a1.sources.src-1.channels = c1
a1.sources.src-1.spoolDir = /home/hadoop/data/flumeData
a1.sources.src-1.fileHeader = true

#sink配置
a1.sinks.k1.type = hdfs
a1.sinks.k1.channel = c1
#HDFS文件路径
a1.sinks.k1.hdfs.path = /flume/events/%y-%m-%d/%H%M/%S
#如使用类似%y-%m-%d时间参数,必须制定timestamp
a1.sinks.k1.hdfs.useLocalTimeStamp = true
#生成的HDFS文件前缀
a1.sinks.k1.hdfs.filePrefix = events-
#控制文件生成时间,10m生成一个
a1.sinks.k1.hdfs.round = true
a1.sinks.k1.hdfs.roundValue = 10
a1.sinks.k1.hdfs.roundUnit = minute

#channel配置
a1.channels.c1.type = memory
a1.channels.c1.capacity = 10000
a1.channels.c1.transactionCapacity = 10000
a1.channels.c1.byteCapacityBufferPercentage = 20
a1.channels.c1.byteCapacity = 800000
2.2 启动flume采集数据
[hadoop@node03 ~]$ cd /kkb/install/apache-flume-1.6.0-cdh5.14.2-bin/
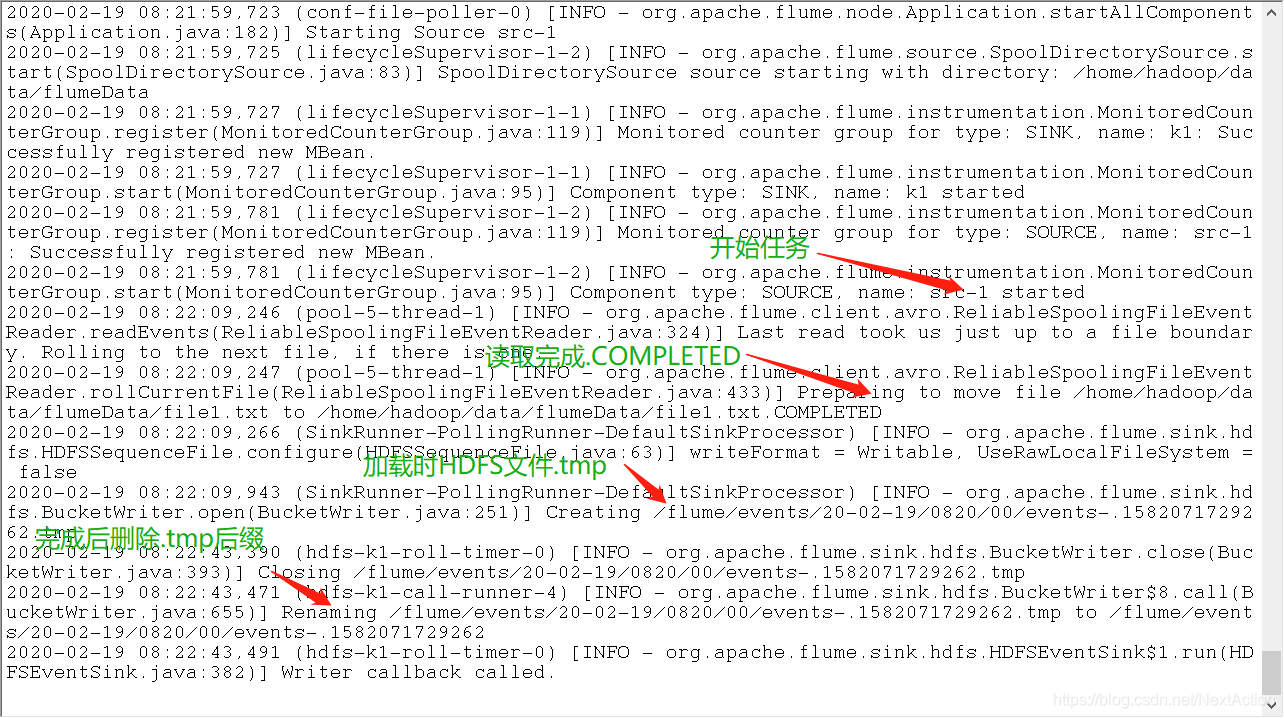
[hadoop@node03 apache-flume-1.6.0-cdh5.14.2-bin]$ bin/flume-ng agent -c ./conf -f ./conf/spooldir.conf -n a1 -Dflume.root.logger=INFO,console2.3 上传文件到指定目录
[hadoop@node03 conf]$ echo "hello world" >> /home/hadoop/data/flumeData/.file1.txt
[hadoop@node03 conf]$ mv /home/hadoop/data/flumeData/.file1.txt /home/hadoop/data/flumeData/file1.txt
2.4 分析flume加载过程
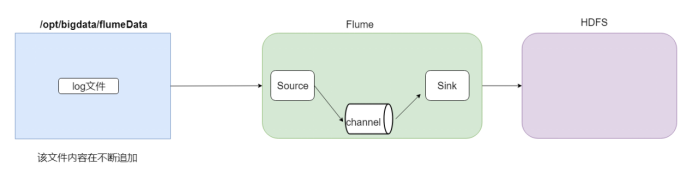
3. 断点续传
断点续传的意思是:当flume重启后,任务可以从上次处理的位置开始继续工作。
选用Taildir Source,官网解释:
Watch the specified files, and tail them in nearly real-time once detected new lines appended to the each files. If the new lines are being written, this source will retry reading them in wait for the completion of the write.
This source is reliable and will not miss data even when the tailing files rotate. It periodically writes the last read position of each files on the given position file in JSON format. If Flume is stopped or down for some reason, it can restart tailing from the position written on the existing position file.
In other use case, this source can also start tailing from the arbitrary position for each files using the given position file. When there is no position file on the specified path, it will start tailing from the first line of each files by default.
Taildir Source特点:
· 断点续传
· 可监控多目录
下面例子中,我们不断向 log文件中写入,当重启flume后文件仍会续传。
3.1 编辑配置文件
[hadoop@node03 conf]$ vi tail-dir.conf
# agent命名
a1.sources = r1
a1.sinks = k1
a1.channels = c1

# source配置
a1.sources.r1.type = TAILDIR
a1.sources.r1.positionFile = /kkb/install/apache-flume-1.6.0-cdh5.14.2-bin/taildir_position.json
a1.sources.r1.filegroups = f1
a1.sources.r1.filegroups.f1 = /home/hadoop/data/flumeData/.*log.*
a1.sources.ri.maxBatchCount = 1000

# sink配置
a1.sinks.k1.type = hdfs
a1.sinks.k1.channel = c1
a1.sinks.k1.hdfs.path = hdfs://node01:8020/taildir/files/%y-%m-%d/%H%M/
a1.sinks.k1.hdfs.filePrefix = events-
a1.sinks.k1.hdfs.round = true
a1.sinks.k1.hdfs.roundValue = 10
a1.sinks.k1.hdfs.roundUnit = minute
a1.sinks.k1.hdfs.rollInterval = 3
a1.sinks.k1.hdfs.rollSize = 5000
a1.sinks.k1.hdfs.rollCount = 50000
a1.sinks.k1.hdfs.batchSize = 5000
a1.sinks.k1.hdfs.useLocalTimeStamp = true
#生成的文件类型,默认是Sequencefile,可用DataStream,则为普通文本
a1.sinks.k1.hdfs.fileType = DataStream

# channel配置
a1.channels.c1.type = memory
a1.channels.c1.capacity = 1000
a1.channels.c1.transactionCapacity = 100

# 绑定channel
a1.sources.r1.channels = c1
a1.sinks.k1.channel = c1
3.2 启动flume采集数据
[hadoop@node03 ~]$ cd /kkb/install/apache-flume-1.6.0-cdh5.14.2-bin/
[hadoop@node03 apache-flume-1.6.0-cdh5.14.2-bin]$ bin/flume-ng agent -c ./conf -f ./conf/tail-dir.conf -n a1 -Dflume.root.logger=INFO,console
3.3 模拟追加数据
[hadoop@node03 ~]$ cd ~/data/flumeData/
[hadoop@node03 flumeData]$ echo "hello world1" >> file1.log
[hadoop@node03 flumeData]$ echo "hello world2" >> file1.log
[hadoop@node03 flumeData]$ echo "hello world3" >> file1.log
4. agent级联
Flume的多个agent可以连接,即agent1的sink发送到agent2的source。
Sink端选用avro

假设有如下场景:
有两台服务器A和B,现要求把A产生的日志,发送到B,然后入B所在集群的HDFS存储。
上面场景就可以在两台服务器都安装flume,分别建立两个agent,实现两agent串联。
4.1 编辑配置文件
4.1.1 服务器A
[hadoop@node02 ~]$ cd /kkb/install/apache-flume-1.6.0-cdh5.14.2-bin/conf
[hadoop@node02 conf]$ vi tail-avro.conf
# Name the components on this agent
a1.sources = r1
a1.sinks = k1
a1.channels = c1
# Describe/configure the source
a1.sources.r1.type = exec
a1.sources.r1.command = tail -F /home/hadoop/data/flumeData/access.log
a1.sources.r1.channels = c1
# Describe the sink
##sink端的avro是一个数据发送者
a1.sinks = k1
a1.sinks.k1.type = avro
a1.sinks.k1.channel = c1
a1.sinks.k1.hostname = 192.168.52.120
a1.sinks.k1.port = 4141
a1.sinks.k1.batch-size = 10
# Use a channel which buffers events in memory
a1.channels.c1.type = memory
a1.channels.c1.capacity = 1000
a1.channels.c1.transactionCapacity = 100
# Bind the source and sink to the channel
a1.sources.r1.channels = c1
a1.sinks.k1.channel = c1
4.1.2 服务器B
[hadoop@node03 ~]$ cd /kkb/install/apache-flume-1.6.0-cdh5.14.2-bin/conf/
[hadoop@node03 conf]$ vi avro-hdfs.conf
# Name the components on this agent
a1.sources = r1
a1.sinks = k1
a1.channels = c1
# Describe/configure the source
##source中的avro组件是一个接收者服务
a1.sources.r1.type = avro
a1.sources.r1.channels = c1
a1.sources.r1.bind = 192.168.52.120
a1.sources.r1.port = 4141
# Describe the sink
a1.sinks.k1.type = hdfs
a1.sinks.k1.hdfs.path = /avro/hdfs/%y-%m-%d/%H%M/
a1.sinks.k1.hdfs.filePrefix = events-
a1.sinks.k1.hdfs.round = true
a1.sinks.k1.hdfs.roundValue = 10
a1.sinks.k1.hdfs.roundUnit = minute
a1.sinks.k1.hdfs.rollInterval = 3000
a1.sinks.k1.hdfs.rollSize = 2000000
a1.sinks.k1.hdfs.rollCount = 500
a1.sinks.k1.hdfs.batchSize = 1
a1.sinks.k1.hdfs.useLocalTimeStamp = true
#生成的文件类型,默认是Sequencefile,可用DataStream,则为普通文本
a1.sinks.k1.hdfs.fileType = DataStream
# Use a channel which buffers events in memory
a1.channels.c1.type = memory
a1.channels.c1.capacity = 1000
a1.channels.c1.transactionCapacity = 100

# Bind the source and sink to the channel
a1.sources.r1.channels = c1
a1.sinks.k1.channel = c1
4.2 服务器A准备
(1) 创建目录
[hadoop@node02 conf]$ mkdir -p /home/hadoop/data/flumeData/(2) 开发持续写入脚本,模拟日志写入
[hadoop@node02 ~]$ cd /home/hadoop/data/flumeData/
[hadoop@node02 flumeData]$ vi tail-file.sh
#!/bin/bash
while true
do
  /bin/echo `date` >> ./access.log
  sleep 1s
done
4.3 顺序启动服务器B,服务器A的agent
(1) 启动B上的agent
[hadoop@node03 ~]$ cd /kkb/install/apache-flume-1.6.0-cdh5.14.2-bin/
[hadoop@node03 apache-flume-1.6.0-cdh5.14.2-bin]$ bin/flume-ng agent -c ./conf -f ./conf/tail-avro.conf -n a1 -Dflume.root.logger=INFO,console
(2) 启动A上的agent
[hadoop@node02 ~]$ cd /kkb/install/apache-flume-1.6.0-cdh5.14.2-bin/
[hadoop@node02 apache-flume-1.6.0-cdh5.14.2-bin]$ bin/flume-ng agent -c ./conf -f ./conf/avro-hdfs.conf -n a1 -Dflume.root.logger=INFO,console
4.4 数据写入
服务器B执行脚本,模拟数据写入,并观察A,B服务器变化。
[hadoop@node02 ~]$ cd /home/hadoop/data/flumeData/
[hadoop@node02 flumeData]$ sh tail-file.sh
总结
本文共介绍了四种采集方案:
- netcat 采集网络Socket数据;
- spooldir 采集目录下不断生成的文件;
- taildir 实现多目录监控及断点续传(较常用);
- 多级agent处理复杂传输;


 693
693

 被折叠的 条评论
为什么被折叠?
被折叠的 条评论
为什么被折叠?
 到【灌水乐园】发言


