


目录
Linux内核实现名称空间的创建
ip netns命令
可以借助ip netns命令来完成对 Network Namespace 的各种操作。ip netns命令来自于iproute安装包,一般系统会默认安装,如果没有的话,请自行安装。
注意:ip netns命令修改网络配置时需要 sudo 权限。
可以通过ip netns命令完成对Network Namespace 的相关操作,可以通过ip netns help查看命令帮助信息:
[root@localhost ~]#  ip netns help
Usage:	ip netns list
	ip netns add NAME
	ip netns attach NAME PID
	ip netns set NAME NETNSID
	ip [-all] netns delete [NAME]
	ip netns identify [PID]
	ip netns pids NAME
	ip [-all] netns exec [NAME] cmd ...
	ip netns monitor
	ip netns list-id
NETNSID := auto | POSITIVE-INT

[root@localhost ~]# ip netns list
默认情况下,Linux系统中是没有任何 Network Namespace的,所以ip netns list命令不会返回任何信息。
创建Network Namespace
[root@localhost ~]# ip netns add ns0
[root@localhost ~]# ip netns list
ns0
新创建的 Network Namespace 会出现在/var/run/netns/目录下。如果相同名字的 namespace 已经存在,命令会报Cannot create namespace file “/var/run/netns/ns0”: File exists的错误。
[root@localhost ~]# ls /var/run/netns/
ns0
[root@localhost ~]# ip netns add ns0
Cannot create namespace file "/var/run/netns/ns0": File exists
对于每个 Network Namespace 来说,它会有自己独立的网卡、路由表、ARP 表、iptables 等和网络相关的资源。
操作Network Namespace
ip命令提供了ip netns exec子命令可以在对应的 Network Namespace 中执行命令。
查看新创建 Network Namespace 的网卡信息
[root@localhost ~]# ip netns exec ns0 ip addr
1: lo: <LOOPBACK> mtu 65536 qdisc noop state DOWN group default qlen 1000
    link/loopback 00:00:00:00:00:00 brd 00:00:00:00:00:00
可以看到,新创建的Network Namespace中会默认创建一个lo回环网卡,此时网卡处于关闭状态。此时,尝试去 ping 该lo回环网卡,会提示Network is unreachable
[root@localhost ~]# ip netns exec ns0 ping 127.0.0.1
connect: 网络不可达
通过下面的命令启用lo回环网卡:
[root@localhost ~]# ip netns exec ns0 ip link set lo up
[root@localhost ~]# ip netns exec ns0 ping 127.0.0.1
PING 127.0.0.1 (127.0.0.1) 56(84) bytes of data.
64 bytes from 127.0.0.1: icmp_seq=1 ttl=64 time=0.020 ms
64 bytes from 127.0.0.1: icmp_seq=2 ttl=64 time=0.020 ms
64 bytes from 127.0.0.1: icmp_seq=3 ttl=64 time=0.022 ms
转移设备
我们可以在不同的 Network Namespace 之间转移设备(如veth)。由于一个设备只能属于一个 Network Namespace ,所以转移后在这个 Network Namespace 内就看不到这个设备了。

其中,veth设备属于可转移设备,而很多其它设备(如lo、vxlan、ppp、bridge等)是不可以转移的。
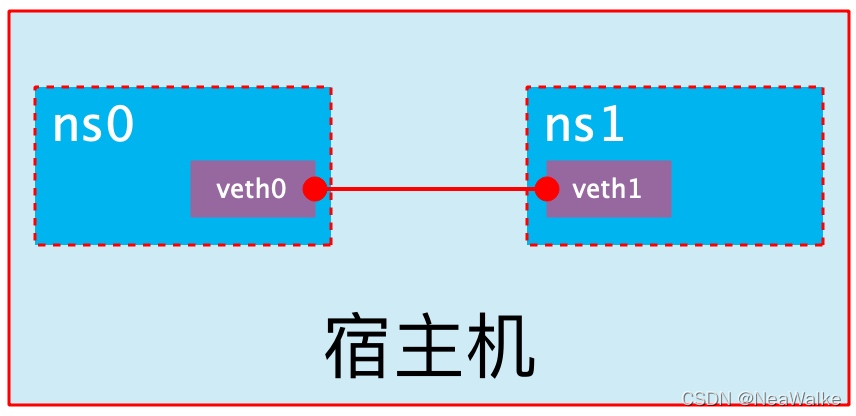
veth pair
veth pair 全称是 Virtual Ethernet Pair,是一个成对的端口,所有从这对端口一 端进入的数据包都将从另一端出来,反之也是一样。
引入veth pair是为了在不同的 Network Namespace 直接进行通信,利用它可以直接将两个 Network Namespace 连接起来。
创建 veth pair
[root@localhost ~]# ip link add type veth
[root@localhost ~]# ip a
······
4: veth0@veth1: <BROADCAST,MULTICAST,M-DOWN> mtu 1500 qdisc noop state DOWN group default qlen 1000
    link/ether 6a:1a:eb:e4:9e:79 brd ff:ff:ff:ff:ff:ff
5: veth1@veth0: <BROADCAST,MULTICAST,M-DOWN> mtu 1500 qdisc noop state DOWN group default qlen 1000
    link/ether 66:e7:d1:64:c7:08 brd ff:ff:ff:ff:ff:ff
可以看到,此时系统中新增了一对veth pair,将veth0和veth1两个虚拟网卡连接了起来,此时这对 veth pair 处于”未启用“状态。
实现Network Namespace间通信
下面我们利用veth pair实现两个不同的 Network Namespace 之间的通信。刚才我们已经创建了一个名为ns0的 Network Namespace,下面再创建一个信息Network Namespace,命名为ns1
[root@localhost ~]# ip netns add ns1
[root@localhost ~]# ip netns list
ns1
ns0
将veth0加入到ns0,将veth1加入到ns1
[root@localhost ~]# ip link set veth0 netns ns0
[root@localhost ~]# ip link set veth1 netns ns1
然后我们分别为这对veth pair配置上ip地址,并启用它们
[root@localhost ~]# ip netns exec ns0 ip link set veth0 up
[root@localhost ~]# ip netns exec ns0 ip addr add 192.168.0.1/24 dev veth0
[root@localhost ~]# ip netns exec ns1 ip link set lo up
[root@localhost ~]# ip netns exec ns1 ip link set veth1 up
[root@localhost ~]# ip netns exec ns1 ip addr add 192.168.0.2/24 dev veth1
查看这对veth pair的状态
[root@localhost ~]# ip netns exec ns0 ip a
1: lo: <LOOPBACK,UP,LOWER_UP> mtu 65536 qdisc noqueue state UNKNOWN group default qlen 1000
    link/loopback 00:00:00:00:00:00 brd 00:00:00:00:00:00
    inet 127.0.0.1/8 scope host lo
       valid_lft forever preferred_lft forever
    inet6 ::1/128 scope host
       valid_lft forever preferred_lft forever
4: veth0@if5: <BROADCAST,MULTICAST,UP,LOWER_UP> mtu 1500 qdisc noqueue state UP group default qlen 1000
    link/ether 6a:1a:eb:e4:9e:79 brd ff:ff:ff:ff:ff:ff link-netns ns1
    inet 192.168.0.1/24 scope global veth0
       valid_lft forever preferred_lft forever
    inet6 fe80::681a:ebff:fee4:9e79/64 scope link
       valid_lft forever preferred_lft forever

[root@localhost ~]# ip netns exec ns1 ip a
1: lo: <LOOPBACK,UP,LOWER_UP> mtu 65536 qdisc noqueue state UNKNOWN group default qlen 1000
    link/loopback 00:00:00:00:00:00 brd 00:00:00:00:00:00
    inet 127.0.0.1/8 scope host lo
       valid_lft forever preferred_lft forever
    inet6 ::1/128 scope host
       valid_lft forever preferred_lft forever
5: veth1@if4: <BROADCAST,MULTICAST,UP,LOWER_UP> mtu 1500 qdisc noqueue state UP group default qlen 1000
    link/ether 66:e7:d1:64:c7:08 brd ff:ff:ff:ff:ff:ff link-netns ns0
    inet 192.168.0.2/24 scope global veth1
       valid_lft forever preferred_lft forever
    inet6 fe80::64e7:d1ff:fe64:c708/64 scope link
       valid_lft forever preferred_lft forever
从上面可以看出,我们已经成功启用了这个veth pair,并为每个veth设备分配了对应的ip地址。我们尝试在ns1中访问ns0中的ip地址:
[root@localhost ~]# ip netns exec ns1 ping 192.168.0.1
PING 192.168.0.1 (192.168.0.1) 56(84) bytes of data.
64 bytes from 192.168.0.1: icmp_seq=1 ttl=64 time=0.030 ms
64 bytes from 192.168.0.1: icmp_seq=2 ttl=64 time=0.019 ms
64 bytes from 192.168.0.1: icmp_seq=3 ttl=64 time=0.025 ms
64 bytes from 192.168.0.1: icmp_seq=4 ttl=64 time=0.020 ms
64 bytes from 192.168.0.1: icmp_seq=5 ttl=64 time=0.024 ms
可以看到,veth pair成功实现了两个不同Network Namespace之间的网络交互。
veth设备重命名
重命名设备时,需先关闭设备
[root@localhost ~]# ip netns exec ns0 ip link set veth0 down
[root@localhost ~]# ip netns exec ns0 ip link set dev veth0 name eht0
[root@localhost ~]# ip netns exec ns0 ip a
1: lo: <LOOPBACK,UP,LOWER_UP> mtu 65536 qdisc noqueue state UNKNOWN group default qlen 1000
    link/loopback 00:00:00:00:00:00 brd 00:00:00:00:00:00
    inet 127.0.0.1/8 scope host lo
       valid_lft forever preferred_lft forever
    inet6 ::1/128 scope host
       valid_lft forever preferred_lft forever
4: eht0@if5: <BROADCAST,MULTICAST> mtu 1500 qdisc noqueue state DOWN group default qlen 1000
    link/ether 6a:1a:eb:e4:9e:79 brd ff:ff:ff:ff:ff:ff link-netns ns1
    inet 192.168.0.1/24 scope global eht0
       valid_lft forever preferred_lft forever
四种网络模式配置
bridge模式
[root@localhost ~]# docker run -it --name box1 --rm busybox
/ # ifconfig
eth0      Link encap:Ethernet  HWaddr 02:42:AC:11:00:02
          inet addr:172.17.0.2  Bcast:172.17.255.255  Mask:255.255.0.0
          UP BROADCAST RUNNING MULTICAST  MTU:1500  Metric:1
          RX packets:11 errors:0 dropped:0 overruns:0 frame:0
          TX packets:0 errors:0 dropped:0 overruns:0 carrier:0
          collisions:0 txqueuelen:0
          RX bytes:962 (962.0 B)  TX bytes:0 (0.0 B)

lo        Link encap:Local Loopback
          inet addr:127.0.0.1  Mask:255.0.0.0
          UP LOOPBACK RUNNING  MTU:65536  Metric:1
          RX packets:0 errors:0 dropped:0 overruns:0 frame:0
          TX packets:0 errors:0 dropped:0 overruns:0 carrier:0
          collisions:0 txqueuelen:1000
          RX bytes:0 (0.0 B)  TX bytes:0 (0.0 B)

/ # exit
[root@localhost ~]# docker container ls -a
CONTAINER ID   IMAGE     COMMAND   CREATED   STATUS    PORTS     NAMES
在创建容器时添加–network bridge与不加–network选项效果是一致的
[root@localhost ~]# docker run -it --name box2 --network bridge --rm busybox
/ # ifconfig
eth0      Link encap:Ethernet  HWaddr 02:42:AC:11:00:02
          inet addr:172.17.0.2  Bcast:172.17.255.255  Mask:255.255.0.0
          UP BROADCAST RUNNING MULTICAST  MTU:1500  Metric:1
          RX packets:8 errors:0 dropped:0 overruns:0 frame:0
          TX packets:0 errors:0 dropped:0 overruns:0 carrier:0
          collisions:0 txqueuelen:0
          RX bytes:696 (696.0 B)  TX bytes:0 (0.0 B)

lo        Link encap:Local Loopback
          inet addr:127.0.0.1  Mask:255.0.0.0
          UP LOOPBACK RUNNING  MTU:65536  Metric:1
          RX packets:0 errors:0 dropped:0 overruns:0 frame:0
          TX packets:0 errors:0 dropped:0 overruns:0 carrier:0
          collisions:0 txqueuelen:1000
          RX bytes:0 (0.0 B)  TX bytes:0 (0.0 B)

/ #
none模式
[root@localhost ~]# docker run -it --name box1 --network none --rm busybox
/ # ifconfig
lo        Link encap:Local Loopback
          inet addr:127.0.0.1  Mask:255.0.0.0
          UP LOOPBACK RUNNING  MTU:65536  Metric:1
          RX packets:0 errors:0 dropped:0 overruns:0 frame:0
          TX packets:0 errors:0 dropped:0 overruns:0 carrier:0
          collisions:0 txqueuelen:1000
          RX bytes:0 (0.0 B)  TX bytes:0 (0.0 B)
container模式
启动第一个容器
[root@localhost ~]# docker run -it --name box1 --rm busybox
/ # ifconfig
eth0      Link encap:Ethernet  HWaddr 02:42:AC:11:00:02
          inet addr:172.17.0.2  Bcast:172.17.255.255  Mask:255.255.0.0
          UP BROADCAST RUNNING MULTICAST  MTU:1500  Metric:1
          RX packets:8 errors:0 dropped:0 overruns:0 frame:0
          TX packets:0 errors:0 dropped:0 overruns:0 carrier:0
          collisions:0 txqueuelen:0
          RX bytes:696 (696.0 B)  TX bytes:0 (0.0 B)
启动第二个容器
[root@localhost ~]# docker run -it --name box2 --rm busybox
/ # ifconfig
eth0      Link encap:Ethernet  HWaddr 02:42:AC:11:00:03
          inet addr:172.17.0.3  Bcast:172.17.255.255  Mask:255.255.0.0
          UP BROADCAST RUNNING MULTICAST  MTU:1500  Metric:1
          RX packets:3 errors:0 dropped:0 overruns:0 frame:0
          TX packets:0 errors:0 dropped:0 overruns:0 carrier:0
          collisions:0 txqueuelen:0
          RX bytes:266 (266.0 B)  TX bytes:0 (0.0 B)
可以看到名为box2的容器IP地址是172.17.0.3,与第一个容器的IP地址不是一样的,也就是说并没有共享网络,此时如果我们将第二个容器的启动方式改变一下,就可以使名为box2的容器IP与box1容器IP一致,也即共享IP,但不共享文件系统。
[root@localhost ~]# docker run -it --name box2 --network container:box1 --rm busybox
/ # ifconfig
eth0      Link encap:Ethernet  HWaddr 02:42:AC:11:00:02
          inet addr:172.17.0.2  Bcast:172.17.255.255  Mask:255.255.0.0
          UP BROADCAST RUNNING MULTICAST  MTU:1500  Metric:1
          RX packets:12 errors:0 dropped:0 overruns:0 frame:0
          TX packets:0 errors:0 dropped:0 overruns:0 carrier:0
          collisions:0 txqueuelen:0
          RX bytes:976 (976.0 B)  TX bytes:0 (0.0 B)
此时我们在box1容器上创建一个目录
/ # mkdir /tmp/data
/ # ls /tmp/
data
到box2容器上检查/tmp目录会发现并没有这个目录,因为文件系统是处于隔离状态,仅仅是共享了网络而已。
在box2容器上部署一个站点
/ # echo "hello hello" > /tmp/index.html
/ # httpd -h /tmp/
/ # netstat --antl

/ # netstat -antl
Active Internet connections (servers and established)
Proto Recv-Q Send-Q Local Address           Foreign Address         State
tcp        0      0 :::80                   :::*                    LISTEN
在box1容器上用本地地址去访问此站点
/ # wget  -O - -q 172.17.0.2:80
hello hello
由此可见,container模式下的容器间关系就相当于一台主机上的两个不同进程
host模式
启动容器时直接指明模式为host
[root@localhost ~]# docker run -it --name box2 --rm --network host busybox
/ # ifconfig
docker0   Link encap:Ethernet  HWaddr 02:42:0D:AA:1A:D4
          inet addr:172.17.0.1  Bcast:172.17.255.255  Mask:255.255.0.0
          inet6 addr: fe80::42:dff:feaa:1ad4/64 Scope:Link
          UP BROADCAST MULTICAST  MTU:1500  Metric:1
          RX packets:0 errors:0 dropped:0 overruns:0 frame:0
          TX packets:9 errors:0 dropped:0 overruns:0 carrier:0
          collisions:0 txqueuelen:0
          RX bytes:0 (0.0 B)  TX bytes:806 (806.0 B)

ens160    Link encap:Ethernet  HWaddr 00:0C:29:0C:D0:DC
          inet addr:192.168.8.132  Bcast:192.168.8.255  Mask:255.255.255.0
          inet6 addr: fe80::20c:29ff:fe0c:d0dc/64 Scope:Link
          UP BROADCAST RUNNING MULTICAST  MTU:1500  Metric:1
          RX packets:147908 errors:0 dropped:0 overruns:0 frame:0
          TX packets:109469 errors:0 dropped:0 overruns:0 carrier:0
          collisions:0 txqueuelen:1000
          RX bytes:22194695 (21.1 MiB)  TX bytes:148144416 (141.2 MiB)

lo        Link encap:Local Loopback
          inet addr:127.0.0.1  Mask:255.0.0.0
          inet6 addr: ::1/128 Scope:Host
          UP LOOPBACK RUNNING  MTU:65536  Metric:1
          RX packets:7948 errors:0 dropped:0 overruns:0 frame:0
          TX packets:7948 errors:0 dropped:0 overruns:0 carrier:0
          collisions:0 txqueuelen:1000
          RX bytes:585533 (571.8 KiB)  TX bytes:585533 (571.8 KiB)
此时如果我们在这个容器中启动一个http站点,我们就可以直接用宿主机的IP直接在浏览器中访问这个容器中的站点了。
/ # echo 'hello world' > /tmp/index.html
/ # httpd -h /tmp
/ # netstat -antl
Active Internet connections (servers and established)
Proto Recv-Q Send-Q Local Address           Foreign Address         State
tcp        0      0 0.0.0.0:22              0.0.0.0:*               LISTEN
tcp        0      0 0.0.0.0:514             0.0.0.0:*               LISTEN
tcp        0      0 192.168.8.132:22        192.168.8.1:57353       ESTABLISHED
tcp        0      0 192.168.8.132:22        192.168.8.1:57460       ESTABLISHED
tcp        0      0 192.168.8.132:59444     192.168.8.132:80        TIME_WAIT
tcp        0      0 192.168.8.132:22        192.168.8.1:57149       ESTABLISHED
tcp        0      0 192.168.8.132:59448     192.168.8.132:80        TIME_WAIT
tcp        0      1 192.168.8.132:40372     192.168.8.131:80        SYN_SENT
tcp        0      0 :::80                   :::*                    LISTEN
tcp        0      0 :::22                   :::*                    LISTEN
tcp        0      0 :::514                  :::*                    LISTEN

容器的常用操作
查看容器的主机名
[root@localhost ~]# docker run -it --name box1 --rm busybox
/ # hostname
5101862b56d4
在容器启动时注入主机名
[root@localhost ~]# docker run -it --name box1 --hostname neawalke --rm busybox
/ # hostname
neawalke
/ # cat /etc/hosts
127.0.0.1	localhost
::1	localhost ip6-localhost ip6-loopback
fe00::0	ip6-localnet
ff00::0	ip6-mcastprefix
ff02::1	ip6-allnodes
ff02::2	ip6-allrouters
172.17.0.2	neawalke	# 注入主机名时会自动创建主机名到IP的映射关系
/ # cat /etc/resolv.conf
# Generated by NetworkManager
nameserver 8.8.8.8		# DNS也会自动配置为宿主机的DNS
/ # ping baidu.com
PING baidu.com (220.181.38.251): 56 data bytes
64 bytes from 220.181.38.251: seq=0 ttl=127 time=56.528 ms
64 bytes from 220.181.38.251: seq=1 ttl=127 time=79.711 ms
手动指定容器要使用的DNS
[root@localhost ~]# docker  run -it --name box1 --dns 114.114.114.114 busybox
/ # cat /etc/resolv.conf
nameserver 114.114.114.114

/ # nslookup -type=a www.baidu.com
Server:		114.114.114.114
Address:	114.114.114.114:53

Non-authoritative answer:
www.baidu.com	canonical name = www.a.shifen.com
Name:	www.a.shifen.com
Address: 36.152.44.95
Name:	www.a.shifen.com
Address: 36.152.44.96
手动往/etc/hosts文件中注入主机名到IP地址的映射
[root@localhost ~]# docker run -it --name box1 --add-host www.a.com:1.1.1.1 --rm busybox
/ # cat /etc/hosts
127.0.0.1	localhost
::1	localhost ip6-localhost ip6-loopback
fe00::0	ip6-localnet
ff00::0	ip6-mcastprefix
ff02::1	ip6-allnodes
ff02::2	ip6-allrouters
1.1.1.1	www.a.com
172.17.0.2	82b87f935d9a
开放式容器端口
执行docker run的时候有个-p选项,可以将容器中的应用端口映射到宿主机中,从而实现让外部主机可以通过访问宿主机的某端口来访问容器内应用的目的。
-p选项能够使用多次,其所能够暴露的端口必须是容器确实在监听的端口。
-p选项的使用格式:
- -p <containerPort>
- 将指定的容器端口映射至主机所有地址的一个动态端口
- -p <hostPort>:<containerPort>
- 将容器端口映射至指定的主机端口
- -p <ip>::<containerPort>
- 将指定的容器端口映射至主机指定的动态端口
- -p <ip>:<hostPort>:<containerPort>
- 将指定的容器端口映射至主机指定的端口
动态端口指的是随机端口,具体的映射结果可使用docker port命令查看。
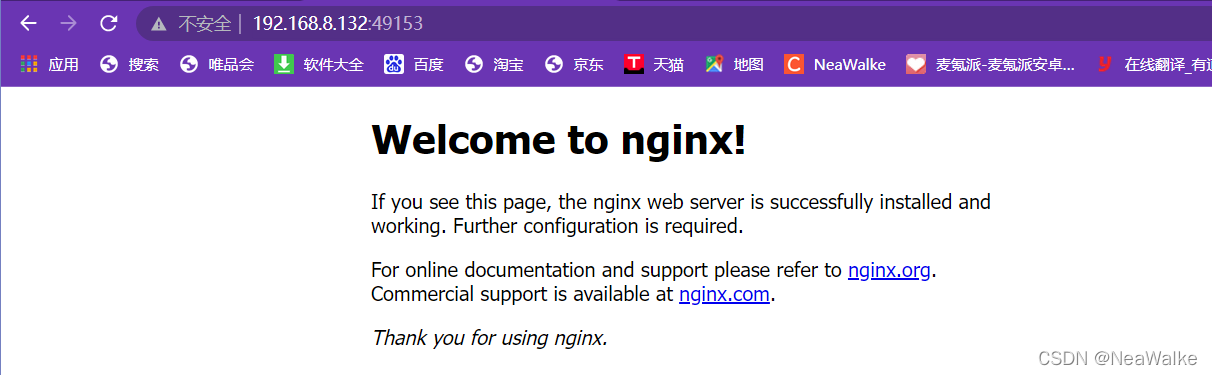
[root@localhost ~]# docker run --name test --rm -p 80 neawalke/nginx:v1.0
以上命令执行后会一直占用着前端,我们新开一个终端连接来看一下容器的80端口被映射到了宿主机的什么端口上
[root@localhost ~]# docker port test
80/tcp -> 0.0.0.0:49153
80/tcp -> :::49153
由此可见,容器的80端口被暴露到了宿主机的49153端口上,此时我们在宿主机上访问一下这个端口看是否能访问到容器内的站点
iptables防火墙规则将随容器的创建自动生成,随容器的删除自动删除规则。
将容器端口映射到宿主机的指定端口
[root@localhost ~]# docker run --name test --rm -p 8080:80 neawalke/nginx:v1.0

[root@localhost ~]# docker port test
80/tcp -> 0.0.0.0:8080
80/tcp -> :::8080
自定义docker0桥的网络属性信息
官方文档相关配置.
自定义docker0桥的网络属性信息需要修改/etc/docker/daemon.json配置文件
{
    "bip": "192.168.1.5/24",
    "fixed-cidr": "192.168.1.5/25",
    "fixed-cidr-v6": "2001:db8::/64",
    "mtu": 1500,
    "default-gateway": "10.20.1.1",
    "default-gateway-v6": "2001:db8:abcd::89",
    "dns": ["10.20.1.2","10.20.1.3"]
}
核心选项为bip,即bridge ip之意,用于指定docker0桥自身的IP地址;其它选项可通过此地址计算得出。
docker远程连接
dockerd守护进程的C/S,其默认仅监听Unix Socket格式的地址(/var/run/docker.sock),如果要使用TCP套接字,则需要修改/etc/docker/daemon.json配置文件,添加如下内容,然后重启docker服务:
"hosts": ["tcp://0.0.0.0:2375", "unix:///var/run/docker.sock"]
在客户端上向dockerd直接传递“-H|–host”选项指定要控制哪台主机上的docker容器
docker -H 192.168.8.132:2375 ps
docker 创建自定义桥
创建一个额外的自定义桥,区别于docker0
[root@localhost ~]# docker network ls
NETWORK ID     NAME      DRIVER    SCOPE
61073fce2e9f   bridge    bridge    local
bc4c56283df0   host      host      local
32581f70c056   none      null      local
[root@localhost ~]# docker network create -d bridge --subnet "192.168.2.0/24" --gateway "192.168.2.1" br0
d3f0f0b7c13d25d9a90169663a71dbe71fb442b4758bfdf9e9f52259a37ad934
[root@localhost ~]# docker network ls
NETWORK ID     NAME      DRIVER    SCOPE
d3f0f0b7c13d   br0       bridge    local
61073fce2e9f   bridge    bridge    local
bc4c56283df0   host      host      local
32581f70c056   none      null      local
使用新创建的自定义桥来创建容器:
[root@localhost ~]# docker run -it --name box1 --network br0 --rm busybox
/ # ifconfig
eth0      Link encap:Ethernet  HWaddr 02:42:C0:A8:02:02
          inet addr:192.168.2.2  Bcast:192.168.2.255  Mask:255.255.255.0
          UP BROADCAST RUNNING MULTICAST  MTU:1500  Metric:1
          RX packets:8 errors:0 dropped:0 overruns:0 frame:0
          TX packets:0 errors:0 dropped:0 overruns:0 carrier:0
          collisions:0 txqueuelen:0
          RX bytes:696 (696.0 B)  TX bytes:0 (0.0 B)
再创建一个容器,使用默认的bridge桥:
[root@localhost ~]# docker run -it --name box --rm busybox
/ # ip a
1: lo: <LOOPBACK,UP,LOWER_UP> mtu 65536 qdisc noqueue qlen 1000
    link/loopback 00:00:00:00:00:00 brd 00:00:00:00:00:00
    inet 127.0.0.1/8 scope host lo
       valid_lft forever preferred_lft forever
7: eth0@if8: <BROADCAST,MULTICAST,UP,LOWER_UP,M-DOWN> mtu 1500 qdisc noqueue
    link/ether 02:42:ac:11:00:02 brd ff:ff:ff:ff:ff:ff
    inet 172.17.0.2/16 brd 172.17.255.255 scope global eth0
       valid_lft forever preferred_lft forever
/ #
试想一下,此时的box与box1能否互相通信?如果不能该如何实现通信?

#使box容器连接到br0网桥
[root@localhost ~]# docker network connect br0 box

[root@localhost ~]# docker run -it --name box --rm busybox
/ # ip a
1: lo: <LOOPBACK,UP,LOWER_UP> mtu 65536 qdisc noqueue qlen 1000
    link/loopback 00:00:00:00:00:00 brd 00:00:00:00:00:00
    inet 127.0.0.1/8 scope host lo
       valid_lft forever preferred_lft forever
7: eth0@if8: <BROADCAST,MULTICAST,UP,LOWER_UP,M-DOWN> mtu 1500 qdisc noqueue
    link/ether 02:42:ac:11:00:02 brd ff:ff:ff:ff:ff:ff
    inet 172.17.0.2/16 brd 172.17.255.255 scope global eth0
       valid_lft forever preferred_lft forever
9: eth1@if10: <BROADCAST,MULTICAST,UP,LOWER_UP,M-DOWN> mtu 1500 qdisc noqueue
    link/ether 02:42:c0:a8:02:03 brd ff:ff:ff:ff:ff:ff
    inet 192.168.2.3/24 brd 192.168.2.255 scope global eth1
       valid_lft forever preferred_lft forever
/ # ping 192.168.2.1
PING 192.168.2.1 (192.168.2.1): 56 data bytes
64 bytes from 192.168.2.1: seq=0 ttl=64 time=0.105 ms
64 bytes from 192.168.2.1: seq=1 ttl=64 time=0.090 ms
64 bytes from 192.168.2.1: seq=2 ttl=64 time=0.077 ms
[root@localhost ~]# docker run -it --name box1 --network br0 --rm busybox
/ # ping 172.17.0.2
PING 172.17.0.2 (172.17.0.2): 56 data bytes

#使box1容器连接到bridge
[root@localhost ~]# docker network connect bridge box1

/ # ping 172.17.0.2
PING 172.17.0.2 (172.17.0.2): 56 data bytes
64 bytes from 172.17.0.2: seq=0 ttl=64 time=0.259 ms
64 bytes from 172.17.0.2: seq=1 ttl=64 time=0.142 ms


 60万+
60万+

 被折叠的 条评论
为什么被折叠?
被折叠的 条评论
为什么被折叠?
 到【灌水乐园】发言


