


 本文深入剖析了SpringBoot的Web模块源码,从静态资源处理、请求映射、响应处理到视图解析器、拦截器、文件上传、异常处理等关键环节。详细介绍了DispatcherServlet、HandlerMapping、HandlerAdapter的工作原理,以及参数和返回值的处理流程。此外,还探讨了如何自定义配置以适应不同需求,展示了SpringBoot如何实现Web服务器的嵌入和定制化。
此文章篇幅过场,可以将其分为如下 七个模块依次进行分析。
层层递进的关系来分析 SpringBoot 的Web模块源码
1. SpringBoot Web源码分析(一) 静态资源源码分析
2. SpringBoot Web源码分析(二) 请求处理源码分析
3. SpringBoot Web源码分析(三) 响应处理源码分析
4. SpringBoot Web源码分析(四) 视图解析器源码分析
5. SpringBoot Web源码分析(五),拦截器和文件上传
6. SpringBoot Web源码分析(六) 异常处理和Servlet组件
7. SpringBoot Web源码分析(七) 嵌入式服务器和定制化原理
SpringBoot 核心源码分析(Web 篇)
文章目录
一、Web 核心分析
1.1 简单功能分析
1.1.1 静态资源访问
1. 静态资源目录
只要放在类路径下:called /static(or /public or /resources or /META-INF/resources)
访问当前项目路径/ + 静态资源名,只需要写静态资源名就能访问,springboot
原理:/**
收到请求后先去匹配 controller,如果不能处理就去交给静态资源处理器。
改变默认的静态资源位置
  web:
    resources:
      static-locations: classpath:/path
2. 静态资源访问前缀
spring:
  mvc:
    static-path-pattern: /res/**
当前项目 + static-path-pattern + 静态资源名 = 静态资源文件夹下的
1.1.2 欢迎页支持
1. 自动加载的欢迎页面
- 在静态资料路径下 index.html
- 可以配置静态资源路径
- 但是不可以配置静态资源的访问前缀。否则导致index.html 不能被默认访问
- controller 能够处理 /index 请求的controller 自动会请求
2. favicon支持
将 favicon.ico 放置在静态资源路径下,会自动将favicon.ico 作为页面小图标
1.1.3 静态资源配置原理
1. 加载配置类源码
- springboot启动默认加载 XXXAutoConfiguration类(自动配置类)
- SpringMVC功能的自动配置类是 WebMvcAutoConfiguration
@Configuration(
    proxyBeanMethods = false
)
@ConditionalOnWebApplication(
    type = Type.SERVLET
)
@ConditionalOnClass({Servlet.class, DispatcherServlet.class, WebMvcConfigurer.class})
@ConditionalOnMissingBean({WebMvcConfigurationSupport.class})
@AutoConfigureOrder(-2147483638)
@AutoConfigureAfter({DispatcherServletAutoConfiguration.class, TaskExecutionAutoConfiguration.class, ValidationAutoConfiguration.class})
public class WebMvcAutoConfiguration {}
2. 配置类生效源码
@Configuration(
        proxyBeanMethods = false
    )
    @Import({WebMvcAutoConfiguration.EnableWebMvcConfiguration.class})
    @EnableConfigurationProperties({WebMvcProperties.class, ResourceProperties.class, WebProperties.class})
    @Order(0)
    public static class WebMvcAutoConfigurationAdapter implements WebMvcConfigurer, ServletContextAware {}
配置文件的相关属性和什么进行了绑定
如果配置中只有一个有参构造器,那么属性会自动从容器中找
// ResourceProperties 获取 spring.resources
// WebMvcProperties 获取 sprint.mvc
// ListableBeanFactory 获取bean 工厂
// ResourceHandlerRegistrationCustomizer 获取资源处理自定义器
// ...
        public WebMvcAutoConfigurationAdapter(ResourceProperties resourceProperties, WebProperties webProperties, WebMvcProperties mvcProperties, ListableBeanFactory beanFactory, ObjectProvider<HttpMessageConverters> messageConvertersProvider, ObjectProvider<WebMvcAutoConfiguration.ResourceHandlerRegistrationCustomizer> resourceHandlerRegistrationCustomizerProvider, ObjectProvider<DispatcherServletPath> dispatcherServletPath, ObjectProvider<ServletRegistrationBean<?>> servletRegistrations) {
            this.resourceProperties = (Resources)(resourceProperties.hasBeenCustomized() ? resourceProperties : webProperties.getResources());
            this.mvcProperties = mvcProperties;
            this.beanFactory = beanFactory;
            this.messageConvertersProvider = messageConvertersProvider;
            this.resourceHandlerRegistrationCustomizer = (WebMvcAutoConfiguration.ResourceHandlerRegistrationCustomizer)resourceHandlerRegistrationCustomizerProvider.getIfAvailable();
            this.dispatcherServletPath = dispatcherServletPath;
            this.servletRegistrations = servletRegistrations;
            this.mvcProperties.checkConfiguration();
        }
3. 资源处理的默认规则源码
这样可以看出默认规则下的SpringBoot 以什么路径作为静态资源,以及为webjar的配置
public void addResourceHandlers(ResourceHandlerRegistry registry) {
            if (!this.resourceProperties.isAddMappings()) {
                logger.debug("Default resource handling disabled");
            } else {
                Duration cachePeriod = this.resourceProperties.getCache().getPeriod();
                CacheControl cacheControl = this.resourceProperties.getCache().getCachecontrol().toHttpCacheControl();
                if (!registry.hasMappingForPattern("/webjars/**")) {
                    this.customizeResourceHandlerRegistration(registry.addResourceHandler(new String[]{"/webjars/**"}).addResourceLocations(new String[]{"classpath:/META-INF/resources/webjars/"}).setCachePeriod(this.getSeconds(cachePeriod)).setCacheControl(cacheControl));
                }

                String staticPathPattern = this.mvcProperties.getStaticPathPattern();
                if (!registry.hasMappingForPattern(staticPathPattern)) {
                    this.customizeResourceHandlerRegistration(registry.addResourceHandler(new String[]{staticPathPattern}).addResourceLocations(WebMvcAutoConfiguration.getResourceLocations(this.resourceProperties.getStaticLocations())).setCachePeriod(this.getSeconds(cachePeriod)).setCacheControl(cacheControl));
                }

            }
        }
4. 可以直接禁用所有静态资源
spring:
  web:
    resources:
      add-mappings: false
5. 默认资源配置源码
private static final String[] CLASSPATH_RESOURCE_LOCATIONS =
new String[]{"classpath:/META-INF/resources/",
"classpath:/resources/", "classpath:/static/",
"classpath:/public/"};
    private String[] staticLocations;
    private boolean addMappings;
    private final ResourceProperties.Chain chain;
    private final ResourceProperties.Cache cache;
6. 欢迎页源码
我们都知道SpringBoot中有默认的欢迎页面,这里是用SpringBoot给我们提供的类 WelcomePageHandlerMapping 来进行提供的,在访问这个HanderMapping之前,其实SpringBoot 会先去访问 RequestMappingHandlerMapping,即程序员自己创建的 controller 的HandlerMapping,这也说明了我们编写的Controller的优先级是最高的(后面有详细描述)。
@Bean
public WelcomePageHandlerMapping welcomePageHandlerMapping(ApplicationContext applicationContext, FormattingConversionService mvcConversionService, ResourceUrlProvider mvcResourceUrlProvider) {
    WelcomePageHandlerMapping welcomePageHandlerMapping = new WelcomePageHandlerMapping(new TemplateAvailabilityProviders(applicationContext), applicationContext, this.getWelcomePage(), this.mvcProperties.getStaticPathPattern());
    welcomePageHandlerMapping.setInterceptors(this.getInterceptors(mvcConversionService, mvcResourceUrlProvider));
    welcomePageHandlerMapping.setCorsConfigurations(this.getCorsConfigurations());
    return welcomePageHandlerMapping;
}

WelcomePageHandlerMapping(TemplateAvailabilityProviders templateAvailabilityProviders, ApplicationContext applicationContext, Resource welcomePage, String staticPathPattern) {
    if (welcomePage != null && "/**".equals(staticPathPattern)) {
        logger.info("Adding welcome page: " + welcomePage);
        this.setRootViewName("forward:index.html");
    }
    else if (this.welcomeTemplateExists(templateAvailabilityProviders, applicationContext)) {
        logger.info("Adding welcome page template: index");
        this.setRootViewName("index");
    }

}
1.2 请求处理
1.2.1 请求参数处理
1. 请求映射
- xxxMapping
- Rest 风格(使用Http请求的方式动词来表示对资源的操作)
- 以前:/getUser 获取用户 /deleteUser 删除用户 /editUser 修改用户 /saveUser 保存用户
- 现在:/user get获取 Delete 删除用户 PUT 修改用户 POST 保存用户
- 核心 Filter HiddenHttpMethodFilter
开启这个过滤器
  mvc:
    hiddenmethod:
      filter:
        enabled: true
2. Rest原理
- 表单提交的时候会带上_method=PUT
- 请求过来HidderHttpMethodFilter拦截
- 请求是否正常,并且判断是否是 POST
- 获取到_method 属性的值
- 兼容以下请求,PUT DELETE PATCH
- 原生request包装模式 requestWrapper重写了getMethod 方法
- 过滤器使用 wrapper。以后的方法调用getMethod是调用requestWrapper的
- 请求是否正常,并且判断是否是 POST
protected void doFilterInternal(HttpServletRequest request, HttpServletResponse response, FilterChain filterChain) throws ServletException, IOException {
        HttpServletRequest requestToUse = request;
        if ("POST".equals(request.getMethod()) && request.getAttribute("javax.servlet.error.exception") == null) {
            String paramValue = request.getParameter(this.methodParam);
            if (StringUtils.hasLength(paramValue)) {
                String method = paramValue.toUpperCase(Locale.ENGLISH);
                if (ALLOWED_METHODS.contains(method)) {
                    requestToUse = new HiddenHttpMethodFilter.HttpMethodRequestWrapper(request, method);
                }
            }
        }
1.2.2 请求映射处理源码分析
FrameworkServlet
继承树结构:DispatcherServlet 继承 FrameworkServlet 继承 HttpServletBean 继承 HttpServlet
我们都知道,当一个请求发送给服务器时,服务器底层会找到发送请求的地址,并执行对应的Servlet 方法,在HttpServlet类中,将 四种请求的方法封装成为四种do* 方法,我们就从这里下手,这里就是处理请求的入口。
FrameworkServlet 继承了HttpServlet,查找FrameworkServlet中重写的doGet和doPost方法等等
    protected final void doGet(HttpServletRequest request, HttpServletResponse response) throws ServletException, IOException {
        this.processRequest(request, response);
    }

    protected final void doPost(HttpServletRequest request, HttpServletResponse response) throws ServletException, IOException {
        this.processRequest(request, response);
    }

    protected final void doPut(HttpServletRequest request, HttpServletResponse response) throws ServletException, IOException {
        this.processRequest(request, response);
    }

    protected final void doDelete(HttpServletRequest request, HttpServletResponse response) throws ServletException, IOException {
        this.processRequest(request, response);
    }
我们发现这么多的 do 方法中,都是在执行这个 processRequest 方法
FrameworkServlet - processRequest()
进入到 processRequest方法中
protected final void processRequest(HttpServletRequest request, HttpServletResponse response) throws ServletException, IOException {
        // 初始化的过程
        long startTime = System.currentTimeMillis();
        Throwable failureCause = null;
        LocaleContext previousLocaleContext = LocaleContextHolder.getLocaleContext();
        LocaleContext localeContext = this.buildLocaleContext(request);
        RequestAttributes previousAttributes = RequestContextHolder.getRequestAttributes();
        ServletRequestAttributes requestAttributes = this.buildRequestAttributes(request, response, previousAttributes);
        WebAsyncManager asyncManager = WebAsyncUtils.getAsyncManager(request);
        asyncManager.registerCallableInterceptor(FrameworkServlet.class.getName(), new FrameworkServlet.RequestBindingInterceptor());
        this.initContextHolders(request, localeContext, requestAttributes);

        try {
            // 执行核心方法 doService
            this.doService(request, response);
        } catch (IOException | ServletException var16) {
            failureCause = var16;
            throw var16;
        } catch (Throwable var17) {
            failureCause = var17;
            throw new NestedServletException("Request processing failed", var17);
        } finally {
            this.resetContextHolders(request, previousLocaleContext, previousAttributes);
            if (requestAttributes != null) {
                requestAttributes.requestCompleted();
            }

            this.logResult(request, response, (Throwable)failureCause, asyncManager);
            this.publishRequestHandledEvent(request, response, startTime, (Throwable)failureCause);
        }

    }
通过查看 processRequest 方法,我们发现此方法做了大量的初始化,并且执行了另一个核心方法 doService 方法
FrameworkServlet - doService()
查看这个doService方法,发现是一个抽象方法, 下层来实现的
protected abstract void doService(HttpServletRequest var1, HttpServletResponse var2) throws Exception;
DispatcherServlet
DispatchServlet - doService() 实现
于是我们来到了DispatcherServlet这个类中,果然发现了doService的实现方法
    protected void doService(HttpServletRequest request, HttpServletResponse response) throws Exception {
        this.logRequest(request);
        Map<String, Object> attributesSnapshot = null;
        if (WebUtils.isIncludeRequest(request)) {
            attributesSnapshot = new HashMap();
            Enumeration attrNames = request.getAttributeNames();

            label95:
            while(true) {
                String attrName;
                do {
                    if (!attrNames.hasMoreElements()) {
                        break label95;
                    }

                    attrName = (String)attrNames.nextElement();
                } while(!this.cleanupAfterInclude && !attrName.startsWith("org.springframework.web.servlet"));

                attributesSnapshot.put(attrName, request.getAttribute(attrName));
            }
        }

        request.setAttribute(WEB_APPLICATION_CONTEXT_ATTRIBUTE, this.getWebApplicationContext());
        request.setAttribute(LOCALE_RESOLVER_ATTRIBUTE, this.localeResolver);
        request.setAttribute(THEME_RESOLVER_ATTRIBUTE, this.themeResolver);
        request.setAttribute(THEME_SOURCE_ATTRIBUTE, this.getThemeSource());
        if (this.flashMapManager != null) {
            FlashMap inputFlashMap = this.flashMapManager.retrieveAndUpdate(request, response);
            if (inputFlashMap != null) {
                request.setAttribute(INPUT_FLASH_MAP_ATTRIBUTE, Collections.unmodifiableMap(inputFlashMap));
            }

            request.setAttribute(OUTPUT_FLASH_MAP_ATTRIBUTE, new FlashMap());
            request.setAttribute(FLASH_MAP_MANAGER_ATTRIBUTE, this.flashMapManager);
        }

        // 上面的代码都是在进行初始化操作

        try {
            // 最终执行了这个方法
            this.doDispatch(request, response);
        } finally {
            if (!WebAsyncUtils.getAsyncManager(request).isConcurrentHandlingStarted() && attributesSnapshot != null) {
                this.restoreAttributesAfterInclude(request, attributesSnapshot);
            }

        }

    }
我们发现这个方法的结构和processRequest 方法的结构大体相同,先做出初始化,然后去调用了另一个核心方法 doDispatch方法
通过DispatcherServlet中重写的doService方法,我们可以看出是调用了doDispatch这个方法,到这里我们就能够知道,每次请求都会调用这个核心方法
每一个请求进来都会调动这个方法
DispatchServlet - doDispatch()
    protected void doDispatch(HttpServletRequest request, HttpServletResponse response) throws Exception {
        // 封装一下Request请求
        HttpServletRequest processedRequest = request;
        // 初始化HandlerExecutionChain
        HandlerExecutionChain mappedHandler = null;
        boolean multipartRequestParsed = false;

        WebAsyncManager asyncManager = WebAsyncUtils.getAsyncManager(request);

        try {
            ModelAndView mv = null;
            Exception dispatchException = null;

            try {
                // 检查是否文件上传
                processedRequest = checkMultipart(request);
                multipartRequestParsed = (processedRequest != request);
                // 寻找到Request对应哪一个Hander(controller)方法
                mappedHandler = getHandler(processedRequest);
                if (mappedHandler == null) {
                    noHandlerFound(processedRequest, response);
                    return;
                }

                // Determine handler adapter for the current request.
                HandlerAdapter ha = getHandlerAdapter(mappedHandler.getHandler());

                // Process last-modified header, if supported by the handler.
                String method = request.getMethod();
                boolean isGet = "GET".equals(method);
                if (isGet || "HEAD".equals(method)) {
                    long lastModified = ha.getLastModified(request, mappedHandler.getHandler());
                    if (new ServletWebRequest(request, response).checkNotModified(lastModified) && isGet) {
                        return;
                    }
                }

                if (!mappedHandler.applyPreHandle(processedRequest, response)) {
                    return;
                }

                // Actually invoke the handler.
                mv = ha.handle(processedRequest, response, mappedHandler.getHandler());

                if (asyncManager.isConcurrentHandlingStarted()) {
                    return;
                }

                applyDefaultViewName(processedRequest, mv);
                mappedHandler.applyPostHandle(processedRequest, response, mv);
            }
            catch (Exception ex) {
                dispatchException = ex;
            }
            catch (Throwable err) {
                // As of 4.3, we're processing Errors thrown from handler methods as well,
                // making them available for @ExceptionHandler methods and other scenarios.
                dispatchException = new NestedServletException("Handler dispatch failed", err);
            }
            processDispatchResult(processedRequest, response, mappedHandler, mv, dispatchException);
        }
        catch (Exception ex) {
            triggerAfterCompletion(processedRequest, response, mappedHandler, ex);
        }
        catch (Throwable err) {
            triggerAfterCompletion(processedRequest, response, mappedHandler,
                    new NestedServletException("Handler processing failed", err));
        }
        finally {
            if (asyncManager.isConcurrentHandlingStarted()) {
                // Instead of postHandle and afterCompletion
                if (mappedHandler != null) {
                    mappedHandler.applyAfterConcurrentHandlingStarted(processedRequest, response);
                }
            }
            else {
                // Clean up any resources used by a multipart request.
                if (multipartRequestParsed) {
                    cleanupMultipart(processedRequest);
                }
            }
        }
    }
DispatchServlet - getHandler()
在方法的执行过程中我们注意到,有这样一个方法,叫handlerMapping 方法,这个方法的作用就是根据请求找到对应的映射,得到相应的 Handler(Controller)来处理这个请求
寻找handlerMappings的方法
	@Nullable
	protected HandlerExecutionChain getHandler(HttpServletRequest request) throws Exception {
		if (this.handlerMappings != null) {
			for (HandlerMapping mapping : this.handlerMappings) {
				HandlerExecutionChain handler = mapping.getHandler(request);
				if (handler != null) {
					return handler;
				}
			}
		}
		return null;
	}
我们通过 Debug 方式来查看这个,发现SpringBoot中给有五中HandlerMapping

再来分析 getHandler 方法,我们可以得出在寻找相关的Handler时,最先寻找的是RequestMappingHandlerMapping,即我们编写的Controller的优先级是最高的,这也解释了我在前面所讲的Controller的优先级是最高的。
在HandlerMapping中我们可以找到我们在Controller层中编写的控制器,也进一步证明了我的猜想

解释了默认情况下的WelcomePageHandlerMapping,视图默认重定向index.html,这里解释了默认情况下的静态资源的index.html 作为欢迎页面

小结
所有的请求映射都在HandlerMapping中
- springboot自动配置欢迎页的HandlerMapping,访问/能访问到index.html
- springboot自动配置了RequestMappingHandlerMapping
- 请求进来,挨个尝试所有的HandlerMapping看是否有请求
- 如果有,就找到这个请求的Hander
- 如果没有,就继续找
- 需要一些自定义的映射处理,我们也可以自己给容器中放HandlerMapping
1.2.3 常用参数注解
@RequestMapping("/car/{id}/{username}")
    public Map<String,Object> getCar(@PathVariable("id") Integer id,
                                     @PathVariable("username") String username,
                                     @PathVariable Map<String,String> pv,
                                     @RequestHeader("User-Agent") String user_Agent,
                                     @RequestHeader Map<String,String> head,
                                     @RequestParam("age") Integer age,
                                     @RequestParam Map<String,String> param,
                                     @CookieValue Cookie cookie){}
1.2.4 参数处理原理
- 从前面的分析我们可以得出是HandlerMapping中找到能处理请求的Handler(Controller)
- 下一步就是为当前 Handler找一个适配器 HandlerAdapter;RequestMappingHandlerAdapter
- 适配器执行目标方法并且确定方法参数的每一个值
- 找到参数解析器
- 返回值处理器
1. 执行过程
// Determine handler adapter for the current request.
// 获取当前 Handler 的适配器
HandlerAdapter ha = getHandlerAdapter(mappedHandler.getHandler());

// Process last-modified header, if supported by the handler.
String method = request.getMethod();
boolean isGet = "GET".equals(method);
if (isGet || "HEAD".equals(method)) {
	long lastModified = ha.getLastModified(request, mappedHandler.getHandler());
	if (new ServletWebRequest(request, response).checkNotModified(lastModified) && isGet) {
		return;
	}
}

if (!mappedHandler.applyPreHandle(processedRequest, response)) {
	return;
}

// Actually invoke the handler.
// 真正的执行这个 Handler
mv = ha.handle(processedRequest, response, mappedHandler.getHandler());
2. HandlerAdapter 接口
public interface HandlerAdapter {

	boolean supports(Object handler);

	ModelAndView handle(HttpServletRequest request, HttpServletResponse response, Object handler) throws Exception;

	long getLastModified(HttpServletRequest request, Object handler);

}
通过这个接口我们可以自定义一个HandlerAdapter实现类,通过supports 来告诉 SpringMVC 这个实现类支持哪一种Handler(也可以自定义),如果支持,就会调用这个接口的Handle方法
SpringBoot 给我们提供了四种 HandlerAdapter

- RequestMappingHandlerAdapter 支持方法上标注 @RequestMapping
- HandlerFunctionAdapter 支持函数式编程
…
默认寻找的是第一个
3. 执行目标方法 ha.handle()
// Actually invoke the handle
mv = ha.handle(processedRequest, response, mappedHandler.getHandler());
进入后发现执行 HandleInternal
return handleInternal(request, response, (HandlerMethod) handler);
再深入发现进入了RequestMappingHandlerAdapter类中的checkRequest方法这里也验证了我前面所说的RequestMappingHandlerAdapter 是用来处理这个请求的
checkRequest(request);
继续执行
		checkRequest(request);

		// Execute invokeHandlerMethod in synchronized block if required.
		if (this.synchronizeOnSession) {
			HttpSession session = request.getSession(false);
			if (session != null) {
				Object mutex = WebUtils.getSessionMutex(session);
				synchronized (mutex) {
					mav = invokeHandlerMethod(request, response, handlerMethod);
				}
			}
			else {
				// No HttpSession available -> no mutex necessary
				mav = invokeHandlerMethod(request, response, handlerMethod);
			}
		}
		else {
			// No synchronization on session demanded at all...
			mav = invokeHandlerMethod(request, response, handlerMethod);
		}
我们发现了一个方法叫做 invokeHandlerMethod (执行目标方法)我们进入
	@Nullable
	protected ModelAndView invokeHandlerMethod(HttpServletRequest request,
			HttpServletResponse response, HandlerMethod handlerMethod) throws Exception {

		ServletWebRequest webRequest = new ServletWebRequest(request, response);
		try {
			WebDataBinderFactory binderFactory = getDataBinderFactory(handlerMethod);
			ModelFactory modelFactory = getModelFactory(handlerMethod, binderFactory);

			ServletInvocableHandlerMethod invocableMethod = createInvocableHandlerMethod(handlerMethod);
			if (this.argumentResolvers != null) {
				invocableMethod.setHandlerMethodArgumentResolvers(this.argumentResolvers);
			}
			if (this.returnValueHandlers != null) {
				invocableMethod.setHandlerMethodReturnValueHandlers(this.returnValueHandlers);
			}
			invocableMethod.setDataBinderFactory(binderFactory);
			invocableMethod.setParameterNameDiscoverer(this.parameterNameDiscoverer);

			ModelAndViewContainer mavContainer = new ModelAndViewContainer();
			mavContainer.addAllAttributes(RequestContextUtils.getInputFlashMap(request));
			modelFactory.initModel(webRequest, mavContainer, invocableMethod);
			mavContainer.setIgnoreDefaultModelOnRedirect(this.ignoreDefaultModelOnRedirect);

			AsyncWebRequest asyncWebRequest = WebAsyncUtils.createAsyncWebRequest(request, response);
			asyncWebRequest.setTimeout(this.asyncRequestTimeout);

			WebAsyncManager asyncManager = WebAsyncUtils.getAsyncManager(request);
			asyncManager.setTaskExecutor(this.taskExecutor);
			asyncManager.setAsyncWebRequest(asyncWebRequest);
			asyncManager.registerCallableInterceptors(this.callableInterceptors);
			asyncManager.registerDeferredResultInterceptors(this.deferredResultInterceptors);

			if (asyncManager.hasConcurrentResult()) {
				Object result = asyncManager.getConcurrentResult();
				mavContainer = (ModelAndViewContainer) asyncManager.getConcurrentResultContext()[0];
				asyncManager.clearConcurrentResult();
				LogFormatUtils.traceDebug(logger, traceOn -> {
					String formatted = LogFormatUtils.formatValue(result, !traceOn);
					return "Resume with async result [" + formatted + "]";
				});
				invocableMethod = invocableMethod.wrapConcurrentResult(result);
			}

			invocableMethod.invokeAndHandle(webRequest, mavContainer);
			if (asyncManager.isConcurrentHandlingStarted()) {
				return null;
			}

			return getModelAndView(mavContainer, modelFactory, webRequest);
		}
		finally {
			webRequest.requestCompleted();
		}
	}
4. 参数解析器 argumentResolvers
确定将要执行的目标方法的每一个参数值是什么,源码在解析参数的过程中利用了一个for循环来比对参数解析器,如果发现该参数没有对应的参数解析器就会发生保存。并且将对应的参数解析器放入缓存中,防止每次都进行一一比对。
SpringMVC 目标方法能解析多少类型接口,是取决于参数解析器
参数解析器接口
public interface HandlerMethodArgumentResolver {
    boolean supportsParameter(MethodParameter var1);

    @Nullable
    Object resolveArgument(MethodParameter var1, @Nullable ModelAndViewContainer var2, NativeWebRequest var3, @Nullable WebDataBinderFactory var4) throws Exception;
}
support方法来判断是否支持当前参数,如果支持就调用resolveArgument方法
5. 返回值处理器 returnValueHandlers
用来定义返回值的类型
6. invokeAndHandle()
封装完成后执行 invokeAndHandle 方法

通过打断点的方式我们知道,执行了invokeAndHandle 方法后,执行 invokeForRequest 方法,断点就会直接到 Controller中去,所以 invokeForRequest 方法中就是最终的方法
7. invokeForRequest()
真正执行Controller 的方法

    public Object invokeForRequest(NativeWebRequest request, @Nullable ModelAndViewContainer mavContainer, Object... providedArgs) throws Exception {
    	// 确定所有参数,将所有参数获取在 args 这个数组中,调用Controller中的方法时传入这个参数
        Object[] args = this.getMethodArgumentValues(request, mavContainer, providedArgs);
        if (logger.isTraceEnabled()) {
            logger.trace("Arguments: " + Arrays.toString(args));
        }
		// 通过反射来执行我们 Controller 中的方法
        return this.doInvoke(args);
    }
出现了反射工具类 ReflectionUtils 进一步验证通过反射来执行 Controller 中的方法

8. Servlet API
HttpServletRequest,HttpServletResponse 等
ServletRequestMethodArgumentResolver 以上部分参数
@Override
	public boolean supportsParameter(MethodParameter parameter) {
		Class<?> paramType = parameter.getParameterType();
		return (WebRequest.class.isAssignableFrom(paramType) ||
				ServletRequest.class.isAssignableFrom(paramType) ||
				MultipartRequest.class.isAssignableFrom(paramType) ||
				HttpSession.class.isAssignableFrom(paramType) ||
				(pushBuilder != null && pushBuilder.isAssignableFrom(paramType)) ||
				Principal.class.isAssignableFrom(paramType) ||
				InputStream.class.isAssignableFrom(paramType) ||
				Reader.class.isAssignableFrom(paramType) ||
				HttpMethod.class == paramType ||
				Locale.class == paramType ||
				TimeZone.class == paramType ||
				ZoneId.class == paramType);
	}
9. 复杂参数 Map和Model
Map 和 Model 中的参数会自动送到请求域中。
Map 和 Model 会返回 mavContainer.getModel() ----> BindingAwareModelMap() 用来解析Model 和Map
10.自定义参数对象执行过程
自动转换成复杂对象,并且能够联级封装
ServletModelAttributeMethodProcessor 这个参数处理器支持处理自定义参数对象
判断是否是简单参数
public static boolean isSimpleValueType(Class<?> type) {
		return (Void.class != type && void.class != type &&
				(ClassUtils.isPrimitiveOrWrapper(type) ||
				Enum.class.isAssignableFrom(type) ||
				CharSequence.class.isAssignableFrom(type) ||
				Number.class.isAssignableFrom(type) ||
				Date.class.isAssignableFrom(type) ||
				Temporal.class.isAssignableFrom(type) ||
				URI.class == type ||
				URL.class == type ||
				Locale.class == type ||
				Class.class == type));
	}
@Override
	@Nullable
	public final Object resolveArgument(MethodParameter parameter, @Nullable ModelAndViewContainer mavContainer,
			NativeWebRequest webRequest, @Nullable WebDataBinderFactory binderFactory) throws Exception {

		Assert.state(mavContainer != null, "ModelAttributeMethodProcessor requires ModelAndViewContainer");
		Assert.state(binderFactory != null, "ModelAttributeMethodProcessor requires WebDataBinderFactory");

		String name = ModelFactory.getNameForParameter(parameter);
		ModelAttribute ann = parameter.getParameterAnnotation(ModelAttribute.class);
		if (ann != null) {
			mavContainer.setBinding(name, ann.binding());
		}

		Object attribute = null;
		BindingResult bindingResult = null;

		if (mavContainer.containsAttribute(name)) {
			attribute = mavContainer.getModel().get(name);
		}
		else {
			// Create attribute instance
			try {
				attribute = createAttribute(name, parameter, binderFactory, webRequest);
			}
			catch (BindException ex) {
				if (isBindExceptionRequired(parameter)) {
					// No BindingResult parameter -> fail with BindException
					throw ex;
				}
				// Otherwise, expose null/empty value and associated BindingResult
				if (parameter.getParameterType() == Optional.class) {
					attribute = Optional.empty();
				}
				bindingResult = ex.getBindingResult();
			}
		}

		if (bindingResult == null) {
			// Bean property binding and validation;
			// skipped in case of binding failure on construction.
			WebDataBinder binder = binderFactory.createBinder(webRequest, attribute, name);
			if (binder.getTarget() != null) {
				if (!mavContainer.isBindingDisabled(name)) {
					bindRequestParameters(binder, webRequest);
				}
				validateIfApplicable(binder, parameter);
				if (binder.getBindingResult().hasErrors() && isBindExceptionRequired(binder, parameter)) {
					throw new BindException(binder.getBindingResult());
				}
			}
			// Value type adaptation, also covering java.util.Optional
			if (!parameter.getParameterType().isInstance(attribute)) {
				attribute = binder.convertIfNecessary(binder.getTarget(), parameter.getParameterType(), parameter);
			}
			bindingResult = binder.getBindingResult();
		}

		// Add resolved attribute and BindingResult at the end of the model
		Map<String, Object> bindingResultModel = bindingResult.getModel();
		mavContainer.removeAttributes(bindingResultModel);
		mavContainer.addAllAttributes(bindingResultModel);

		return attribute;
	}
web数据绑定器,将请求参数的指定值绑定到 javabean 中
WebDataBinder binder = binderFactory.createBinder(webRequest, attribute, name);
webDataBinder 利用它里面的转换器,将请求的数据转换成指定类型,再封装到 JavaBean 中
GenericConversionService:在设置每一个值的时候,找里面的所有Conversion,哪一个能将这个数据类型转换到指定的类型


我们也能够给WebDataBinder 中放我们自己的 Convert
11.自定义Convert
    //1、WebMvcConfigurer定制化SpringMVC的功能
    @Bean
    public WebMvcConfigurer webMvcConfigurer(){
        return new WebMvcConfigurer() {
            @Override
            public void configurePathMatch(PathMatchConfigurer configurer) {
                UrlPathHelper urlPathHelper = new UrlPathHelper();
                // 不移除;后面的内容。矩阵变量功能就可以生效
                urlPathHelper.setRemoveSemicolonContent(false);
                configurer.setUrlPathHelper(urlPathHelper);
            }

            @Override
            public void addFormatters(FormatterRegistry registry) {
                registry.addConverter(new Converter<String, Pet>() {

                    @Override
                    public Pet convert(String source) {
                        // 啊猫,3
                        if(!StringUtils.isEmpty(source)){
                            Pet pet = new Pet();
                            String[] split = source.split(",");
                            pet.setName(split[0]);
                            pet.setAge(Integer.parseInt(split[1]));
                            return pet;
                        }
                        return null;
                    }
                });
            }
        };
    }
12.总结:参数处理原理
1. HandlerAdapter
2. 执行目标方法
3. 参数解析器HandlerMethodArgumentResolve
4. 返回值处理器
5. 确定目标方法的每一个参数
1. 挨个判断所有参数解析器哪一个支持这个参数
2. 解析这个参数的值
3. 自定义类型参数,封装POJO
6. 目标方法执行完成
7. 处理派发结果
1.3 响应处理
1.3.1 响应 JSON
相关依赖
    <dependency>
     <groupId>org.springframework.boot</groupId>
       <artifactId>spring-boot-starter-web</artifactId>
     </dependency>
web场景自动引入了json场景
    <dependency>
      <groupId>org.springframework.boot</groupId>
      <artifactId>spring-boot-starter-json</artifactId>
      <version>2.3.4.RELEASE</version>
      <scope>compile</scope>
    </dependency>
通过 debug 模式下,我们能找到在底层有一个返回值解析器
1. 返回值解析器

在返回要返回的值之前,要经过多次进行检测,检测是否为空,是否为字符串等等,等确定是一个返回对象时,执行这个方法:
try {
			this.returnValueHandlers.handleReturnValue(
					returnValue, getReturnValueType(returnValue), mavContainer, webRequest);
		}
进入找到真正执行的方法
	@Override
	public void handleReturnValue(@Nullable Object returnValue, MethodParameter returnType,
			ModelAndViewContainer mavContainer, NativeWebRequest webRequest) throws Exception {
		// 找到哪个返回值处理器能处理,然后来进行处理
		HandlerMethodReturnValueHandler handler = selectHandler(returnValue, returnType);
		if (handler == null) {
			throw new IllegalArgumentException("Unknown return value type: " + returnType.getParameterType().getName());
		}
		handler.handleReturnValue(returnValue, returnType, mavContainer, webRequest);
	}
返回值处理器接口

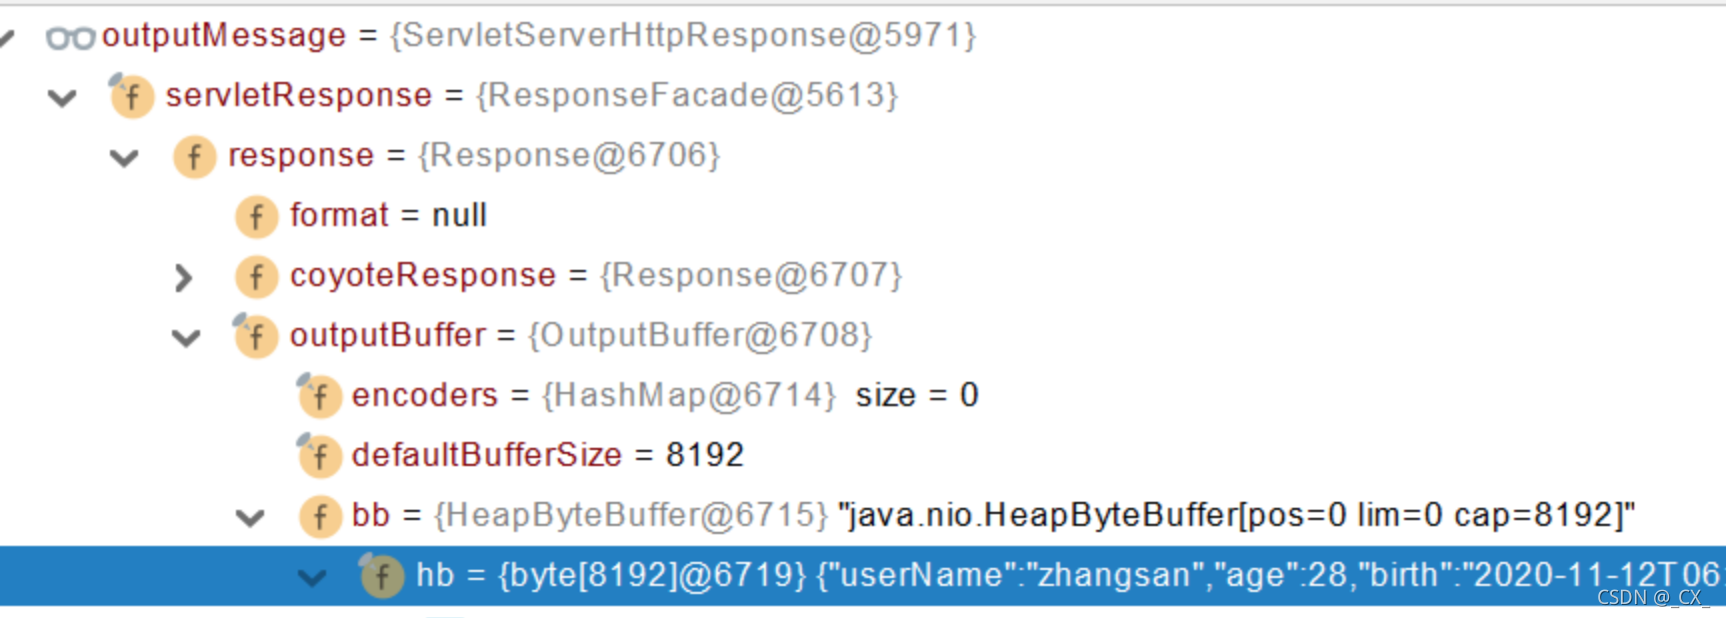
RequestResponseBodyMethodProcessor
@Override
	public void handleReturnValue(@Nullable Object returnValue, MethodParameter returnType,
			ModelAndViewContainer mavContainer, NativeWebRequest webRequest)
			throws IOException, HttpMediaTypeNotAcceptableException, HttpMessageNotWritableException {

		mavContainer.setRequestHandled(true);
		ServletServerHttpRequest inputMessage = createInputMessage(webRequest);
		ServletServerHttpResponse outputMessage = createOutputMessage(webRequest);

		// Try even with null return value. ResponseBodyAdvice could get involved.
        // 使用消息转换器进行写出操作
		writeWithMessageConverters(returnValue, returnType, inputMessage, outputMessage);
	}
第一个方法用来判断这个返回值处理器是否支持这个返回值
第二个方法就是当支持时,就会调用这个处理方法来进行处理
2. 返回值解析器原理
- 返回值处理器判断是否支持这种类型
- 返回值调用 handleReturnValue 方法来进行处理
- RequestResponseBodyMethodProcessor 可以处理@RequestBody 注解标注的请求
- 利用 MessageConverters 进行处理 将数据写为 JSON
1. 内容协商(浏览器默认会以请求头的方式告诉服务器他能接受什么样的内容类型)
2. 服务器最终根据自己自身的能力,决定服务器能生产出什么样内容类型的数据,
3. SpringMVC会挨个遍历所有容器底层的 HttpMessageConverter ,看谁能处理? - 得到MappingJackson2HttpMessageConverter可以将对象写为JSON
- 利用MappingJackson2HttpMessageConverter将对象转为JSON再写出去。
- 利用 MessageConverters 进行处理 将数据写为 JSON
内容协商

1.3.2 SpringMVC 支持的返回值
ModelAndView
Model
View
ResponseEntity
ResponseBodyEmitter
StreamingResponseBody
HttpEntity
HttpHeaders
Callable
DeferredResult
ListenableFuture
CompletionStage
WebAsyncTask
有 @ModelAttribute 且为对象类型的
@ResponseBody 注解 ---> RequestResponseBodyMethodProcessor;
1.3.3 HTTPMessageConverter原理

HttpMessageConverter: 看是否支持将 此 Class类型的对象,转为MediaType类型的数据。
例子:Person对象转为JSON。或者 JSON转为Person
默认的MessageConverter

0 - 只支持Byte类型的
1 - String
2 - String
3 - Resource
4 - ResourceRegion
5 - DOMSource.class \ SAXSource.class) \ StAXSource.class \StreamSource.class \Source.class
6 - MultiValueMap
7 - true
8 - true
9 - 支持注解方式xml处理的。
最终 MappingJackson2HttpMessageConverter 把对象转为JSON(利用底层的jackson的objectMapper转换的)
1.4 视图解析与模板引擎
视图解析:SpringBoot 默认不支持 jsp,需要引入第三方模块技术实现页面渲染
1.4.1 视图解析

1.4.2 模板引擎-Thymeleaf
1. 简介
Thymeleaf is a modern server-side Java template engine for both web and standalone environments, capable of processing HTML, XML, JavaScript, CSS and even plain text.
现代化、服务端Java模板引擎
2. 基本语法

…
1.4.3 视图解析流程
- 目标方法处理的过程中,所有数据都会被放在 ModelAndViewContainer 里面。包括数据和视图地址
- 方法的参数是一个自定义类型对象(从请求参数中确定的),把他重新放在 ModelAndViewContainer
- 任何目标方法执行完成以后都会返回 ModelAndView(数据和视图地址)。
- processDispatchResult 处理派发结果(页面改如何响应)
- render(mv, request, response); 进行页面渲染逻辑
- 根据方法的String返回值得到 View 对象【定义了页面的渲染逻辑】
- 所有的视图解析器尝试是否能根据当前返回值得到View对象
- 得到了 redirect:/main.html --> Thymeleaf new RedirectView()
- ContentNegotiationViewResolver 里面包含了下面所有的视图解析器,内部还是利用下面所有视图解析器得到视图对象。
- view.render(mv.getModelInternal(), request, response); 视图对象调用自定义的render进行页面渲染工作
- 根据方法的String返回值得到 View 对象【定义了页面的渲染逻辑】
- render(mv, request, response); 进行页面渲染逻辑
- RedirectView 如何渲染【重定向到一个页面】
- 获取目标url地址
- response.sendRedirect(encodedURL);
View 接口

视图解析器


1.5 拦截器
1.5.1 拦截器基本用法

1. 声明一个自己的拦截器,实现 HandlerInterceptor 接口。

2. 将这个拦截器注册到容器中
如果我们想在 web 配置中加入我们自己的配置时,就需要创建一个配置类,实现 WebMvcConfigurer 接口,在这里面添加上我们自己额外的配置。
WebMvcConfigurer 接口

根据方法就能看到里面有一个 addInterceptors 方法,添加我们自定义的拦截器
最后将拦截器添加到容器中,这样这个拦截器就能生效了

1.5.1 拦截器源码分析
1. 根据当前请求,找到 HandlerExecutionChain
doDispatch() 中的getHandler 方法,得到处理器(可以处理请求的handler以及handler的所有拦截器)


2. 顺序执行所有拦截器的preHandler 方法
如果返回为true 则执行下一个拦截器。

如果返回为false则执行triggerAfterCompletion方法,倒序执行(i-- 的for循环方式)

3. 如果任何一个拦截器都返回 false,直接不执行目标方法
4. 所有拦截器都返回 true,执行目标方法

5. 执行PostHandler方法
我们点进去发现也是倒序执行(使用 i-- 的方式)


6. 异常直接触发afterCompletion

7. 页面渲染完成触发 afterCompletion
(第一行是页面进行渲染的方法,后面无论是否发生异常都会运行afterCompletion方法)
这里也从源码的角度证明了拦截器中 afterCompletion 方法是一定会执行的

拦截器总结图

1.6 文件上传
1.6.1 文件上传示例
1. 页面代码
<!DOCTYPE html>
<html lang="en">
<head>
    <meta charset="UTF-8">
    <title>文件上传</title>
</head>
<body>

    <form method="post" action="/upload" enctype="multipart/form-data">
        <label>单文件</label>
        <input type="file" name="signalFile">
        <label>多文件</label>
        <input type="file" multiple name="multipleFile">
        <input type="submit" value="提交">
    </form>
</body>
</html>
2. Controller 处理并保存到磁盘
    @PostMapping("/upload")
    public String upload(@RequestPart("signalFile") MultipartFile signalFile,
                         @RequestPart("multipleFile") MultipartFile[] multipleFile) throws IOException {

        signalFile.transferTo(new File("D:\\imgs\\" + signalFile.getOriginalFilename()));
        for (MultipartFile file : multipleFile) {
            file.transferTo(new File("D:\\imgs\\" + file.getOriginalFilename()));
        }
        return "file";
    }
1.6.2 文件上传原理
文件上传自动配置类-MultipartAutoConfiguration-MultipartProperties

-
自动配置好了 StandardServletMultipartResolver 【标准的Servlet文件上传解析器】
-
原理步骤
- 请求进来使用文件上传解析器判断(isMultipart)并封装(resolveMultipart,返回MultipartHttpServletRequest)文件上传请求
判断是否是一个文件上传请求,如果是就返回这个请的封装类
 两个判断过程 判断multipartResolver是否为空
然后判断表单头部是否是包含 multipart/

如果确定是一个文件上传请求,就会调用对其进行封装的方法封装过程

调用StandardServletMultipartResolver实现的resolveMultipart方法

-
参数解析器来解析请求中的文件内容封装成MultipartFile(详情请看参数解析器的源码分析)
-
将request中文件信息封装为一个Map;MultiValueMap<String, MultipartFile>
1.7 异常处理
1.7.1 错误处理
1. 默认规则
-
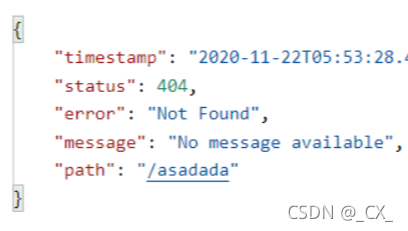
默认情况下,Spring Boot提供/error处理所有错误的映射
-
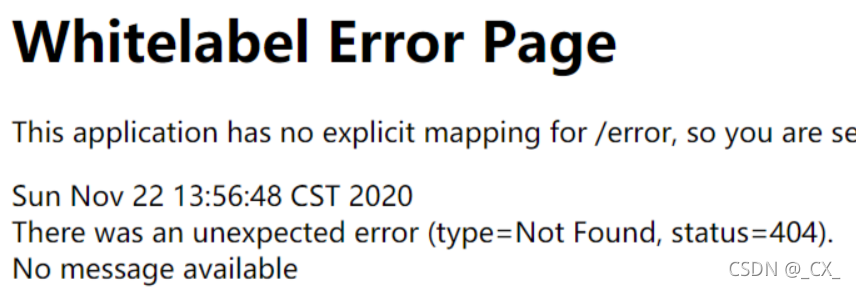
对于机器客户端,它将生成JSON响应,其中包含错误,HTTP状态和异常消息的详细信息。对于浏览器客户端,响应一个“ whitelabel”错误视图,以HTML格式呈现相同的数据
-
要对其进行自定义,添加View解析为error
-
要完全替换默认行为,可以实现 ErrorController 并注册该类型的Bean定义,或添加ErrorAttributes类型的组件以使用现有机制但替换其内容。
-
error/下的4xx,5xx页面会被自动解析;
2. 定制错误处理逻辑
- 自定义错误页
- @ControllerAdvice+@ExceptionHandler处理全局异常;底层是 ExceptionHandlerExceptionResolver 支持的
- @ResponseStatus+自定义异常 ;底层是 ResponseStatusExceptionResolver ,把responsestatus注解的信息底层调用 response.sendError(statusCode, resolvedReason);tomcat发送的/error
- Spring底层的异常,如 参数类型转换异常;DefaultHandlerExceptionResolver 处理框架底层的异常。
3. 异常处理自动配置原理
-
ErrorMvcAutoConfiguration 自动配置异常处理规则
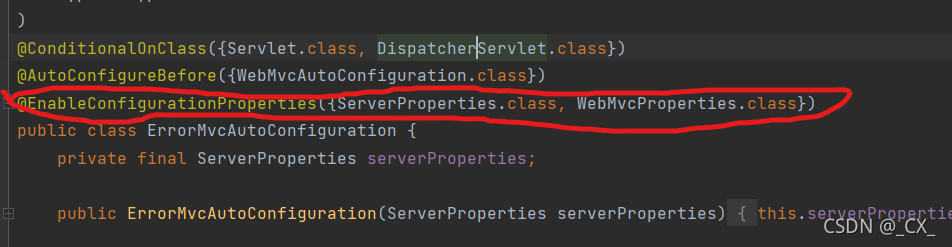
这里的ServerProperties.class 和 WebMvcProperties.class 中定义了许多配置属性- 容器中的组件:DefaultErrorAttribute( id:errorAttribute)
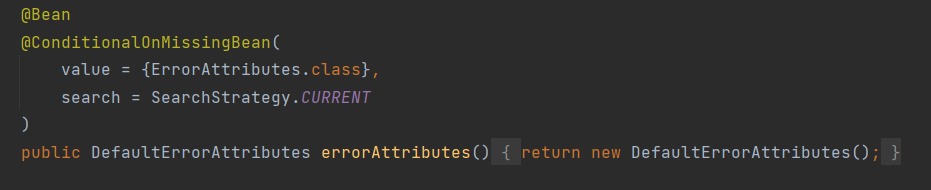
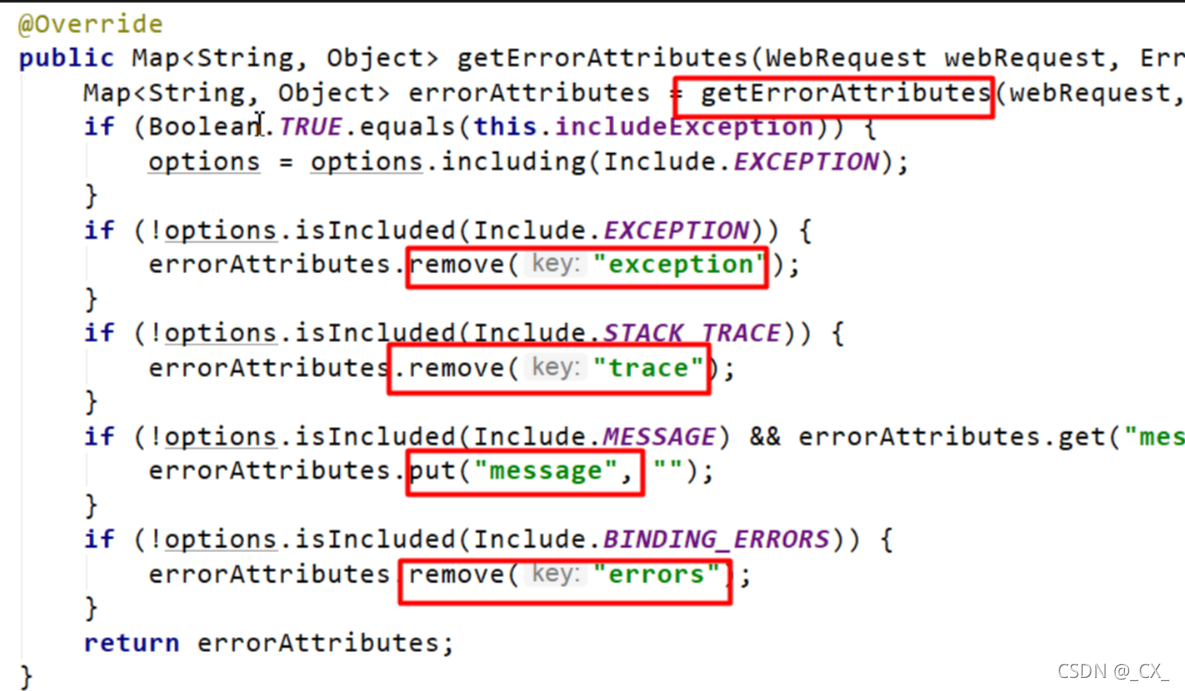
- DefaultErrorAttributes:定义错误页面中可以包含哪些数据。
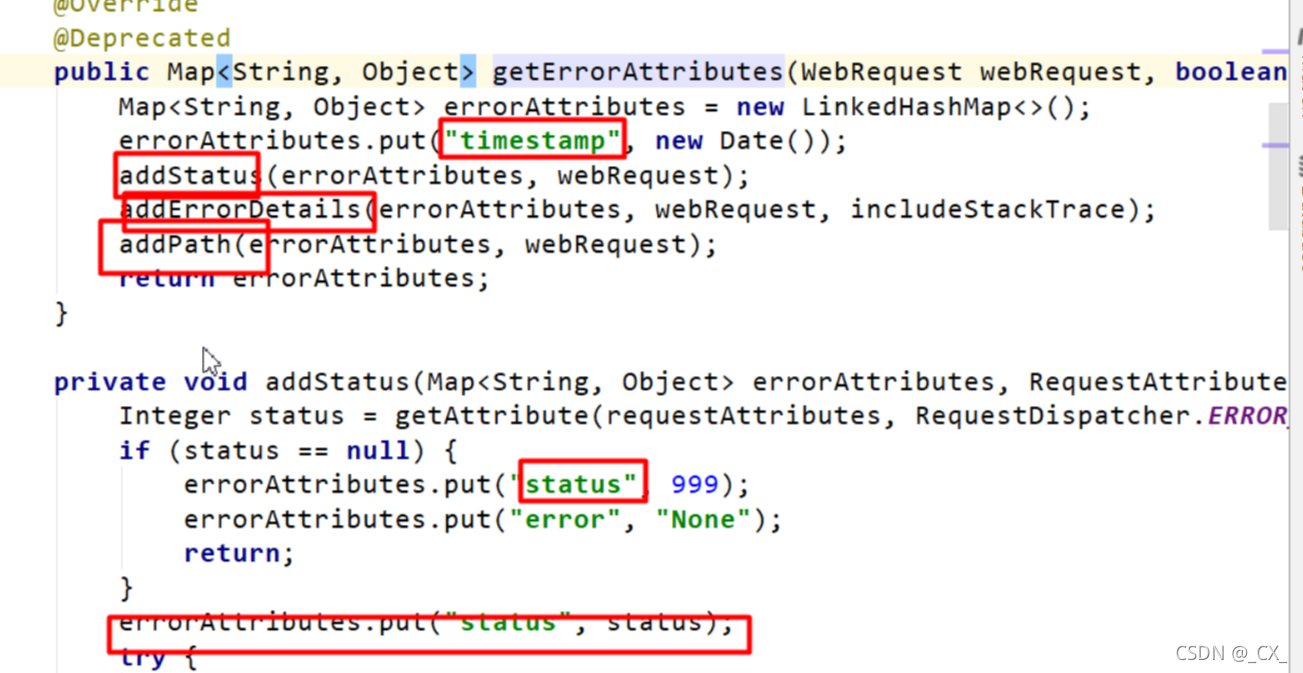
- DefaultErrorAttributes:定义错误页面中可以包含哪些数据。
- 容器中的组件:DefaultErrorAttribute( id:errorAttribute)
-
public class DefaultErrorAttributes implements ErrorAttributes, HandlerExceptionResolver**
-
容器中的组件:类型:BasicErrorController (id:basicErrorController)json+白页 适配响应
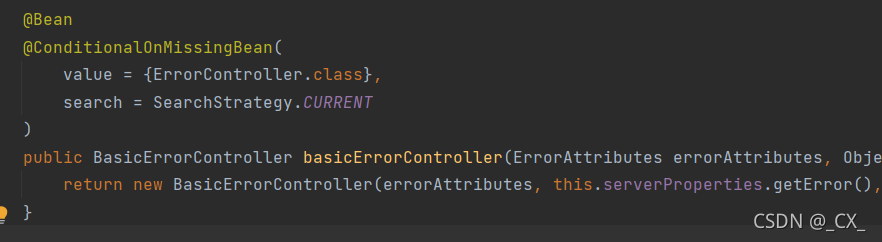
-
默认处理 /error 路径的请求

- 容器中有组件 View->id是error;(响应默认错误页)
- 容器中放组件 BeanNameViewResolver(视图解析器);按照返回的视图名作为组件的id去容器中找View对象。-
容器中的组件:类型:DefaultErrorViewResolver -> id:conventionErrorViewResolver
- 如果发生错误,会以HTTP的状态码 作为视图页地址(viewName),找到真正的页面
- error/404、5xx.html

如果想要返回页面;就会找error视图【StaticView】。(默认是一个白页)
-
4.总结:异常处理步骤流程
- 执行目标方法,目标方法运行期间有任何异常都会被catch、而且标志当前请求结束;并且用 dispatchException
- 进入视图解析流程(页面渲染)
rocessDispatchResult(processedRequest, response, mappedHandler, mv, dispatchException); - mv = processHandlerException;处理handler发生的异常,处理完成返回ModelAndView;
- 遍历所有的 handlerExceptionResolvers,看谁能处理当前异常【HandlerExceptionResolver处理器异常解析器】
- 系统默认的 异常解析器;
-
DefaultErrorAttributes先来处理异常。把异常信息保存到rrequest域,并且返回null;
-
默认没有任何人能处理异常,所以异常会被抛出
- 如果没有任何人能处理最终底层就会发送 /error 请求。会被底层的BasicErrorController处理
- 解析错误视图;遍历所有的 ErrorViewResolver 看谁能解析。
- 默认的 DefaultErrorViewResolver ,作用是把响应状态码作为错误页的地址,error/500.html
- 模板引擎最终响应这个页面 error/500.html
-
1.8 Web原生组件注入(Servlet、Filter、Listener)
1.8.1 基本步骤
1. 使用 Servlet API
Servlet
@ServletComponentScan(basePackages = "")
@WebServlet("")
注意:这种方式不会走 SpringMVC 的拦截器
Filter
@ServletComponentScan(basePackages = "")
@WebFilter(urlPatterns ={""})
Listener
@ServletComponentScan(basePackages = "")
@WebListener
2. RegistrationBean 方式
ServletRegistrationBean, FilterRegistrationBean, ServletListenerRegistrationBean
@Configuration
public class MyRegistConfig {

    @Bean
    public ServletRegistrationBean myServlet(){
        MyServlet myServlet = new MyServlet();

        return new ServletRegistrationBean(myServlet,"/my","/my02");
    }


    @Bean
    public FilterRegistrationBean myFilter(){

        MyFilter myFilter = new MyFilter();
//        return new FilterRegistrationBean(myFilter,myServlet());
        FilterRegistrationBean filterRegistrationBean = new FilterRegistrationBean(myFilter);
        filterRegistrationBean.setUrlPatterns(Arrays.asList("/my","/css/*"));
        return filterRegistrationBean;
    }

    @Bean
    public ServletListenerRegistrationBean myListener(){
        MySwervletContextListener mySwervletContextListener = new MySwervletContextListener();
        return new ServletListenerRegistrationBean(mySwervletContextListener);
    }
}
1.8.2 分析:DispatchServlet 如何注册进来
● 容器中自动配置了 DispatcherServlet 属性绑定到 WebMvcProperties;对应的配置文件配置项是 spring.mvc。
● 通过 ServletRegistrationBean 把 DispatcherServlet 配置进来。
● 默认映射的是 / 路径。
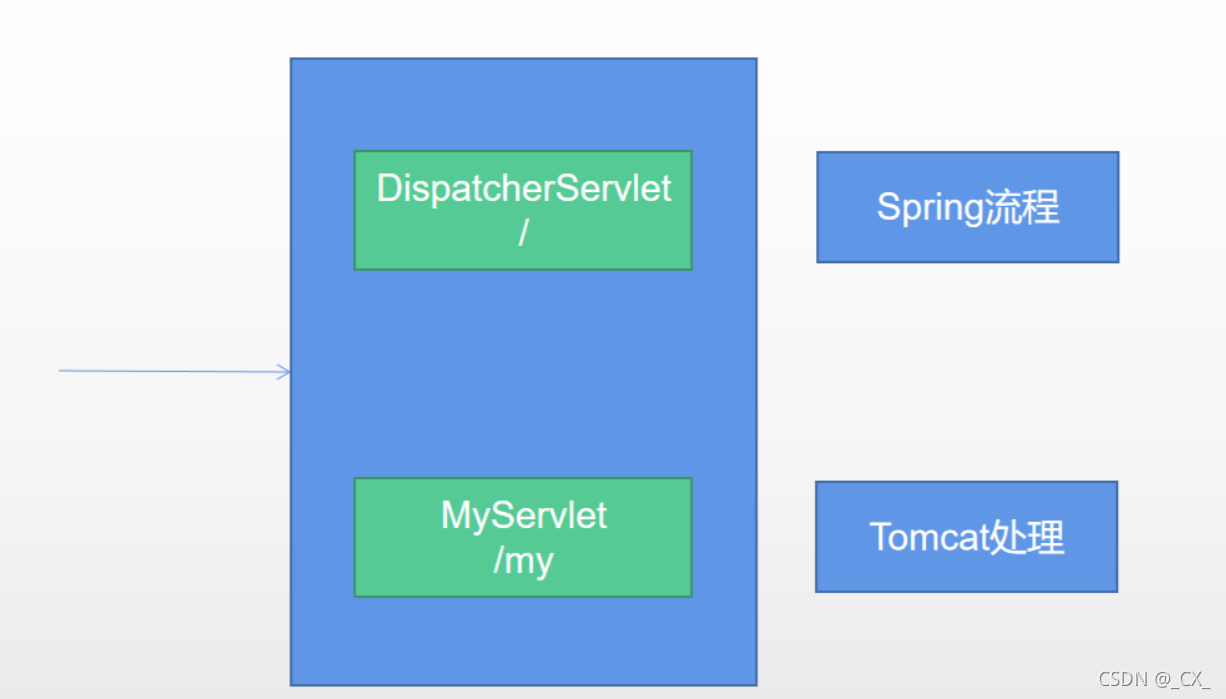
多个Servlet都能处理到同一层路径,精确优选原则
1.9 嵌入式Servlet 服务器
1.9.1 切换嵌入式Servlet容器
1. 默认支持的webServer
○ Tomcat, Jetty, or Undertow
○ ServletWebServerApplicationContext 容器启动寻找ServletWebServerFactory 并引导创建服务器
2. 切换服务器

<dependency>
    <groupId>org.springframework.boot</groupId>
    <artifactId>spring-boot-starter-web</artifactId>
    <exclusions>
        <exclusion>
            <groupId>org.springframework.boot</groupId>
            <artifactId>spring-boot-starter-tomcat</artifactId>
        </exclusion>
    </exclusions>
</dependency>
3. 原理
○ SpringBoot应用启动发现当前是Web应用。web场景包-导入tomcat
○ web应用会创建一个web版的ioc容器 ServletWebServerApplicationContext
○ ServletWebServerApplicationContext 启动的时候寻找 ServletWebServerFactory(Servlet 的web服务器工厂—> Servlet 的web服务器)
○ SpringBoot底层默认有很多的WebServer工厂;TomcatServletWebServerFactory, JettyServletWebServerFactory, or UndertowServletWebServerFactory
○ 底层直接会有一个自动配置类。ServletWebServerFactoryAutoConfiguration
○ ServletWebServerFactoryAutoConfiguration导入了ServletWebServerFactoryConfiguration(配置类)
○ ServletWebServerFactoryConfiguration 配置类 根据动态判断系统中到底导入了那个Web服务器的包。(默认是web-starter导入tomcat包),容器中就有 TomcatServletWebServerFactory
○ TomcatServletWebServerFactory 创建出Tomcat服务器并启动;TomcatWebServer 的构造器拥有初始化方法initialize—this.tomcat.start();
○ 内嵌服务器,就是手动把启动服务器的代码调用(tomcat核心jar包存在)
1.9.2 定制 Servlet 容器
1. 步骤
- 实现 WebServerFactoryCustomizer
○ 把配置文件的值和ServletWebServerFactory 进行绑定 - 修改配置文件 server.xxx
- 直接自定义 ConfigurableServletWebServerFactory
xxxxxCustomizer:定制化器,可以改变xxxx的默认规则
import org.springframework.boot.web.server.WebServerFactoryCustomizer;
import org.springframework.boot.web.servlet.server.ConfigurableServletWebServerFactory;
import org.springframework.stereotype.Component;

@Component
public class CustomizationBean implements WebServerFactoryCustomizer<ConfigurableServletWebServerFactory> {

    @Override
    public void customize(ConfigurableServletWebServerFactory server) {
        server.setPort(9000);
    }
}
1.10.1 SpringBoot 定制化原理
1. 定制化常见方式
● 修改配置文件;
● xxxxxCustomizer;
● 编写自定义的配置类 xxxConfiguration;+ @Bean替换、增加容器中默认组件;视图解析器
● Web应用 编写一个配置类实现 WebMvcConfigurer 即可定制化web功能;+ @Bean给容器中再扩展一些组件
@Configuration
public class AdminWebConfig implements WebMvcConfigurer
@EnableWebMvc + WebMvcConfigurer —— @Bean 可以全面接管SpringMVC,所有规则全部自己重新配置; 实现定制和扩展功能
-
原理
○ 1、WebMvcAutoConfiguration 默认的SpringMVC的自动配置功能类。静态资源、欢迎页…
○ 2、一旦使用 @EnableWebMvc 、。会 @Import(DelegatingWebMvcConfiguration.class)
○ 3、DelegatingWebMvcConfiguration 的 作用,只保证SpringMVC最基本的使用- 把所有系统中的 WebMvcConfigurer 拿过来。所有功能的定制都是这些 WebMvcConfigurer 合起来一起生效
- 自动配置了一些非常底层的组件。RequestMappingHandlerMapping、这些组件依赖的组件都是从容器中获取
- public class DelegatingWebMvcConfiguration extends WebMvcConfigurationSupport
○ 4、WebMvcAutoConfiguration 里面的配置要能生效 必须 @ConditionalOnMissingBean(WebMvcConfigurationSupport.class)
○ 5、@EnableWebMvc 导致了 WebMvcAutoConfiguration 没有生效。
2. 原理分析套路
场景starter - xxxxAutoConfiguration - 导入xxx组件 - 绑定xxxProperties – 绑定配置文件项


 1355
1355

 被折叠的 条评论
为什么被折叠?
被折叠的 条评论
为什么被折叠?
 到【灌水乐园】发言


