


Spring boot+Shiro
一、Shiro框架
1、官方文档:http://shiro.apache.org/index.html
shrio是一个基于Java的安全认证框架,是一个轻量级的安全框架,主要的作用是在后端承担认证和授权的工作,可在JavaSE和JavaEE环境中使用
2、shiro架构
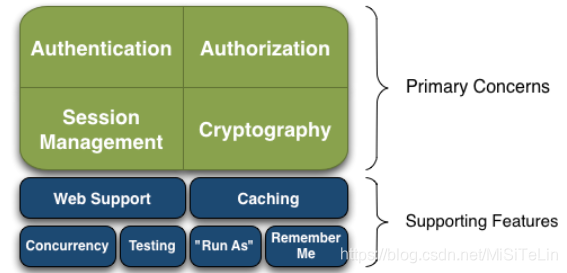
- Authentication:有时称为“登录”,这是证明用户是他们所说的身份的行为。
- Authorization:**访问控制的过程,即确定“谁”有权访问“什么”。
- Session Management:即使在非Web或EJB应用程序中,也管理用户特定的会话。
- Cryptography:使用密码算法保持数据安全,同时仍然易于使用。
在不同的应用程序环境中,还具有其他功能来支持和加强这些问题,尤其是:
- Web Support:Shiro的Web支持API可帮助轻松保护Web应用程序。
- Caching:缓存是Apache Shiro API的第一层公民,可确保安全操作保持快速有效。
- Concurrency:Apache Shiro的并发功能支持多线程应用程序。
- Testing:测试支持可以帮助您编写单元测试和集成测试,并确保您的代码将按预期进行保护。
- “Run As”:一种功能,允许用户采用其他用户的身份(如果允许),有时在管理方案中很有用。
- “Remember Me”:在整个会话中记住用户的身份,因此他们仅在必要时登录。
在认证过程中有三个核心的对象:Subject,SecurityManager和Realm(s)

-
Subject:Subject本质上是当前正在执行的用户的安全特定“视图”,是shiro对外的API核心。Subject代表了当前的用户,可以是一个人,但它也可以表示第三方服务,守护程序帐户。
Subject只是一个门面,其内部有关操作都交给了SecurityManager去执行
-
SecurityManager:是Shiro体系结构的核心,并充当一种“伞”对象,该对象协调其内部安全组件,这些安全组件一起形成对象图。相当于sprintmvc的dispatcherServlet,负责其他组件与shiro的交互
-
Realm:领域充当Shiro与应用程序的安全数据之间的“桥梁”或“连接器”。可以执行身份验证(登录)和授权(访问控制),相当于数据库中的DataSource,可以自定义该类
二、在Springboot中配置shiro
1、导包
<!--shiro-->
<dependency>
    <groupId>org.apache.shiro</groupId>
    <artifactId>shiro-spring</artifactId>
    <version>1.5.3</version>
</dependency>
<dependency>
    <groupId>org.apache.shiro</groupId>
    <artifactId>shiro-spring-boot-starter</artifactId>
    <version>1.5.3</version>
</dependency>
<!--shiro注解支持需要aop的支持-->
<dependency>
    <groupId>org.springframework.boot</groupId>
    <artifactId>spring-boot-starter-aop</artifactId>
</dependency>
2、开启aop的自动代理
sprint:
	aop:
		proxy-target-class: true
3、自定义Realm
@Slf4j
public class ShiroRealm extends AuthorizingRealm {
    @Lazy
    @Resource
    private RedisUtil redisUtil;
    @Autowired
    private SysUserDao sysUserDao;

    /**
     * 重写身份令牌验证方式
     * 若返回false则在执行登录操作时会报org.apache.shiro.authc.pam.UnsupportedTokeException
     * 即不支持的身份令牌
     */
    @Override
    public boolean supports(AuthenticationToken token) {
        return token instanceof JwtToken;
    }

    /**
     * 权限信息认证(包括角色认证以及权限认证):是用户访问controller的时候才进行验证
     * 触发检测用户权限时才会调用此方法,例如checkRole,checkPermission
     *
     * @param principals 身份信息
     * @return AuthorizationInfo 权限信息
     */
    @Override
    protected AuthorizationInfo doGetAuthorizationInfo(PrincipalCollection principals) {
        return null;
    }

    /**
     * 用户信息认证:在用户进行登录的时候进行验证
     *
     * @param auth 用户登录的账号密码信息
     * @return 返回封装了用户信息的 AuthenticationInfo 实例
     * @throws AuthenticationException
     */
    @Override
    protected AuthenticationInfo doGetAuthenticationInfo(AuthenticationToken auth) throws AuthenticationException {
        String token = (String) auth.getCredentials();
        if (token == null) {
            throw new AuthenticationException("token为空!");
        }

        // 校验token有效性
        LoginUser loginUser = this.checkUserTokenIsEffect(token);
        //可进行一系列验证。。。

        /**
         * 封装用户的登录数据
         */
        return new SimpleAuthenticationInfo(loginUser, token, getName());
    }

    /**
     * 清除当前用户的权限认证缓存
     *
     * @param principals 权限信息
     */
    @Override
    public void clearCache(PrincipalCollection principals) {
        super.clearCache(principals);
    }

}
SimpleAuthenticationInfo源码解析
- 构造方法的第一个参数指定了登录的用户数据
- 第二个参数用来校验第一个参数所指定的用户,一般可为用户的token或password
- 第三个参数指定了授权的对象名
/**
 * Constructor that takes in a single 'primary' principal of the account and its corresponding credentials,
 * associated with the specified realm.
 * <p/>
 * This is a convenience constructor and will construct a {@link PrincipalCollection PrincipalCollection} based
 * on the {@code principal} and {@code realmName} argument.
 *
 * @param principal   the 'primary' principal associated with the specified realm.
 * @param credentials the credentials that verify the given principal.
 * @param realmName   the realm from where the principal and credentials were acquired.
 */
public SimpleAuthenticationInfo(Object principal, Object credentials, String realmName) {
    this.principals = new SimplePrincipalCollection(principal, realmName);
    this.credentials = credentials;
}
4、shiro的配置文件
@Slf4j
@Configuration
public class ShiroConfig {

    /**
     * 开启shiro注解支持
     * @return
     */
    @Bean
    public static LifecycleBeanPostProcessor lifecycleBeanPostProcessor() {
        return new LifecycleBeanPostProcessor();
    }

    /**
     * 添加注解支持
     * @return
     */
    @Bean
    @DependsOn("lifecycleBeanPostProcessor")
    public DefaultAdvisorAutoProxyCreator defaultAdvisorAutoProxyCreator() {
        DefaultAdvisorAutoProxyCreator defaultAdvisorAutoProxyCreator = new DefaultAdvisorAutoProxyCreator();
        defaultAdvisorAutoProxyCreator.setProxyTargetClass(true);
        defaultAdvisorAutoProxyCreator.setUsePrefix(true);
        return defaultAdvisorAutoProxyCreator;
    }

    @Bean
    public AuthorizationAttributeSourceAdvisor authorizationAttributeSourceAdvisor(DefaultWebSecurityManager securityManager) {
        AuthorizationAttributeSourceAdvisor advisor = new AuthorizationAttributeSourceAdvisor();
        //设置安全管理器
        advisor.setSecurityManager(securityManager);
        return advisor;
    }

    /**
     * ShiroFilterFactoryBean 处理拦截资源文件问题。
     * 1、一个URL可以配置多个Filter,使用逗号分隔
     * 2、当设置多个过滤器时,全部验证通过,才视为通过
     * 3、部分过滤器可指定参数,如perms,roles
     */
    @Bean
    public ShiroFilterFactoryBean shirFilter(@Qualifier("defaultWebSecurityManager") DefaultWebSecurityManager defaultWebSecurityManager) {
        ShiroFilterFactoryBean shiroFilterFactoryBean = new ShiroFilterFactoryBean();
        // 设置安全管理器SecurityManager
        shiroFilterFactoryBean.setSecurityManager(defaultWebSecurityManager);
        /**
         * 配置拦截器,顺序拦截,使用链式结构
         * anon:无需认证就可以访问
         * authc:需要认证才可以访问
         * user:需要设置remenberMe=true属性才能访问
         * perms:需要拥有对某个资源的权限才能访问
         * role:需要拥有某个角色的权限才能访问
         */
        Map<String, String> filterChainDefinitionMap = new LinkedHashMap<String, String>();
        filterChainDefinitionMap.put("/**", "anon");
        //设置shiro的拦截器
        shiroFilterFactoryBean.setFilterChainDefinitionMap(filterChainDefinitionMap);
        return shiroFilterFactoryBean;
    }

    @Bean
    public DefaultWebSecurityManager defaultWebSecurityManager(@Qualifier("shiroRealm") ShiroRealm shiroRealm) {
        DefaultWebSecurityManager securityManager = new DefaultWebSecurityManager();
        //关联Realm
        securityManager.setRealm(shiroRealm);
        return securityManager;
    }
    /**
     * 自定义身份认证Realm
     * @return
     */
    @Bean
    public ShiroRealm shiroRealm() {
        return new ShiroRealm();
    }
}
三、Shiro的认证过程
首先是先将接收到的用户输入的数据生成UsernamePasswordToken类或者该类的子类,获取shiro的Subject对象执行subject.login(usernamePasswordToken)方法
Subject subject = SecurityUtils.getSubject();
    UsernamePasswordToken usernamePasswordToken = new UsernamePasswordToken(user.get("email").toString(), user.get("password").toString());
     try {
        subject.login(usernamePasswordToken);
     } catch  (UnknownAccountException uae) {
     	return ResponseEntity.ok(new ResultOK(500,"账号不存在!"));
     } catch (IncorrectCredentialsException ice) {
     	return ResponseEntity.ok(new ResultOK(500,"账号或密码有误!"));
     } catch (LockedAccountException lae) {
     	return ResponseEntity.ok(new ResultOK(500,"账号被锁定!"));
     } catch (AuthenticationException ae) {
     	return ResponseEntity.ok(new ResultOK(500,"用户认证失败!"));
     } catch (Exception e) {
     	return ResponseEntity.ok(new ResultOK(500,e.getMessage()));
     }
     return ResponseEntity.ok(new ResultOK(200,"登录成功!");
这里的usernamePasswordToken(以下简称token)就是用户名和密码的一个结合对象,然后调用subject的login方法将token传入开始认证过程。底层调用的其实是securityManager的login方法:
Subject subject = securityManager.login(this, token);
再往下看securityManager的login方法内部:
public Subject login(Subject subject, AuthenticationToken token) throws AuthenticationException {
    AuthenticationInfo info;
     try {
            info = authenticate(token);
     } catch (AuthenticationException ae) {
            try {
                onFailedLogin(token, ae, subject);
     } catch (Exception e) {
                if (log.isInfoEnabled()) {
                    log.info("onFailedLogin method threw an " +
                            "exception.  Logging and propagating original AuthenticationException.", e);
     }
            }
            throw ae; //propagate
     }
        Subject loggedIn = createSubject(token, info, subject);
     onSuccessfulLogin(token, info, loggedIn);
     return loggedIn;
}
上面代码的关键在于:
info = authenticate(token);
即将token传入authenticate方法中得到一个AuthenticationInfo类型的认证信息。以下是authenticate方法的具体内容:
public final AuthenticationInfo authenticate(AuthenticationToken token) throws AuthenticationException {
    if (token == null) {
        throw new IllegalArgumentException("Method argument (authentication token) cannot be null.");
    }
    log.trace("Authentication attempt received for token [{}]", token);
    AuthenticationInfo info;
    try {
        info = doAuthenticate(token);
    if (info == null) {
            String msg = "No account information found for authentication token [" + token + "] by this " +
                    "Authenticator instance.  Please check that it is configured correctly.";
    throw new AuthenticationException(msg);
    }
    } catch (Throwable t) {
        AuthenticationException ae = null;
    if (t instanceof AuthenticationException) {
            ae = (AuthenticationException) t;
    }
        if (ae == null) {
            //Exception thrown was not an expected AuthenticationException.  Therefore it is probably a little more
    //severe or unexpected.  So, wrap in an AuthenticationException, log to warn, and propagate: String msg = "Authentication failed for token submission [" + token + "].  Possible unexpected " +
                    "error? (Typical or expected login exceptions should extend from AuthenticationException).";
    ae = new AuthenticationException(msg, t);
    if (log.isWarnEnabled())
                log.warn(msg, t);
    }
        try {
            notifyFailure(token, ae);
    } catch (Throwable t2) {
            if (log.isWarnEnabled()) {
                String msg = "Unable to send notification for failed authentication attempt - listener error?.  " +
                        "Please check your AuthenticationListener implementation(s).  Logging sending exception " +
                        "and propagating original AuthenticationException instead...";
    log.warn(msg, t2);
    }
        }
        throw ae;
    }
    log.debug("Authentication successful for token [{}].  Returned account [{}]", token, info);
    notifySuccess(token, info);
    return info;
}
首先就是判断token是否为空,不为空再将token传入doAuthenticate方法中:
protected AuthenticationInfo doAuthenticate(AuthenticationToken authenticationToken) throws AuthenticationException {
    assertRealmsConfigured();
    Collection<Realm> realms = getRealms();
    if (realms.size() == 1) {
        return doSingleRealmAuthentication(realms.iterator().next(), authenticationToken);
    } else {
        return doMultiRealmAuthentication(realms, authenticationToken);
    }
}
这一步是判断是有单个Reaml验证还是多个Reaml验证,单个就执行doSingleRealmAuthentication()方法,多个就执行doMultiRealmAuthentication()方法。
一般情况下是单个验证:
protected AuthenticationInfo doSingleRealmAuthentication(Realm realm, AuthenticationToken token) {
    if (!realm.supports(token)) {
        String msg = "Realm [" + realm + "] does not support authentication token [" +
                token + "].  Please ensure that the appropriate Realm implementation is " +
                "configured correctly or that the realm accepts AuthenticationTokens of this type.";
        throw new UnsupportedTokenException(msg);
    }
    AuthenticationInfo info = realm.getAuthenticationInfo(token);
    if (info == null) {
        String msg = "Realm [" + realm + "] was unable to find account data for the " +
                "submitted AuthenticationToken [" + token + "].";
        throw new UnknownAccountException(msg);
    }
    return info;
}
这一步中首先判断是否支持Realm,只有支持Realm才调用realm.getAuthenticationInfo(token)获取info。
public final AuthenticationInfo getAuthenticationInfo(AuthenticationToken token) throws AuthenticationException {
    AuthenticationInfo info = getCachedAuthenticationInfo(token);
    if (info == null) {
        //otherwise not cached, perform the lookup:
        info = doGetAuthenticationInfo(token);
        log.debug("Looked up AuthenticationInfo [{}] from doGetAuthenticationInfo", info);
        if (token != null && info != null) {
            cacheAuthenticationInfoIfPossible(token, info);
        }
    } else {
        log.debug("Using cached authentication info [{}] to perform credentials matching.", info);
    }
    if (info != null) {
        assertCredentialsMatch(token, info);
    } else {
        log.debug("No AuthenticationInfo found for submitted AuthenticationToken [{}].  Returning null.", token);
    }
    return info;
}
首先查看Cache中是否有该token的info,如果有,则直接从Cache中去即可。如果是第一次登录,则Cache中不会有该token的info,需要调用doGetAuthenticationInfo(token)方法获取,并将结果加入到Cache中,方便下次使用。而这里调用的doGetAuthenticationInfo()方法就是我们在自定义的Realm中重写的方法,具体的内容是自定义了对拿到的这个token的一个处理的过程:
protected AuthenticationInfo doGetAuthenticationInfo(AuthenticationToken authenticationToken) throws AuthenticationException {
    if (authenticationToken.getPrincipal() == null)
        return null;
    String email = authenticationToken.getPrincipal().toString();
    User user = userService.findByEmail(email);
    if (user == null)
        return null;
    else return new SimpleAuthenticationInfo(email, user.getPassword(), getName());
}
这其中进行了几步判断:可以判断传入的用户名是否为空,判断传入的用户名在本地的数据库中是否存在,该用户是否有效等验证,验证不通过则返回一个Exception。通过之后则生成一个包括传入用户名和密码的info,注意此时关于用户名的验证已经完成,接下来进入对密码的验证。
将这一步得到的info返回给getAuthenticationInfo方法中的
assertCredentialsMatch(token, info);
此时的info是正确的用户名和密码的信息,token是输入的用户名和密码的信息,经过前面步骤的验证过程,用户名此时已经是真是存在的了,这一步就是验证输入的用户名和密码的对应关系是否正确。
protected void assertCredentialsMatch(AuthenticationToken token, AuthenticationInfo info) throws AuthenticationException {
    CredentialsMatcher cm = getCredentialsMatcher();
    if (cm != null) {
        if (!cm.doCredentialsMatch(token, info)) {
            //not successful - throw an exception to indicate this:
            String msg = "Submitted credentials for token [" + token + "] did not match the expected credentials.";
            throw new IncorrectCredentialsException(msg);
        }
    }
    else {
        throw new AuthenticationException("A CredentialsMatcher must be configured in order to verify " +
                "credentials during authentication.  If you do not wish for credentials to be examined, you " +
                "can configure an " + AllowAllCredentialsMatcher.class.getName() + " instance.");
    }
}
这一步验证完成之后,整个shrio认证的过程就结束了。

 1万+


 扫一扫


 被折叠的 条评论
为什么被折叠?
 到【灌水乐园】发言


