


SpringBoot使用Gateway聚合Springdoc,Knife4j
前言
同时支持springboot:3.0,springboot:2.0,使用gateway聚合springdoc,ui使用knife4j,解决由于nginx配置代理前缀导致的文档无法访问,不强依赖注册中心(nacos,zk,Eureka)
有帮助的话记得点个赞哟!!!
基础环境
将所有依赖集成好作为一个本地包供其他项目使用
- jdk17
- maven3.6+
- springboot3.0+|springboot2.0+
- springcloud:2022.0.1
- springcloud-alibaba:1.8.1-2022.0.0-RC2
- springdoc:2.0.2|springdoc:1.6.0+
- knife4j:4.0.0
当使用springboot:3.0,请使用 springdoc:2.0.0+
当使用springboot:2.0,请使用 springdoc:1.6.0+(部分springdoc的包名替换即可)
工具包(framework-document)
依赖
<dependencies>
    <dependency>
        <groupId>org.springdoc</groupId>
        <artifactId>springdoc-openapi-starter-webmvc-api</artifactId>
        <scope>provided</scope>
    </dependency>
    <dependency>
        <groupId>org.springdoc</groupId>
        <artifactId>springdoc-openapi-starter-webflux-api</artifactId>
        <scope>provided</scope>
    </dependency>
    <dependency>
        <groupId>org.springframework.cloud</groupId>
        <artifactId>spring-cloud-starter-gateway</artifactId>
        <scope>provided</scope>
    </dependency>
</dependencies>
代码
文档信息properties
import com.github.mpcloud.framework.core.consts.Constant;
import org.springframework.boot.context.properties.ConfigurationProperties;

/**
 * The type Swagger properties.
 *
 * @author : Milo
 */
@ConfigurationProperties("springdoc.info")
public class DocumentInfoProperties {
    private static final String DEFAULT_OPEN_API_ROUTE_NAME = "open-api-route";
    private static final String DEFAULT_GATEWAY_API_ROUTE_NAME = "open-api-gateway-route";
    /**
     * 文档标题
     */
    private String title;
    /**
     * 文档描述
     */
    private String description;
    /**
     * 项目version
     */
    private String projectVersion;
    /**
     * 许可证
     */
    private String license;
    /**
     * 许可证URL
     */
    private String licenseUrl;
    /**
     * 项目负责人信息
     */
    private final Contact contact = new Contact();
    /**
     * gateway
     */
    private final Gateway gateway = new Gateway();

    public String getTitle() {
        return this.title;
    }

    public void setTitle(final String title) {
        this.title = title;
    }

    public String getDescription() {
        return this.description;
    }

    public void setDescription(final String description) {
        this.description = description;
    }

    public String getProjectVersion() {
        return this.projectVersion;
    }

    public void setProjectVersion(final String projectVersion) {
        this.projectVersion = projectVersion;
    }

    public String getLicense() {
        return this.license;
    }

    public void setLicense(final String license) {
        this.license = license;
    }

    public String getLicenseUrl() {
        return this.licenseUrl;
    }

    public void setLicenseUrl(final String licenseUrl) {
        this.licenseUrl = licenseUrl;
    }

    public Contact getContact() {
        return this.contact;
    }

    public Gateway getGateway() {
        return gateway;
    }

    public static class Contact {
        /**
         * 联系人
         **/
        private String name;
        /**
         * 联系人url
         **/
        private String url;
        /**
         * 联系人email
         **/
        private String email;

        public String getName() {
            return this.name;
        }

        public void setName(final String name) {
            this.name = name;
        }

        public String getUrl() {
            return this.url;
        }

        public void setUrl(final String url) {
            this.url = url;
        }

        public String getEmail() {
            return this.email;
        }

        public void setEmail(final String email) {
            this.email = email;
        }
    }

    public static class Gateway {
        /**
         * api 前缀
         */
        private String apiPathPrefix = Constant.URL_PREFIX;
        /**
         * 接口文档路由名称
         */
        private String openApiRouteName = DEFAULT_OPEN_API_ROUTE_NAME;
        /**
         * 网关接口文档路由名称
         */
        private String openApiGatewayApiRouteName = DEFAULT_GATEWAY_API_ROUTE_NAME;

        public String getApiPathPrefix() {
            return apiPathPrefix;
        }

        public void setApiPathPrefix(String apiPathPrefix) {
            this.apiPathPrefix = apiPathPrefix;
        }

        public String getOpenApiRouteName() {
            return openApiRouteName;
        }

        public void setOpenApiRouteName(String openApiRouteName) {
            this.openApiRouteName = openApiRouteName;
        }

        public String getOpenApiGatewayApiRouteName() {
            return openApiGatewayApiRouteName;
        }

        public void setOpenApiGatewayApiRouteName(String openApiGatewayApiRouteName) {
            this.openApiGatewayApiRouteName = openApiGatewayApiRouteName;
        }
    }
}
文档信息Configuration
import io.swagger.v3.oas.models.OpenAPI;
import io.swagger.v3.oas.models.info.Contact;
import io.swagger.v3.oas.models.info.Info;
import io.swagger.v3.oas.models.info.License;
import org.springframework.boot.autoconfigure.condition.ConditionalOnProperty;
import org.springframework.boot.autoconfigure.condition.ConditionalOnWebApplication;
import org.springframework.boot.context.properties.EnableConfigurationProperties;
import org.springframework.context.annotation.Bean;
import org.springframework.context.annotation.Configuration;

/**
 * @author milo
 */
@Configuration(proxyBeanMethods = false)
@EnableConfigurationProperties(DocumentInfoProperties.class)
@ConditionalOnProperty(name = "springdoc.api-docs.enabled", havingValue = "true")
@ConditionalOnWebApplication
public class DocumentConfiguration {
    @Bean
    public OpenAPI openApi(final DocumentInfoProperties docInfo) {
        return new OpenAPI().info(new Info()
            .title(docInfo.getTitle())
            .description(docInfo.getDescription())
            .version(docInfo.getProjectVersion())
            .contact(new Contact().name(docInfo.getContact().getName()).email(docInfo.getContact().getEmail()).url(docInfo.getContact().getUrl()))
            .license(new License().name(docInfo.getLicense()).url(docInfo.getLicenseUrl()))
        );
    }
}
解决Nginx代理导致的接口前缀问题
解决代理导致的接口文档请求不了的问题
如果nginx配置的以下内容,则需要如下类解决这个问题.
		location /api{
			proxy_pass http://localhost:8080;
			rewrite "^/api/(.*)$" /$1 break;
			proxy_set_header Host $host:$server_port;
		}
复写原有地址前缀
import com.github.mpcloud.framework.core.utils.PathUtils;
import org.springdoc.core.properties.SpringDocConfigProperties;
import org.springdoc.webflux.core.providers.SpringWebFluxProvider;

/**
 * @author : Milo
 */
public class CustomizeSpringWebFluxProvider extends SpringWebFluxProvider {
    @Override
    public String findPathPrefix(SpringDocConfigProperties springDocConfigProperties) {
        DocumentInfoProperties documentInfoProperties = applicationContext.getBean(DocumentInfoProperties.class);
        return PathUtils.append(documentInfoProperties.getGateway().getApiPathPrefix() + super.findPathPrefix(springDocConfigProperties));
    }
}
网关与SpringDoc整合的配置类
import com.github.mpcloud.framework.core.consts.Constant;
import com.github.mpcloud.framework.core.utils.PathUtils;
import com.github.mpcloud.framework.core.utils.spring.SpringContextHolder;
import org.springdoc.core.properties.AbstractSwaggerUiConfigProperties.SwaggerUrl;
import org.springdoc.core.properties.SpringDocConfigProperties;
import org.springdoc.core.properties.SwaggerUiConfigParameters;
import org.springdoc.core.providers.SpringWebProvider;
import org.springframework.boot.autoconfigure.condition.ConditionalOnProperty;
import org.springframework.boot.autoconfigure.condition.ConditionalOnWebApplication;
import org.springframework.boot.context.event.ApplicationReadyEvent;
import org.springframework.cloud.client.discovery.DiscoveryClient;
import org.springframework.cloud.client.discovery.event.HeartbeatEvent;
import org.springframework.cloud.client.serviceregistry.Registration;
import org.springframework.cloud.gateway.event.RefreshRoutesEvent;
import org.springframework.cloud.gateway.route.RouteLocator;
import org.springframework.cloud.gateway.route.builder.RouteLocatorBuilder;
import org.springframework.context.annotation.Bean;
import org.springframework.context.annotation.Configuration;
import org.springframework.context.event.EventListener;

import java.util.List;

import static org.springdoc.core.utils.Constants.SPRINGDOC_ENABLED;
import static org.springdoc.core.utils.Constants.SPRINGDOC_SWAGGER_UI_ENABLED;
import static org.springframework.util.AntPathMatcher.DEFAULT_PATH_SEPARATOR;

/**
 * @author : Milo
 */
@Configuration
@ConditionalOnWebApplication(type = ConditionalOnWebApplication.Type.REACTIVE)
@ConditionalOnProperty(name = { SPRINGDOC_ENABLED, SPRINGDOC_SWAGGER_UI_ENABLED }, matchIfMissing = true, havingValue = "true")
public class GatewayRouterGroupProviderConfiguration {
    private final DiscoveryClient discoveryClient;
    private final SpringDocConfigProperties springDocConfig;
    private final DocumentInfoProperties documentInfo;
    private final SwaggerUiConfigParameters swaggerUiConfig;

    public GatewayRouterGroupProviderConfiguration(DiscoveryClient discoveryClient, SpringDocConfigProperties springDocConfig, DocumentInfoProperties documentInfo, SwaggerUiConfigParameters swaggerUiConfig) {
        this.discoveryClient = discoveryClient;
        this.springDocConfig = springDocConfig;
        this.documentInfo = documentInfo;
        this.swaggerUiConfig = swaggerUiConfig;
    }

    /**
     * openapi 路由(重写服务名所在位置)
     *
     * @param builder 路由构造器
     *
     * @return 路由
     */
    @Bean
    public RouteLocator openApiRouteLocator(final RouteLocatorBuilder builder) {
        return builder.routes()
            .route(this.documentInfo.getGateway().getOpenApiRouteName(), route -> route
                .path(this.springDocConfig.getApiDocs().getPath() + "/**")
                .filters(filter -> filter.rewritePath(this.springDocConfig.getApiDocs().getPath() + "/(?<segment>.*)", "/$\{segment}" + this.springDocConfig.getApiDocs().getPath()))
                .uri(Constant.HTTP_PREFIX + "localhost:" + SpringContextHolder.getServerPort())
            )
            .build();
    }

    /**
     * 网关当前路由 (去掉服务名)
     *
     * @param builder 路由构造器
     *
     * @return 路由
     */
    @Bean
    public RouteLocator registrationRouteLocator(Registration registration, final RouteLocatorBuilder builder) {
        return builder.routes()
            .route(this.documentInfo.getGateway().getOpenApiRouteName(), route -> route
                .path(DEFAULT_PATH_SEPARATOR + registration.getServiceId() + "/**")
                .filters(filter -> filter.rewritePath(DEFAULT_PATH_SEPARATOR + registration.getServiceId() + "/(?<segment>.*)", "/$\{segment}"))
                .uri(Constant.HTTP_PREFIX + "localhost:" + SpringContextHolder.getServerPort())
            )
            .build();
    }

    /**
     * Spring web provider spring web provider.
     *
     * @return the spring web provider
     */
    @Bean
    SpringWebProvider springWebProvider() {
        return new SpringGatewayProvider();
    }

    @EventListener(classes = { ApplicationReadyEvent.class, HeartbeatEvent.class, RefreshRoutesEvent.class })
    public synchronized void discover() {
        List<SwaggerUrl> swaggerUrls = this.discoveryClient.getServices()
            .stream()
            .map(instance -> {
                final SwaggerUrl swaggerUrl = new SwaggerUrl();
                swaggerUrl.setName(instance);
                swaggerUrl.setDisplayName(instance);
                swaggerUrl.setUrl(PathUtils.append(this.documentInfo.getGateway().getApiPathPrefix(), this.springDocConfig.getApiDocs().getPath(), instance));
                return swaggerUrl;
            })
            .toList();
        swaggerUiConfig.getUrls().clear();
        swaggerUiConfig.getUrls().addAll(swaggerUrls);
    }
}
使用工具包
gateway中使用
依赖
<dependencies>
    <!--上面的步骤所构建的包(这个是我本地的,请替换为自己写的)-->
    <dependency>
        <groupId>com.github.mpcloud</groupId>
        <artifactId>framework-document</artifactId>
    </dependency>
    <dependency>
        <groupId>org.springframework.cloud</groupId>
        <artifactId>spring-cloud-starter-gateway</artifactId>
    </dependency>
    <dependency>
        <groupId>org.springframework.cloud</groupId>
        <artifactId>spring-cloud-starter-loadbalancer</artifactId>
    </dependency>
    <dependency>
        <groupId>org.springframework.boot</groupId>
        <artifactId>spring-boot-starter-actuator</artifactId>
    </dependency>
    <dependency>
        <groupId>com.github.ben-manes.caffeine</groupId>
        <artifactId>caffeine</artifactId>
    </dependency>
    <dependency>
        <groupId>com.alibaba.cloud</groupId>
        <artifactId>spring-cloud-starter-alibaba-nacos-discovery</artifactId>
    </dependency>
    <dependency>
        <groupId>com.alibaba.cloud</groupId>
        <artifactId>spring-cloud-starter-alibaba-nacos-config</artifactId>
    </dependency>
    <dependency>
        <groupId>com.alibaba.nacos</groupId>
        <artifactId>nacos-client</artifactId>
    </dependency>
    <dependency>
        <groupId>org.springframework.cloud</groupId>
        <artifactId>spring-cloud-starter-bootstrap</artifactId>
    </dependency>
    <dependency>
        <groupId>org.springdoc</groupId>
        <artifactId>springdoc-openapi-starter-webflux-ui</artifactId>
    </dependency>
    <dependency>
        <groupId>com.github.xiaoymin</groupId>
        <artifactId>knife4j-openapi3-ui</artifactId>
    </dependency>
</dependencies>
配置
server:
  port: 8080
spring:
  application:
    name: mpcloud-gateway
  cloud:
    nacos:
      username: nacos
      password: nacos
      discovery:
        server-addr: localhost:8848
        namespace: mpcloud
        cluster-name: shanghai
        heart-beat-timeout: 40000
        heart-beat-interval: 20000
        ip-delete-timeout: 80000
      config:
        server-addr: localhost:8848
        namespace: mpcloud
        timeout: 3000
        file-extension: yml
    gateway:
      discovery:
        locator:
          enabled: true
          lower-case-service-id: true
      globalcors:
        cors-configurations:
          '[/**]':
            allowedHeaders: '*'
            allowedMethods: '*'
            allowedOrigins: '*'
      httpclient:
        connect-timeout: 2000
        response-timeout: 60s
  main:
    banner-mode: off
  webflux:
    multipart:
      file-storage-directory: /tmp
      max-in-memory-size: 12MB
    format:
      date-time: yyyy-MM-dd HH:mm:ss
      date: yyyy-MM-dd
      time: HH:mm:ss
springdoc:
  api-docs:
    enabled: true
    groups:
      enabled: true
    path: /v3/api-docs
  swagger-ui:
    enabled: true
  info:
    title: 网关Api文档
    description: 网关Api文档
    project-version: 0.0.1
    license: https://milo-xiaomeng.github.io
    license-url: https://milo-xiaomeng.github.io
    contact:
      name: milo
      url: http://localhost:8080
      email: milo.xiaomeng@gmail.com
    gateway:
      # 如果Nginx设置了代理路径前缀,则此处位置必须为对应前缀 如果没有前缀,可以不设置或者为 /
      # 如Nginx如下配置
      # location /api{
      #   proxy_pass http://localhost:8080;
      #   rewrite "^/api/(.*)$" /$1 break;
      #   proxy_set_header Host $host:$server_port;
      # }
      api-path-prefix: /api
  show-actuator: true
web服务中使用
依赖
dependencies>
    <dependency>
        <groupId>org.springframework.boot</groupId>
        <artifactId>spring-boot-starter-web</artifactId>
    </dependency>
    <dependency>
        <groupId>com.alibaba.cloud</groupId>
        <artifactId>spring-cloud-starter-alibaba-nacos-discovery</artifactId>
    </dependency>
    <dependency>
        <groupId>com.alibaba.cloud</groupId>
        <artifactId>spring-cloud-starter-alibaba-nacos-config</artifactId>
    </dependency>
    <dependency>
        <groupId>com.alibaba.nacos</groupId>
        <artifactId>nacos-client</artifactId>
    </dependency>
    <dependency>
        <groupId>org.springframework.cloud</groupId>
        <artifactId>spring-cloud-starter-bootstrap</artifactId>
    </dependency>
    <!--上面的步骤所构建的包(这个是我本地的,请替换为自己写的)-->
    <dependency>
        <groupId>com.github.mpcloud</groupId>
        <artifactId>framework-document</artifactId>
    </dependency>
    <dependency>
        <groupId>org.springdoc</groupId>
        <artifactId>springdoc-openapi-starter-webmvc-api</artifactId>
    </dependency>
</dependencies>
配置
server:
  port: 8083
spring:
  application:
    name: mpcloud-monitoring
  profiles:
    active: dev
  cloud:
    nacos:
      username: nacos
      password: nacos
      discovery:
        server-addr: localhost:8848
        namespace: mpcloud
        cluster-name: shanghai
      config:
        server-addr: localhost:8848
        namespace: mpcloud
        timeout: 3000
        file-extension: yml
springdoc:
  api-docs:
    enabled: true
    groups:
      enabled: true
    path: /v3/api-docs
  info:
    title: 监控Api文档
    description: 监控Api文档
    project-version: 0.0.1
    license: mpcloud.github.com
    license-url: mpcloud.github.com
    contact:
      name: milo
      url: http://localhost:8080
      email: milo.xiaomeng@gmail.com
  show-actuator: true
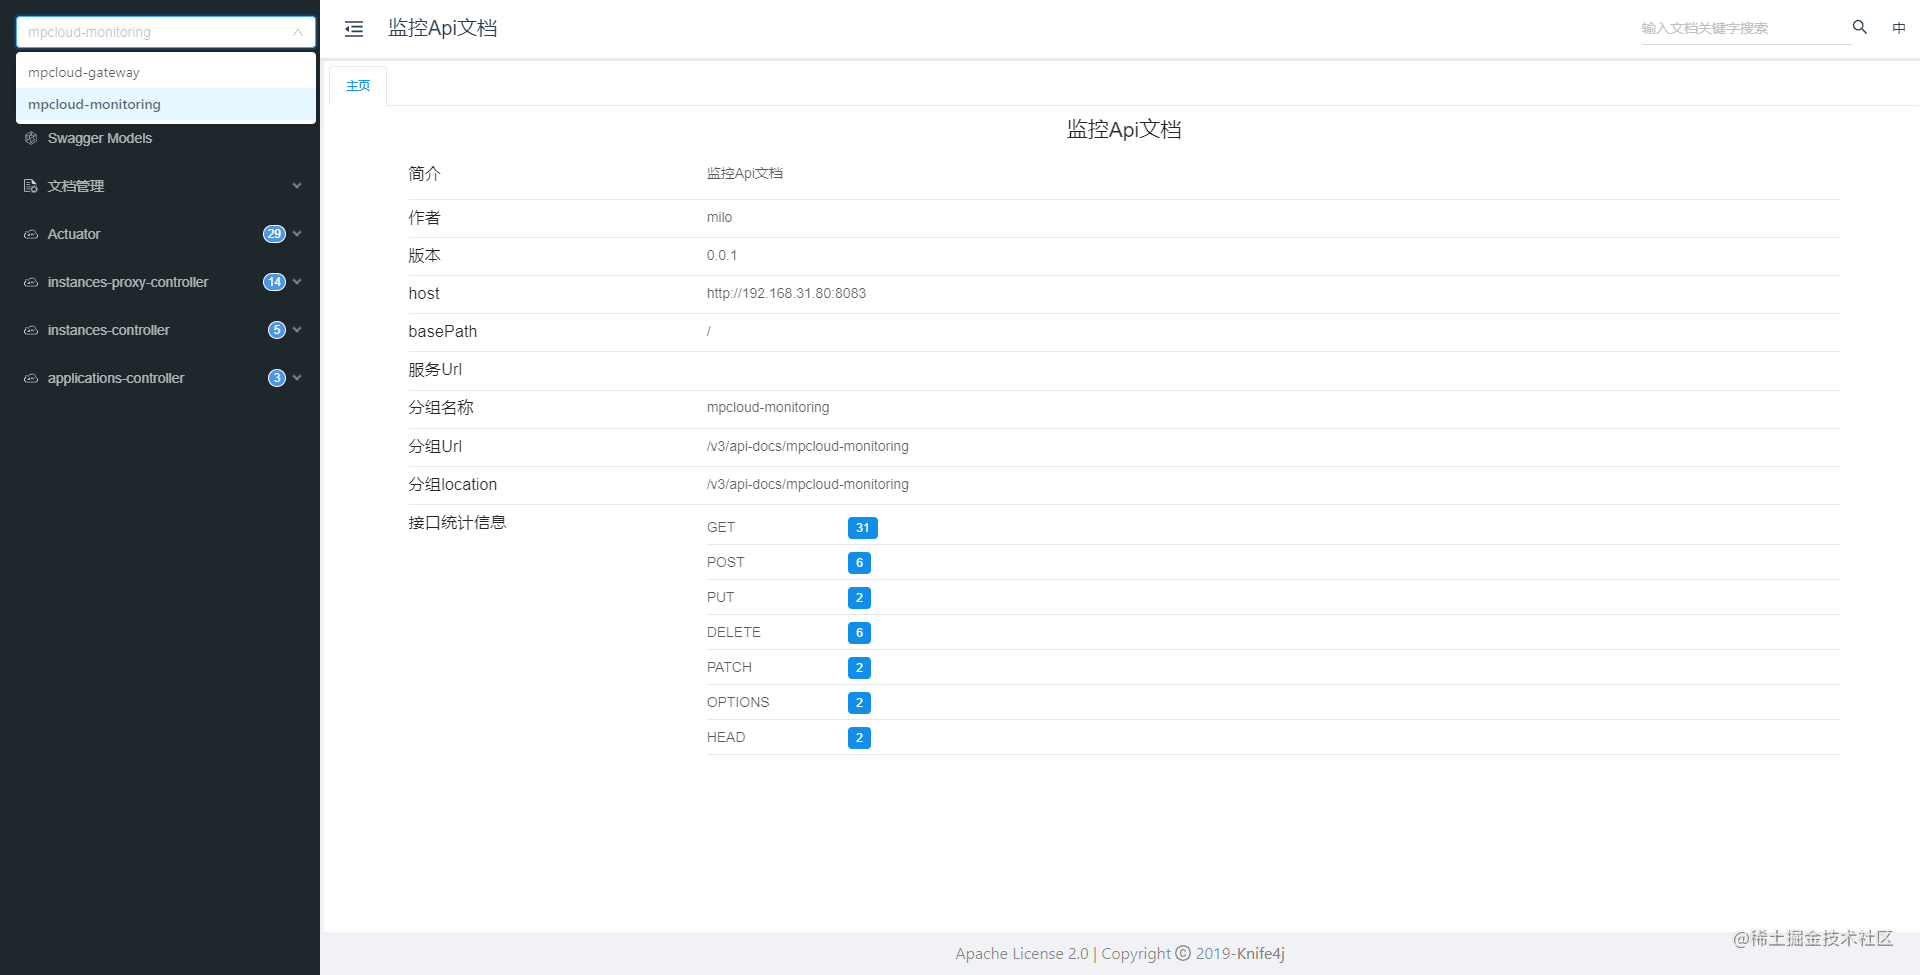
效果

 1112


 扫一扫


 被折叠的 条评论
为什么被折叠?
 到【灌水乐园】发言


