


 本文详细介绍了如何将SpringBoot的配置文件从properties转换为yml,并且提供了数据库设计和后台代码的结构分析。重点讲解了Controller、Service、DAO、Mapper.xml的设置,以及启动类的注释修改,强调了命名规范和数据库设计的重要性。
本文主要内容:后台链接数据库
SpringBoot配置文件替换
将application.properties配置文件替换成application.yml和application-dev.yml
该处参考链接
yml文件分析:在application.properties中有
spring.application.name=demo到了application-dev.yml中就变成了
spring:
  	datasource:
    	name: demo
这个可以理解吧,仔细看一下,就是application.properties文件中的一个"."到了application-dev.yml中的一个换行,其他名字什么的都没变,记住一定要换行,然后写一行前面加空格,这是一种规范。
注意事项:这里有个小问题,就是变换之前数据驱动是这个spring.datasource.driver-class-name=com.mysql.jdbc.Driverr变换之后变成了这个com.mysql.cj.jdbc.Driver多了一个cj。
解释说明:这里其实你要是想偷懒可以只用一个yml文件,不用创建两个,这里是为了标准,application.yml文件中代码的意思就是调用application-dev.yml,这里还有一个默认规范,SpringBoot系统自动识别名为application的配置文件。替换完了要把之前的文件删除掉(建议你复制一份放在桌面,万一你配置错了没有原文模板可以参考)。
文件结构:

替换前代码
# 应用名称
spring.application.name=demo
# 应用服务 WEB 访问端口
server.port=19080
#下面这些内容是为了让MyBatis映射
#指定Mybatis的Mapper文件
mybatis.mapper-locations=classpath:mappers/*xml
#指定Mybatis的实体目录
mybatis.type-aliases-package=com.example.demo.mybatis.entity
# 数据库驱动:
spring.datasource.driver-class-name=com.mysql.cj.jdbc.Driver
# 数据源名称
spring.datasource.name=demo
# 数据库连接地址
spring.datasource.url=jdbc:mysql://127.0.0.1:3306/blue?serverTimezone=UTC
# 数据库用户名&密码:
spring.datasource.username=root
spring.datasource.password=123
替换后代码
application.yml
spring:
  profiles:
    active: dev
application-dev.yml
server:
  port: 19080

spring:
  datasource:
    name: demo
    username: root
    password: 123
    url: jdbc:mysql://127.0.0.1:3306/blue?serverTimezone=UTC
    driver-class-name: com.mysql.cj.jdbc.Driver

mybatis:
  mapper-locations: classpath:mappers/*xml
  type-aliases-package: com.example.demo.mybatis.entity
后台代码
文件结构
这个就是一条龙服务,从cotroller层到dao。
老规矩:没有的文件夹和文件请创建,下面开始一个一个讲解文件的注意事项

Controller
该层没有动,还是和之前一样就行了
package com.example.demo;

import com.example.demo.service.UploadAndDownload;
import com.example.demo.util.FileUtil;
import org.springframework.beans.factory.annotation.Autowired;
import org.springframework.web.bind.annotation.*;
import org.springframework.web.context.request.RequestContextHolder;
import org.springframework.web.context.request.ServletRequestAttributes;
import org.springframework.web.multipart.MultipartFile;

import javax.activation.MimetypesFileTypeMap;
import javax.servlet.http.HttpServletResponse;
import java.io.File;
import java.io.IOException;
import java.nio.file.Files;
import java.nio.file.Path;
import java.nio.file.Paths;
import java.util.Map;

@RequestMapping("allController")
@RestController
@CrossOrigin
public class AllController {


    //    定义文件存放的父文件夹路径
    private static String parentPath = "E:"+File.separator+"boot"+ File.separator+"fileUpload";

    @Autowired
    private UploadAndDownload upAndDow;

    @RequestMapping("/dianji")
    public String dianjji(){
        return "66666666666";
    }

    @RequestMapping("/upload")
    public String upload(){
        return "upload";
    }

    @RequestMapping(value = "/upload",method = RequestMethod.POST)
    @ResponseBody
    public String upload(@RequestParam("file") MultipartFile file,String name,String anhao){
        String result = upAndDow.upload(file,name,anhao);
        return result;
    }

    @RequestMapping(value = "/download",method = RequestMethod.POST)
    public String download(@RequestBody  Map map){
        System.out.println(map);
        return "http://127.0.0.1:19080/allController/downloadFile?fileName=123456.txt";
    }

    @RequestMapping(value = "/downloadFile")
    public void download(@RequestParam("fileName") String filename) throws IOException {
        ServletRequestAttributes requestAttributes = (ServletRequestAttributes) RequestContextHolder.getRequestAttributes();
        HttpServletResponse response = requestAttributes.getResponse();
        // 设置信息给客户端不解析
        String type = new MimetypesFileTypeMap().getContentType(filename);
        // 设置contenttype,即告诉客户端所发送的数据属于什么类型
        response.setHeader("Content-type",type);
        // 设置编码
        String hehe = new String(filename.getBytes("utf-8"), "iso-8859-1");
        // 设置扩展头,当Content-Type 的类型为要下载的类型时 , 这个信息头会告诉浏览器这个文件的名字和类型。
        response.setHeader("Content-Disposition", "attachment;filename=" + hehe);
        FileUtil.download(filename, response);
    }
}
Service
这里我把类名命名成了UploadAndDownload,规范命名应该是UploadAndDownloadService,简略命名应该是UpAndDownService,后面要加Service,这样不管谁接手你的代码还是你后期维护都能看得懂。
package com.example.demo.service;

import com.example.demo.dao.AllMapper;
import com.example.demo.entity.FileEntity;
import org.springframework.beans.factory.annotation.Autowired;
import org.springframework.stereotype.Service;
import org.springframework.web.multipart.MultipartFile;

import java.io.File;
import java.io.IOException;
import java.util.Date;

@Service
public class UploadAndDownload {
    @Autowired
    private AllMapper allMapper;

    //    定义文件存放的父文件夹路径
    private static String parentPath = "E:"+File.separator+"boot"+ File.separator+"fileUpload";


    //上传
    public String upload(MultipartFile file,String name,String anhao){
        boolean isEmpty = file.isEmpty();
        long fileSize = file.getSize();
        System.out.println("isEmpty:"+isEmpty+"  fileSize:"+fileSize);
        if (file.isEmpty()){
            return "不可传输空文件";
        }
//        else if(file.getSize()>1000){return "文件太大";}
        else{
//          获取文件原名
            String originalFilename = file.getOriginalFilename();

//          获取源文件前缀
            String fileNamePrefix = originalFilename.substring(0,originalFilename.lastIndexOf("."));

//          获取源文件后缀
            String fileNameSuffix = originalFilename.substring(originalFilename.lastIndexOf("."));

//          将源文件前缀之后加上时间戳避免重名
            String newFileNamePrefix = fileNamePrefix.concat(String.valueOf(new Date().getTime()));

//          得到上传后新文件的文件名
            String newFileName = newFileNamePrefix+fileNameSuffix;

//			调用dao层向数据库添加file信息
            FileEntity fileEntity = new FileEntity();
            fileEntity.setFilename(newFileName);
            fileEntity.setFilesize(String.valueOf(file.getSize()));
            System.out.println("file.getSize()"+file.getSize());
            fileEntity.setUploadtime(new Date());
            fileEntity.setFilepath(parentPath+File.separator+newFileName);
            allMapper.addFile(fileEntity);

//          创建一个新的File对象用于存放上传的文件
            File fileNew = new File(parentPath+File.separator+newFileName);
            try {
                file.transferTo(fileNew);
            } catch (IOException e) {
                e.printStackTrace();
            }
        }
        return "上传成功";
    }
}
dao
这个是接口,不是类,看清楚了
package com.example.demo.dao;

import com.example.demo.entity.FileEntity;
import org.springframework.stereotype.Repository;

@Repository
public interface AllMapper {
    FileEntity addFile(FileEntity fileEntity);
}
mapper.xml
注意事项:namespace换成自己的,resultType换成自己的,select中的id要和dao接口中的方法名一致。
该处是可以优化,暂时懒得做。
<?xml version="1.0" encoding="UTF-8"?>
<!DOCTYPE mapper PUBLIC "-//mybatis.org//DTD Mapper 3.0//EN" "http://mybatis.org/dtd/mybatis-3-mapper.dtd">
<mapper namespace="com.example.demo.dao.AllMapper">

<!--    <resultMap id="BaseResultMap" type="com.example.entity.User">-->
<!--        <result column="id" jdbcType="INTEGER" property="id" />-->
<!--        <result column="userName" jdbcType="VARCHAR" property="userName" />-->
<!--        <result column="passWord" jdbcType="VARCHAR" property="passWord" />-->
<!--        <result column="realName" jdbcType="VARCHAR" property="realName" />-->
<!--    </resultMap>-->

    <select id="addFile" resultType="com.example.demo.entity.FileEntity">
        insert into files(filename,filesize,filepath,uploadtime) values (#{filename},#{filesize},#{filepath},#{uploadtime});
    </select>

</mapper>
启动类加注释
加
@MapperScan("com.example.demo.dao")换成自己的,别只会复制,如果你的路径和我的不一样的话
package com.example.demo;

import org.mybatis.spring.annotation.MapperScan;
import org.springframework.boot.SpringApplication;
import org.springframework.boot.autoconfigure.SpringBootApplication;

@MapperScan("com.example.demo.dao")
@SpringBootApplication
public class DemoApplication {

    public static void main(String[] args) {
        SpringApplication.run(DemoApplication.class, args);
    }
}
数据库设计
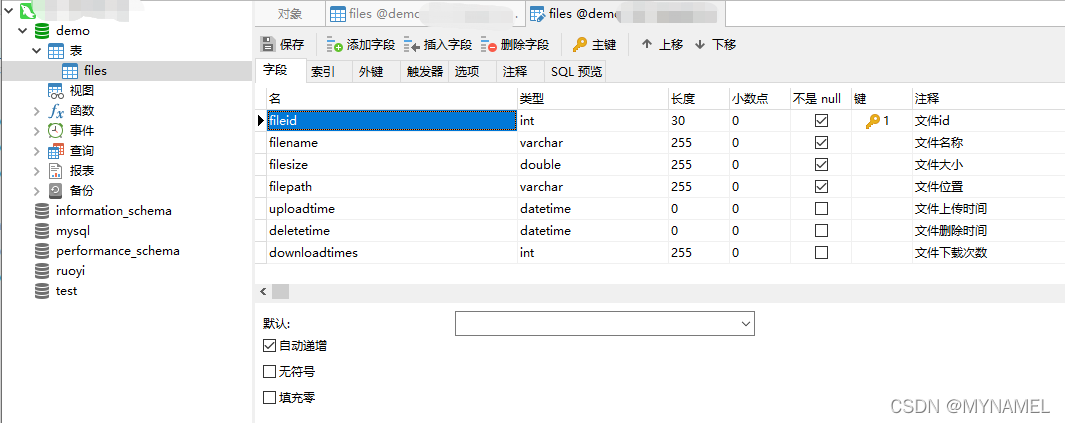
效果图


 5939
5939

 被折叠的 条评论
为什么被折叠?
被折叠的 条评论
为什么被折叠?
 到【灌水乐园】发言


