


 本文介绍了一个基于MVP架构的应用案例,详细阐述了如何利用Retrofit、RxJava等技术栈实现网络请求、数据处理及UI展示等功能。具体包括MVP各层职责划分、RecyclerView的使用、异步数据处理流程等方面。
实现思路:
1. MVP分层,Model处理逻辑数据,Persenter调用Model,当 Model 数据加载成功后会调用 Presenter 的回调方法通知 Presenter 数据加载完毕,最后 Presenter 再调用 View 层接口展示加载后数据
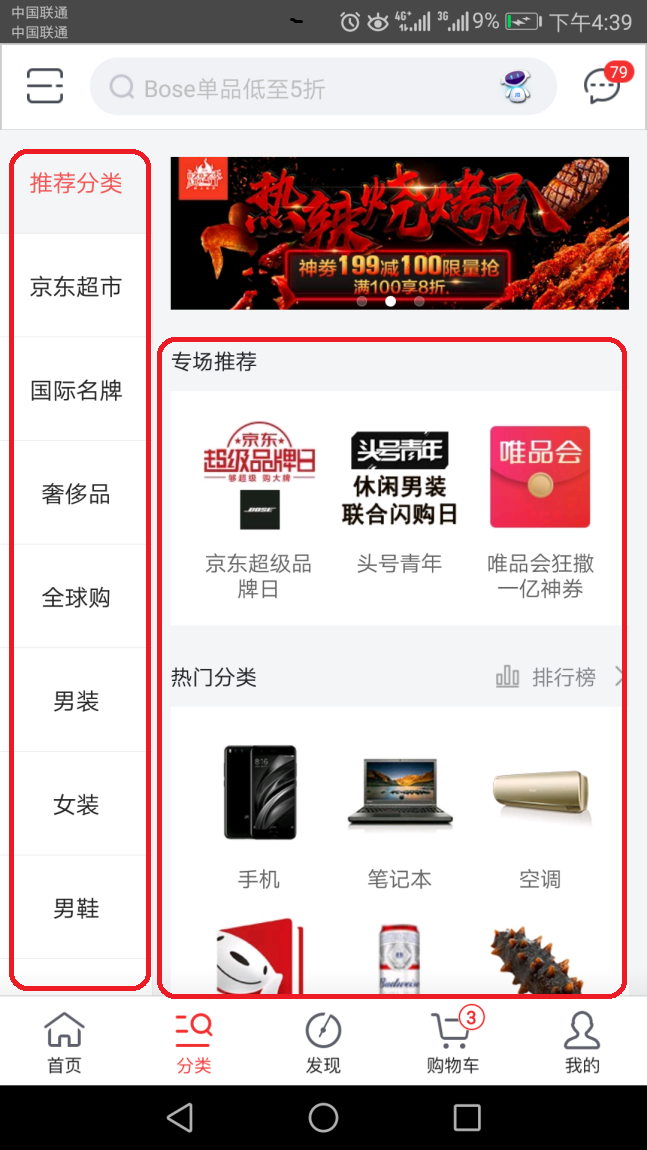
2. 主页面显示两个RecyclerView实现左右分类样式
3. Retrofit访问网络接口获取数据
4. Rxjava异步处理数据
5. 设置适配器,点击左边的条目更新右边数据,将数据列表传入适配器
6. 重写适配器的4个方法,并在显示视图的方法中做优化
7. 使用EventBus传值 将左侧页面cid传给右侧页面
8. 使用Fresco 获取图片显示
9. 接口:第一个接口传入一个cid给第二个接口拼接接口请求数据
https://www.zhaoapi.cn/product/getCatagory
https://www.zhaoapi.cn/product/getProductCatagory?cid=1
1.依赖
//《Recyclerview的依赖》
compile 'com.android.support:recyclerview-v7:27.+'

//《Retrofit网络请求依赖》
implementation 'com.squareup.retrofit2:retrofit:2.4.0'
compile 'com.squareup.retrofit2:converter-gson:2.4.0'

//《Butterknife依赖(黄油刀)》
compile 'com.jakewharton:butterknife:8.8.1'
annotationProcessor 'com.jakewharton:butterknife-compiler:8.8.1'

//《Rxjava2》
compile 'io.reactivex.rxjava2:rxjava:2.1.7'
compile 'io.reactivex.rxjava2:rxandroid:2.0.1'

//《RXjava2的适配器》
compile 'com.squareup.retrofit2:adapter-rxjava2:2.4.0'

//《EventBus的依赖》
compile 'org.greenrobot:eventbus:3.0.0'

//《Fresco图片框架依赖》
compile 'com.facebook.fresco:fresco:0.14.1'
因主布局文件使用Fragment 需将版本改为27
android {
    compileSdkVersion 27


    defaultConfig {
        applicationId "com.example.rikao0420"
        minSdkVersion 15
        targetSdkVersion 27
        versionCode 1
        versionName "1.0"

        testInstrumentationRunner "android.support.test.runner.AndroidJUnitRunner"

    }
dependencies {
    implementation fileTree(dir: 'libs', include: ['*.jar'])

    implementation 'com.android.support:appcompat-v7:27.+'
2.权限
<uses-permission android:name="android.permission.INTERNET" />
<uses-permission android:name="android.permission.MOUNT_UNMOUNT_FILESYSTEMS" />
<uses-permission android:name="android.permission.WRITE_EXTERNAL_STORAGE" />
<uses-permission android:name="android.permission.READ_EXTERNAL_STORAGE" />
3.拼接接口
package com.example.rikao0420.api;

import com.example.rikao0420.entity.LeftDataBean;
import com.example.rikao0420.entity.MessageBean;
import com.example.rikao0420.entity.RightDataBean;
import java.util.List;
import io.reactivex.Flowable;
import retrofit2.http.GET;
import retrofit2.http.Query;

public interface ApiService {

    //左侧请求数据
    @GET("product/getCatagory")
   Flowable<MessageBean<List<LeftDataBean>>> getLeftData();

    //请求右一级数据
    @GET("product/getProductCatagory")
  Flowable<MessageBean<List<RightDataBean>>>  getRightData(@Query("cid") String cid);

}
4.拼接接口
package com.example.rikao0420.utils;

public class StringUrl {
    //接口
    public static final String BASE_URL="https://www.zhaoapi.cn/";
}
5.RetrofitUtils网络请求框架
package com.example.rikao0420.utils;

import com.example.rikao0420.api.ApiService;
import retrofit2.Retrofit;
import retrofit2.adapter.rxjava2.RxJava2CallAdapterFactory;
import retrofit2.converter.gson.GsonConverterFactory;

public class RetrofitUtils {

    //1创建一个单列
    private static volatile RetrofitUtils instance;
    private final Retrofit retrofit;

    //2创建一个私有的无参构造
    private RetrofitUtils(){

        //3创建Retrofit
        retrofit = new Retrofit.Builder()
                .baseUrl(StringUrl.BASE_URL)//接口
                .addConverterFactory(GsonConverterFactory.create())//默认Gson进行解析
                .addCallAdapterFactory(RxJava2CallAdapterFactory.create())//使用RxJava2适配器
                .build();
    }

  //4创建一个静态方法 得到instance
    public static RetrofitUtils getInstance(){

        //5判断instance是否为空
        if(instance==null){

            //6若为空 添加同步锁
            synchronized (RetrofitUtils.class){

                //7再进行判断是否为空
                if(null==instance){

                    //8经过双向判断为空 则创建RetrofitUtils
                    instance = new RetrofitUtils();
                }
            }
        }
        //9返回instance
        return instance;
    }

    //创建方法 方便调用
    public  ApiService getApiService(){
        return retrofit.create(ApiService.class);
    }

}
6.初始化Fresco 使用默认设置
package com.example.rikao0420.app;

import android.app.Application;
import com.facebook.drawee.backends.pipeline.Fresco;

public class App extends Application{
    @Override
    public void onCreate() {
        super.onCreate();
        //初始化Fresco 使用默认设置
        Fresco.initialize(this);
    }
}
7.网络请求数据的最外层泛型封装
package com.example.rikao0420.entity;
//封装外层泛型类
public class MessageBean<T> {
    private String code;
    private String msg;
    private T data;

    public String getCode() {
        return code;
    }

    public void setCode(String code) {
        this.code = code;
    }

    public String getMsg() {
        return msg;
    }

    public void setMsg(String msg) {
        this.msg = msg;
    }

    public T getData() {
        return data;
    }

    public void setData(T data) {
        this.data = data;
    }
}
8.封装左侧内层数据
package com.example.rikao0420.entity;


//封装左侧内层数据
public class LeftDataBean {
    private int cid;
    private String createtime;
    private String icon;
    private int ishome;
    private String name;

    public int getCid() {
        return cid;
    }

    public void setCid(int cid) {
        this.cid = cid;
    }

    public String getCreatetime() {
        return createtime;
    }

    public void setCreatetime(String createtime) {
        this.createtime = createtime;
    }

    public String getIcon() {
        return icon;
    }

    public void setIcon(String icon) {
        this.icon = icon;
    }

    public int getIshome() {
        return ishome;
    }

    public void setIshome(int ishome) {
        this.ishome = ishome;
    }

    public String getName() {
        return name;
    }

    public void setName(String name) {
        this.name = name;
    }
}
9.封装右侧内层数据
package com.example.rikao0420.entity;

import java.util.List;

//封装右侧内层数据
public class RightDataBean {
    private String cid;
    private String name;
    private String pcid;
    private List<RightDataBeanSecond> list;

    public String getCid() {
        return cid;
    }

    public void setCid(String cid) {
        this.cid = cid;
    }

    public String getName() {
        return name;
    }

    public void setName(String name) {
        this.name = name;
    }

    public String getPcid() {
        return pcid;
    }

    public void setPcid(String pcid) {
        this.pcid = pcid;
    }

    public List<RightDataBeanSecond> getList() {
        return list;
    }

    public void setList(List<RightDataBeanSecond> list) {
        this.list = list;
    }
}
10.封装右侧内层二级的数据
package com.example.rikao0420.entity;

//封装右侧内层二级的数据
public class RightDataBeanSecond {

    private String icon;
    private String name;
    private int pcid;
    private int pscid;

    public String getIcon() {
        return icon;
    }

    public void setIcon(String icon) {
        this.icon = icon;
    }

    public String getName() {
        return name;
    }

    public void setName(String name) {
        this.name = name;
    }

    public int getPcid() {
        return pcid;
    }

    public void setPcid(int pcid) {
        this.pcid = pcid;
    }

    public int getPscid() {
        return pscid;
    }

    public void setPscid(int pscid) {
        this.pscid = pscid;
    }
}
11.左侧M层接口
package com.example.rikao0420.model;

import com.example.rikao0420.prsenter.LeftDataPresenter;

public interface LeftDataModel {
    //定义请求数据的方法
    void getLeftDataBean(LeftDataPresenter presenter);
}
12.左侧M层接口实现类
package com.example.rikao0420.model;

import com.example.rikao0420.entity.LeftDataBean;
import com.example.rikao0420.entity.MessageBean;
import com.example.rikao0420.prsenter.LeftDataPresenter;
import com.example.rikao0420.utils.RetrofitUtils;
import java.util.List;
import io.reactivex.android.schedulers.AndroidSchedulers;
import io.reactivex.schedulers.Schedulers;
import io.reactivex.subscribers.DisposableSubscriber;

public class MyLeftDataModel implements LeftDataModel{

    //请求数据的方法
    @Override
    public void getLeftDataBean(final LeftDataPresenter presenter) {
        //转换线程
        RetrofitUtils.getInstance().getApiService().getLeftData()
                //转为线程
                .subscribeOn(Schedulers.io())//Io子线程 网络请求
                .observeOn(AndroidSchedulers.mainThread())//主线程 更新UI
                .subscribeWith(new DisposableSubscriber<MessageBean<List<LeftDataBean>>>() {
                    @Override
                    public void onNext(MessageBean<List<LeftDataBean>> listMessageBean) {
                        //得到数据 进行判断是否为空
                        if(listMessageBean!=null){
                            List<LeftDataBean> list = listMessageBean.getData();
                            if(list!=null){
                                //调用P层方法 将数据传给P层
                                presenter.Success(list);
                            }
                        }
                    }
                    @Override
                    public void onError(Throwable t) {
                        //调用P层方法 将异常传给P层
                        presenter.Error(t);
                    }

                    @Override
                    public void onComplete() {
                    }
                });

    }
}
13.右侧M层接口
package com.example.rikao0420.model;

import com.example.rikao0420.prsenter.RightDataPresenter;

public interface RightDataModel {
    //定义请求数据的方法
    void getRightDataBean(String cid,RightDataPresenter presenter);

}
14.右侧M层接口实现类
package com.example.rikao0420.model;

import com.example.rikao0420.entity.MessageBean;
import com.example.rikao0420.entity.RightDataBean;
import com.example.rikao0420.prsenter.RightDataPresenter;
import com.example.rikao0420.utils.RetrofitUtils;
import java.util.List;
import io.reactivex.android.schedulers.AndroidSchedulers;
import io.reactivex.schedulers.Schedulers;
import io.reactivex.subscribers.DisposableSubscriber;

public class MyRightDataModel implements RightDataModel{

    @Override
    public void getRightDataBean(String cid, final RightDataPresenter presenter) {

        //得到数据
         RetrofitUtils.getInstance().getApiService().getRightData(cid)
                 .subscribeOn(Schedulers.io())//io线程 网络请求
                .observeOn(AndroidSchedulers.mainThread())//主线程 更新UI
                .subscribeWith(new DisposableSubscriber<MessageBean<List<RightDataBean>>>() {
                    @Override
                    public void onNext(MessageBean<List<RightDataBean>> listMessageBean) {
                        //得到数据 进行判断是否为空
                        if(listMessageBean!=null){
                            List<RightDataBean> data = listMessageBean.getData();
                            if(data!=null){
                                //调用P层方法 将数据传给P层
                                presenter.Success(data);
                            }
                        }
                    }
                    @Override
                    public void onError(Throwable t) {
                        presenter.Error(t);
                    }

                    @Override
                    public void onComplete() {
  }
                });
    }
}
15.P层接口
package com.example.rikao0420.prsenter;

public interface LeftDataPresenter {

    //调用成功和失败的方法
    void Success(Object o);
    void Error(Throwable t);
}
16.P层接口实现类
package com.example.rikao0420.prsenter;

import com.example.rikao0420.entity.LeftDataBean;
import com.example.rikao0420.model.MyLeftDataModel;
import com.example.rikao0420.view.LeftDataView;
import java.util.List;

public class MyLeftDataPresenter implements LeftDataPresenter{

    //创建构建器 将V层传入P层
    LeftDataView dataView;
    private MyLeftDataModel model;
    public MyLeftDataPresenter(LeftDataView dataView){
            this.dataView=dataView;
            //实例化M层
        model = new MyLeftDataModel();
    }

    //防止内存泄露
    public void detachView() {
        if (dataView != null) {
            dataView = null;
        }
    }

    @Override
    public void Success(Object o) {
        //得到M层传来的数据
        List<LeftDataBean> list = (List<LeftDataBean>) o;

        //调用V层方法 将数据传到V层
            dataView.netWorkHome(list);
    }
    @Override
    public void Error(Throwable t) {}

    //创建请求数据的方法
    public void getLeftDataBeanp(){
        model.getLeftDataBean(this);
    }


}
17.右侧P层接口
package com.example.rikao0420.prsenter;

public interface RightDataPresenter {
    //调用成功和失败的方法
    void Success(Object o);
    void Error(Throwable t);
}
18.右侧P层接口实现类
package com.example.rikao0420.prsenter;

import com.example.rikao0420.entity.RightDataBean;
import com.example.rikao0420.model.MyRightDataModel;
import com.example.rikao0420.view.RightDataView;
import java.util.List;

public class MyRightDataPresenter implements RightDataPresenter{
    RightDataView dataView;
    private final MyRightDataModel model;

    public MyRightDataPresenter(RightDataView dataView){
        this.dataView=dataView;

        model = new MyRightDataModel();
    }

    @Override
    public void Success(Object o) {
        //得到M层传来的数据
        List<RightDataBean> list = (List<RightDataBean>) o;
        //调用V层方法 将数据传给
        dataView.netWorkHome(list);
    }

    @Override
    public void Error(Throwable t) {
    }

    //创建方法 接收V层传来的cid 然后进行请求
    public void getRightDataUrl(String cid){
        model.getRightDataBean(cid,this);
    }
}
19.主页面 布局文件中是两个Fragment
package com.example.rikao0420.view;

import android.os.Bundle;
import android.support.v7.app.AppCompatActivity;
import com.example.rikao0420.R;

public class MainActivity extends AppCompatActivity {

    @Override
    protected void onCreate(Bundle savedInstanceState) {
        super.onCreate(savedInstanceState);
        setContentView(R.layout.activity_main);
    }
}
20.左侧V层接口
package com.example.rikao0420.view;

import com.example.rikao0420.entity.LeftDataBean;
import java.util.List;

public interface LeftDataView {
    //定义接收数据的方法
    void netWorkHome(List<LeftDataBean> list);
}
21.左侧V层接口实现类
package com.example.rikao0420.view;

import android.os.Bundle;
import android.support.annotation.Nullable;
import android.support.v4.app.Fragment;
import android.support.v7.widget.LinearLayoutManager;
import android.support.v7.widget.RecyclerView;
import android.util.Log;
import android.view.LayoutInflater;
import android.view.View;
import android.view.ViewGroup;
import com.example.rikao0420.R;
import com.example.rikao0420.adapter.LeftAdapter;
import com.example.rikao0420.entity.LeftDataBean;
import com.example.rikao0420.prsenter.MyLeftDataPresenter;
import org.greenrobot.eventbus.EventBus;
import java.util.List;
import butterknife.BindView;
import butterknife.ButterKnife;
import butterknife.Unbinder;

public class LeftFragment extends Fragment implements LeftDataView,LeftAdapter.OnLeftClickListener {

    @BindView(R.id.left_rcv)
    RecyclerView left_Rcv;
    Unbinder unbinder;
    private MyLeftDataPresenter presenter;
    private LeftAdapter leftAdapter;
    List<LeftDataBean> list;

    @Nullable
    @Override
    public View onCreateView(LayoutInflater inflater, @Nullable ViewGroup container, @Nullable Bundle savedInstanceState) {

        //引入左侧布局文件
        View view = inflater.inflate(R.layout.left_fragment,null);

        unbinder = ButterKnife.bind(this, view);

        //设置布局管理器
       left_Rcv.setLayoutManager(new LinearLayoutManager(getActivity(),LinearLayoutManager.VERTICAL,false));

        //实例化P层
        presenter = new MyLeftDataPresenter(this);

        //调用请求的方法
        presenter.getLeftDataBeanp();

        return view;
    }

    //因其在主线程 可直接更新UI
    @Override
    public void netWorkHome(List<LeftDataBean> list) {
        this.list=list;
        //得到数据 创建适配器
        leftAdapter = new LeftAdapter(getActivity(), list);
        left_Rcv.setAdapter(leftAdapter);

        //调用适配器中的点击方法
        leftAdapter.OnClick(this);

    }

    @Override
    public void onDestroyView() {
        super.onDestroyView();
        unbinder.unbind();
    }

    //条目点击事件
    @Override
    public void OnClickItem(int position) {
        //得到cid
        int cid = list.get(position).getCid();

        //使用EventBus传值
        EventBus.getDefault().post(cid+"");
    }
}
22.右侧V层接口
package com.example.rikao0420.view;

import com.example.rikao0420.entity.RightDataBean;
import java.util.List;

public interface RightDataView {
    //定义接收数据的方法
    void netWorkHome(List<RightDataBean> list);

}
23.右侧V层接口实现类
package com.example.rikao0420.view;

import android.os.Bundle;
import android.support.annotation.Nullable;
import android.support.v4.app.Fragment;
import android.support.v7.widget.LinearLayoutManager;
import android.support.v7.widget.RecyclerView;
import android.view.LayoutInflater;
import android.view.View;
import android.view.ViewGroup;
import com.example.rikao0420.R;
import com.example.rikao0420.adapter.RightAdapter;
import com.example.rikao0420.entity.RightDataBean;
import com.example.rikao0420.prsenter.MyRightDataPresenter;
import org.greenrobot.eventbus.EventBus;
import org.greenrobot.eventbus.Subscribe;
import org.greenrobot.eventbus.ThreadMode;
import java.util.List;
import butterknife.BindView;
import butterknife.ButterKnife;
import butterknife.Unbinder;

public class RightFragment extends Fragment implements RightDataView {

    @BindView(R.id.right_rcv)
    RecyclerView right_Rcv;
    Unbinder unbinder;
    private RightAdapter rightAdapter;
    private MyRightDataPresenter presenter;
    private String cid="1";

    @Nullable
    @Override
    public View onCreateView(LayoutInflater inflater, @Nullable ViewGroup container, @Nullable Bundle savedInstanceState) {
        //注册EventBus
        EventBus.getDefault().register(this);

        //引入右侧布局文件
        View view = inflater.inflate(R.layout.right_fragment, container, false);

        //实例化P层 将cid传入P层
        presenter = new MyRightDataPresenter(this);

        //进入时默认显示cid=1的数据
        presenter.getRightDataUrl(cid);

        unbinder = ButterKnife.bind(this, view);


        return view;
    }

    //接收数据的方法
    @Override
    public void netWorkHome(List<RightDataBean> list) {
        //设置布局
        right_Rcv.setLayoutManager(new LinearLayoutManager(getActivity()));

        //进入适配器
        rightAdapter = new RightAdapter(getActivity(), list);
        right_Rcv.setAdapter(rightAdapter);
    }

    @Override
    public void onDestroyView() {
        super.onDestroyView();
        unbinder.unbind();

        //注销EventBus
        EventBus.getDefault().unregister(this);
    }

    //定义方法 接收Left传来的cid
    @Subscribe(threadMode = ThreadMode.MAIN)
    public void ciddata(String cid){

        //调用P层请求的方法
     presenter.getRightDataUrl(cid);

    }

}
24.左侧适配器
package com.example.rikao0420.adapter;

import android.content.Context;
import android.support.v7.widget.RecyclerView;
import android.util.Log;
import android.view.LayoutInflater;
import android.view.View;
import android.view.ViewGroup;
import android.widget.TextView;
import com.example.rikao0420.R;
import com.example.rikao0420.entity.LeftDataBean;
import java.util.List;

public class LeftAdapter extends RecyclerView.Adapter{

    Context context;
    List<LeftDataBean> list;
    public LeftAdapter(Context context, List<LeftDataBean> list) {
        this.context=context;
        this.list=list;

        Log.e("Adapter层", "onNext: "+list.size() );
    }

    @Override
    public RecyclerView.ViewHolder onCreateViewHolder(ViewGroup parent, int viewType) {
        //引入左侧条目布局文件
        View view = LayoutInflater.from(context).inflate(R.layout.left_fragment_item, parent, false);

        //创建myViewHolder 将view传过去
       MyViewHolder myViewHolder=new MyViewHolder(view);

        return myViewHolder;
    }

    @Override
    public void onBindViewHolder(RecyclerView.ViewHolder holder, final int position) {
        MyViewHolder myViewHolder = (MyViewHolder) holder;

        //为控件进行赋值
        myViewHolder.name.setText(list.get(position).getName());

        //条目进行点击
        myViewHolder.itemView.setOnClickListener(new View.OnClickListener() {
            @Override
            public void onClick(View v) {

                //进行点击事件
                listener.OnClickItem(position);

            }
        });
    }

    @Override
    public int getItemCount() {
        return list.size();
    }

    class MyViewHolder extends RecyclerView.ViewHolder{

        private final TextView name;

        public MyViewHolder(View view) {
            super(view);

            //找到布局文件中的控件ID
            name = view.findViewById(R.id.left_fragment_name);
        }
    }

    //定义方法
    OnLeftClickListener listener;
    public void OnClick(OnLeftClickListener listener ){
        this.listener=listener;
    }

    //条目点击事件
     public interface OnLeftClickListener{
            void OnClickItem(int position);
    }

}
25.右侧一级条目的适配器
package com.example.rikao0420.adapter;

import android.content.Context;
import android.support.v7.widget.GridLayoutManager;
import android.support.v7.widget.RecyclerView;
import android.view.LayoutInflater;
import android.view.View;
import android.view.ViewGroup;
import android.widget.TextView;
import com.example.rikao0420.R;
import com.example.rikao0420.entity.RightDataBean;
import com.example.rikao0420.entity.RightDataBeanSecond;
import java.util.List;

public class RightAdapter extends RecyclerView.Adapter{

    Context context;
    List<RightDataBean> list;
    public RightAdapter(Context context, List<RightDataBean> list) {
        this.context=context;
        this.list=list;
    }

    @Override
    public RecyclerView.ViewHolder onCreateViewHolder(ViewGroup parent, int viewType) {
        //引入左侧条目布局文件
        View view = LayoutInflater.from(context).inflate(R.layout.right_fragment_item, parent, false);

        //创建myViewHolder 将view传过去
       MyViewHolder myViewHolder=new MyViewHolder(view);

        return myViewHolder;
    }

    @Override
    public void onBindViewHolder(RecyclerView.ViewHolder holder, final int position) {
        MyViewHolder myViewHolder = (MyViewHolder) holder;

        //为控件进行赋值
        myViewHolder.name.setText(list.get(position).getName());

        List<RightDataBeanSecond> secondList = list.get(position).getList();
        //创建二级数据的适配器
        RightSecondRcv rightSecondRcv  = new RightSecondRcv(context,secondList);

        //进入二级适配器
        myViewHolder.secondRcv.setAdapter(rightSecondRcv);

        //设置二级数据显示布局
        myViewHolder.secondRcv.setLayoutManager(new GridLayoutManager(context,3));

    }

    @Override
    public int getItemCount() {
        return list.size();
    }

    class MyViewHolder extends RecyclerView.ViewHolder{

        private final TextView name;
        private final RecyclerView secondRcv;

        public MyViewHolder(View view) {
            super(view);

            //找到布局文件中的控件ID
            name = view.findViewById(R.id.right_fragment_name);
           secondRcv = view.findViewById(R.id.right_frgment_secondRcv);


        }
    }


}
26.右侧二级条目的适配器
package com.example.rikao0420.adapter;

import android.content.Context;
import android.support.annotation.NonNull;
import android.support.v7.widget.RecyclerView;
import android.view.LayoutInflater;
import android.view.View;
import android.view.ViewGroup;
import android.widget.TextView;
import com.example.rikao0420.R;
import com.example.rikao0420.entity.RightDataBeanSecond;
import com.facebook.drawee.view.SimpleDraweeView;
import java.util.List;

public class RightSecondRcv extends RecyclerView.Adapter{

    Context context;
    List<RightDataBeanSecond> list;
    public RightSecondRcv(Context context, List<RightDataBeanSecond> list) {
        this.list=list;
        this.context=context;
    }

    @NonNull
    @Override
    public RecyclerView.ViewHolder onCreateViewHolder(@NonNull ViewGroup parent, int viewType) {
        //引入左侧条目布局文件
        View view = LayoutInflater.from(context).inflate(R.layout.right_secondrcv_item, parent, false);

        //创建myViewHolder 将view传过去
       MyViewHolder myViewHolder = new MyViewHolder(view);

        return myViewHolder;
    }

    @Override
    public void onBindViewHolder(@NonNull RecyclerView.ViewHolder holder, int position) {

        MyViewHolder myViewHolder = (MyViewHolder) holder;
        //进行赋值
        myViewHolder.img.setImageURI(list.get(position).getIcon());
        myViewHolder.name.setText(list.get(position).getName());
    }

    @Override
    public int getItemCount() {
        return list.size();
    }

    class MyViewHolder extends RecyclerView.ViewHolder{

        private final SimpleDraweeView img;
        private final TextView name;

        public MyViewHolder(View view) {
            super(view);

            //找到布局文件中的控件ID
            img = view.findViewById(R.id.right_secondRcv_img);
            name = view.findViewById(R.id.right_secondRcv_name);

        }
    }
}
<?xml version="1.0" encoding="utf-8"?>
<LinearLayout xmlns:android="http://schemas.android.com/apk/res/android"
    xmlns:app="http://schemas.android.com/apk/res-auto"
    xmlns:tools="http://schemas.android.com/tools"
    android:layout_width="match_parent"
    android:layout_height="match_parent"
    android:orientation="horizontal"
    tools:context="com.example.rikao0420.view.MainActivity">

    <!--左侧的fragment-->
    <fragment
        android:layout_width="0dp"
        android:layout_weight="2.5"
        android:layout_height="match_parent"
        android:id="@+id/left_fragment"
        android:name="com.example.rikao0420.view.LeftFragment"
    />
    <!--右侧的fragment-->
    <fragment
        android:layout_width="0dp"
        android:layout_weight="7.5"
        android:layout_height="match_parent"
        android:id="@+id/right_fragment"
        android:name="com.example.rikao0420.view.RightFragment"
        />

</LinearLayout>
28. 左侧 RecyclerView 布局
<?xml version="1.0" encoding="utf-8"?>
<LinearLayout xmlns:android="http://schemas.android.com/apk/res/android"
    android:layout_width="match_parent"
    android:layout_height="match_parent"
    android:background="#00FFFF"
    android:orientation="vertical">

    <!--左侧RecyclerView布局-->
    <android.support.v7.widget.RecyclerView
        android:id="@+id/left_rcv"
        android:layout_width="match_parent"
        android:layout_height="match_parent">
    </android.support.v7.widget.RecyclerView>
29. 右侧 RecyclerView 布局
<?xml version="1.0" encoding="utf-8"?>
<LinearLayout xmlns:android="http://schemas.android.com/apk/res/android"
    android:layout_width="match_parent"
    android:layout_height="wrap_content"
    android:orientation="vertical"
    android:background="#ff0">

    <!--右侧RecyclerView布局-->
    <android.support.v7.widget.RecyclerView
        android:id="@+id/right_rcv"
        android:layout_width="match_parent"
        android:layout_height="match_parent">
    </android.support.v7.widget.RecyclerView>

</LinearLayout>
30. 左侧条目布局
<?xml version="1.0" encoding="utf-8"?>
<LinearLayout xmlns:android="http://schemas.android.com/apk/res/android"
    android:layout_width="match_parent"
    android:layout_height="80px"
    android:orientation="vertical"
    android:layout_gravity="center"
    android:gravity="center">

    <!--左侧条目布局-->
    <TextView
        android:id="@+id/left_fragment_name"
        android:layout_width="match_parent"
        android:layout_height="wrap_content"
        android:layout_marginLeft="10px"
        android:textSize="24px"/>

</LinearLayout>
31.右侧一级条目布局(嵌套 RecyclerView显示二级条目 )
<?xml version="1.0" encoding="utf-8"?>
<LinearLayout xmlns:android="http://schemas.android.com/apk/res/android"
    android:layout_width="match_parent"
    android:layout_height="wrap_content"
    android:orientation="vertical"
    android:padding="10px">

    <!--右侧一级条目布局 -->
    <TextView
        android:id="@+id/right_fragment_name"
        android:layout_width="match_parent"
        android:layout_height="wrap_content"
        android:layout_marginLeft="10px"
        android:padding="10px"
        android:textSize="24px"/>

    <android.support.v7.widget.RecyclerView
        android:id="@+id/right_frgment_secondRcv"
        android:layout_width="match_parent"
        android:layout_height="match_parent">
    </android.support.v7.widget.RecyclerView>

</LinearLayout>
32.右侧二级条目布局
<?xml version="1.0" encoding="utf-8"?>
<LinearLayout xmlns:android="http://schemas.android.com/apk/res/android"
    android:layout_width="match_parent"
    android:layout_height="wrap_content"
    android:orientation="vertical"
    android:paddingLeft="10px">

    <!--右侧二级条目的布局-->
    <RelativeLayout
        android:layout_width="match_parent"
        android:layout_height="wrap_content"
        android:layout_marginTop="10px">

        <com.facebook.drawee.view.SimpleDraweeView
            android:id="@+id/right_secondRcv_img"
            android:layout_width="80px"
            android:layout_centerHorizontal="true"
            android:layout_height="80px" >
        </com.facebook.drawee.view.SimpleDraweeView>


        <TextView
            android:id="@+id/right_secondRcv_name"
            android:layout_width="wrap_content"
            android:layout_height="wrap_content"
            android:layout_marginTop="10px"
            android:layout_centerHorizontal="true"
            android:layout_below="@id/right_secondRcv_img"
            android:text="月饼"/>

    </RelativeLayout>
</LinearLayout>


 1985
1985


 被折叠的 条评论
为什么被折叠?
被折叠的 条评论
为什么被折叠?
 到【灌水乐园】发言


