


1. 为什么我们需要异步通知系统
在开发我的个人博客系统时,最初我把所有功能都设计成了同步操作。当用户评论后,系统会立即发送邮件通知博主和被回复的用户。这种设计看似简单直接,但在实际运行中却暴露出了严重的性能问题。
同步通知的性能瓶颈
让我们先看一下同步实现的代码:
@PostMapping("/comment/add")
public Result addComment(@RequestBody CommentVO comment) {


    // 1. 保存评论到数据库
    commentService.saveComment(comment);

    // 2. 发送邮件通知(这一过程可能需要5-10秒)
    emailService.sendNotification(comment);

    // 3. 返回结果给用户
    return Result.success();
}
为了量化分析这个问题,我使用JMeter进行了压力测试(50并发用户,100循环次数),同时对比了同步和异步两种实现方式的性能差异:
| 性能指标 | 同步接口 | 异步接口 | 性能提升 |
|---|---|---|---|
| 平均响应时间 | 5007ms | 55ms | 提升91倍 |
| 最小响应时间 | 5001ms | 50ms | 提升100倍 |
| 最大响应时间 | 5083ms | 81ms | 提升63倍 |
| 吞吐量 | 9.8请求/秒 | 324.3请求/秒 | 提升33倍 |
| 数据接收率 | 1.83KB/s | 69.59KB/s | 提升38倍 |
| 数据发送率 | 2.38KB/s | 76.65KB/s | 提升32倍 |
测试结果的响应时间分布图更直观地展示了两种实现方式的差异:
| 同步接口响应时间 | 异步接口响应时间 |
|---|---|
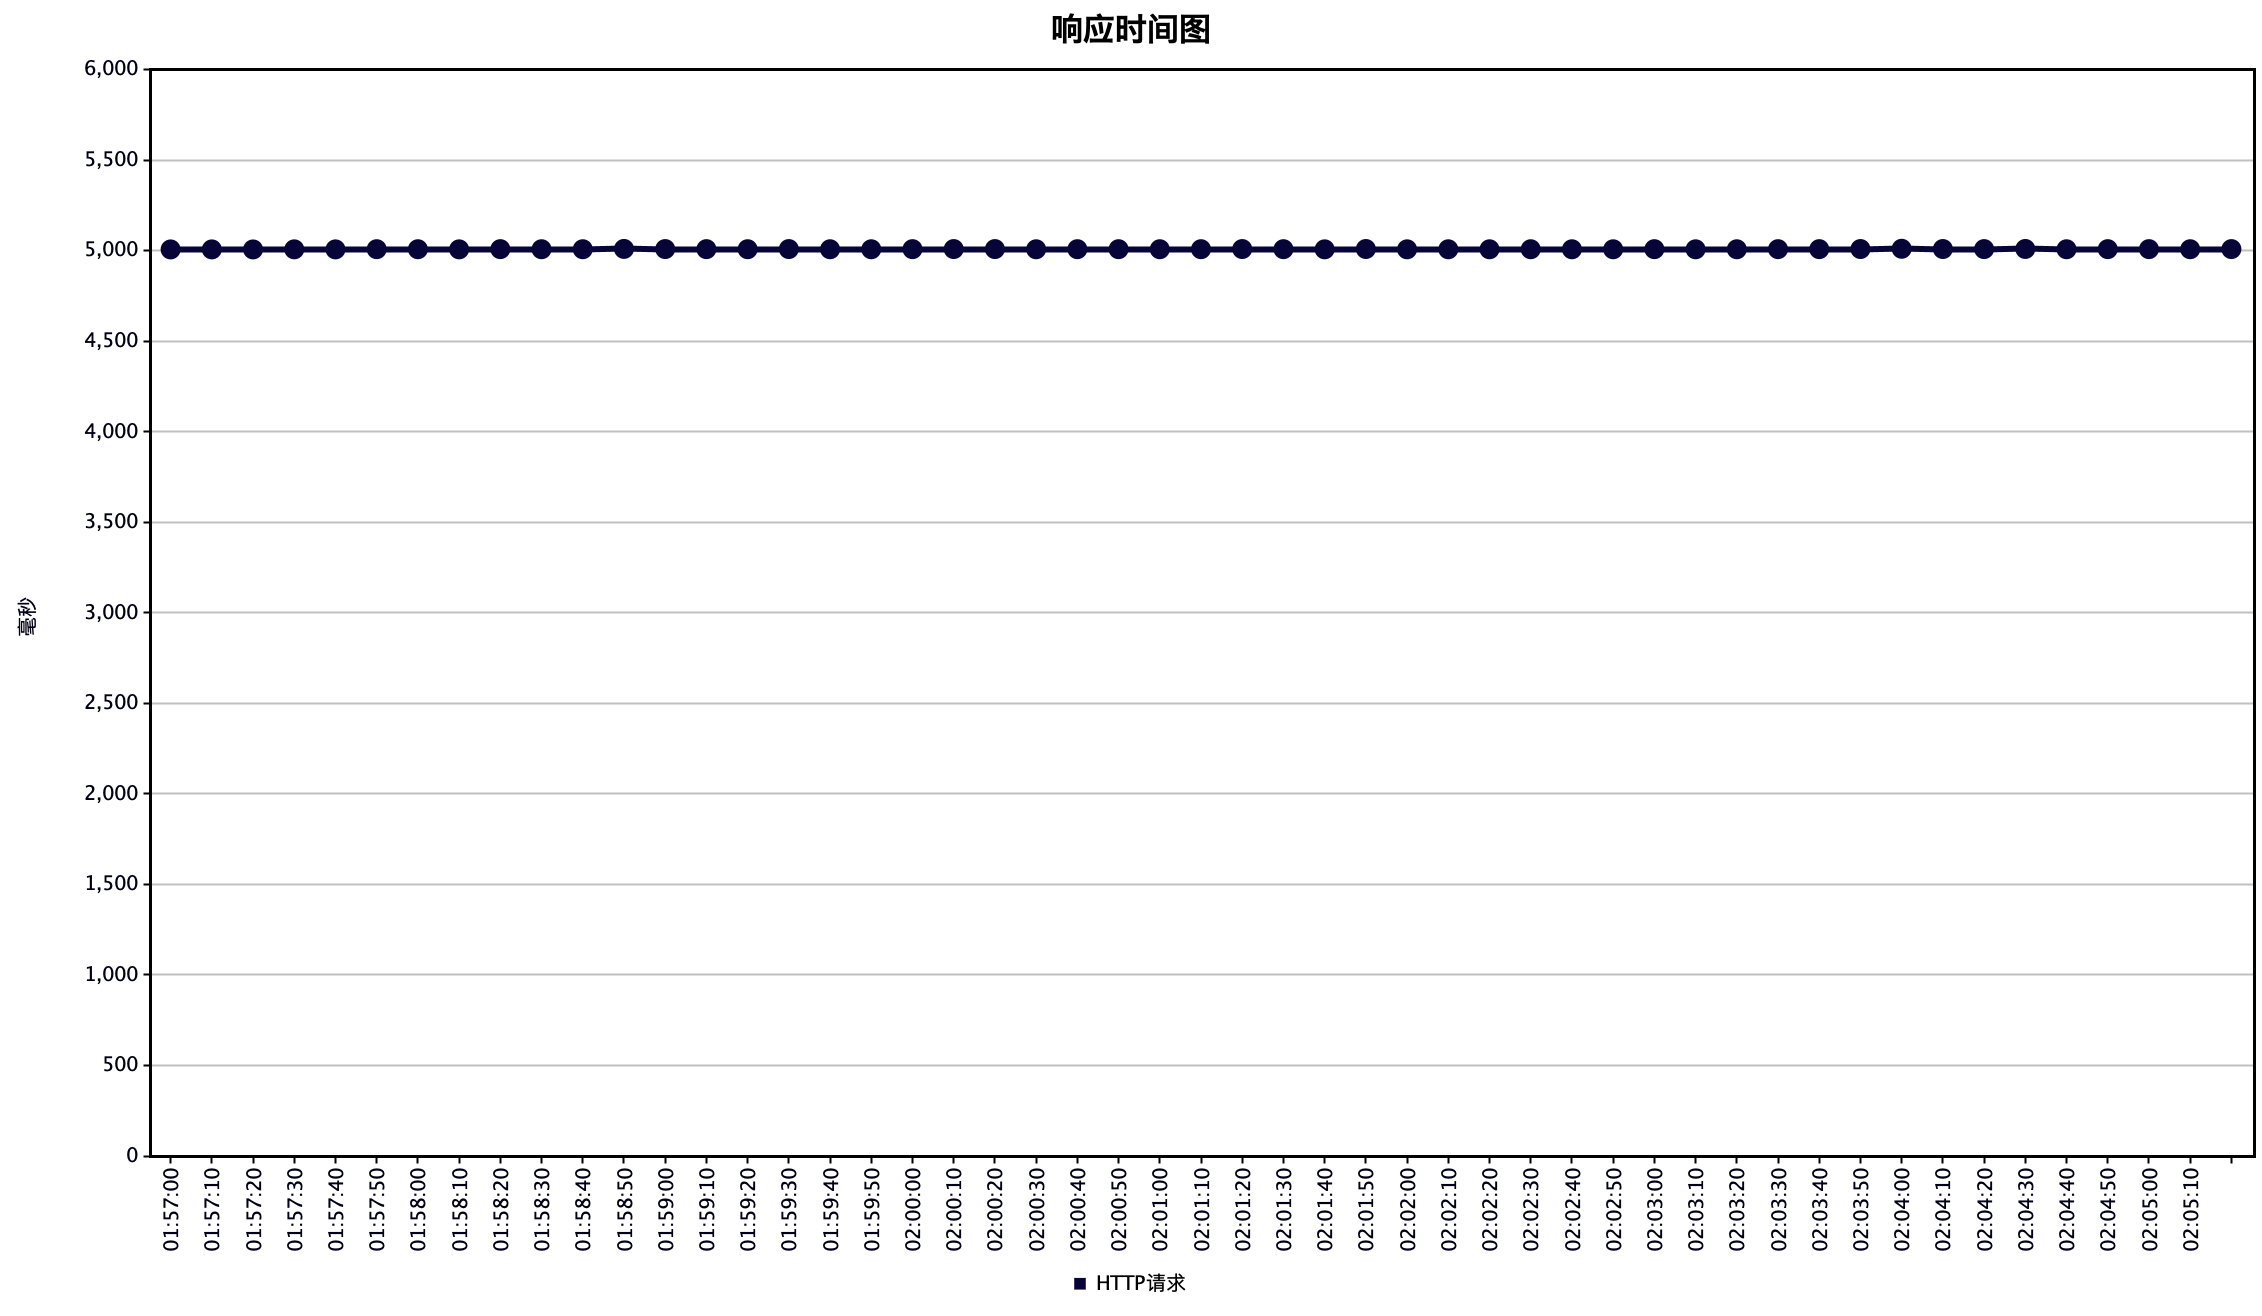 |
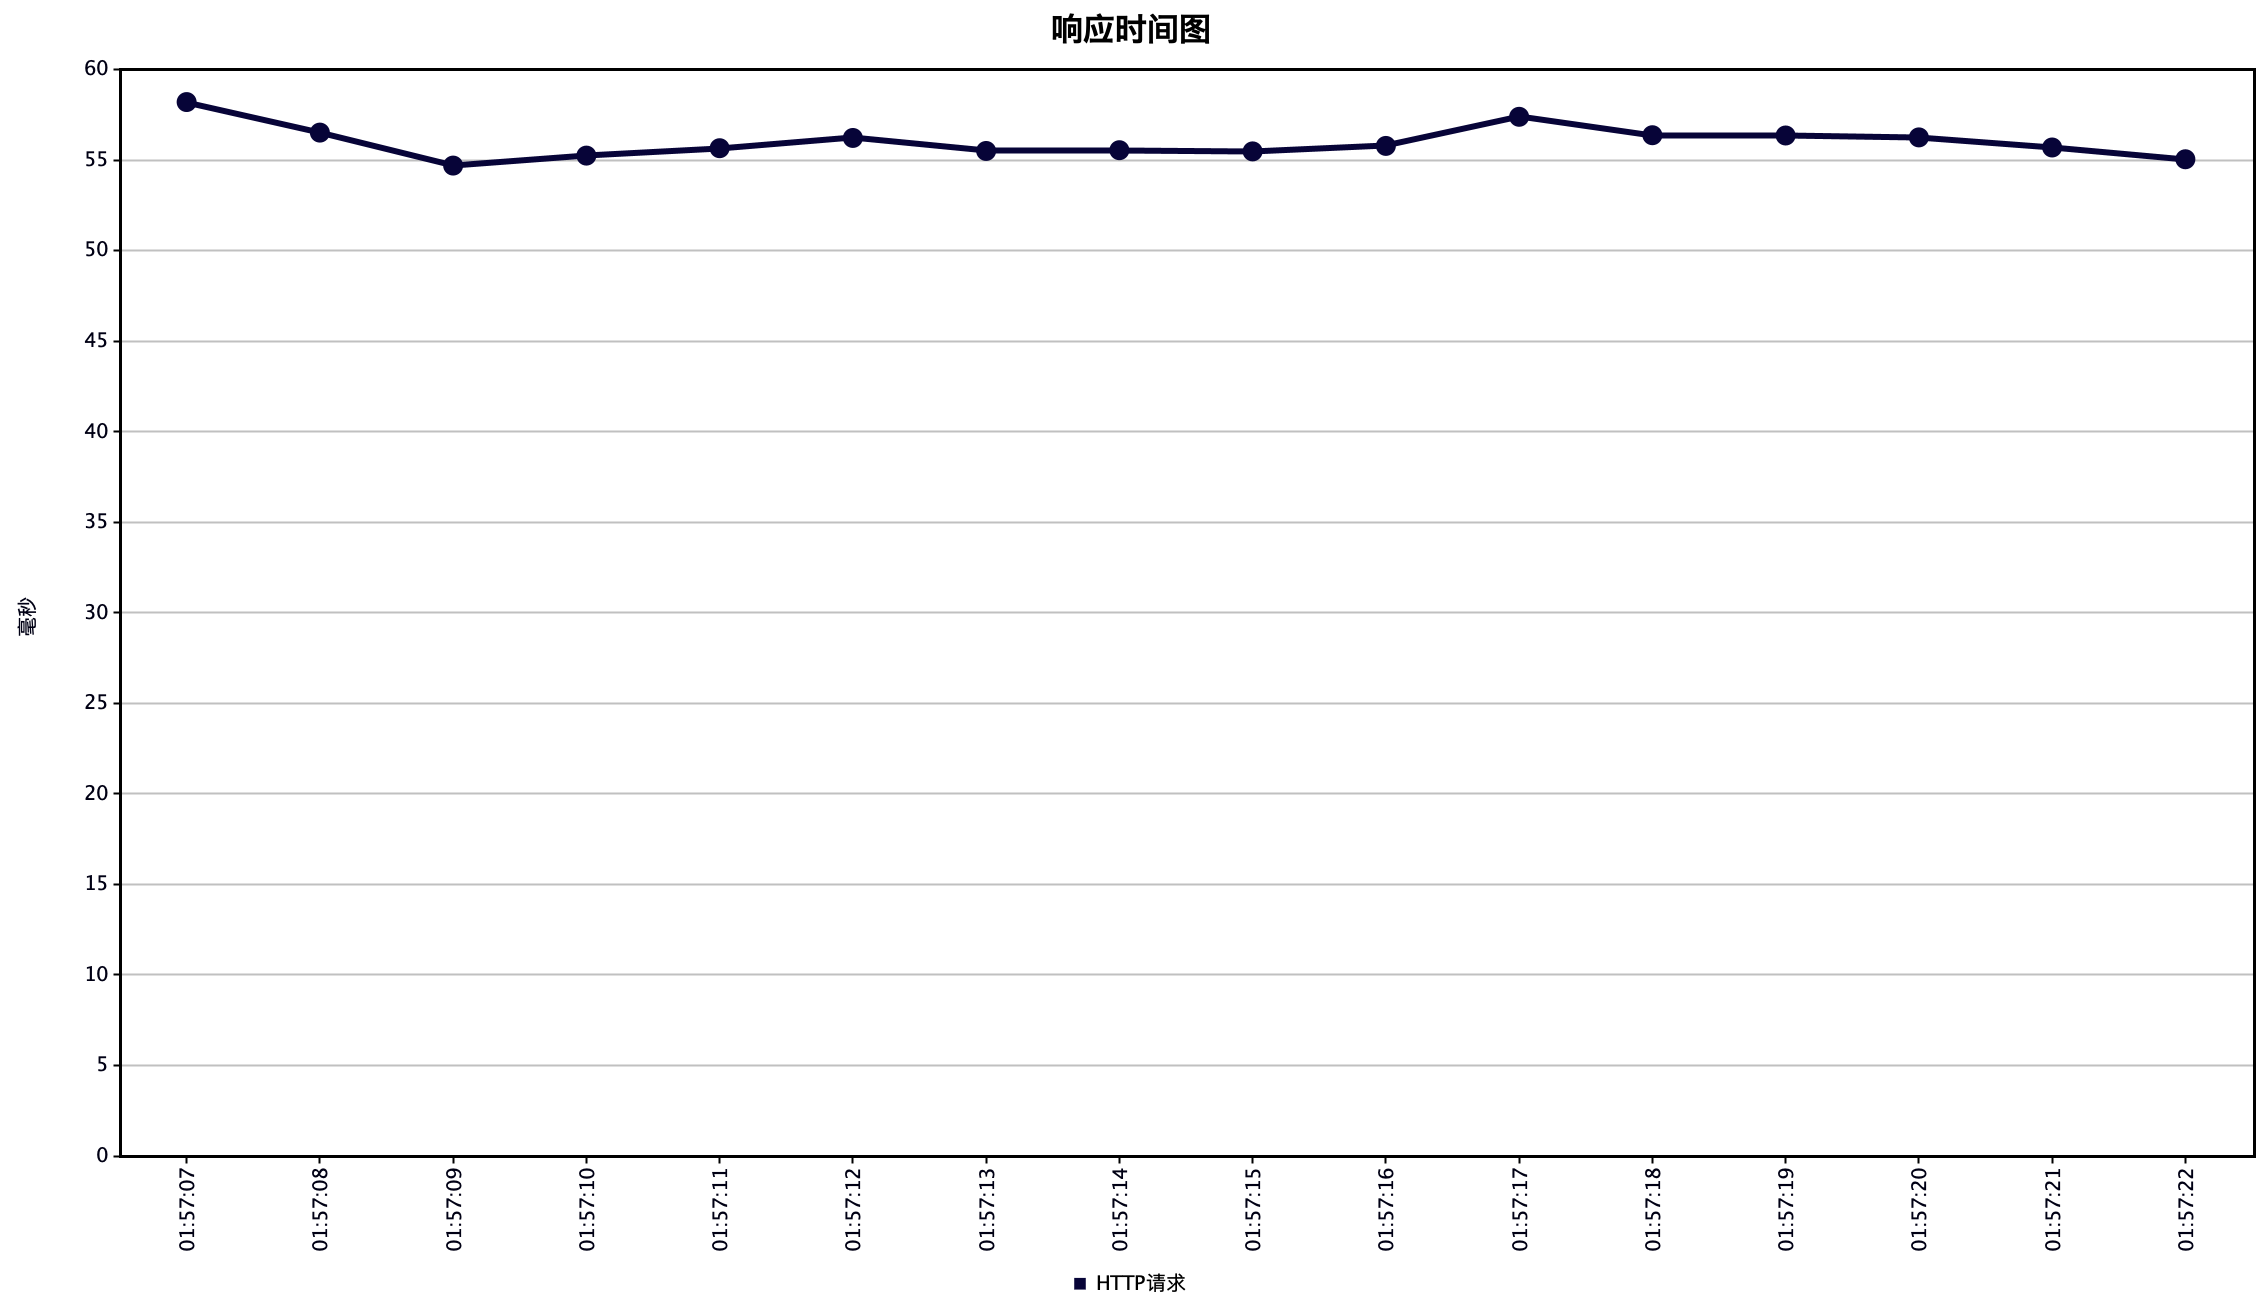 |
为了全方位对比两种实现方式的性能特征,我们还可以通过下面的雷达图来分析:
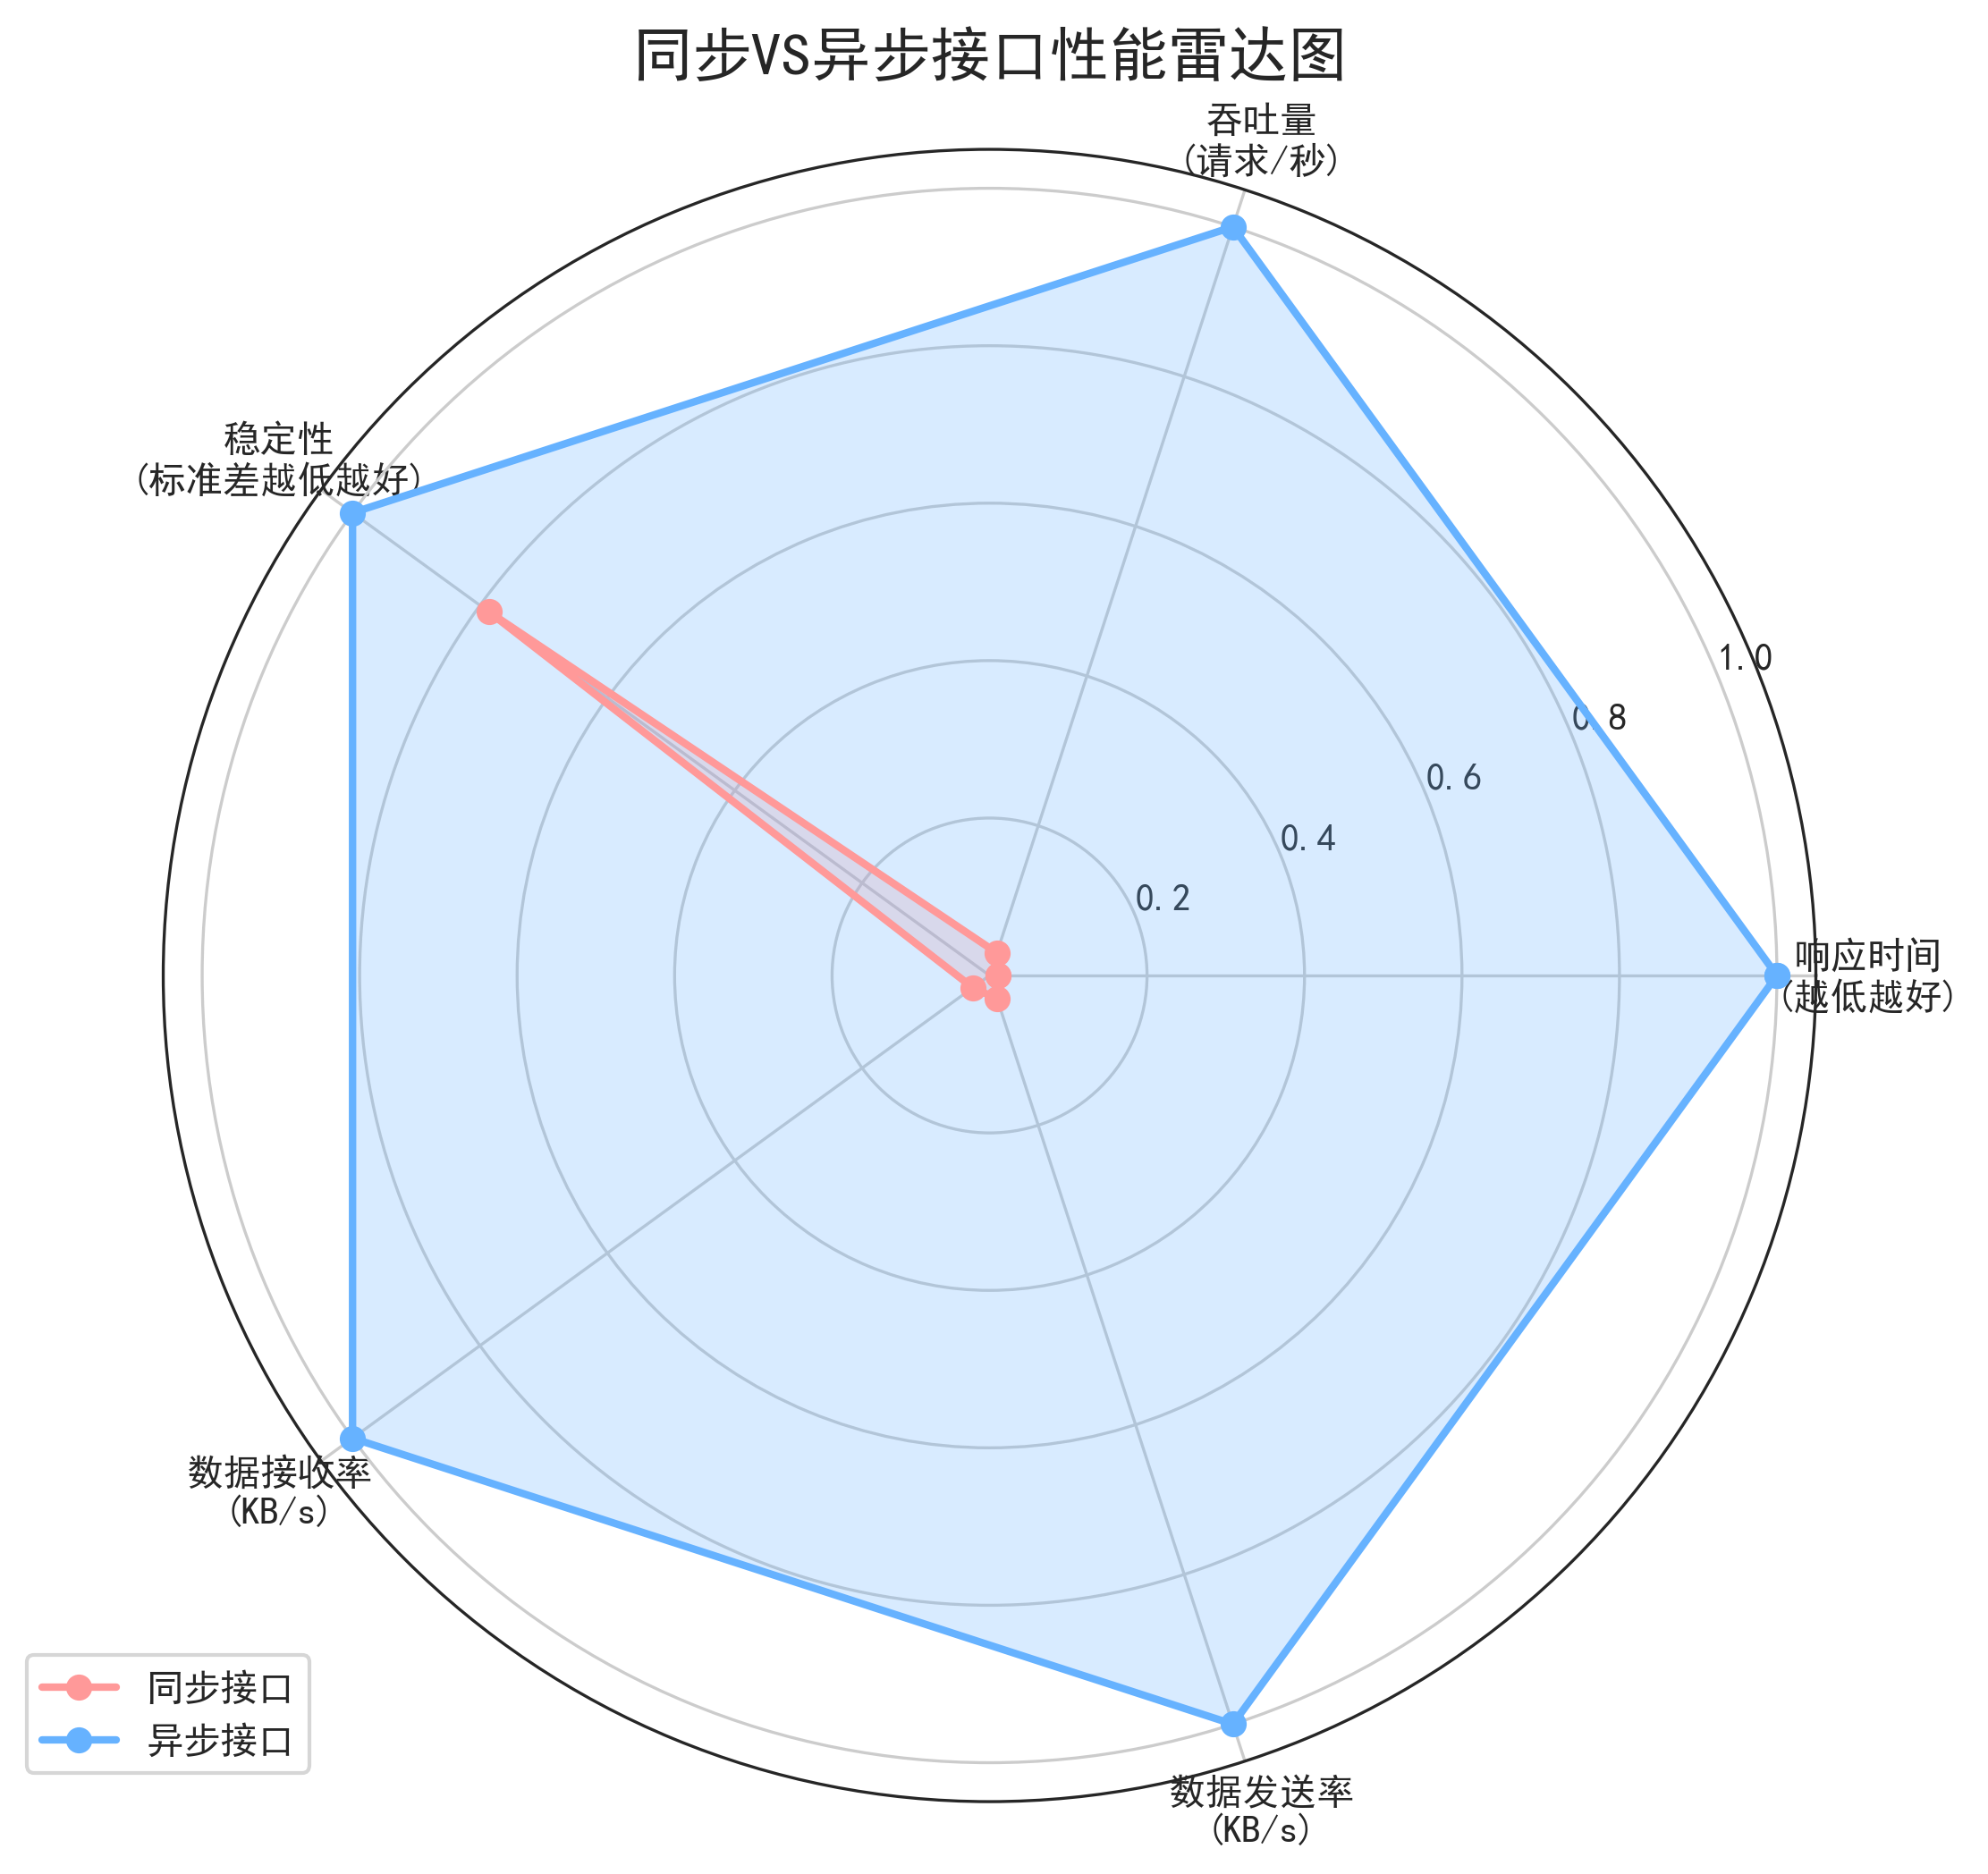
通过这些数据,我们可以得出以下关键发现:
-
响应时间断崖式下降:异步实现将响应时间从5秒降至55毫秒,提升了91倍。这意味着用户几乎可以瞬间收到评论成功的反馈。
-
系统吞吐量显著提升:异步方式下系统每秒可以处理324.3个请求,是同步方式的33倍。这大大提高了系统的并发处理能力。
-
资源利用更加高效:数据传输效率提升了30多倍,表明系统资源得到了更好的利用。
-
稳定性保持良好:尽管性能大幅提升,但两种实现的标准差都保持在较低水平(同步4.06,异步3.19),说明系统表现稳定可预测。
更重要的是,异步实现解决了同步方式最致命的问题:在流量突增时,同步实现会因邮件服务连接池耗尽而导致整个评论功能崩溃。而异步架构通过消息队列实现了请求的削峰填谷,即使在访问高峰期也能保持系统的稳定运行。
异步架构的优势
将通知处理改为异步后,系统架构变成了这样:
这种设计带来了三大好处:
- 响应时间提升:评论API从7秒降至50ms,用户体验大幅改善
- 系统解耦:通知服务的问题不会影响核心业务
- 削峰填谷:流量高峰期,消息在队列缓冲,避免系统过载
2. RabbitMQ核心概念速览
在深入实现前,先了解RabbitMQ的几个关键概念。
交换机、队列与绑定:不只是术语
RabbitMQ的工作模式并不复杂,简单理解就是:
- 生产者:发送消息到交换机
- 交换机:根据规则将消息路由到队列
- 队列:存储消息的地方
- 消费者:从队列获取并处理消息
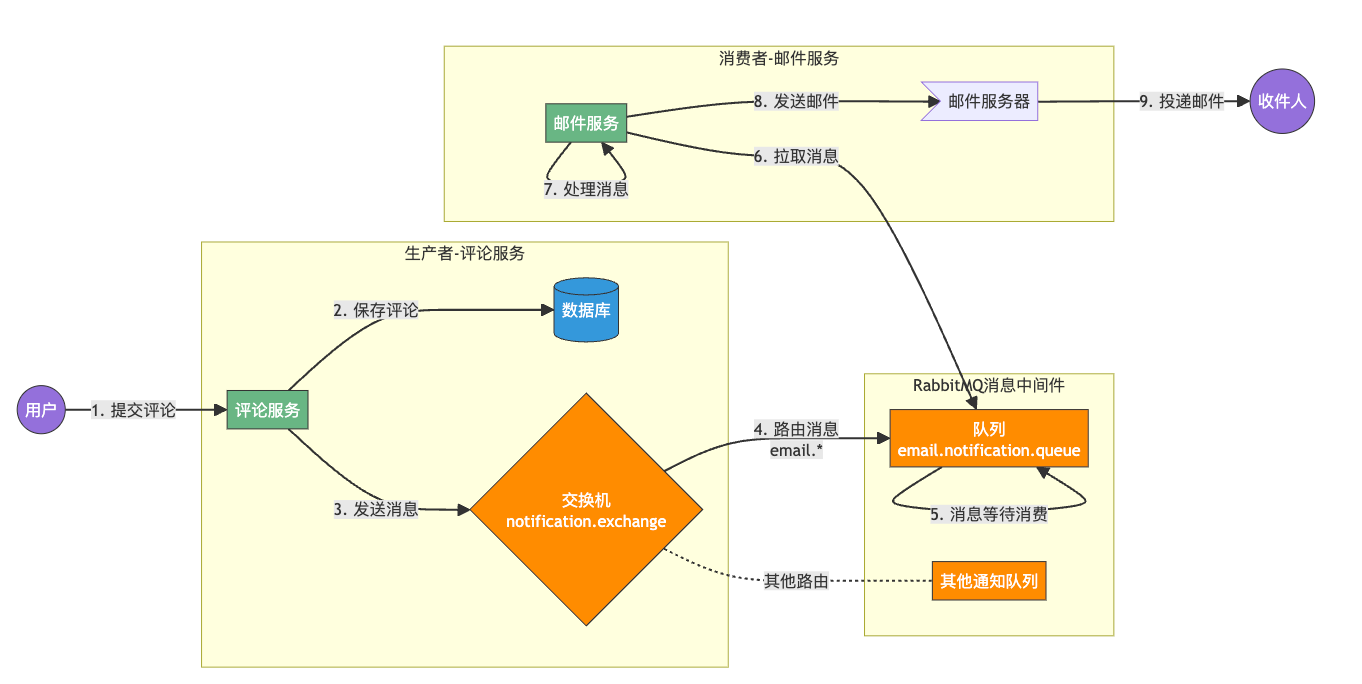
他们之间的工作流程如下图所示,生产者(Producer)首先将消息发布(Publish)到交换机(Exchange),交换机根据配置的路由规则(Route)决定将消息发送到哪个或哪些队列(Queue)。消息到达队列后会被存储,直到有消费者来处理。消费者(Consumer)主动从队列中获取(Consume)消息并进行处理。整个过程中,交换机负责消息的分发路由,而队列则负责消息的缓冲存储,这种解耦设计使得系统各组件可以独立扩展,并能灵活应对各种消息分发场景。

四种交换机类型对比
RabbitMQ提供四种交换机类型,每种适合不同场景:
| 交换机类型 | 路由行为 | 适用场景 |
|---|---|---|
| Direct | 精确匹配routing key | 直接定向发送特定通知 |
| Topic | 模式匹配routing key | 按照通知类型/接收者分类 |
| Fanout | 广播到所有绑定队列 | 群发通知 |
| Headers | 根据消息头属性匹配 | 复杂条件下的通知分发 |
对于我的博客通知系统,最终选择了Topic交换机,因为它灵活性高,可以根据通知类型和接收者进行精细路由。
// 创建Topic交换机的示例代码
@Bean
public TopicExchange notificationExchange() {


    // 第一个参数 "notification.exchange" - 交换机的名称,用于标识这个交换机
    // 第二个参数 true - 表示交换机是持久化的,重启RabbitMQ后交换机仍然存在
    // 第三个参数 false - 表示非自动删除模式,即使没有队列绑定到此交换机也不会自动删除
    return new TopicExchange("notification.exchange", true, false);
}
消息持久化与确认机制
队列挂了,消息会丢吗?取决于你的配置:
// 1. 声明持久化队列
@Bean
public Queue emailNotificationQueue() {


    return new Queue("email.notification.queue", true); // 第二个参数true表示持久化
}

// 2. 发送持久化消息
rabbitTemplate.convertAndSend("notification.exchange", "email.comment", message,
    m -> {


        m.getMessageProperties().setDeliveryMode(MessageDeliveryMode.PERSISTENT);
        return m;
    }
);
下图是消息持久化的工作流程图,展示了消息从发送到持久化存储再到消费的全过程。
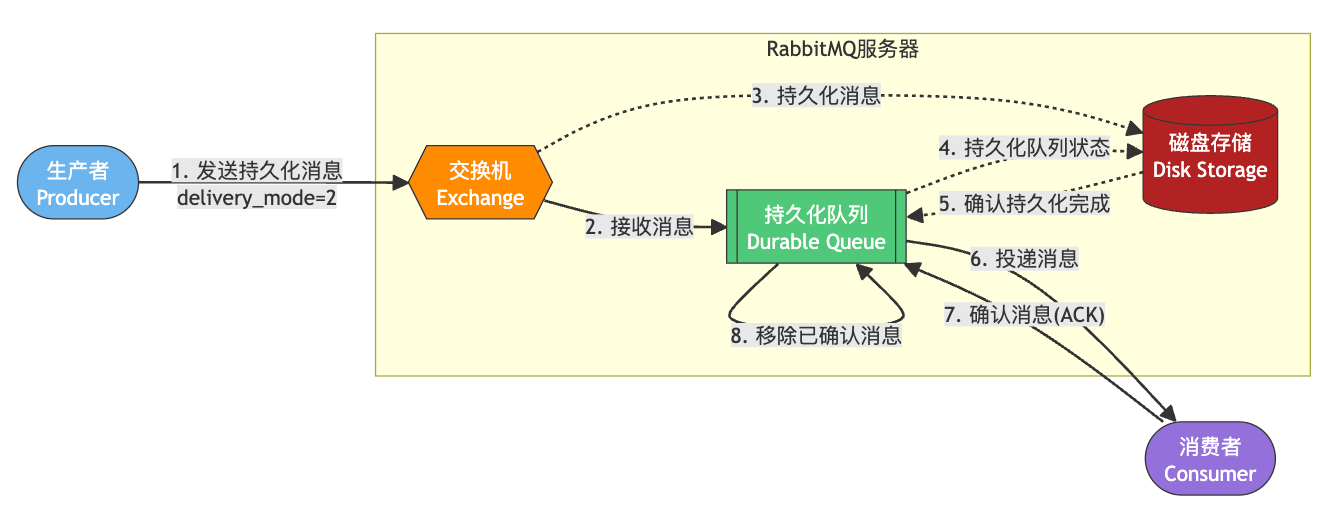
可以简单理解为消息的"防丢失机制"。整个流程就像是寄送一封重要信件,需要多重确认和保障:
-
发送带保障的消息:生产者发送消息时特别标记了"请妥善保管"(delivery_mode=2),就像寄挂号信一样。
-
交换机接收消息:交换机就像邮局的分拣中心,接收到消息后准备送往指定队列。
-
保存消息副本:为了防止意外,系统会先将消息内容存储到磁盘上,类似邮局保留寄件凭证。
-
记录队列状态:系统不仅保存消息本身,还会记录队列的状态信息,就像邮局的登记簿,记录每封信的去向。
-
确认存储完成:只有当消息安全地写入磁盘后,才会确认存储成功,这保证即使服务器突然关机,消息也不会丢失。
-
转发给消费者:确认安全后,队列将消息发送给消费者处理,就像邮递员最终将信送到收件人手中。
-
消费者确认接收:消费者处理完消息后会发送确认(ACK),相当于收件人签收了邮件。
-
清理已处理消息:收到确认后,队列才会移除这条消息,类似邮局在确认送达后归档处理记录。
这整个流程保证了即使在系统崩溃或重启的情况下,已发送但未处理的消息也不会丢失,非常适合处理那些不能容忍丢失的重要业务消息,比如订单、支付通知等。
3. 异步通知系统整体架构设计
通知系统的领域模型
首先,定义清晰的通知消息模型:
@Data
public class NotificationMessage {


    // 通知唯一ID
    private String notificationId;

    // 通知类型:COMMENT, LIKE, SYSTEM_ANNOUNCEMENT...
    private NotificationType type;

    // 接收者信息
    private String recipientId;
    private String recipientEmail;

    // 通知内容
    private String title;
    private String content;
    private Map<String, Object> extraData;

    // 元数据
    private Date createdTime;
    private int retryCount;
}
队列拓扑结构设计
我的博客通知系统使用了以下队列结构:
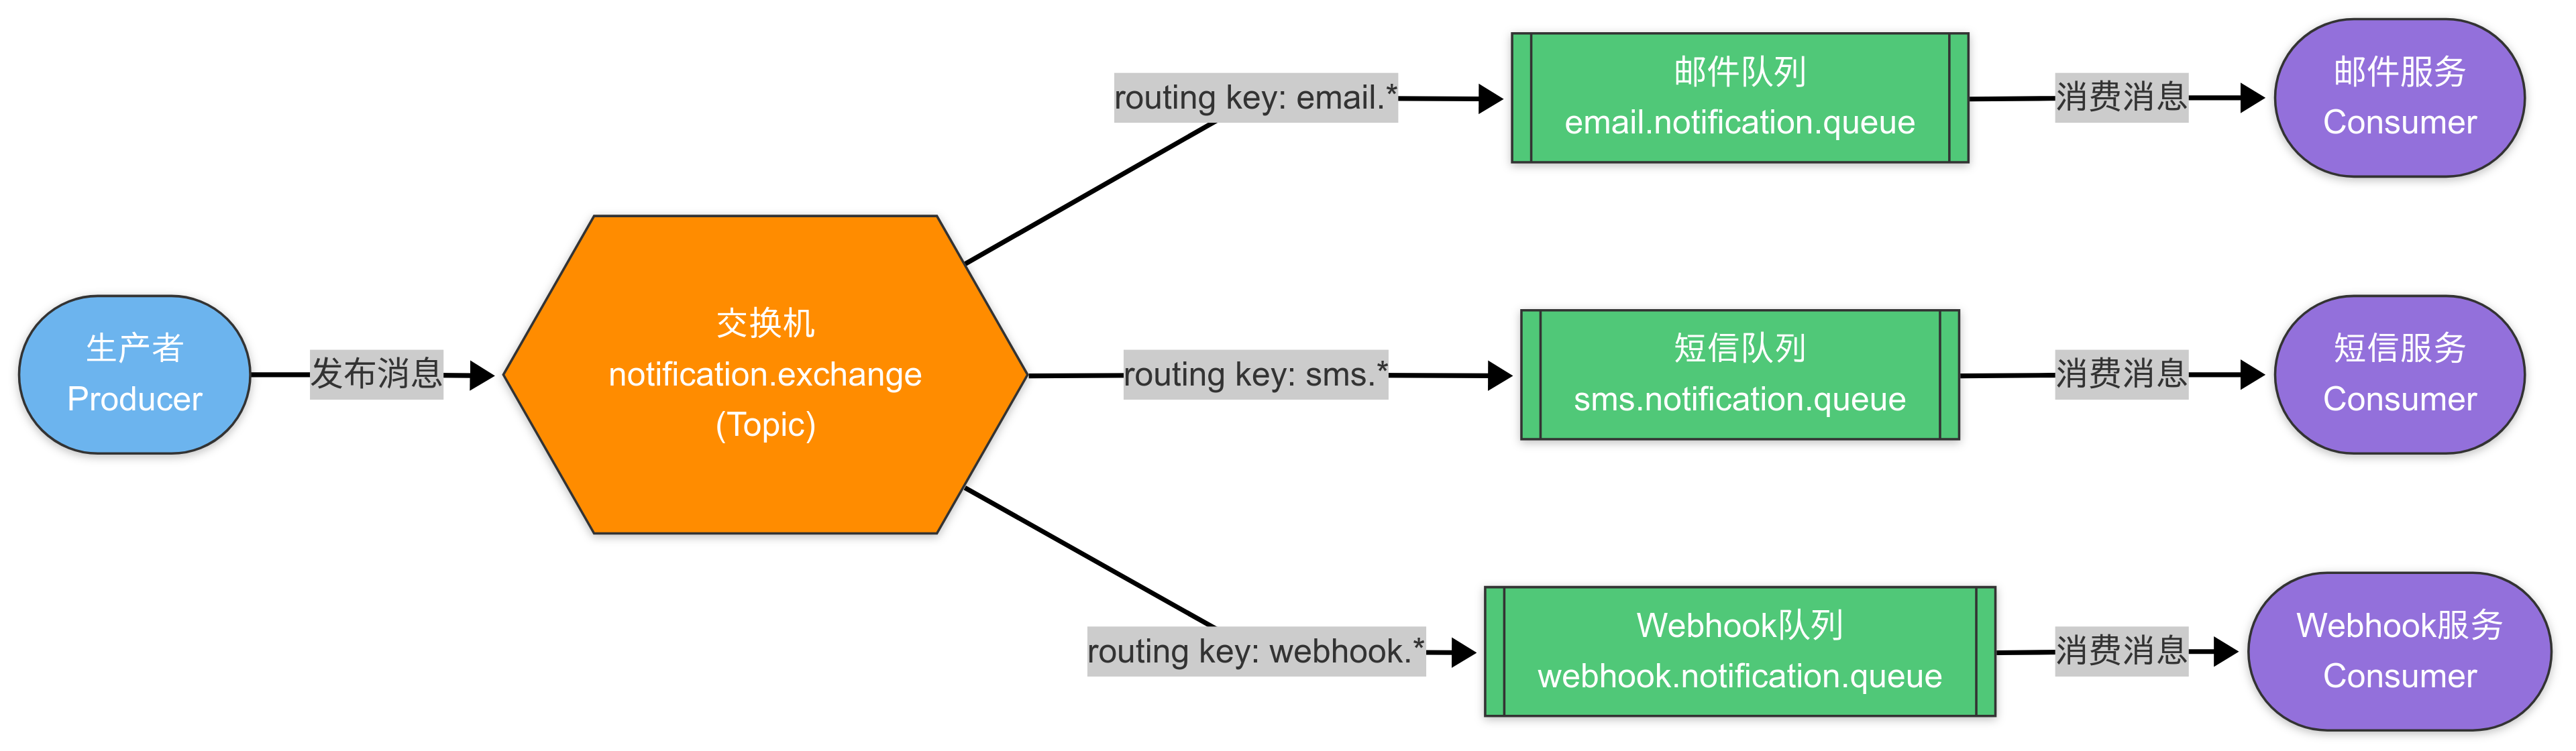
notification.exchange (Topic) ---> email.notification.queue [routing key: email.*]
                              ---> sms.notification.queue [routing key: sms.*]
                              ---> webhook.notification.queue [routing key: webhook.*]
这种结构的好处是:
- 不同类型的通知分开处理
- 可以为不同队列设置不同的消费者和处理策略
- 方便扩展新的通知渠道
- 灵活的路由模式
- 独立的消费者服务
4. 代码实战:SpringBoot中的RabbitMQ实现
基础配置
首先添加依赖:
<dependency>
    <groupId>org.springframework.boot</groupId>
    <artifactId>spring-boot-starter-amqp</artifactId>
</dependency>
然后配置连接:
# application.yml
spring:
  rabbitmq:
    host: localhost
    port: 5672
    username: guest
    password: guest
    virtual-host: /
    # 生产者确认机制
    publisher-confirm-type: correlated
    publisher-returns: true
    template:
      mandatory: true
    # 消费者配置
    listener:
      simple:
        acknowledge-mode: manual
        prefetch: 10
        concurrency: 5
        max-concurrency: 10
RabbitMQ配置类
@Configuration
public class RabbitMQConfig {


    // 定义交换机
    @Bean
    public TopicExchange notificationExchange() {


        return new TopicExchange("notification.exchange", true, false);
    }

    // 定义邮件通知队列
    @Bean
    public Queue emailNotificationQueue() {


        Map<String, Object> args = new HashMap<>();
        // 设置死信交换机,处理失败的消息
        args.put("x-dead-letter-exchange", "notification.dlx");
        args.put("x-dead-letter-routing-key", "email.failed");
        return new Queue("email.notification.queue", true, false, false, args);
    }

    // 绑定队列到交换机
    @Bean
    public Binding emailBinding() {


        return BindingBuilder
                .bind(emailNotificationQueue())
                .to(notificationExchange())
                .with("email.*");  // routing key pattern
    }

    // ... 其他队列和绑定的定义

    // 配置RabbitTemplate
    @Bean
    public RabbitTemplate rabbitTemplate(ConnectionFactory connectionFactory) {


        RabbitTemplate rabbitTemplate = new RabbitTemplate(connectionFactory);
        rabbitTemplate.setMessageConverter(new Jackson2JsonMessageConverter());

        // 设置生产者确认回调
        rabbitTemplate.setConfirmCallback((correlationData, ack, cause) -> {


            if (!ack) {


                log.error("消息发送到交换机失败: {}", cause);
                // 执行重试逻辑
            }
        });

        // 设置消息返回回调
        rabbitTemplate.setReturnsCallback(returned -> {


            log.error("消息路由到队列失败: exchange={}, routingKey={}, message={}, replyCode={}, replyText={}",
                    returned.getExchange(), returned.getRoutingKey(),
                    new String(returned.getMessage().getBody()),
                    returned.getReplyCode(), returned.getReplyText());
            // 执行消息无法路由的处理逻辑
        });

        return rabbitTemplate;
    }
}
生产者实现
@Service
@Slf4j
public class NotificationProducerService {


    @Autowired
    private RabbitTemplate rabbitTemplate;

    public void sendEmailNotification(NotificationMessage message) {


        try {


            String routingKey = "email." + message.getType().name().toLowerCase();

            // 设置消息唯一ID用于后续跟踪
            CorrelationData correlationData = new CorrelationData(message.getNotificationId());

            log.info("发送邮件通知: id={}, recipient={}", message.getNotificationId(), message.getRecipientEmail());

            rabbitTemplate.convertAndSend(
                "notification.exchange",
                routingKey,
                message,
                correlationData
            );
        } catch (Exception e) {


            log.error("发送通知消息异常", e);
            // 异常处理,如记录数据库
        }
    }
}
在评论服务中使用:
@Service
public class CommentService {


    @Autowired
    private NotificationProducerService notificationProducer;

    @Transactional
    public void saveComment(CommentDTO comment) {


        // 1. 保存评论到数据库
        Comment savedComment = commentRepository.save(comment.toEntity());

        // 2. 异步发送通知
        if (comment.getReplyToUserId() != null) {
 最低0.47元/天 解锁文章


 882
882

 被折叠的 条评论
为什么被折叠?
被折叠的 条评论
为什么被折叠?
 到【灌水乐园】发言


