


1. 什么是Spring框架
官方:Spring是分层的JavaSE/EE应用的full-stack轻量级开源框架,以IoC和AOP为内核
可见要理解Spring框架,其一是要学会Spring在开发中的使用,其二是要理解IoC和AoP两个概念,
2. 反转控制IoC:Inverse Of Control
反转的是Bean的创建权
参考了这篇大神的文章:https://www.cnblogs.com/xdp-gacl/p/4249939.html
再来点自己的理解:之前在普通的编程中,对象要由自己来new一个,这样的带来的后果就是类和类之间存在耦合。那么字啊用了IoC以后,IOC 是提供了一个IOCBean容器,我们不再需要自己new对象了,可以让这个容器来帮我们去创建。而这个实现可以称为DI
2.1 依赖注入 Dependency Injection
是IoC的具体实现,例如service需要dao,将二者之间的依赖关系配置到IoC容器之中,进而降低二者的耦合。并且IOC在管理bean的时候是单例的。但业务逻辑层和数据访问层之间仍然存在依赖关系,这种依赖关系靠Spring框架来进行维护,框架会将数据访问层(持久层)的对象自动传入业务逻辑层。
2.2 依赖注入的方式
如何将UserDao注入到UserService内部?
- set方法
在配置文件中进行注入
子标签注入
p命名空间注入,写法会简单写 - 构造方法注入
先建立两个无参与有参构造方法
2.3 不同数据类型的注入
1)普通属性的注入
2)引用类型的注入
3)集合类型的注入
List类型
Map类型
Properties类型
3. 面向切面编程AOP:Aspect Oriented Programming
3.1 动态代理(设计模式中内容,补看)
动态代理是用来松耦合的,代码不太会写。模糊印象和设计模式有关系。 学完回来,写了两遍,虽然大部分是idea写的
代理模式是无法直接引用目标对象,从而通过代理类来间接地使用目标对象。可以保护目标对象,扩展目标方法,解除目标对象和使用对象之间的耦合
动态代理是相对于静态代理而言的一种设计模式,静态代理的代理对象在编译期间就生成,而动态代理的代理对象在运行时自动生成。
3.2 什么是AOP
面向切面编程底层靠Spring封装好的动态代理代码来实现,是一种规范化行为。对业务逻辑的各个部分可以进行隔离(松耦合),使得业务逻辑各部分之间的耦合度降低。例如功能A和功能B,要结合在一起,不将代码写在一起,而在运行过程通过配置中进行组合,提高了程序的重用性,与开发的效率。
3.3 AOP的作用与优势
基本上就是代理模式的优势+封装好的代码
在程序运行的期间,在不修改源码的情况下对方法进行功能的增强
优势:减少重复代码,提高开发效率,便于维护
3.4 AOP原理的示意
将待增强的功能和增强功能通过配置文件在运行时动态地结合在一起,代码之间是松耦合的,而AOP就是
3.5 AOP底层原理
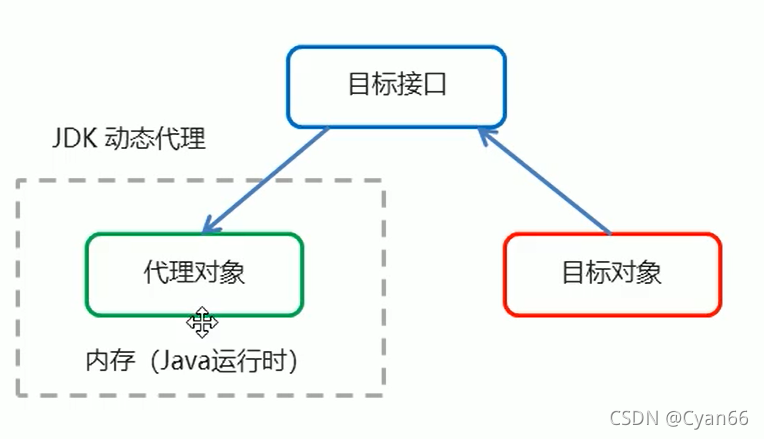
通过Spring的动态代理实现,运行时生成代理对象
1.JDK代理:基于接口的动态代理
缺点:没有接口就无法实现代理
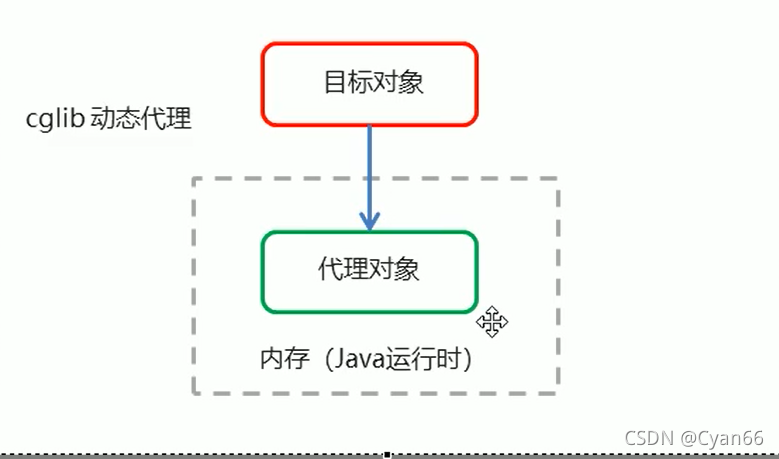
2.cglib代理:基于父类的动态代理
cglib是一个第三方小组件,生成一个动态的子对象。
AOP底层就是对动态代理的代码进行了封装,封装以后就只需要对部分进行编码,通过配置文件的方式来完成制定目标的方法增强。
3.5.1 一些重要的概念
1.Target 目标对象:代理的目标对象
2.Proxy 代理:一个类被AOP织入增强以后,就产生了一个代理类
3.JoinPoint 连接点:连接点是那些拦截到的method,是可以被增强的方法
4.PointCut 切入点:是对具体哪些连接点进行拦截的定义
5. Advice 通知or增强:在根据PointCut拦截到JoinCut要做的增强
6. Aspect 切面:PointCut+Advice
7. Weaving 织入:运行期间将增强应用到目标对象并生成代理对象的动作
3.6 AOP开发的注意事项
3.6.1 需要编写的内容
1.核心业务代码,即目标类的目标方法
2.**谁是切点和通知:**切面类,切面类中包括了增强功能方法
3.配置文件中配置织入的关系
3.6.2 AOP所实现的内容
1.监控切入点方法的执行
2.使用代理机制,动态创建目标对象代理对象
3.再根据通知的类别在代理对象的对应位置将对应的功能织入
4.将以上几步完成完整的代码逻辑进行运行
Spring框架会根据目标类是否有接口来决定采用哪种动态代理方式
3.7 AOP的xml实现方式
3.7.1 速通:xml方式实现AOP(开发环境:Idea ultimate)
1.导入AOP的相关依赖的坐标
使用aspectj框架的配置AOP方法,这个配置方法由于太好使被Spring整合了(拿来吧你)
<dependencies>
        <dependency>
            <groupId>org.springframework</groupId>
            <artifactId>spring-context</artifactId>
            <version>5.0.5.RELEASE</version>
        </dependency>
        <dependency>
            <groupId>org.springframework</groupId>
            <artifactId>spring-test</artifactId>
            <version>5.0.5.RELEASE</version>
        </dependency>
        <dependency>
            <groupId>org.aspectj</groupId>
            <artifactId>aspectjweaver</artifactId>
            <version>1.9.0</version>
        </dependency>
        <dependency>
            <groupId>junit</groupId>
            <artifactId>junit</artifactId>
            <version>4.13</version>
            <scope>test</scope>
        </dependency>
    </dependencies>
2.创建目标接口与目标类:
//目标类

/**
 * @author Cyan
 * @version 1.0
 * @description: 需要去增强目标对象
 * @date 2021/11/29 20:37
 */

public class Target {
    public void save(){
        System.out.println("Save running...");
    }

}
3.创建切面类与增强方法
//切面类与增强方法
import org.aspectj.lang.ProceedingJoinPoint;

/**
 * @author Cyan
 * @version 1.0
 * @description: 切面类与Advices
 * @date 2021/11/29 22:48
 */
public class MyAspect {
    //前置增强
    public void before(){
        System.out.println("前置增强功能...");
    }
    //后置增强
    public void afterReturning(){
        System.out.println("后置增强功能...");
    }
    //环绕增强
    //ProceedingJoinPoint:就是切点
    public Object around(ProceedingJoinPoint proceedingJoinPoint) throws Throwable{
        System.out.println("环绕前增强...");
        //切点方法
        Object proceed= proceedingJoinPoint.proceed();
        System.out.println("环绕后增强");
        return proceed;
    }
    //异常抛出增强
    public void afterThrowing(){
        System.out.println("异常抛出增强...");
    }
    //最终增强,类似于finally的效果
    public void after(){
        System.out.println("最终增强...");
    }


}
4.将对象创建权交给Spring
1)配置目标对象与切面对象(示例)
<!--目标对象配置,引用位置记得要更改-->
    <bean id="target" class="com.cyan.aop.Target"></bean>

<!--切面对象配置,把MyAspect交给ioc容器-->
    <bean id="myAspect" class="com.cyan.aop.MyAspect"></bean>
5.在applicationContext.xml里配置织入关系
要想配置aop,首先必须有aop的命名空间与命名位置,在文件头中加入
xmlns:aop="http://www.springframework.org/schema/aop"
xsi:schemaLocation="
       http://www.springframework.org/schema/aop http://www.springframework.org/schema/aop/spring-aop.xsd“
再来配置织入关系(都是示例):
			<aop:before method="before" pointcut="execution(public void com.cyan.aop.Target.save())"/>
            <aop:after-returning method="afterReturning" pointcut="execution(* com.cyan.aop.*.*(..))"/>
            <aop:around method="around" pointcut="execution(* com.cyan.aop.*.*(..))"/>
            <aop:after-throwing method="afterThrowing" pointcut="execution(* com.cyan.aop.*.*(..))"/>
            <aop:after method="after" pointcut-ref="myPointcut"/>
6.代码测试
**
 * @author Cyan
 * @version 1.0
 * @description: TODO
 * @date 2021/11/29 23:19
 */
//指定测试引擎
@RunWith(SpringJUnit4ClassRunner.class)
//指定配置文件
@ContextConfiguration("classpath:applicationContext.xml")
public class AopTest {
    @Autowired
    private TargetInterface target;

    @Test
    public void test1(){
        target.save();
    }
}
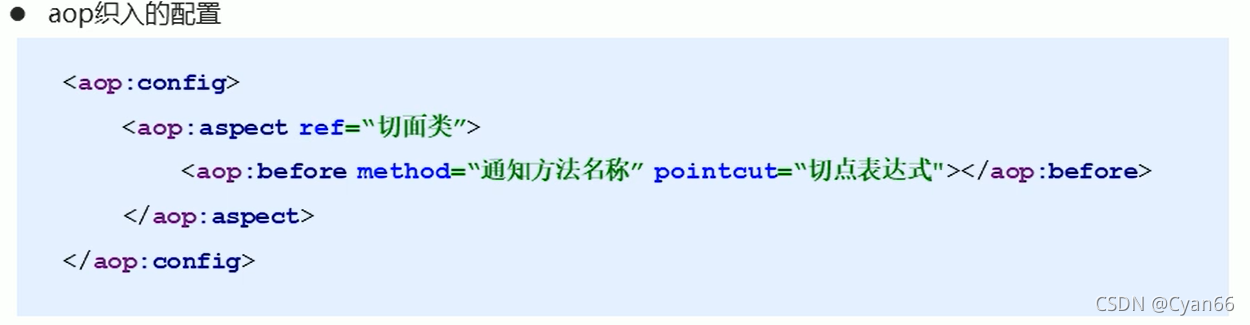
3.7.2 AOP的xml配置
关键在于aop织入的部分
1.切点表达式写法
execution([modifier] 返回值类型 包名.类名.方法名(参数))
修饰符可省略
使用星号*代表任意返回值类型,包名,类名,方法名
包名和类名之间的分隔,.代表当前包下的类,而…代表当前包和子包下的类
参数列表可以用…表示任意个数,任意类别的参数列表
例:
<!--代表在com.cyan.aop这个包下的所有类的不管什么名字什么参数的所有方法全部增强!-->
excution(* com.cyan.aop.*.*(..))
2.Advice的配置写法
<aop:通知类型 method="切面方法名" pointcut="execution()"></aop:通知类型>
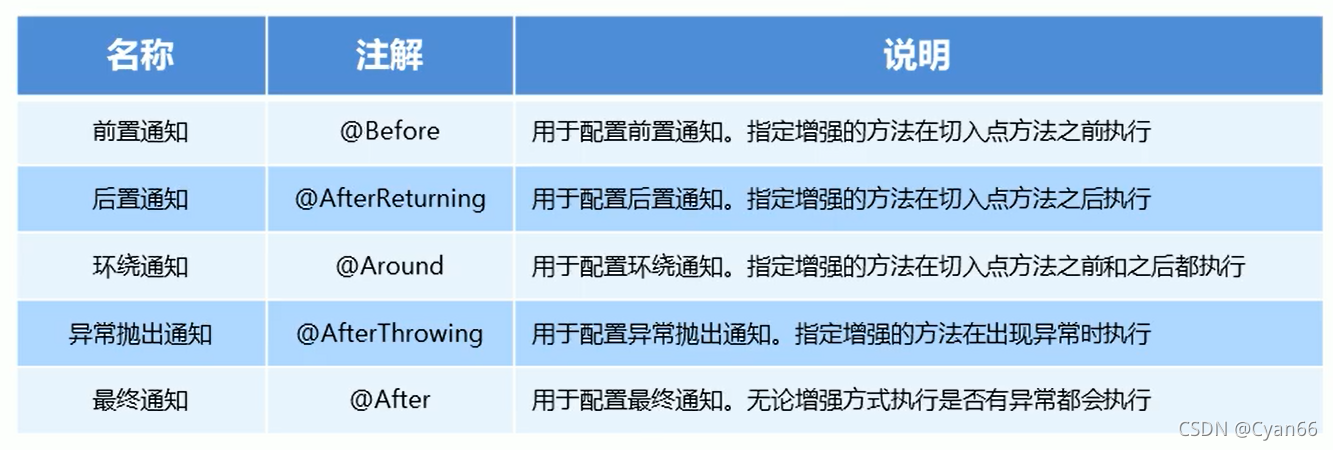
通知类别以及之间的区别

3.切点表达式的抽取与使用
//切点表达式的抽取
<aop:pointcut id="myPointcut" expression="execution(* com.cyan.aop.*.*(..))"></aop:pointcut>
//切点表达式的使用示例
<aop:after method="after" pointcut-ref="myPointcut"/>
3.8 AOP的注解实现方式
3.8.1 速通注解实现
1.创建目标接口与目标类
@Component("target")
public class Target implements TargetInterface{
    public void save(){
        System.out.println("Save running...");
    }

}
2.创建切面类与增强方法
3.将对象创建权交给Spring
4.切面类中使用注解配置织入关系
@Component("myAspect")
@Aspect //标注了当前是一个切面类
public class MyAspect {
    //前置增强
    @Before("execution(* com.cyan.anno.*.*(..))")
    public void before(){
        System.out.println("前置增强功能...");
    }

    //后置增强
    @AfterReturning("execution(* com.cyan.anno.*.*(..))")
    public void afterReturning(){
        System.out.println("后置增强功能...");
    }

    //环绕增强
    //ProceedingJoinPoint:就是切点
    @Around("execution(* com.cyan.anno.*.*(..))")
    public Object around(ProceedingJoinPoint proceedingJoinPoint) throws Throwable{
        System.out.println("环绕前增强...");
        //切点方法
        Object proceed= proceedingJoinPoint.proceed();
        System.out.println("环绕后增强");
        return proceed;
    }

    //异常抛出增强
    @AfterThrowing("execution(* com.cyan.anno.*.*(..))")
    public void afterThrowing(){
        System.out.println("异常抛出增强...");
    }

    //最终增强,类似于finally
    @After("MyAspect.myPointcut()")
    public void after(){
        System.out.println("最终增强...");
    }

    //切点表达式的抽取
    @Pointcut("execution(* com.cyan.anno.*.*(..))")
    public void myPointcut(){}


}
5.配置文件中开启组件扫描和AOP自动代理
相比xml配置方法,里面多了context的命名空间
<?xml version="1.0" encoding="UTF-8"?>
<beans xmlns="http://www.springframework.org/schema/beans"
       xmlns:xsi="http://www.w3.org/2001/XMLSchema-instance"
       xmlns:aop="http://www.springframework.org/schema/aop"
       xmlns:context="http://www.springframework.org/schema/context"
       xsi:schemaLocation="
       http://www.springframework.org/schema/beans http://www.springframework.org/schema/beans/spring-beans.xsd
       http://www.springframework.org/schema/aop http://www.springframework.org/schema/aop/spring-aop.xsd
       http://www.springframework.org/schema/context http://www.springframework.org/schema/context/spring-context.xsd"
>

    <!--开启组件扫描-->
    <context:component-scan base-package="com.cyan.anno"/>

    <!--开启aop自动代理-->
    <aop:aspectj-autoproxy/>


</beans>
6.Test(记得改接口所在包的位置)
//指定测试引擎
@RunWith(SpringJUnit4ClassRunner.class)
//指定配置文件
@ContextConfiguration("classpath:applicationContext-anno.xml")
public class AnnoTest {
    @Autowired
    private TargetInterface target;

    @Test
    public void test1(){
        target.save();
    }
}
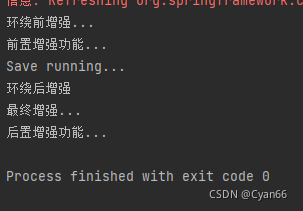
7.运行结果(很有意思)
3.8.2 注解实现的配置
1.通知类别的写法
2.annotation中切点表达式的抽取和使用
定义方法如下
//定义方法
@Pointcut("切点表达式")
public void myPointCut(){}
//使用方法
 @After("MyAspect.myPointcut()")
 public void after(){
     System.out.println("最终增强...");
 }
3.8.3 注解实现的知识要点
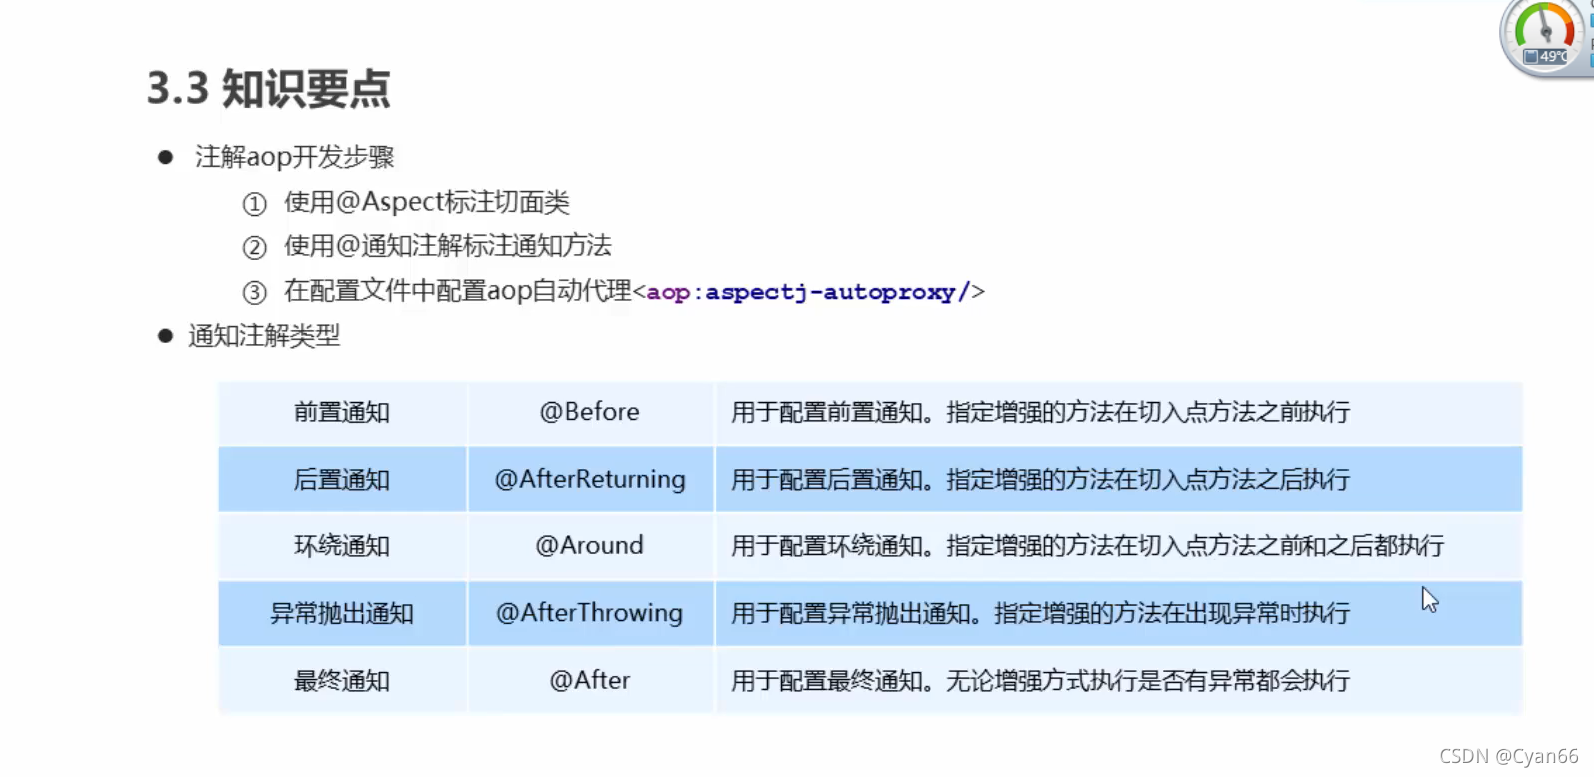
3.9 AOP的使用场景
AOP应用场景
场景一: 记录日志
场景二: 监控方法运行时间 (监控性能)
场景三: 权限控制
场景四: 缓存优化 (第一次调用查询数据库,将查询结果放入内存对象, 第二次调用, 直接从内存对象返回,不需要查询数据库 )
场景五: 事务管理 (调用方法前开启事务, 调用方法后提交关闭事务 )


 被折叠的 条评论
为什么被折叠?
被折叠的 条评论
为什么被折叠?
 到【灌水乐园】发言


