


 本文介绍如何在CentOS7上安装配置MySQL5.6,包括删除自带的MariaDB,解压安装包,创建MySQL用户和组,配置my.cnf文件,执行安装命令,配置服务启动项等步骤。
centos7安装mysql5.6
一、删除centos7自带的mariadb
[root@mysqlslave ~]# rpm -qa mariadb
[root@mysqlslave ~]# rpm -qa | grep mariadb
mariadb-libs-5.5.56-2.el7.x86_64
[root@mysqlslave ~]# rpm -e --nodeps mariadb-libs-5.5.56-2.el7.x86_64
[root@mysqlslave ~]#
二、将上传到根目录下的文件解压到/usr/local下
[root@mysqlslave ~]# ls
anaconda-ks.cfg  mysql-5.6.31-linux-glibc2.5-x86_64.tar.gz
[root@mysqlslave ~]# tar zxvf mysql-5.6.31-linux-glibc2.5-x86_64.tar.gz -C /usr/local/
三、改名为mysql
[root@mysqlslave ~]# cd /usr/local/
[root@mysqlslave local]# ls
bin  etc  games  include  lib  lib64  libexec  mysql-5.6.31-linux-glibc2.5-x86_64  sbin  share  src
[root@mysqlslave local]# mv mysql-5.6.31-linux-glibc2.5-x86_64/ mysql
[root@mysqlslave local]# ls
bin  etc  games  include  lib  lib64  libexec  mysql  sbin  share  src
四、创建mysql用户和mysql组
[root@mysqlslave mysql]# groupadd mysql
[root@mysqlslave mysql]# useradd -r -g mysql mysql
进入到mysql目录下修改目录的拥有者为mysql
[root@mysqlslave mysql]# pwd
/usr/local/mysql
[root@mysqlslave mysql]# chgrp -R mysql .
[root@mysqlslave mysql]# chown -R mysql .
[root@mysqlslave mysql]# ll
总用量 48
drwxr-xr-x. 2 mysql mysql 4096 3月 31 22:49 bin
-rw-r--r--. 1 mysql mysql 17987 5月 17 2016 COPYING
drwxr-xr-x. 3 mysql mysql 18 3月 31 22:49 data
drwxr-xr-x. 2 mysql mysql 55 3月 31 22:49 docs
drwxr-xr-x. 3 mysql mysql 4096 3月 31 22:49 include
drwxr-xr-x. 3 mysql mysql 4096 3月 31 22:49 lib
drwxr-xr-x. 4 mysql mysql 30 3月 31 22:49 man
drwxr-xr-x. 10 mysql mysql 4096 3月 31 22:49 mysql-test
-rw-r--r--. 1 mysql mysql 2496 5月 17 2016 README
drwxr-xr-x. 2 mysql mysql 30 3月 31 22:49 scripts
drwxr-xr-x. 28 mysql mysql 4096 3月 31 22:49 share
drwxr-xr-x. 4 mysql mysql 4096 3月 31 22:49 sql-bench
drwxr-xr-x. 2 mysql mysql 136 3月 31 22:49 support-files
拷贝默认的配置文件到/etc下
[root@mysqlslave mysql]# cd support-files/
[root@mysqlslave support-files]#
[root@mysqlslave support-files]# ll
总用量 32
-rwxr-xr-x. 1 mysql mysql  1153 5月  17 2016 binary-configure
-rw-r--r--. 1 mysql mysql   773 5月  17 2016 magic
-rw-r--r--. 1 mysql mysql  1126 5月  17 2016 my-default.cnf
-rwxr-xr-x. 1 mysql mysql  1061 5月  17 2016 mysqld_multi.server
-rwxr-xr-x. 1 mysql mysql   894 5月  17 2016 mysql-log-rotate
-rwxr-xr-x. 1 mysql mysql 10880 5月  17 2016 mysql.server
[root@mysqlslave support-files]# cp my-default.cnf /etc/my.cnf
编辑my.cnf将以下代码复制到文件中
[mysql]
# 设置mysql客户端默认字符集
default-character-set=utf8
socket=/var/lib/mysql/mysql.sock
[mysqld]
skip-name-resolve
#设置3306端口
port = 3306
socket=/var/lib/mysql/mysql.sock
# 设置mysql的安装目录
basedir=/usr/local/mysql
# 设置mysql数据库的数据的存放目录
datadir=/usr/local/mysql/data
# 允许最大连接数
max_connections=200
# 服务端使用的字符集默认为8比特编码的latin1字符集
character-set-server=utf8
# 创建新表时将使用的默认存储引擎
default-storage-engine=INNODB
lower_case_table_name=1
max_allowed_packet=16M
五、安装mysql
进入到mysql目录下执行以下命令
[root@mysqlslave mysql]# pwd
/usr/local/mysql
[root@mysqlslave mysql]# ./scripts/mysql_install_db --user=mysql --datadir=/usr/local/mysql/data/
FATAL ERROR: please install the following Perl modules before executing ./scripts/mysql_install_db:
Data::Dumper
如果出现以下错误,先安装autoconfig
yum -y install autoconf
重新执行安装命令
[root@mysqlslave mysql]# ./scripts/mysql_install_db --user=mysql --datadir=/usr/local/mysql/data/
六、配置mysql
1.授予mysql配置文件my.cnf最大权限777
chmod 777 /etc/my.cnf
2.复制mysql启动脚本到资源目录
[root@mysqlslave mysql]# cp ./support-files/mysql.server /etc/rc.d/init.d/mysqld
3.增加mysqld服务控制脚本执行权限
[root@mysqlslave mysql]# chmod +x /etc/rc.d/init.d/mysqld
4.将mysqld服务加入到系统服务
[root@mysqlslave mysql]# chkconfig --add mysqld
5.检查mysqld服务是否已经生效
[root@mysqlslave mysql]# chkconfig --list mysqld

注:该输出结果只显示 SysV 服务,并不包含
原生 systemd 服务。SysV 配置数据
可能被原生 systemd 配置覆盖。

      要列出 systemd 服务,请执行 'systemctl list-unit-files'。
      查看在具体 target 启用的服务请执行
      'systemctl list-dependencies [target]'。

mysqld         	0:关	1:关	2:开	3:开	4:开	5:开	6:关
6.启动mysql服务
[root@mysqlslave mysql]# systemctl start mysqld
开机自启动
[root@mysqlslave mysql]# systemctl enable mysqld
7.进入mysql的bin目录进入到mysql客户端,首次进入没有密码,直接按回车键
[root@mysqlslave mysql]# cd bin/
[root@mysqlslave bin]# ./mysql -uroot -p
Warning: World-writable config file '/etc/my.cnf' is ignored
Enter password:
Welcome to the MySQL monitor.  Commands end with ; or \g.
Your MySQL connection id is 1
Server version: 5.6.31 MySQL Community Server (GPL)

Copyright (c) 2000, 2016, Oracle and/or its affiliates. All rights reserved.

Oracle is a registered trademark of Oracle Corporation and/or its
affiliates. Other names may be trademarks of their respective
owners.

Type 'help;' or '\h' for help. Type '\c' to clear the current input statement.

mysql>
8.修改mysql的密码为root(自定义)
mysql> use mysql
Reading table information for completion of table and column names
You can turn off this feature to get a quicker startup with -A

Database changed
mysql> update user set password=password('root') where user='root';
Query OK, 4 rows affected (0.01 sec)
Rows matched: 4  Changed: 4  Warnings: 0

mysql> flush privileges;//刷新权限
Query OK, 0 rows affected (0.00 sec)

mysql>
9.允许远程连接mysql(用户名和密码写自己设置的)
mysql>GRANT ALL PRIVILEGES ON *.* TO 'root'@'%' IDENTIFIED BY 'root' WITH GRANT OPTION;
mysql> flush privileges;//刷新权限
Query OK, 0 rows affected (0.00 sec)
10.将mysqlhome添加到环境变量中
[root@mysqlslave bin]# vim ~/.bash_profile
//在文件尾部添加
export PATH=$PATH:/usr/local/mysql/bin
//使配置生效
[root@mysqlslave bin]# source ~/.bash_profile
11.测试mysql命令
[root@mysqlslave bin]# mysql -uroot -proot
Warning: World-writable config file '/etc/my.cnf' is ignored
Warning: Using a password on the command line interface can be insecure.
Welcome to the MySQL monitor.  Commands end with ; or \g.
Your MySQL connection id is 2
Server version: 5.6.31 MySQL Community Server (GPL)

Copyright (c) 2000, 2016, Oracle and/or its affiliates. All rights reserved.

Oracle is a registered trademark of Oracle Corporation and/or its
affiliates. Other names may be trademarks of their respective
owners.

Type 'help;' or '\h' for help. Type '\c' to clear the current input statement.

mysql>
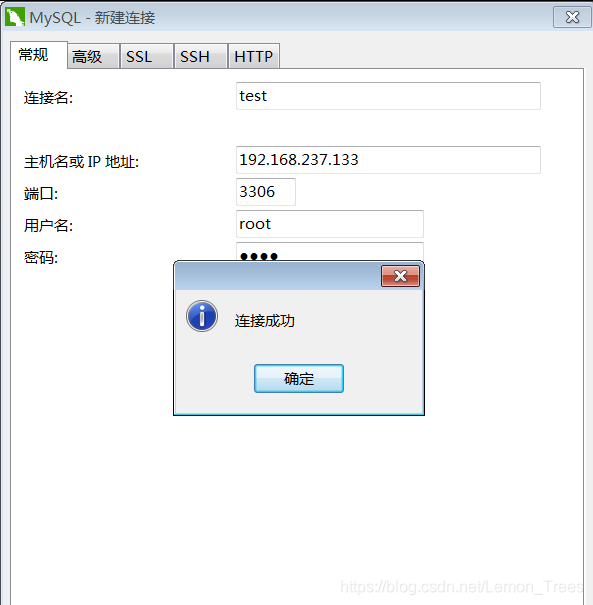
12.关闭防火墙,使用远程连接工具测试连接
[root@mysqlslave bin]# systemctl stop firewalld
[root@mysqlslave bin]# systemctl status firewalld //查看状态
● firewalld.service - firewalld - dynamic firewall daemon
   Loaded: loaded (/usr/lib/systemd/system/firewalld.service; enabled; vendor preset: enabled)
   Active: inactive (dead) since 日 2019-03-31 23:32:22 CST; 5s ago
     Docs: man:firewalld(1)
  Process: 693 ExecStart=/usr/sbin/firewalld --nofork --nopid $FIREWALLD_ARGS (code=exited, status=0/SUCCESS)
 Main PID: 693 (code=exited, status=0/SUCCESS)

3月 31 22:29:59 mysqlslave systemd[1]: Starting firewalld - dynamic firewall daemon...
3月 31 22:30:02 mysqlslave systemd[1]: Started firewalld - dynamic firewall daemon.
3月 31 23:32:21 mysqlslave systemd[1]: Stopping firewalld - dynamic firewall daemon...
3月 31 23:32:22 mysqlslave systemd[1]: Stopped firewalld - dynamic firewall daemon.
[root@mysqlslave bin]# ifconfig //查看IP
ens33: flags=4163<UP,BROADCAST,RUNNING,MULTICAST>  mtu 1500
        inet 192.168.237.133  netmask 255.255.255.0  broadcast 192.168.237.255
        inet6 fe80::ab2c:206d:d423:226e  prefixlen 64  scopeid 0x20<link>
        ether 00:0c:29:d6:e2:e0  txqueuelen 1000  (Ethernet)
        RX packets 249220  bytes 359393771 (342.7 MiB)
        RX errors 0  dropped 0  overruns 0  frame 0
        TX packets 27926  bytes 4047639 (3.8 MiB)
        TX errors 0  dropped 0 overruns 0  carrier 0  collisions 0

lo: flags=73<UP,LOOPBACK,RUNNING>  mtu 65536
        inet 127.0.0.1  netmask 255.0.0.0
        inet6 ::1  prefixlen 128  scopeid 0x10<host>
        loop  txqueuelen 1000  (Local Loopback)
        RX packets 0  bytes 0 (0.0 B)
        RX errors 0  dropped 0  overruns 0  frame 0
        TX packets 0  bytes 0 (0.0 B)
        TX errors 0  dropped 0 overruns 0  carrier 0  collisions 0


 1461
1461

 被折叠的 条评论
为什么被折叠?
被折叠的 条评论
为什么被折叠?
 到【灌水乐园】发言


