


 本文详细解析SpringBoot中静态资源映射规则,深入探讨Thymeleaf模板引擎的配置与使用,包括语法详解及如何扩展SpringMVC。
Web开发(SpringMVC部分)
一、SpringBoot对静态资源的映射规则(存放位置)
1. /werbjars/**:静态资源
由于引入了jquery-webjar,因此所有的/werbjars/**的静态资源都去classpath:/META-INF/resources/webjars/下找。
2. /**:当前项目的静态资源
都去静态资源文件夹下找
	(1) classpath:/META-INF/resources/
	(2) classpath:/resources/
	(3) classpath:/static/
	(4) classpath:/public/
	classpath表示src/main/java或者src/main/resources
3. index.html:欢迎页
去所有的静态资源文件夹下找index.html
4. **/favicon.ico:图标
去静态资源文件下找
二、模板引擎Thymeleaf
1. 引入thymeleaf:
因为SpringBoot默认不支持jsp,所以需要使用模板引擎来传递数据:模板里使用占位符,数据model里存储占位符对应的值,通过模板引擎来获取数据
pom.xml:
<properties>
        <!--   更改thymeleaf的版本     -->
        <thymeleaf.version>3.0.11.RELEASE</thymeleaf.version>
        <thymeleaf-layout-dialect.version>2.2.2</thymeleaf-layout-dialect.version>
</properties>

<dependencies>
        <dependency>
            <groupId>org.springframework.boot</groupId>
            <artifactId>spring-boot-starter-thymeleaf</artifactId>
        </dependency>
</dependencies>
2. thymeleaf的使用:
(1)导入thymeleaf的名称空间:<html lang="en" xmlns:th="http://www.thymeleaf.org">
(2)将html页面放在classpath:/templates/下,SpringBoot就可以自动渲染
3. thymeleaf的语法:
- 可以使用类似
th:text,th:each等标签,来替换掉原生属性的值 - 可以获取map中表达式形式的数据
- 使用
${ }来获取在Controller中存入map的数据 - 项目丢失样式时,先确保html页面里都用
th:href来替换原生属性了
(1)th:text="${hello}":将div标签体里的默认文本内容替换为map中指定的值(对于表达式中<h1>类似的,是其本身的含义)
(2)th:uext="${hello1}":对于表达式中<h1>类似的,是转义字符的含义
(3)th:each="user:${users}":每次遍历都会生成当前的标签h4
当th:each="user:${users}"放在span标签里时,只会生成一个当前的标签h4
(4)标签体内的表达式
- [[...]] == th:text
- [(...)] == th:utext
例如:
/resources/templates/success.html页面:
<!DOCTYPE html>
<html lang="en" xmlns:th="http://www.thymeleaf.org">
<head>
    <meta charset="UTF-8">
    <title>Title</title>
</head>
<body>

    <h1>成功!</h1>

    <div id="div01" class="myDiv" th:id="${hello}" th:class="${hello}" th:text="${hello}">这是显示欢迎信息</div>

    <hr/>

    <div th:text="${hello1}"></div>
    <div th:utext="${hello1}"></div>

    <hr/>

    <h4 th:text="${user}" th:each="user:${users}"></h4>

    <hr/>

    <h4>
        <span th:each="user:${users}"> [[${user}]] </span>
    </h4>

</body>
</html>
/controller/HelloController类:
@Controller
public class HelloController {

    @RequestMapping("/success")
    public String success(Map<String, Object> map){
        map.put("hello", "你好");

        //(2)表达式
        map.put("hello1", "<h1>你们好</h1>");
        map.put("users", Arrays.asList("A","B","C"));

        return "success";
    }
}
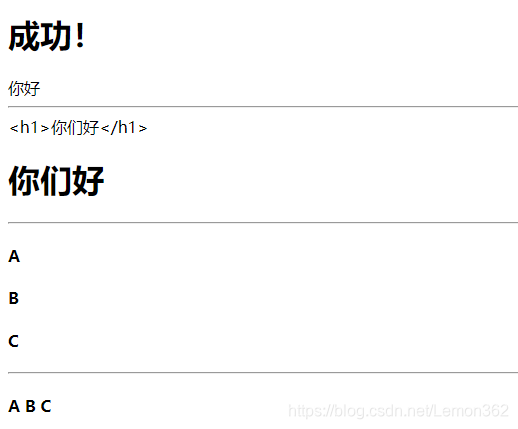
效果:
如果不启动项目,直接打开success.html,会默认显示前端的信息这是显示欢迎信息
如果启动项目,则会用后端的数据来覆盖默认信息,显示你好
三、SpringMVC自动配置
1. SpringBoot对SpringMVC进行了自动配置:
- 源码参见
WebMvcAutoConfiguration类 - 如果我们想添加自己的组件,只需要使用
@Bean,@Component将定制的组件放到容器中即可
2. 扩展SptingMVC
- 编写一个配置类,使用
@Configuration注解,实现WebMvcConfigurer即可 - 效果:扩展了SpringMVC的功能,自动配置的和扩展的功能都能起作用
- 例如:扩展视图映射功能,使得浏览器发送
/lemon也能跳转到succes.html页面
/config/MyMvcConfig.java:
@Configuration
public class MyMvcConfig implements WebMvcConfigurer {

    // 视图映射
    @Override
    public void addViewControllers(ViewControllerRegistry registry) {
        // 浏览器发送 /lemon请求,跳转到success.html页面
        registry.addViewController("/lemon").setViewName("success");
    }
}
3. 全面接管SptingMVC
- 使用
@EnableWebMvc注解标注在自己编写的配置类上,此时SpringBoot对SpringMVC的自动配置都失效了,所有都要自己配置(一般不推荐使用) - 在扩展SprngiMVC时,一定不能标注
@EnableWebMvc!
四、扩展/修改SpringBooot的默认配置
- 方法一:可以使用
@Bean,@Component注解来标注自己编写的配置类 - 方法二:SpringBoot中有很多
xxxConfigurer来帮助我们进行扩展 - 方法三:SpringBoot中有很多
xxxCustomizer来帮助我们进行定制


 被折叠的 条评论
为什么被折叠?
被折叠的 条评论
为什么被折叠?
 到【灌水乐园】发言


