


 本文详细介绍了SpringBoot的默认错误处理机制,包括浏览器和客户端的响应方式,以及如何通过自定义异常类、异常处理器和ErrorAttributes来定制错误页面和JSON数据。
错误处理机制
一. SpringBoot默认的错误处理机制
1. 浏览器:返回一个默认的404错误页面

2. 其他客户端(Postman):响应一个默认的json数据

3. 原理:参见ErrorMvcAutoConfiguration类
二. 定制错误的页面
1. SpringBoot对于错误页面的加载步骤:
(1)如果有模板引擎,请求是根据 error/状态码,只需将错误页面命名为 错误状态码.html,放在模板引擎文件夹template/error文件夹内即可
(2)也可以使用4xx和5xx作为错误页面的文件名,但是会优先寻找精确的状态码.html(404.html)
(3)如果没有模板引擎,就去静态资源文件夹static下找
(4)如果都没有,那么来到SpringBoot默认的错误页面
三. 定制错误的json数据
1. 创建一个自定义异常类/exception/UserNotExistException,继承RuntimeException类
2. 在HelloController中定制:当用户名是aaa时,抛出异常 用户不存在
具体代码:
/exception/UserNotExistException
public class UserNotExistException extends RuntimeException{

    public UserNotExistException(){
        super("用户不存在");
    }
}
HelloController
@Controller
public class HelloController {

    @ResponseBody
    @RequestMapping("/hello")
    public String hello(@RequestParam("user") String user){
        if (user.equals("aaa")){
            throw new UserNotExistException();
        }
        return "Hello World";
    }
}
注意:
(1)需要在主配置文件中配置server.error.include-exception=true和server.error.include-message=always才能生效
(2)需要将MyMvcConfig中注册的自定义拦截器注释掉,否则会提示没有权限,请先登录
效果:当访问 http://localhost:8080/hello?user=aaa 时,会抛出自定义异常
3. 自定义异常处理器MyExceptionHandler,此时,自定义的json数据没有自适应效果,浏览器和客户端都返回json数据。需要转发到 /error,被BasicErrorController处理,进行自适应响应效果处理。
4. 编写一个ErrorAttributes的类(extends DefaultErrorAttributes),重写getErrorAttributes方法,放到容器中,从而将定制的json数据(在MyExceptionHandler中存储在map中的json数据)携带出去。
注意:要想将异常处理器MyExceptionHandler的自定义信息也携带出去,首先在MyExceptionHandler中将存储自定义信息的map放到request域中,然后在MyErrorAttributes中获取异常处理器MyExceptionHandler携带的数据,并存到errorAttributes的map中,一起返回。
具体代码:
MyExceptionHandler:
@ControllerAdvice
public class MyExceptionHandler {

    @ExceptionHandler(UserNotExistException.class)
    public String handleException(Exception e, HttpServletRequest request){
        Map<String, Object> map = new HashMap<>();

        // 传入自己的错误状态码,否则页面显示200
        request.setAttribute("javax.servlet.error.status_code", 500);

        map.put("code", "user.notexist");
        map.put("message", "用户出错啦");

        // 要想将异常处理器的自定义信息也携带出去,首先将map放到request域中
        request.setAttribute("ext", map);

        // 转发到 /error
        return "forward:/error";
    }
}
(1)使用@ExceptionHandler(UserNotExistException.class)来获取定制的错误信息
(2)使用request.setAttribute("javax.servlet.error.status_code", 500);,将自己的错误状态码传入,否则页面会显示200
(3)定义一个map来存储我们自己的错误信息,然后将map存储到request中request.setAttribute("ext", map);
(4)这个自定义异常处理方法需要转发到/error:"forward:/error"
MyErrorAttributes:
@Component
public class MyErrorAttributes extends DefaultErrorAttributes {

    // 返回的map就是页面和json能够获取的字段
    @Override
    public Map<String, Object> getErrorAttributes(WebRequest webRequest, ErrorAttributeOptions options) {

        Map<String, Object> errorAttributes = super.getErrorAttributes(webRequest, options);

        // 这里可以自定义输出的信息
        errorAttributes.put("company", "lemon");

        // 获取异常处理器的携带的数据
        // getAttribute(String name, int scope):scope=0表示request域,scope=1表示session域
        Map<String, Object> ext = (Map<String, Object>) webRequest.getAttribute("ext", 0);

        errorAttributes.put("ext", ext);

        return errorAttributes;
    }
}
(1)为了将在MyExceptionHandler中存储在map中的错误信息数据能够携带出去,重写getErrorAttributes方法,该方法返回的map包含页面和json数据
(2)Map<String, Object> ext = (Map<String, Object>) webRequest.getAttribute("ext", 0);:将MyExceptionHandler中存储在request域中的ext错误信息取出,放到errorAttributes这个大的map中一起返回
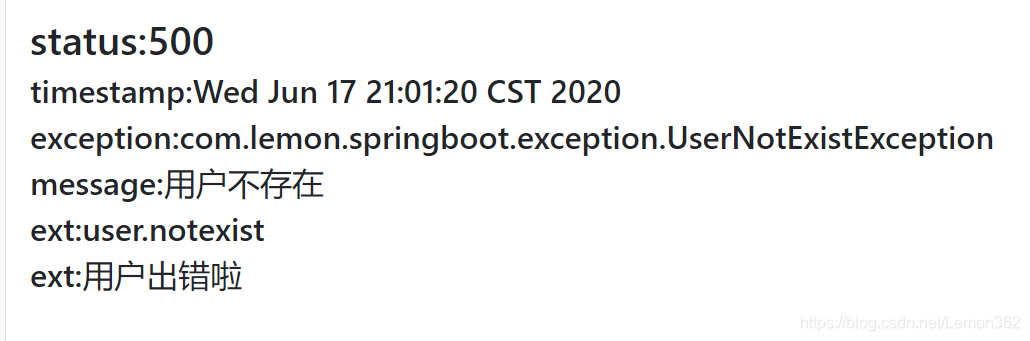
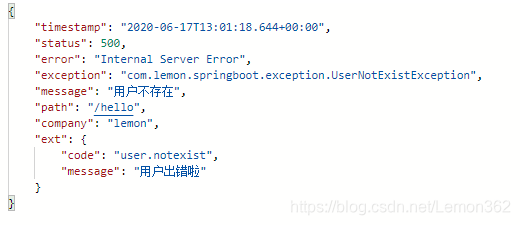
效果:
(1)页面输入http://localhost:8080/hello?user=aaa
(2)Postman输入(GET)http://localhost:8080/hello?user=aaa


 275
275

 被折叠的 条评论
为什么被折叠?
被折叠的 条评论
为什么被折叠?
 到【灌水乐园】发言


