


 本文详细介绍了如何在Spring框架中使用注解进行声明式事务管理,通过银行转账场景模拟,展示了@Transactional注解的配置参数,如传播行为、隔离级别等,以及如何在实际项目中整合和测试。
目录
1 事务
事务是数据库操作的最基本单元,逻辑上的一组操作,要么都成功,如果当中有一个失败的所有操作都失败
特性:原子性、一致性、隔离性、持久性
2 事务场景模拟
场景:银行转账
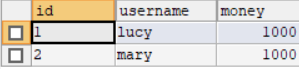
1.创建表并添加记录
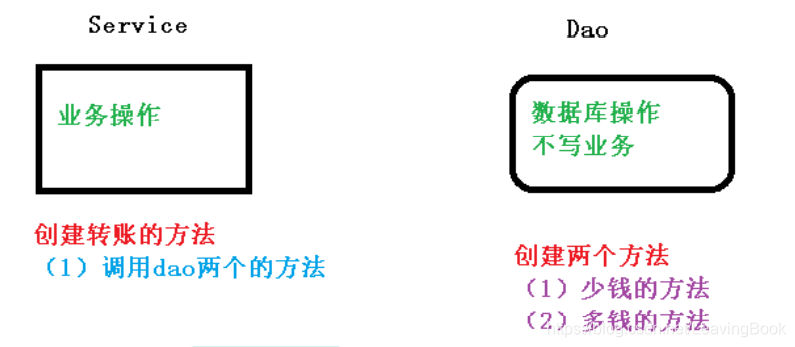
2.创建service和dao完成对象的创建和注入
UserService.java:
package com.wzc.spring.service;

import com.wzc.spring.dao.UserDao;
import org.springframework.beans.factory.annotation.Autowired;
import org.springframework.stereotype.Service;

@Service
public class UserService {

    //注入Dao
    @Autowired
    private UserDao userDao;


    //转账方法
    public void accountMoney(){
        //lucy少100
        userDao.reduceMoney();
        //mary 多100
        userDao.addMoney();

    }
}
UserDao:
package com.wzc.spring.dao;

public interface UserDao {

    //多钱
    public void addMoney();

    //少钱
    public void reduceMoney();
}
UserDaoImpl:
package com.wzc.spring.dao;


import org.springframework.beans.factory.annotation.Autowired;
import org.springframework.jdbc.core.JdbcTemplate;
import org.springframework.stereotype.Repository;

@Repository
public class UserDaoImpl implements UserDao{

    @Autowired
    private JdbcTemplate jdbcTemplate;

    @Override
    public void addMoney() {
        String sql = "update t_account set money=money+? where username=?";
        jdbcTemplate.update(sql,100,"mary");
    }

    @Override
    public void reduceMoney() {
        String sql = "update t_account set money=money-? where username=?";
        jdbcTemplate.update(sql,100,"lucy");
    }
}
测试类
    @Test
    public void testJdbcTemplate(){
        ApplicationContext context = new ClassPathXmlApplicationContext("bean1.xml");
        UserService userService= context.getBean("userService", UserService.class);
        userService.accountMoney();
    }
测试后的结果如下所示:
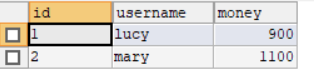
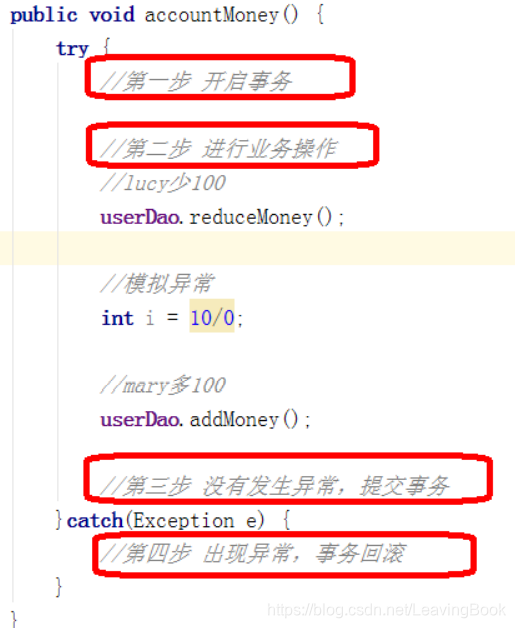
但是经常会存在种种异常,造成加钱和减钱的过程无法共同执行,从而数据库中的内容不准确。此时需要开启事务进行处理。
事务操作的过程:
3 Spring事务管理
一般将事务添加到JavaEE三层结构里面的Service层(业务逻辑层)
两种方式:编程式事务管理和声明式事务管理(使用)
声明式事务管理:基于注解方式、基于xml配置文件方式
在spring底层使用AOP原理处理事务。
4 注解声明式事务管理
1.在配置文件中配置事务管理器,开启事务注解
<?xml version="1.0" encoding="UTF-8"?>
<beans xmlns="http://www.springframework.org/schema/beans"
       xmlns:xsi="http://www.w3.org/2001/XMLSchema-instance"
       xmlns:context="http://www.springframework.org/schema/context"
       xmlns:aop="http://www.springframework.org/schema/aop"
       xmlns:tx="http://www.springframework.org/schema/tx"
       xsi:schemaLocation="http://www.springframework.org/schema/beans http://www.springframework.org/schema/beans/spring-beans.xsd
                           http://www.springframework.org/schema/context http://www.springframework.org/schema/context/spring-context.xsd
                           http://www.springframework.org/schema/aop http://www.springframework.org/schema/aop/spring-aop.xsd
                           http://www.springframework.org/schema/tx http://www.springframework.org/schema/tx/spring-tx.xsd">

    <!-- 开启组件扫描 -->
    <context:component-scan base-package="com.wzc.spring"></context:component-scan>

    <!-- 数据库连接池 -->
    <bean id="dataSource" class="com.alibaba.druid.pool.DruidDataSource" destroy-method="close">
        <property name="url" value="jdbc:mysql://localhost:3306/user_db" />
        <property name="username" value="root" />
        <property name="password" value="root"/>
        <property name="driverClassName" value="com.mysql.jdbc.Driver"/>
    </bean>

    <!-- JDBCtemplate对象 -->
    <bean id="jdbcTemplate" class="org.springframework.jdbc.core.JdbcTemplate">
        <!-- 注入 Datasource-->
        <property name="dataSource" ref="dataSource"></property>
    </bean>

    <!-- 创建事务管理器  -->
    <bean id="transactionManager" class="org.springframework.jdbc.datasource.DataSourceTransactionManager">
        <!-- 注入数据源 -->
        <property name="dataSource" ref="dataSource"></property>
    </bean>

    <!-- 开启事务注解  -->
    <tx:annotation-driven transaction-manager="transactionManager"></tx:annotation-driven>
</beans>
2.在service类(或者service类中的方法上)添加事务注解
(1)@Transactional,既可以添加到类上也可以添加到方法上
(2)若添加到类上,这个类中的所有方法都添加事务
(3)若添加到方法上,则在该方法中添加事务
UserService:
package com.wzc.spring.service;

import com.wzc.spring.dao.UserDao;
import org.springframework.beans.factory.annotation.Autowired;
import org.springframework.stereotype.Service;
import org.springframework.transaction.annotation.Transactional;

@Service
@Transactional
public class UserService {

    //注入Dao
    @Autowired
    private UserDao userDao;


    //转账方法
    public void accountMoney(){
        //lucy少100
        userDao.reduceMoney();
        int a = 100 / 0;
        //mary 多100
        userDao.addMoney();

    }
}
4.1 参数配置
可以在 @Transactional中配置有关事务的参数
主要配置的参数:
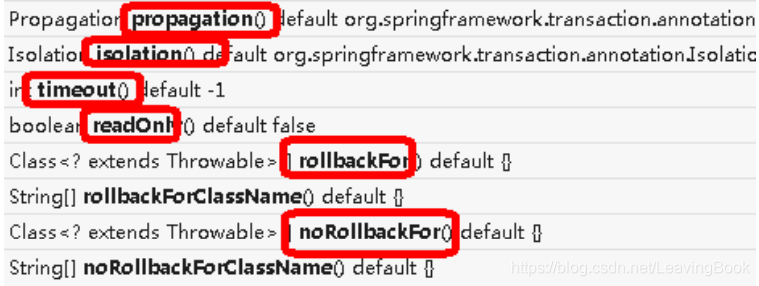
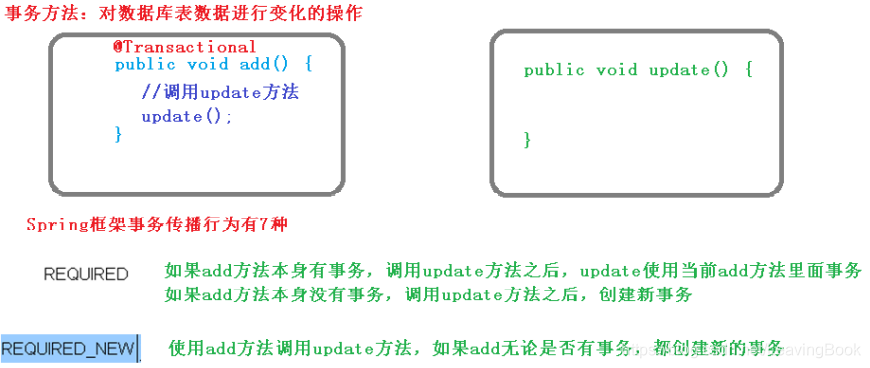
4.1.1 propagation:事务的传播行为
多事务方法进行调用,此过程中事务管理的方式
事务七类传播行为
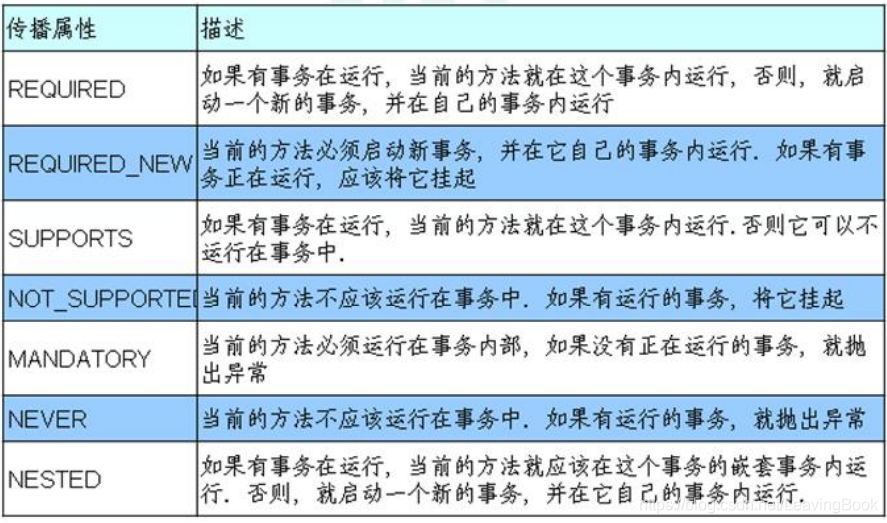
比较典型的两种
配置方法:
@Service
@Transactional(propagation = Propagation.REQUIRED)
public class UserService {
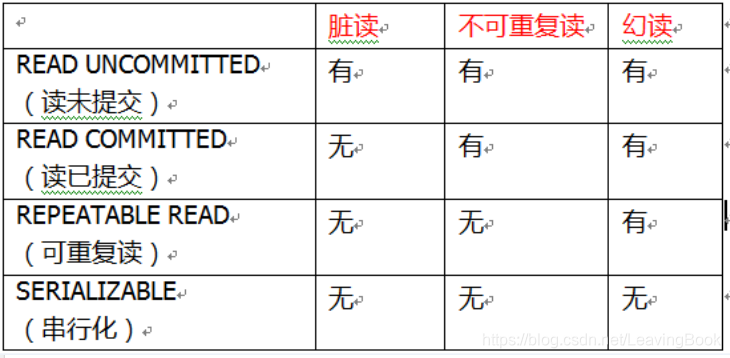
4.1.2 isolation:事务的隔离级别
事务操作会产生脏读、不可重复读、幻读这三个问题
使用事务的隔离级别解决该问题:
配置方法:
@Service
@Transactional(propagation = Propagation.REQUIRED,isolation = Isolation.READ_COMMITTED)
public class UserService {
4.1.3 timeout:超时时间
事务需要在一定时间内进行提交,否则回滚
默认值为-1,设置时单位为秒钟
4.1.4 readOnly:是否只读
默认为false,若设置为true只能进行查询操作
4.1.5 rollbackFor:回滚
设置出现哪些异常进行事务回滚
4.1.6 noRollbackFor:不回滚
设置出现哪些异常不进行事务回滚
5 完全注解开发

package com.wzc.spring.config;


import com.alibaba.druid.pool.DruidDataSource;
import org.springframework.context.annotation.Bean;
import org.springframework.context.annotation.ComponentScan;
import org.springframework.context.annotation.Configuration;
import org.springframework.jdbc.core.JdbcTemplate;
import org.springframework.jdbc.datasource.DataSourceTransactionManager;
import org.springframework.transaction.annotation.EnableTransactionManagement;

import javax.sql.DataSource;
import javax.xml.crypto.Data;

@Configuration //配置类
@ComponentScan(basePackages = "com.wzc.spring") //组件扫描
@EnableTransactionManagement //开启事务
public class Txconfig {

    //创建数据库连接池

    @Bean
    public DruidDataSource getDruidDataSource(){
        DruidDataSource dataSource = new DruidDataSource();
        dataSource.setDriverClassName("com.mysql.jdbc.Driver");
        dataSource.setUrl("jdbc:mysql://localhost:3306/user_db");
        dataSource.setUsername("root");
        dataSource.setPassword("root");

        return dataSource;
    }


    //创建jdbcTemplate对象
    @Bean
    public JdbcTemplate getJdbcTemplate(DataSource dataSource){

        //到ioc容器中根据类型找到dataSource
        JdbcTemplate jdbcTemplate = new JdbcTemplate();
        //注入dataSource
        jdbcTemplate.setDataSource(dataSource);

        return jdbcTemplate;
    }

    //创建事务管理器
    @Bean
    public DataSourceTransactionManager getDataSourceTransactionManager(DataSource dataSource){
        DataSourceTransactionManager transactionManager = new DataSourceTransactionManager();
        transactionManager.setDataSource(dataSource);
        return transactionManager;
    }
}
测试类:
    @Test
    public void testJdbcTemplate2(){
        ApplicationContext context = new AnnotationConfigApplicationContext(Txconfig.class);
        UserService userService= context.getBean("userService", UserService.class);
        userService.accountMoney();
    }
参考资料:
[1]尚硅谷spring5


 1万+
1万+

 被折叠的 条评论
为什么被折叠?
被折叠的 条评论
为什么被折叠?
 到【灌水乐园】发言


