


 本文介绍如何使用Spring Boot搭建一个简单的Web应用程序,包括项目初始化、关键配置及基本控制器的实现。
这里我使用的是IDEA ,首先需建一个Maven项目)。然后导入依赖:
首先要设置spring boot的parent—说明:Spring boot的项目必须要将parent设置为spring boot的parent,该parent包含了大量默认的配置,大大简化了我们的开发。
    <!-- 定义公共资源版本 -->
    <parent>
        <groupId>org.springframework.boot</groupId>
        <artifactId>spring-boot-starter-parent</artifactId>
        <version>2.0.2.RELEASE</version>
        <relativePath />
    </parent>
导入spring boot的web支持
        <dependency>
            <groupId>org.springframework.boot</groupId>
            <artifactId>spring-boot-starter-web</artifactId>
        </dependency>
导入spring boot的thymeleaf支持(用于HTML传递参数)
        <dependency>
            <groupId>org.springframework.boot</groupId>
            <artifactId>spring-boot-starter-thymeleaf</artifactId>
        </dependency>
添加Spring boot的插件
    <build>
        <plugins>
            <plugin>
                <groupId>org.springframework.boot</groupId>
                <artifactId>spring-boot-maven-plugin</artifactId>
            </plugin>
        </plugins>
    </build>
下面是我的pom文件
<?xml version="1.0" encoding="UTF-8"?>
<project xmlns="http://maven.apache.org/POM/4.0.0"
xmlns:xsi="http://www.w3.org/2001/XMLSchema-instance"
xsi:schemaLocation="http://maven.apache.org/POM/4.0.0 http://maven.apache.org/xsd/maven-4.0.0.xsd">
<modelVersion>4.0.0</modelVersion>
<groupId>org.boot</groupId>
<artifactId>ch01</artifactId>
<version>1.0-SNAPSHOT</version>
<!-- 阿里云仓库 -->
<repositories>
<repository>
<id>aliyunmaven</id>
<url>http://maven.aliyun.com/nexus/content/groups/public/</url>
</repository>
</repositories>
<!-- 定义公共资源版本 -->
<parent>
<groupId>org.springframework.boot</groupId>
<artifactId>spring-boot-starter-parent</artifactId>
<version>2.0.2.RELEASE</version>
<relativePath />
</parent>
<properties>
<project.build.sourceEncoding>UTF-8</project.build.sourceEncoding>
<project.reporting.outputEncoding>UTF-8</project.reporting.outputEncoding>
<java.version>1.8</java.version>
</properties>
<dependencies>
<dependency>
<groupId>org.springframework.boot</groupId>
<artifactId>spring-boot-starter-web</artifactId>
</dependency>
<dependency>
<groupId>org.springframework.boot</groupId>
<artifactId>spring-boot-starter-thymeleaf</artifactId>
</dependency>
</dependencies>
<build>
<plugins>
<plugin>
<groupId>org.springframework.boot</groupId>
<artifactId>spring-boot-maven-plugin</artifactId>
</plugin>
</plugins>
</build>
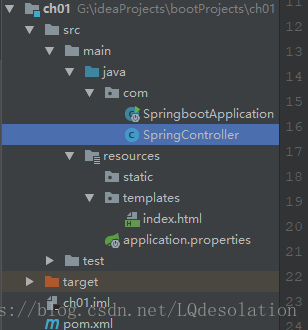
</project>然后建一个package(注:一定要建一个包,类要放在包中否则会出错)
创建 src/main/resources 源文件目录,并在该目录下创建 application.properties 文件、static 和 templates 的文件夹。
application.properties:用于配置项目运行所需的配置数据。
static:用于存放静态资源,如:css、js、图片等。
templates:用于存放模板文件。
如图结构:
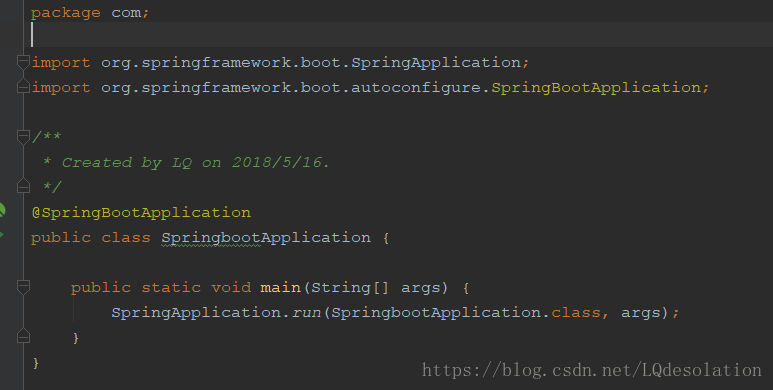
启动程序SpringbootApplication 说明
我们通过此类的main函数来启动spring boot程序。
启动程序SpringbootApplication 是自动生成的,代码如下:
import org.springframework.boot.SpringApplication;
import org.springframework.boot.autoconfigure.SpringBootApplication;


@SpringBootApplication
public class SpringbootApplication {

    public static void main(String[] args) {
        SpringApplication.run(SpringbootApplication.class, args);
    }
}
在该包下创建一个 SpringController 类,如下:
import org.springframework.stereotype.Controller;
import org.springframework.web.bind.annotation.RequestMapping;
import java.util.HashMap;
@Controller //这里必须为Controller
public class SpringController {
@RequestMapping("/hello")
public String helloHtml(HashMap<String, Object> map) {
map.put("hello", "欢迎进入HTML页面");
return "/index";
}
@RequestMapping("/hello2")
@ResponseBody //注意在不跳转html的时候要加这个注解
public String hello() {
return "hello world!";
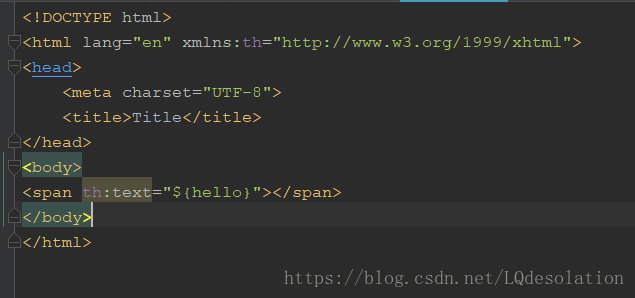
}在templates文件夹你创建index.html
<!DOCTYPE html>
<html lang="en" xmlns:th="http://www.w3.org/1999/xhtml">
<head>
    <meta charset="UTF-8">
    <title>Title</title>
</head>
<body>
<span th:text="${hello}"></span>
</body>
</html>
如图所示:

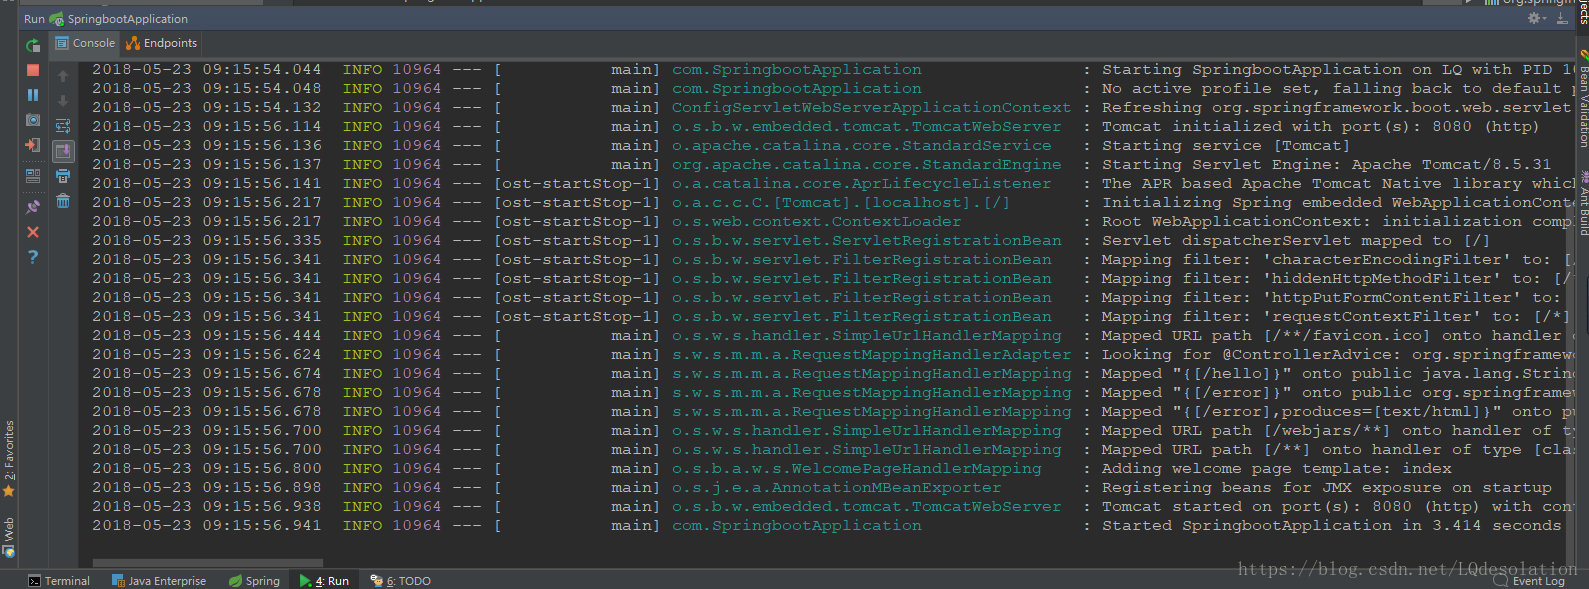
接下来启动SpringbootApplication类中的main方法,会出现如下图表示启动成功
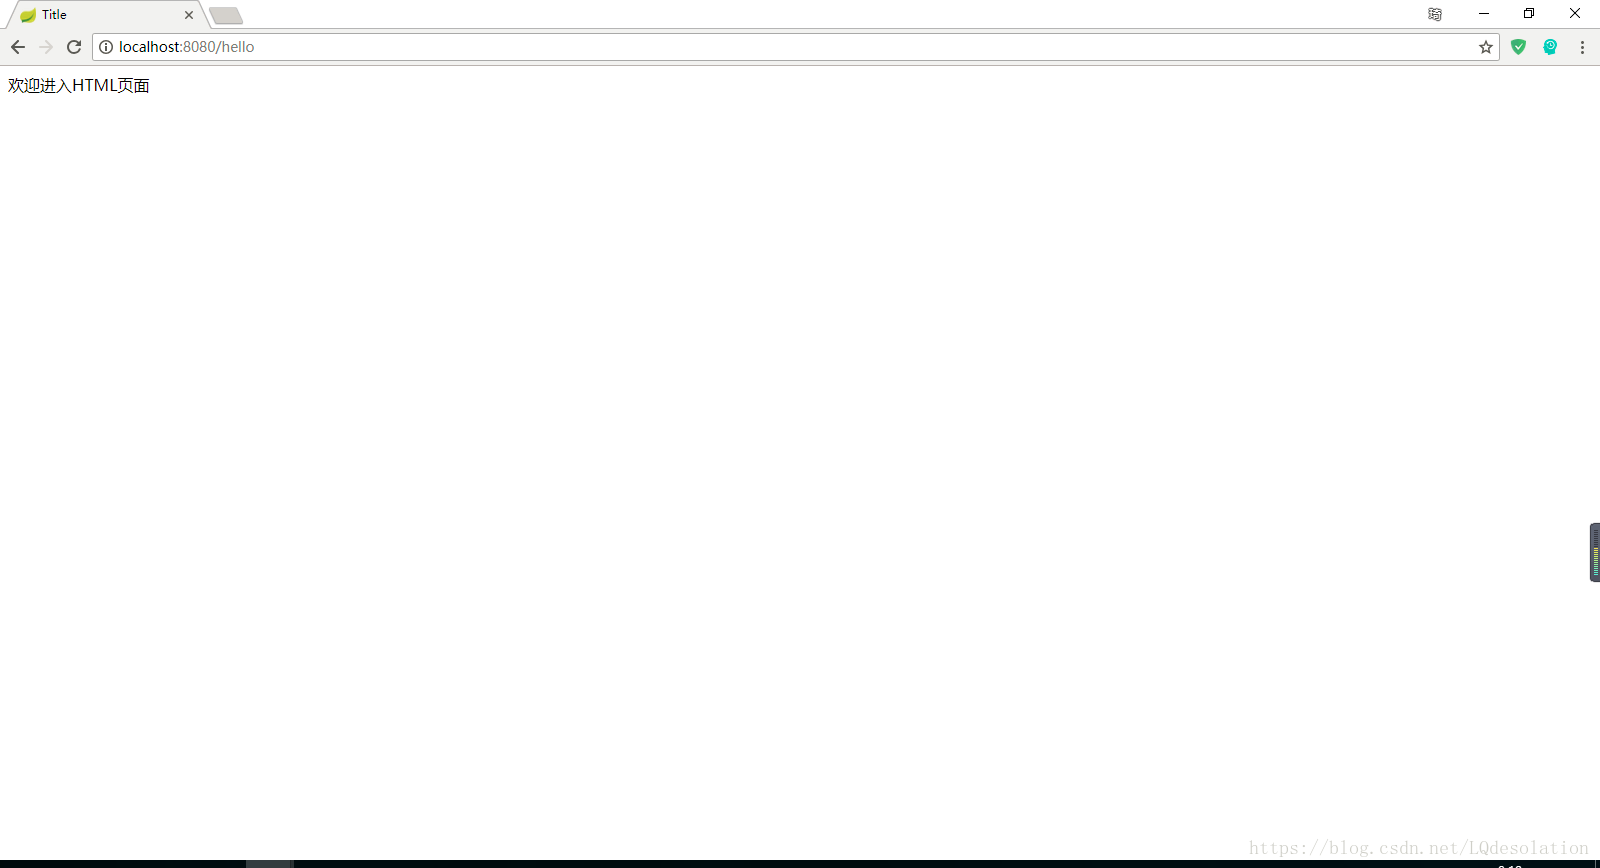
在浏览器中输入:http://localhost:8080/hello 表示页面成功接收参数
代码说明:
代码说明:
1、@SpringBootApplication:Spring Boot项目的核心注解,主要目的是开启自动配置。;
2、@Controller:标明这是一个SpringMVC的Controller控制器;
3、main方法:在main方法中启动一个应用,即:这个应用的入口;
注意:
在不配置参数的情况下:java包中一定要建package 和 html要放在templates文件夹下面 否则会报错!
案例链接:https://github.com/LQDesolation/springBootProjects/tree/master/ch01


 5234
5234

 被折叠的 条评论
为什么被折叠?
被折叠的 条评论
为什么被折叠?
 到【灌水乐园】发言


