


graphql 与 restful
restful
属性状态转移,本质就是用定义uri,通过api接口来获取资源。通用系统架构,不受语言限制
- restful一个接口只返回一个资源,graphql一次可以获取多个资源
- restful用不同的url来区分资源,graphql用类型区分资源
express+graphql
最基本的写法
const express = require('express');
const {buildSchema} = require('graphql');
const {graphqlHTTP} = require('express-graphql');
// 定义schema,查询和类型
const schema = buildSchema(`
  type Query {
    hello: String
  }
`)
// 定义查询对应的解析器
const root = {
  hello: () => {
    return "hello world";
  }
}

const app = express();

app.use('/graphql', graphqlHTTP({
  schema: schema,
  rootValue: root,
  graphiql: true
}));

app.listen(9000, () => {
  console.log("http://localhost:9000/graphql")
});
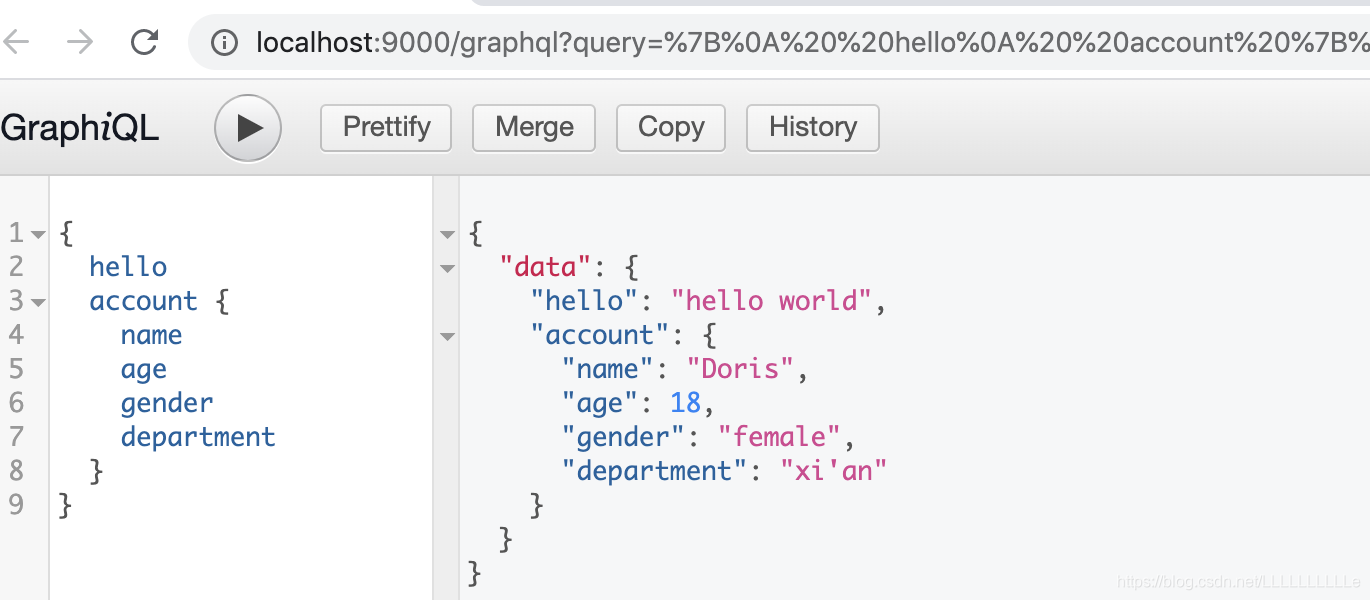
自定义类型
自定义类型就是先在Query中对要定义的类型进行说明,然后再自己在外面对这个类型进行定义
const express = require('express');
const {
  buildSchema
} = require('graphql');
const {
  graphqlHTTP
} = require('express-graphql');
// 定义schema,查询和类型
const schema = buildSchema(`
  type Account {         //
    name: String
    age: Int
    gender: String
    department: String
  }

  type Query {
    hello: String
    account: Account    //
  }
`)
// 定义查询对应的解析器
const root = {
  hello: () => {
    return "hello world";
  },
  account: () => {
    return {
      name: "Doris",
      age: 18,
      gender: "female",
      department: "xi'an"
    }
  }
}

const app = express();

app.use('/graphql', graphqlHTTP({
  schema: schema,
  rootValue: root,
  graphiql: true
}));

app.listen(9000, () => {
  console.log("http://localhost:9000/graphql")
});
通过刚才两个例子可以看出graphql的运行模式,首先分为两个部分,一部分为schema区,一部分为root区:
-
schema区- 定义查询
query的语句及类型(包括自己的自定义类型)
- 定义查询
-
root区- 定义查询对应的
resolver,也就是查询对应的解析器
- 定义查询对应的
比如说上面代码中,在 schema 中定义了一个hello的查询,在 root 中就定义这个 hello 的方法对应的实现,也就是 hello 具体要做什么业务
⚠️ root 中 return 的返回值的类型应该和 schema 中的定义类型保持一致
参数类型
基本参数类型,可以在 schema 中直接使用
- String
- Int
- Boolean
- Float
- ID
[类型]代表数组类型,如: [int] 代表 Int类型的数组
参数传递
基本参数类型的参数传递
type Query{
	getName(Id: ID!, Age: Int): [Int]
}
- 和 js 传参一样,小括号内定义形参,参数需要定义类型
!代表字段不能为空
⚠️ getName(Id: ID!, Age: Int): [Int] 这句最后的[Int]的意思是getName这个查询的返回值是 Int 类型的数组
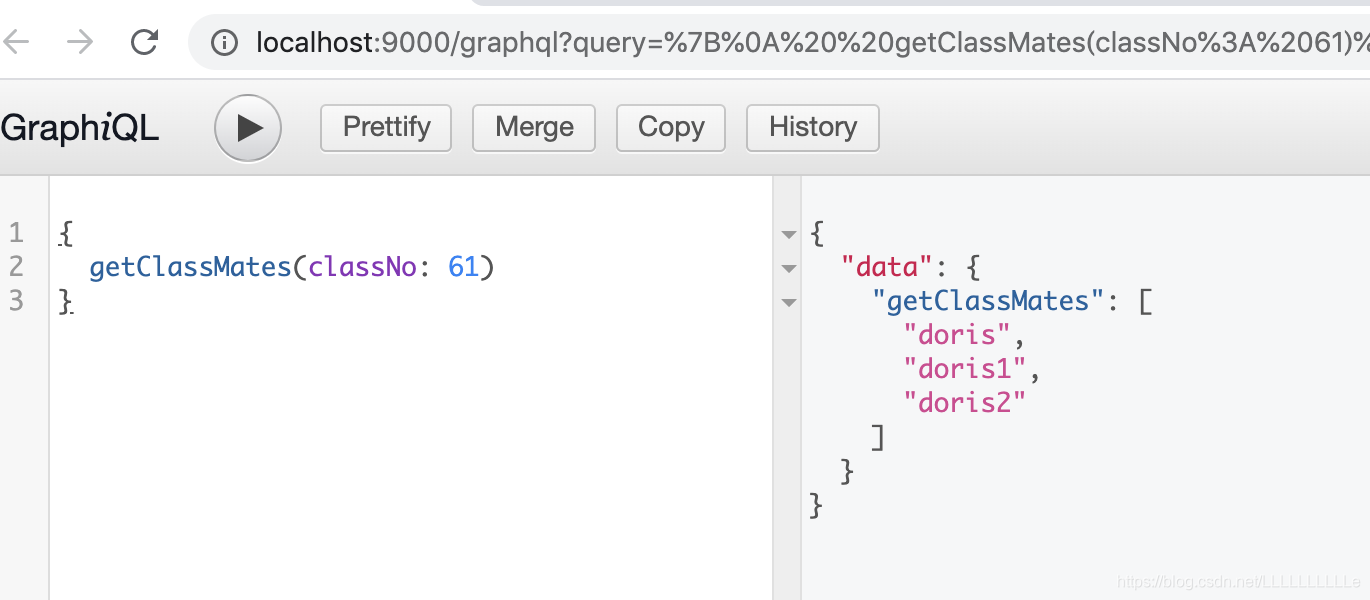
下面来看一下例子:
其中先在schema中定义一个getClassMates()的查询语句,加上形参,注意返回来的数据为string类型的数组。然后在root 中定义getClassMates()这个查询的解析器,其中 getClassMates({classNo}) 中的 {classNo} 其实是从arg中进行的结构赋值,当然也可以写成arg.classNo
const express = require('express');
const {
  buildSchema
} = require('graphql');
const {
  graphqlHTTP
} = require('express-graphql');
// 定义schema,查询和类型
const schema = buildSchema(`
  type Query{
    getClassMates(classNo: Int!): [String]
  }
`)
// 定义查询对应的解析器
const root = {
  getClassMates({ classNo }){
    const obj = {
      61 : ['doris', 'doris1', 'doris2'],
      62 : ['Doris', 'Doris1', 'Doris2']
    }
    return obj[classNo];
  }
}

const app = express();

app.use('/graphql', graphqlHTTP({
  schema: schema,
  rootValue: root,
  graphiql: true
}));

app.listen(9000, () => {
  console.log("http://localhost:9000/graphql")
});
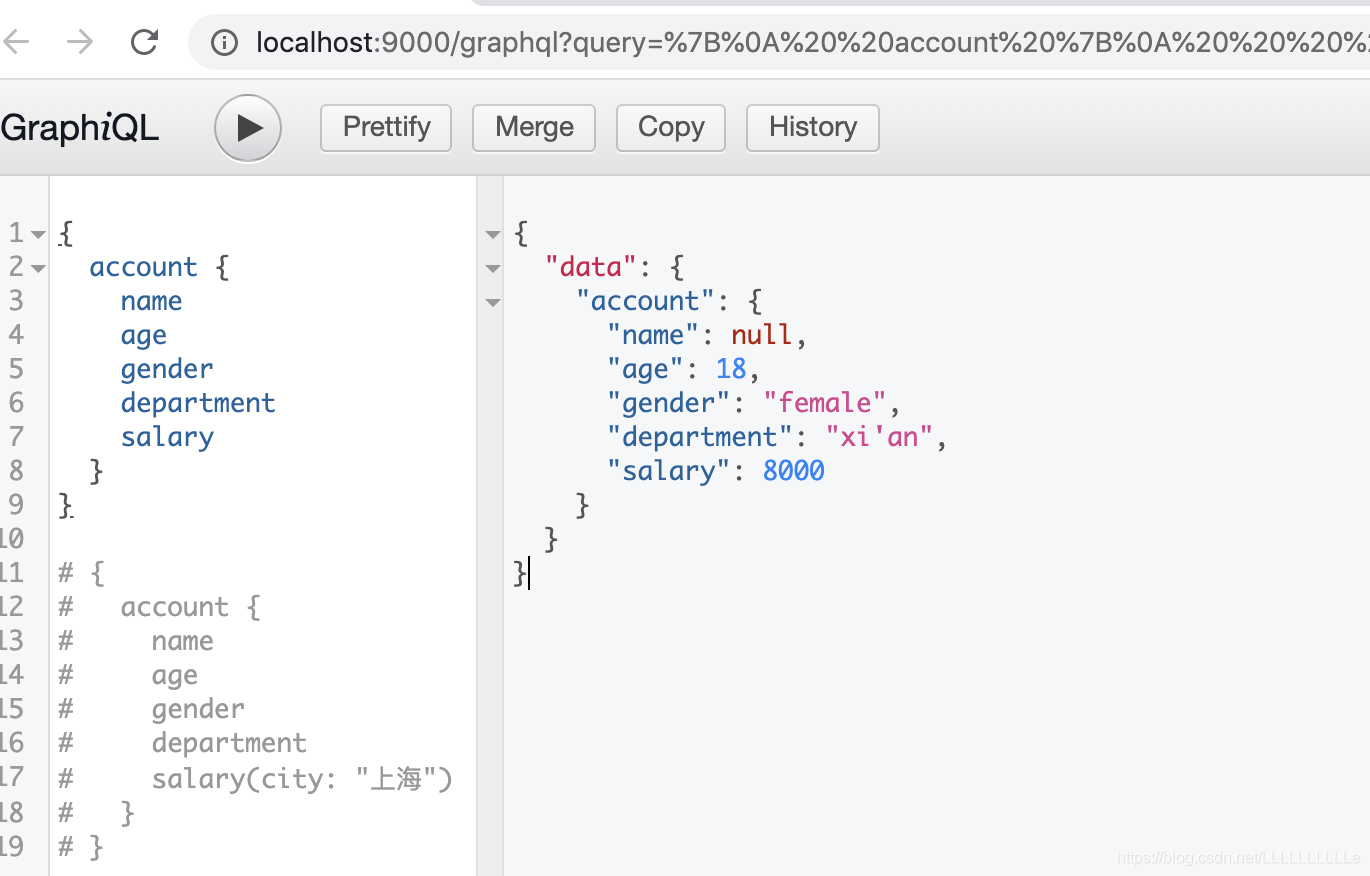
复杂参数类型的参数传递
比如说之前例子中的Account类型
下面的例子中有一个salary,在schema中这个salary是可以传一个city的参数的,这样在对应的root里面,salary就可以被当作一个function来处理,可以在里面进行条件判断等等
const express = require('express');
const {
  buildSchema
} = require('graphql');
const {
  graphqlHTTP
} = require('express-graphql');
// 定义schema,查询和类型
const schema = buildSchema(`
  type Account {
    name: String
    age: Int
    gender: String
    department: String
    salary(city: String): Int
  }
  type Query{
    getClassMates(classNo: Int!): [String]
    account(userName: String): Account
  }
`)
// 定义查询对应的解析器
const root = {
  getClassMates({ classNo }){
    const obj = {
      61 : ['doris', 'doris1', 'doris2'],
      62 : ['Doris', 'Doris1', 'Doris2']
    }
    return obj[classNo];
  },
  account({userName}){
    const name = userName;
    const age = 18;
    const gender = 'female';
    const department = "xi'an"
    const salary = ({city}) => {
      if(city === '北京' || city === '上海' || city === '广州' || city === '深圳'){
        return 10000;
      }
      return 8000;
    }
    return {
      name,
      age,
      gender,
      department,
      salary
    }
  }
}

const app = express();

app.use('/graphql', graphqlHTTP({
  schema: schema,
  rootValue: root,
  graphiql: true
}));

app.listen(9000, () => {
  console.log("http://localhost:9000/graphql")
});
GraphQL Clients
如何在客户端访问graphql接口
- 先在之前的js文件中添加一句可以在访问外部静态文件的代码
// 公开文件夹,供用户访问静态资源
app.use(express, static('public'));
- 新建
public文件夹,并在其中新建index.html文件
<!DOCTYPE html>
<html lang="en">

<head>
  <meta charset="UTF-8">
  <meta name="viewport" content="width=device-width, initial-scale=1.0">
  <meta http-equiv="X-UA-Compatible" content="ie=edge">
  <title>Document</title>
</head>

<body>
  <button onclick="getData()">获取数据</button>
</body>
<script>
  function getData() {
    // 这里的query是一个字符串类型,
    // 这个字符串规定了这个接口的名字,参数,参数类型等
    // 实际上它是来自服务器端的定义
    // 这里从Account的参数中拿到$userName后将它给到account的userName
    const query = `
      query Account($userName: String){
        account(userName: $userName)
      }
    `
    // 定义variables进行传值
    const variables = {userName: "doris"};

    // 通过fetch向外发数据
    fetch('/graphql', {
      method: "POST",
      headers: {
        'Content-Type': 'application/json',
        'Accept': 'application/json'
      },
      body: JSON.stringify({
        query: query,
        variables: variables
      })
    }).then(res => res.json).then(json => {
      console.log(data);
    })
  }
</script>
</html>
然后运行 js 文件,运行完毕之后在localhost:9000/index.html进行对应的操作
但是这时候在这个index页面中点击获取数据按钮的时候会报错👇
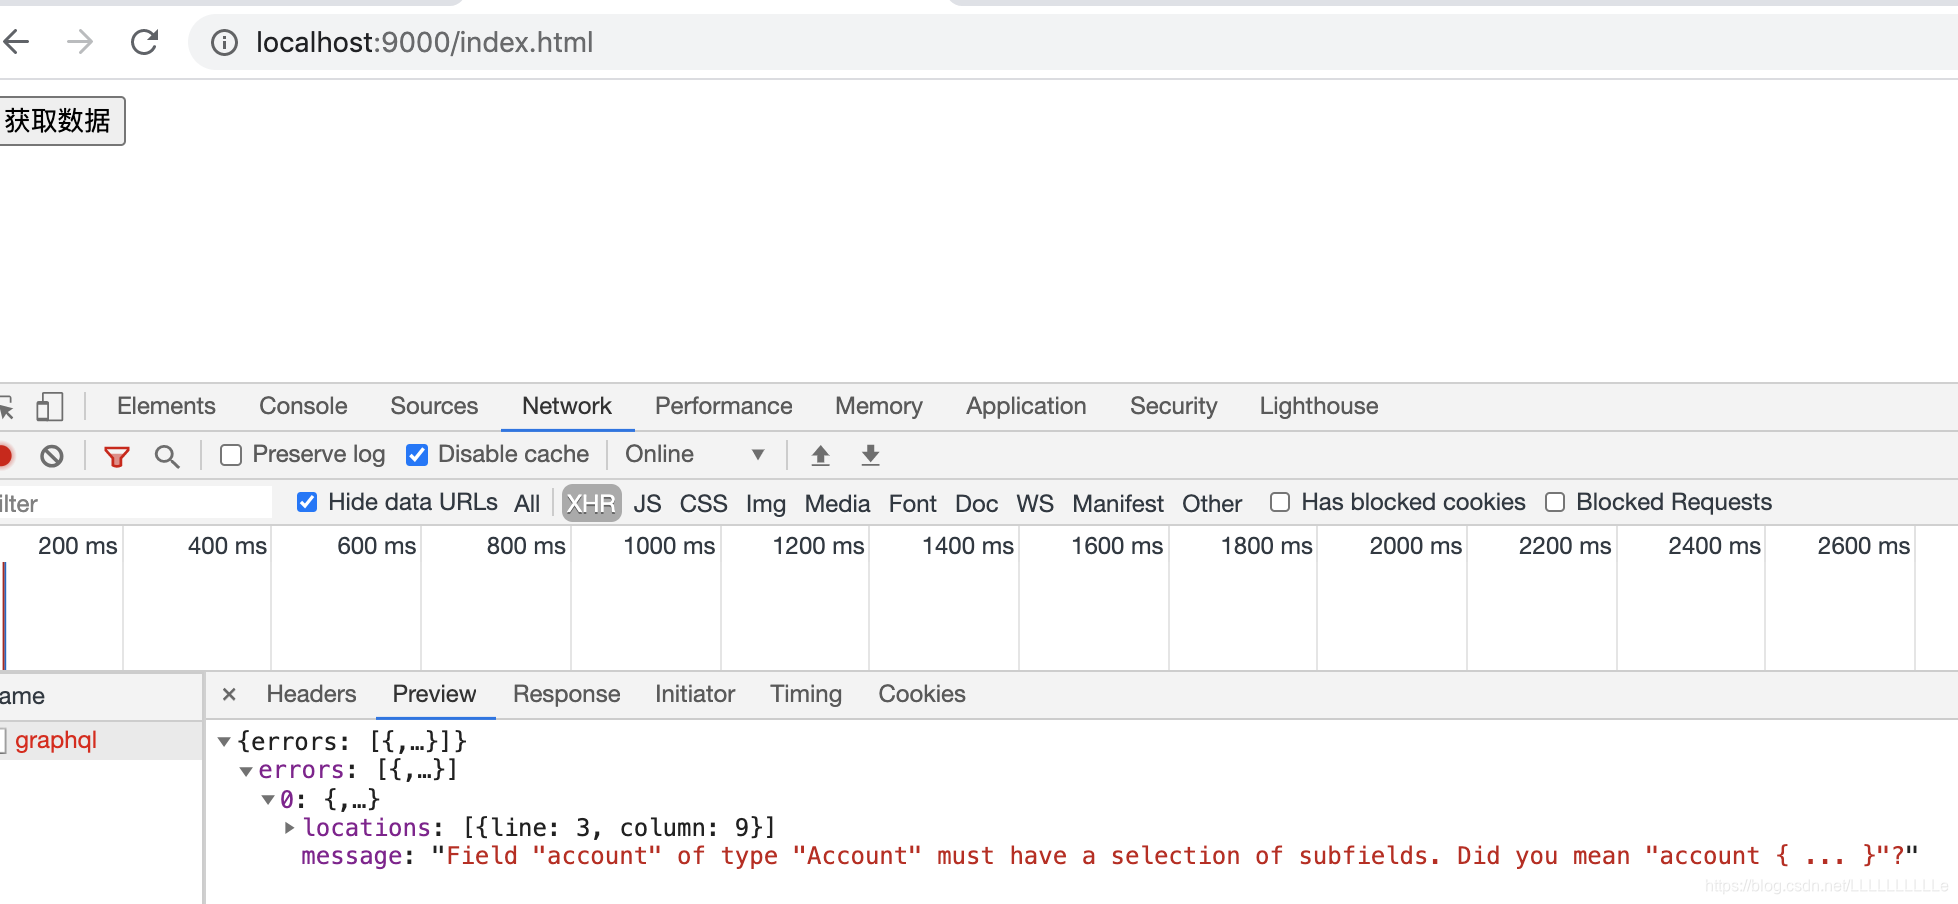
是因为我们在查询的时候并没有告诉它我们需要什么样的字段,所以我们应该在
const query = `
      query Account($userName: String){
        account(userName: $userName)
      }
    `
这个代码中加入需要的字段
const query = `
      query Account($userName: String){
        account(userName: $userName){
			name
			age
			gender
			department
      		salary(city: "上海")
		}
      }
    `
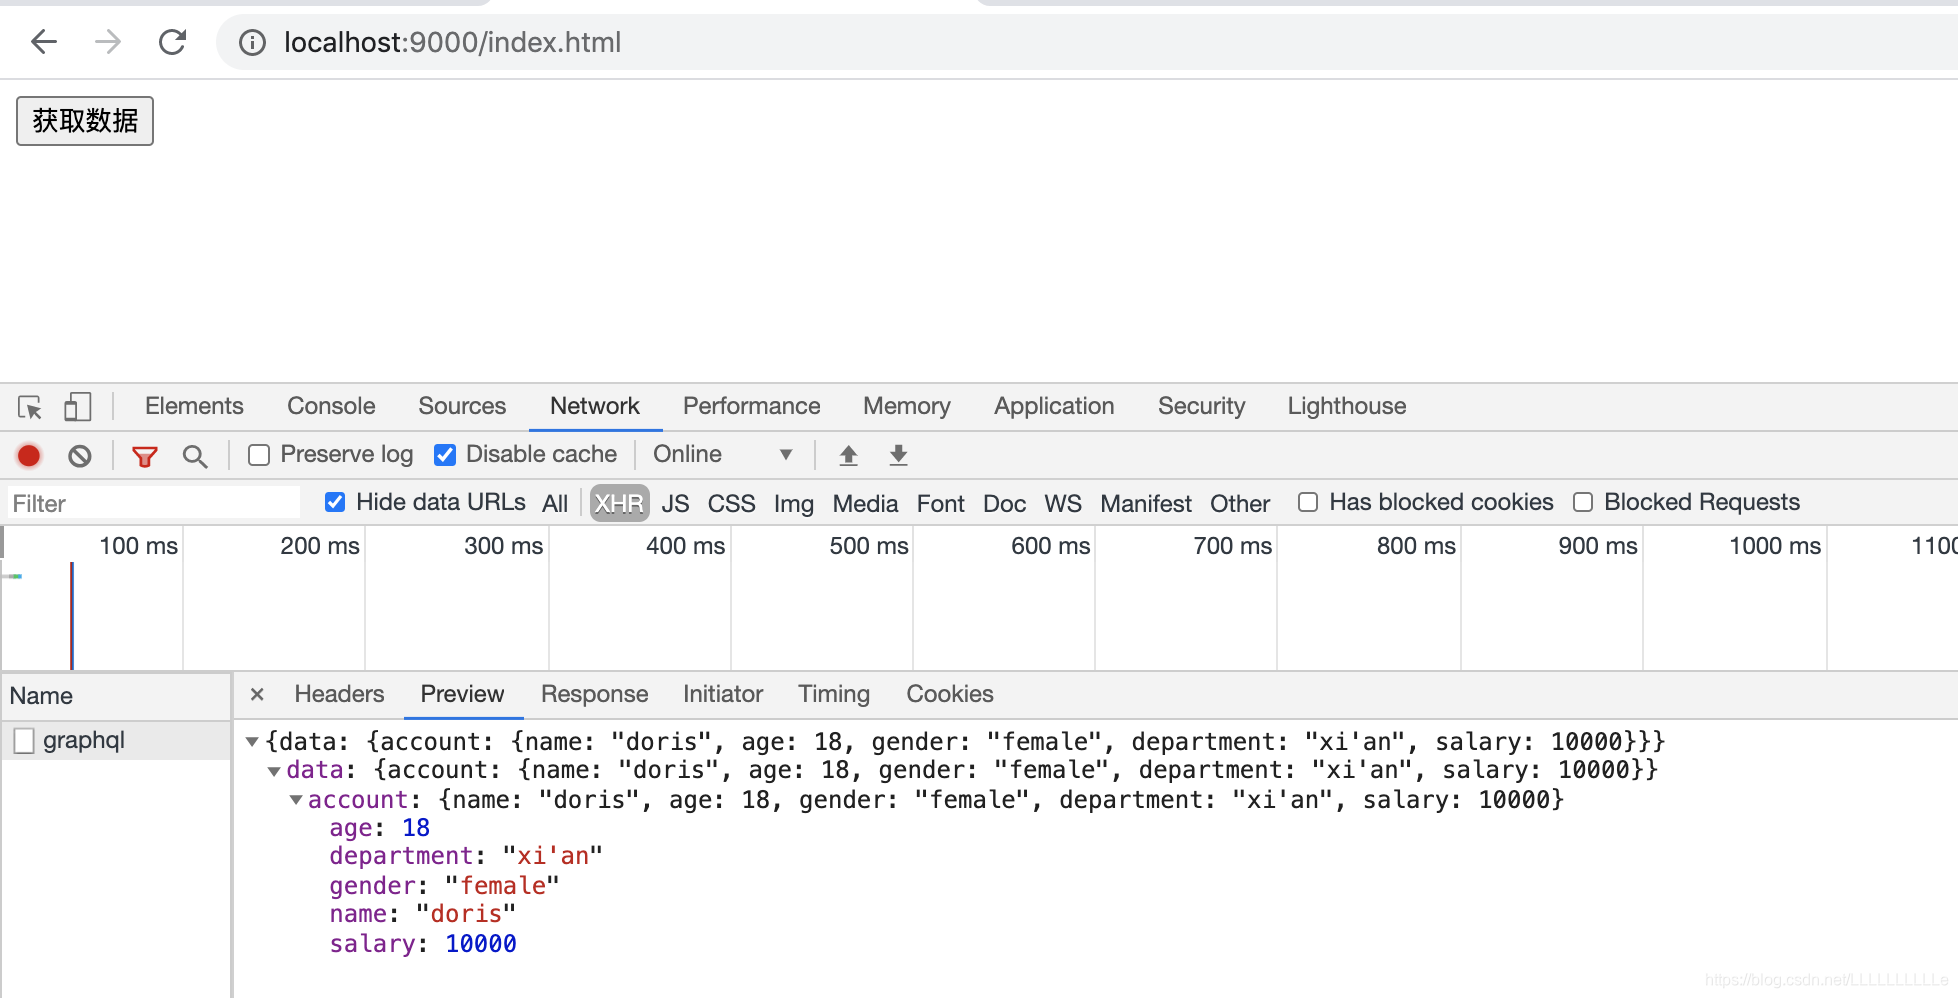
这个时候就可以看到结果了
当然,salary中的city值也可以通过参数传递进来
const query = `
  query Account($userName: String, $city: String){
    account(userName: $userName){
      name
      age
      gender
      department
      salary(city: $city)
    }
  }
`
// 定义variables进行传值
const variables = {userName: "doris", city: "西安"};


 2993
2993

 被折叠的 条评论
为什么被折叠?
被折叠的 条评论
为什么被折叠?
 到【灌水乐园】发言


