Zoom An Image With Different Interpolation Types

本文探讨了OpenGL中纹理缩放的不同插值方法,包括最近邻插值、双线性插值及双三次插值,并提供了GLSL着色器实现细节。

摘要生成于 C知道 ,由 DeepSeek-R1 满血版支持, 前往体验 >

http://www.codeproject.com/Articles/236394/Bi-Cubic-and-Bi-Linear-Interpolation-with-GLSL

Table Of Contents

Introduction

In OpenGL, we can display a texture to small or large area. Displaying a texture in the same size requires copying all texels (texture units) to output pixels. If we want to create a large image from a small texture, OpenGL has to create many intermediate pixels. This process of creating intermediate pixels is called as Interpolation.

OpenGL provides two interpolation methods to create a large texture image. GL_NEAREST and GL_LINEAR. We can provide GL_NEAREST or GL_LINEAR as GL_TEXTURE_MAG_FILTER parameter for glTexParameterf() function.GL_NEAREST is a low quality interpolation and GL_LINEAR provides Bi-Linear interpolation. In addition to OpenGL interpolation types, here different versions of Bi-Cubic interpolation are implemented in pixel shaders. Bi-Cubic interpolation can provide good quality image on creating large image from small textures.
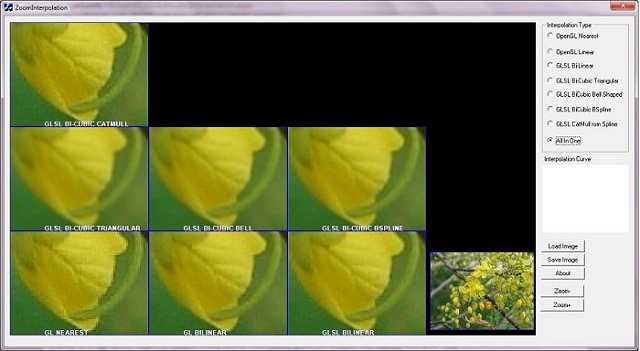
ScreenShot.jpg

Screenshot of ZoomInterpolation Application. Small area of flower is zoomed with different interpolations. Different versions of interpolation have quality difference. GL_NEAREST type of interpolation creates a blocky image, and CatMull-Rom or Bi-Cubic Spline creates a high quality zoomed image. Details of different interpolations are explained in the below sections.

Background

Interpolation is a "Process used to estimate an unknown value between two known values by utilizing a common mathematical relation".

ZoomInterpolation creates zoomed image with different interpolation types. OpenGL provides a Bi-Linear interpolation at its maximum. When zooming a very small texture area to large area, Bi-Linear provides a less quality.

Bi-Linear interpolation creates an intermediate pixel with the help of nearest 4 pixels. Bi-Cubic interpolation, a high quality version, creates an intermediate pixel with the help of nearest 16 pixels.

OpenGL GL_NEAREST Interpolation

GL_NEAREST just copies data available in the nearest pixel and it creates a blocky effect when a very small region is zoomed to a large screen region. In the nearest interpolation, intermediate pixels are created with the nearest valid pixel. This kind of interpolated images are blocky since same data is copied to intermediate pixels.

Below image is created through OpenGL GL_NEAREST interpolation and its quality is very bad. Edge of the flower seems to be a "stair case". We can remove this stair case through better interpolation methods.
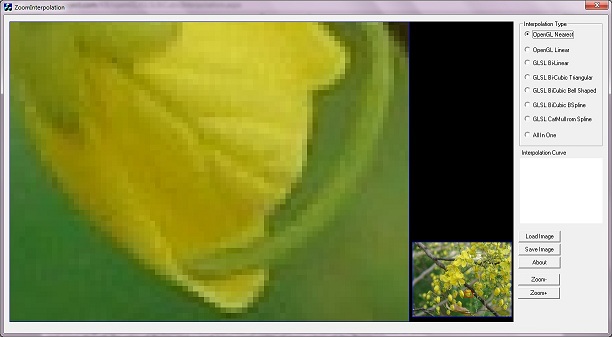
2_GLNearest.jpg

Interpolation with GL_NEAREST interpolation type.

We can use following code to achieve nearest interpolation in OpenGL fixed function pipeline.

glTexParameteri( GL_TEXTURE_2D,GL_TEXTURE_MAG_FILTER, GL_NEAREST); 
glTexParameteri( GL_TEXTURE_2D,GL_TEXTURE_MIN_FILTER, GL_NEAREST);   

OpenGL GL_LINEAR Interpolation

OpenGL provides a good interpolation method, GL_LINEAR. It interpolates nearest 4 pixels[2 pixel in X direction and 2 Pixel in Y direction] and create a smooth image comparing to the GL_NEAREST method. GL_LINEAR method interpolates both in X and Y direction. Therefore it is called Bi-Linear interpolation. Details of Bi-Linear interpolation is explained in GLSL Bi-Linear section.

The following image is created with GL_LINEAR interpolation and its edges are smooth when comparing to the image created through GL_NEAREST interpolation. Here "stair case" effect is not visible. But we can see a shade of yellow and green through the edge of flower, and a small "stair case" is visible at some edges of the flower.

2_GLLinear.jpg

Interpolation with GL_LINEAR interpolation type.

The following code can be used to achieve Bi-Linear interpolation in OpenGL fixed function pipeline.

glTexParameteri( GL_TEXTURE_2D,GL_TEXTURE_MAG_FILTER, GL_LINEAR ); 
glTexParameteri( GL_TEXTURE_2D,GL_TEXTURE_MIN_FILTER, GL_LINEAR );    

GLSL Bi-Linear

OpenGL provides only two interpolations methods to create zoomed display of an image(texture). When zooming a very small region of a texture, we can see some blocky edges in the output image.

The first step to create a better interpolation method is to create Bi-Linear interpolation (which is the same as that ofGL_LINEAR interpolation. But we prepare a pixel shader with Bi-Linear interpolation). We can improve the quality of Bi-Linear and get a better quality image.

A pixel shader is a program which will execute for each pixels of a rendering. More details of Pixel Shaders are availablehere or here.

Bi-Linear Shader Implementation

In Bi-Linear interpolation, the nearest four pixels are considered to create an intermediate pixel.
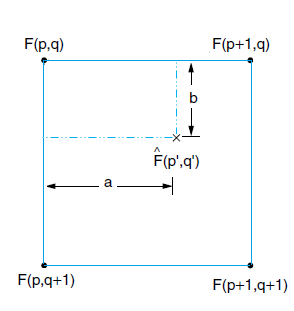
BiLinearLogic.png

From the above figure, an intermediate pixel F(p’,q’) is created by interpolating nearest four texels F(p,q), F(p,q+1), F(p+1,q), F(p+1,q+1).

Texel is the term used to indicate an element in a texture (similar to a pixel in screen) [A texel, or texture element (also texture pixel) is the fundamental unit of texture space].

Initially two texels in top row and bottom row are interpolated with linear interpolation[horizontal]. Then interpolated pixels of top row and bottom row are also linearly interpolated[vertical]. Explanation with code will help to understand the above description.

An interpolation factor a, is used in X direction to interpolate F(p,q) and F(p,q+1) as follows:

F(p’’) = (1.0 – a ) * F(p,q) + a * F(p+1, q) // Linear interpolation in X direction[Top].
F(p+1’’) = (1.0 – a ) * F(p,q+1) + a * F(p+1, q+1) 	// Linear interpolation in 
						// X direction[Bottom].     

An interpolation factor b, is used in Y direction to interpolate F(p’’) and F(p+1’’) as follows:

 F(p’,q’) = (1.0 - b) * F(p’’) +  b *  F(p+1’’) // Linear interpolation in Y direction.  

Corresponding GLSL shader code.

// Function to get interpolated texel data from a texture with GL_NEAREST property.
// Bi-Linear interpolation is implemented in this function with the 
// help of nearest four data.
vec4 tex2DBiLinear( sampler2D textureSampler_i, vec2 texCoord_i )
{
    vec4 p0q0 = texture2D(textureSampler_i, texCoord_i);
    vec4 p1q0 = texture2D(textureSampler_i, texCoord_i + vec2(texelSizeX, 0));

    vec4 p0q1 = texture2D(textureSampler_i, texCoord_i + vec2(0, texelSizeY));
    vec4 p1q1 = texture2D(textureSampler_i, texCoord_i + vec2(texelSizeX , texelSizeY));

    float a = fract( texCoord_i.x * fWidth ); // Get Interpolation factor for X direction.
					// Fraction near to valid data.

    vec4 pInterp_q0 = mix( p0q0, p1q0, a ); // Interpolates top row in X direction.
    vec4 pInterp_q1 = mix( p0q1, p1q1, a ); // Interpolates bottom row in X direction.

    float b = fract( texCoord_i.y * fHeight );// Get Interpolation factor for Y direction.
    return mix( pInterp_q0, pInterp_q1, b ); // Interpolate in Y direction.
}

GLSL Bi-Cubic

In the previous method, the nearest four pixels are used to create an intermediate pixel. In this method, the nearest 16 pixels are used to create an intermediate pixel F(p’q’). Therefore the output image quality will increase. In the below figure, an intermediate pixel F(p'q')[Near to F(p,q)] is created by interpolating nearest 4*4 pixels from F(p-1, q-1) to F(p+2,q+2). Details of this interpolation is explained with the help of code and necessary equations.
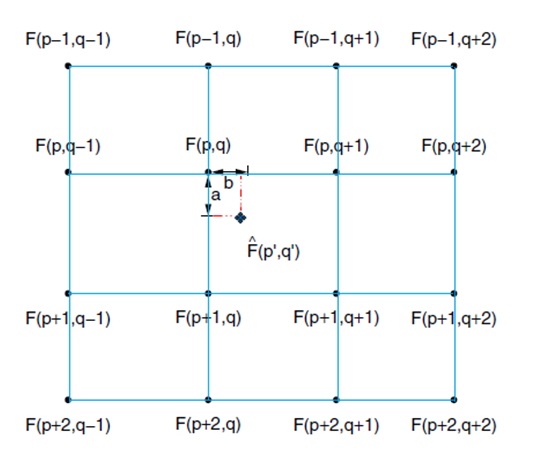
BiCubicLogic.jpg

The following equation [from Digital Image Processing: PIKS Inside, Third Edition] is used to interpolate nearest 16 pixles. First two sigma(S) are appeared as 2 for loops in the shader code.

BiCubicEquation.png

Where F(p+m,q+n) indicates texel data at location (p+m, q+n). Rc() denotes a Bi-Cubic interpolation function such as a BSpline, Traingular, Bell cubic interpolation function. In this sample, I just use a TriangularBell, and B-Spline, andCatMull-Rom interpolation function.

Following is a GLSL shader code for Bi-Cubic Interpolation:

vec4 BiCubic( sampler2D textureSampler, vec2 TexCoord )
{
    float texelSizeX = 1.0 / fWidth; //size of one texel 
    float texelSizeY = 1.0 / fHeight; //size of one texel 
    vec4 nSum = vec4( 0.0, 0.0, 0.0, 0.0 );
    vec4 nDenom = vec4( 0.0, 0.0, 0.0, 0.0 );
    float a = fract( TexCoord.x * fWidth ); // get the decimal part
    float b = fract( TexCoord.y * fHeight ); // get the decimal part
    for( int m = -1; m <=2; m++ )
    {
        for( int n =-1; n<= 2; n++)
        {
			vec4 vecData = texture2D(textureSampler, 
                               TexCoord + vec2(texelSizeX * float( m ), 
					texelSizeY * float( n )));
			float f  = Triangular( float( m ) - a );
			vec4 vecCooef1 = vec4( f,f,f,f );
			float f1 = Triangular ( -( float( n ) - b ) );
			vec4 vecCoeef2 = vec4( f1, f1, f1, f1 );
            nSum = nSum + ( vecData * vecCoeef2 * vecCooef1  );
            nDenom = nDenom + (( vecCoeef2 * vecCooef1 ));
        }
    }
    return nSum / nDenom;
}

BiCubic() function gets a texture coordinate (x,y) and returns the interpolated value of nearest 16 texels.

Nearest 16 texels are iterated through 2 for loops from [x-1,y-1] to [x+2, y+2].

    for( int m = -1; m <=2; m++ )
    {
        for( int n =-1; n<= 2; n++)  

For each nearest element, an interpolation factor is calculated with the corresponding Bi-Cubic interpolation function. In the above BiCubic() function Triangular() is used to get an interpolation factor. Different versions of Bi-Cubic interpolation[BSpline, Traingular, Bell, CatMullRom] can be created by changing Triangular() and its logic. When plotting values from Triangular(), we will get the below image in a triangle form:
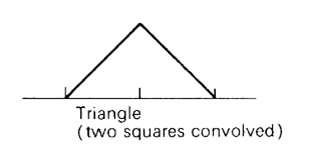
TriangularCurve.png

From plotting of triangular function, left most value of X axis is -2 and right most value of X axis is +2Triangular(x) is plotted in Y direction. It indicates Triangular function returns lower value for a high input and high value for a low input.

For each iteration in BiCubic(), return value of Triangular() is multiplied with current data. In effect, an intermediate pixel is created by interpolating nearest 16 data. The weightage will be high for nearest pixels, and low for far pixels. The output image of Triangular Bi-Cubic is smoother than Bi-Linear.

Implementation of Bi-Cubic Interpolation[ Triangular ]

Triangular function is a simple Bi-Cubic function, as defined in the following equation:
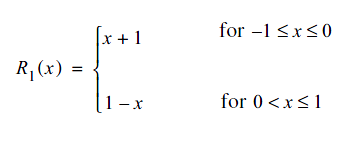
TriangularEquation.png

Here, the return value of R(x) is x+1 when x is between -1 and 0, and return value is x+1 when x is between 0 and 1. The following pseudo code gives more idea of triangular function. This function provides a low value for high input and a high value for a low input.

if( -1 < x && x <= 0 )
{ 
    return x + 1
}
else if( 0 < x && x <= 1 )
{
    return x - 1
}   

TriangularCurve.png

The above diagram is the output of Triangular() function. Triangular(x) is plotted in Y direction.

The following code is used in GLSL shader for Triangular Bi-Cubic implementation.

 float Triangular( float f )
{
	f = f / 2.0;
	if( f < 0.0 )
	{
		return ( f + 1.0 );
	}
	else
	{
		return ( 1.0 - f );
	}
	return 0.0;
}
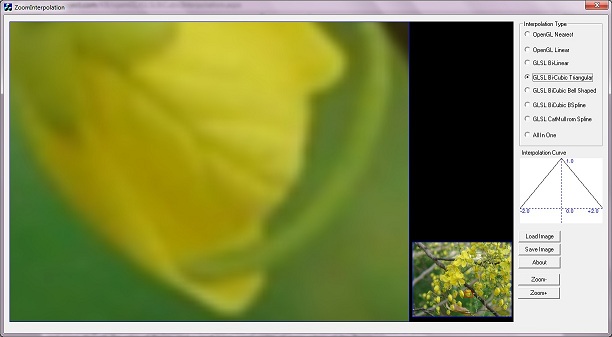
2_GL_Triangle.jpg

Interpolation with GLSL Bi-Cubic Triangular interpolation type.

Implementation of Bi-Cubic Interpolation[ Bell ]

When comparing Bi-Cubic Triangular image with Bi-Linear image, the quality of image is increased. But Triangular creates a blurred effect and all edges are smoothen. The reason of this blurred edge is weight returned fromTriangular() for near and far texel. If weight of near texel is high and far texel is very low, then Bi-Cubic interpolation can achieve smooth edges. Another Bi-Cubic interpolation function which creates a bell shaped (nearest values[Center] are high) and far values are very low[left and right ends].
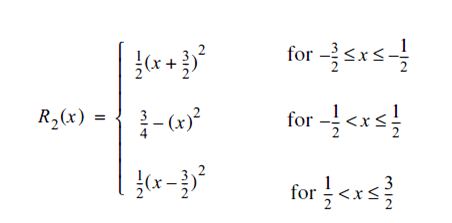
BellEquation.png

The above equation has three conditions to create the following curve. The corresponding code is implemented inBellFunc(). If we plot the input values from -2 to +2 of BellFunc() in a graph, we will get the following curve. Where X direction contains x provided to BellFunc and Y direction is corresponding return value[BellFunc(x)].
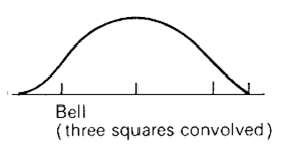
BellCurve.png

The above diagram indicates when x is high, BellFunc(x) is very low, therefore far data of an intermediate texel gets very low weight. For nearest texel BellFunc(x) is high and gets a high weight.

The following code is used in GLSL shader for Bell shaped Bi-Cubic implementation.

float BellFunc( float x )
{
	float f = ( x / 2.0 ) * 1.5; // Converting -2 to +2 to -1.5 to +1.5
	if( f > -1.5 && f < -0.5 )
	{
		return( 0.5 * pow(f + 1.5, 2.0));
	}
	else if( f > -0.5 && f < 0.5 )
	{
		return 3.0 / 4.0 - ( f * f );
	}
	else if( ( f > 0.5 && f < 1.5 ) )
	{
		return( 0.5 * pow(f - 1.5, 2.0));
	}
	return 0.0;
}
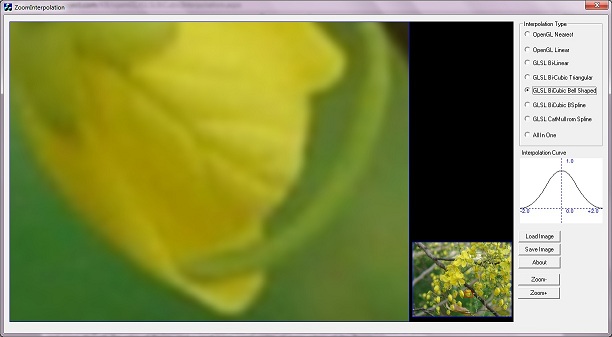
2_BiCubic_Bell.jpg

Interpolation with Bi-Cubic Bell interpolation type.

Implementation of Bi-Cubic Interpolation[ B-Spline ]

When comparing Bi-Cubic Bell shaped with B spline, interpolated image is smooth and edges are more clear. The below equation is used to create BSpline() function.
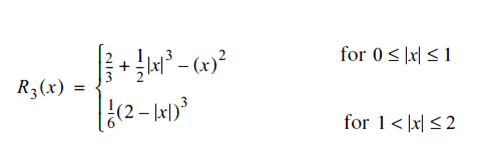
BSplineEquation.png

The code of this equation is implemented in BSpline() function.
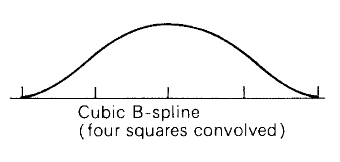
BSplineCurve.png

The above diagram is the output of BSpline() function. BSpline(x) is plotted in Y direction. x starts from -2.0 and ends at +2.0. It indicates when x is high, BSpline(x) is very low and therefore far data of an intermediate texel gets very lower weight. When comparing to Bell shaped wave, values in far range (near -2 and +2) are very low. Therefore, the final output image is also smoother than Bell Bi-Cubic interpolated image. The following code is used in GLSL shader for BSpline implementation.

float BSpline( float x )
{
	float f = x;
	if( f < 0.0 )
	{
		f = -f;
	}

	if( f >= 0.0 && f <= 1.0 )
	{
		return ( 2.0 / 3.0 ) + ( 0.5 ) * ( f* f * f ) - (f*f);
	}
	else if( f > 1.0 && f <= 2.0 )
	{
		return 1.0 / 6.0 * pow( ( 2.0 - f  ), 3.0 );
	}
	return 1.0;
}  
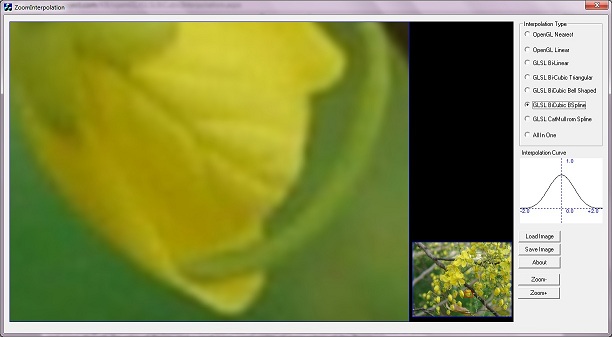
BiCubic_BSpline.jpg

Interpolation with Bi-Cubic BSpline interpolation type.

Implementation of Bi-Cubic Interpolation[CatMull-Rom]

All above Bi-Cubic methods creates a blurred(or smooth) effect. After applying the above interpolation methods, the edges of image become smooth. This method(CatMull-Rom method) preserves edges of image. The following equation is used to create CatMullRom() function, which is used in GLSL shader for CatMullRom interpolation.

CatMullRom.jpg

This equation is available in Reconstruction Filters in Computer Graphics [Equation 8]. If we replace B with 0.0 and C with 0.5, this equation provides CatMul-Rom interpolation values. The following code is used in GLSL shader for CatMul-Rom implementation.

float CatMullRom( float x )
{
    const float B = 0.0;
    const float C = 0.5;
    float f = x;
    if( f < 0.0 )
    {
        f = -f;
    }
    if( f < 1.0 )
    {
        return ( ( 12 - 9 * B - 6 * C ) * ( f * f * f ) +
            ( -18 + 12 * B + 6 *C ) * ( f * f ) +
            ( 6 - 2 * B ) ) / 6.0;
    }
    else if( f >= 1.0 && f < 2.0 )
    {
        return ( ( -B - 6 * C ) * ( f * f * f )
            + ( 6 * B + 30 * C ) * ( f *f ) +
            ( - ( 12 * B ) - 48 * C  ) * f +
            8 * B + 24 * C)/ 6.0;
    }
    else
    {
        return 0.0;
    }
} 
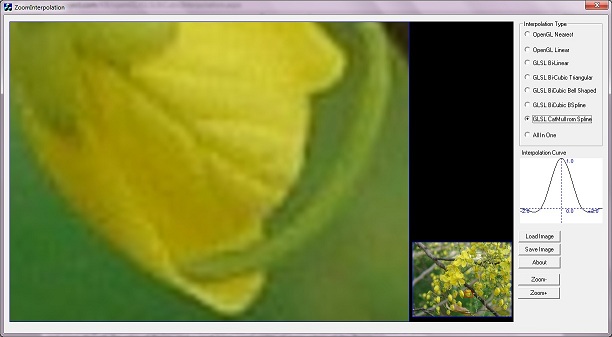
CalMullRom.jpg

The interpolation curve of CatMull Rom is little different with other Bi-Cubic interpolation curves. Here very near data gets high weight to multiply, but far data gets negative value. Therefore, the effect of far data will be removed in the intermediate pixel.

About ZoomInterpolation Application

ZoomInterpolation is an application created to demonstrate different interpolation methods. On startup, it creates a texture with a bitmap [Flower.bmp] available in the resource of this application.

BMPLoader BMPLoadObj; // To load an RGB of a bmp file 
BYTE* pbyData = 0;
BMPLoadObj.LoadBMP( IDB_BITMAP_FLOWER, m_nImageWidth, m_nImageHeight, pbyData );
m_glTexture.Create( m_nImageWidth, m_nImageHeight, pbyData );// Texture creating with bmp  

This application displays two images, zoomed image is in left, and actual image is at right bottom area. Two viewports are used for displaying actual image and zoomed image. A red rectangle indicates zoomed image. Small area of image is selected for texture mapping and displayed to screen.

The following code is used to draw the actual image with a RED rectangle indicating zoomed image area.

/*
 This function draws miniature of actual image with a Red region
 indicating the zoomed area.
 */
void CZoomInterpolationDlg::DrawActualImage()
{
    // Set Rendering area of Actual image.
    glViewport( 805, 10, 200, 150 );

    // Image is attached.
    m_glTexture.Enable();

    // Entire image is mapped to screen.
    m_glVertexBuffer.DrawVertexBuffer( GL_QUADS );
    m_glTexture.Disable();

    // Set Red color for Zoom area indication.
    glColor3f( 1.0, 0.0, 0.0 );

    float fXStart = m_fXOffset * 2;
    float fYStart = m_fYOffset * 2;
    float fWidth = m_fZoomWidth * 2;
    float fHeight = m_fZoomHeight * 2;

    // Draw a rectangle indicate zoom area.
    glBegin( GL_LINE_LOOP );
    glVertex2d( -1.0 + fXStart         ,  -1.0 + fYStart );
    glVertex2d( -1.0 + fXStart + fWidth,  -1.0 + fYStart );
    glVertex2d( -1.0 + fXStart + fWidth,  -1.0 + fYStart + fHeight );
    glVertex2d( -1.0 + fXStart         ,  -1.0 + fYStart + fHeight );
    glVertex2d( -1.0 + fXStart         ,  -1.0 + fYStart );
    glColor3f( 1.0, 1.0, 1.0 );
    glEnd();
}

The following code is used to create the zoomed image with current interpolation.

/*
 Creating zoomed image.
 */
void CZoomInterpolationDlg::DrawZoomedImage()
{
    // Displays all views. Draw()_ method of GLImageView prepares the 
    // Zoomed image of a view. m_ImageView list holds single object in normal case.
    // When All In View is selected in Interpolation type, m_ImageView will hold 7 View
    // objects.
    for( int nViewIndex = 0; nViewIndex < m_ImageView.size(); nViewIndex++ )
    {
        (m_ImageView[nViewIndex])->Draw();
    }
} 

In ZoomInterpolation a rendering area is prepared, then set two viewports to display two types images. First one displays zoomed image, and second display is a miniature of actual image. glViewport() calls at the first step ofCZoomInterpolationDlg::DrawActualImage() and CZoomInterpolationDlg::DrawZoomedImage) prepares different image display area, zoomed image and miniature of actual image.

Pan operation

When mouse clicks on zoomed image and pans, the texture mapping region changes with respect to mouse move and it creates a pan effect.

Zoom and UnZoom

When Mouse scrolls, the zoom/unzoom is implemented by increasing or decreasing the texture mapping area.CZoomInterpolationDlg::HandleZoom() handles zoom and unzoom. Two buttons “Zoom+” and “Zoom-“ are also added to increase zoom or decrease zoom.

Loading new Image

A button “Load Image” is available to load an image file from your machine. The image area is created in an aspect ratio of 4:3[800X600 pixels]. Therefore input image is expected in an aspect ratio of 4:3 for better quality. Otherwise stretched/skewed image will be displayed. BMPLoader class is used to retrieve RGB data from bitmap with the help of Gdi+ library. This class supports different image extensions such as .bmp.jpg.png.tga, etc.

Save Zoomed Image

_rps added a comment in this article, to save the zoomed image into a bmp or jpeg file. "Save Image" button is added in ZoomInterpolation application to save zoomed area to a bitmap file. Save operation is also supported in "All in one View". Pixel information is read from the rendering window, and saved to a BMP file using BMPLoader class.glReadPixels() API is used to read pixel information from rendering window.

The following code is used to retrieve pixel information from rendering area, and to save as a bmp file.

void CZoomInterpolationDlg::OnBnClickedButtonSave()
{
    CString csFileName;
    csFileName.Format( L"ZoomInterpolation.bmp" );
    CFileDialog SaveDlg( false, L"*.bmp", csFileName );
    if( IDOK == SaveDlg.DoModal())
    {
        RECT stImageArea;
        stImageArea.left =0;
        stImageArea.top = 0;
        stImageArea.right = 800;
        stImageArea.bottom = 600;
        CString csFileName = SaveDlg.GetPathName();
        BYTE* pbyData = new BYTE[stImageArea.bottom * stImageArea.right  * 3];
        if( 0 == pbyData )
        {
            AfxMessageBox( L"Memory Allocation failed" );
            return;
        }
        glReadPixels( 0, 0, stImageArea.right, stImageArea.bottom, 
			GL_BGR_EXT, GL_UNSIGNED_BYTE, pbyData );
        BMPLoader SaveBmp;
        SaveBmp.SaveBMP( csFileName, stImageArea.right, stImageArea.bottom, pbyData );
        delete[] pbyData;
    }
} 
Plotting of Interpolation Curve

A simple class is created to plot the curve indicating weights applied in Bi-Cubic interpolation function. Triangular, Bell, and BSpline are plotted with the same code of GLSL shader code. This plotting shows minimum and maximum values in X, and Y direction. This graphical representation helps to identify the weight applied to nearest pixels and far pixels. In X direction, the distance is shown. In Y direction, the weight for a distance is shown. In all Bi-Cubic functions, higher weight is applied to very nearest pixel(When distance is 0). The weight decreases on increasing the distance.

Main Classes Used in ZoomInterpolation Application
  • BMPLoader: This class is used for getting RGB information of an image file. This class supports bmp, jpg, png, and tga format files. GDI+ classes are used to load different image file formats.
  • GLExtension: This class holds all opengl extensions required for pixel shader.
  • GLSetup: This class is used for creating a rendering context and other opengl initialisations.
  • GLVertexBuffer: This class holds vertex data required for rendering a Quad image with texture mapping.
  • PlotInterpCurve: This class draws current interpolation curve with the help of GDI.
  • ZoomInterpolationDlg: This class handles the main operations of ZoomInterpolation Application. 
    All mouse move and button handling are implemented in this class. All other classes in this application are used in this class.
  • GLImageView: This class introduced to create different interpolated image in a single frame.
  • GLText: This class is used to display text display in "All In One" view. This class uses FontEngine class.

All In One View

dan.g. added a comment in this article, to prepare a combined image view of different type of interpolations. This type of view helps to compare different interpolations. We can compare quality of different interpolation methods with a single image. I just prepared a class GLImageView to display zoomed image in a particular window area. 7 objects ofGLImageView class are created, different shader programs[GLSL Linear, GLSL BiCubic Triangular etc.. ] are provided to these GLImageView objects to achieve different types of interpolations. GLText class is used to display interpolation type in image area. Thanks to dan.g., for his suggestion, which helps me to create such a view.

Code to prepare different type of interpolations.

 void CZoomInterpolationDlg::PrepareAllInOneView()
{
    ...............

        int nViewPortXDiv = 800 / 3;
    int nViewPortYDiv = 600 / 3;
    int nResourceId = IDR_GLSL_SHADER_BILINEAR;

    for( int nI = 0; nI < 7; nI++ )
    {
        int nX = nI % 3;
        int nY = nI / 3;

        GLText* pText = new GLText( &m_FontEngine );
        pText->SetText( INTERPOLATION_NAMES[nI] );

        GLImageView* pImage = new GLImageView();
        pImage->SetViewport( nX * nViewPortXDiv, nY * nViewPortYDiv, 
				nViewPortXDiv, nViewPortYDiv );
        pImage->SetText( pText );
        GLenum eTextureFilter;
        if( nI >= 2 )
        {
            GLSLShader* pTempShader = new GLSLShader();

            pTempShader->CreateProgram( nResourceId++, GL_FRAGMENT_PROGRAM_ARB );
            pImage->SetShader( pTempShader, true );
            eTextureFilter = GL_NEAREST;
        }
        else
        {
            pImage->SetShader( 0 ); // Shader is not required for openGL interpolation
            if( 0 == nI )
            {
                eTextureFilter = GL_NEAREST; // Special Handling for OpenGL Interpolation
            }
            else
            {
                eTextureFilter = GL_LINEAR;  // Special Handling for OpenGL Interpolation
            }
        }
        pImage->SetTextureParam( &m_glTexture, m_nImageWidth, 
				m_nImageHeight, eTextureFilter );
        pImage->SetVertexBuffer( &m_glVertexBufferZoom );
        m_ImageView.push_back( pImage );
    }
} 

Limitations

  1. The input image is expected in an aspect ratio of 4:3 for better output image. Otherwise stretched/skewed image will be displayed.
  2. For GLSL shader implementation, following OpenGL extensions are required in your machine.
    1. a. GL_ARB_fragment_shader
    2. b. GL_ARB_vertex_shader

    If your machine does-not have a supporting graphics device, this application will display interpolation with openGL fixed function pipeline(Nearest and Linear).

  3. The shaders for different Bi-Cubic and Bi-Linear interpolation is prepared with the help some equations, I expect some issues in this code. Smile | :)

References

Revision History

  • 07-Aug-2011: Initial version
  • 08-Aug-2011: Added details of ZoomInterpolation application
  • 21-Aug-2011: Added CatMull-Rom interpolation, Interpolation curve with Range values
  • 26-Aug-2011: Created "All In One" View. Created outline for zoomed and actual image display
  • 30-Aug-2011: Added "Save Image" functionality

import sys import cv2 import numpy as np from PySide6.QtWidgets import ( QApplication, QMainWindow, QWidget, QVBoxLayout, QHBoxLayout, QDialog, QLabel, QPushButton, QFileDialog, QTextEdit, QTabWidget, QMessageBox, QProgressBar, QSlider, QComboBox, QGroupBox, QGridLayout, QToolBar, QStatusBar, QDockWidget, QSplitter, QScrollArea, QMenu, QSpinBox, QDoubleSpinBox, QCheckBox, QRadioButton, QButtonGroup # 添加缺失的导入 ) from PySide6.QtGui import ( QAction, QPixmap, QImage, QPainter, QPen, QColor, QIcon, QKeySequence, QTransform, QCursor ) from PySide6.QtCore import Qt, QThread, Signal, QPoint, QSize, QRect import matplotlib matplotlib.use('Agg') # 使用Agg后端,不显示图形窗口 import matplotlib.pyplot as plt from matplotlib.backends.backend_qt5agg import FigureCanvasQTAgg as FigureCanvas from matplotlib.figure import Figure import os import math from scipy import ndimage try: from skimage.feature import graycomatrix, graycoprops except ImportError: from skimage.feature import greycomatrix as graycomatrix, greycoprops as graycoprops plt.rcParams["font.family"] = ["SimHei"] # 仅保留 SimHei(黑体) plt.rcParams["axes.unicode_minus"] = False class ImageProcessingThread(QThread): """图像处理的工作线程,避免界面卡顿""" finished = Signal(object) def __init__(self, function, *args): super().__init__() self.function = function self.args = args def run(self): result = self.function(*self.args) self.finished.emit(result) class ImageViewer(QWidget): """图像显示组件,支持缩放和平移""" def __init__(self, parent=None): super().__init__(parent) self.image = QImage() self.scale_factor = 1.0 self.dragging = False self.last_pos = QPoint() self.setMouseTracking(True) layout = QVBoxLayout(self) self.label = QLabel(self) self.label.setAlignment(Qt.AlignCenter) self.label.setMinimumSize(1, 1) # 允许缩小 layout.addWidget(self.label) def set_image(self, image): self.image = image self.update_pixmap() def update_pixmap(self): if not self.image.isNull(): scaled_pixmap = QPixmap.fromImage(self.image).scaled( self.image.width() * self.scale_factor, self.image.height() * self.scale_factor, Qt.KeepAspectRatio, Qt.SmoothTransformation) self.label.setPixmap(scaled_pixmap) def wheelEvent(self, event): """鼠标滚轮缩放""" delta = event.angleDelta().y() if delta > 0: self.scale_factor *= 1.1 else: self.scale_factor *= 0.9 self.update_pixmap() def mousePressEvent(self, event): """鼠标按下开始拖动""" if event.button() == Qt.LeftButton: self.dragging = True self.last_pos = event.position().toPoint() # 修改后 def mouseMoveEvent(self, event): """鼠标拖动图像""" if self.dragging: delta = event.pos() - self.last_pos scroll_bar = self.parent().horizontalScrollBar() scroll_bar.setValue(scroll_bar.value() - delta.x()) scroll_bar = self.parent().verticalScrollBar() scroll_bar.setValue(scroll_bar.value() - delta.y()) self.last_pos = event.pos() def mouseReleaseEvent(self, event): """鼠标释放结束拖动""" if event.button() == Qt.LeftButton: self.dragging = False def resizeEvent(self, event): """窗口大小变化时更新图像显示""" self.update_pixmap() super().resizeEvent(event) class HistogramWidget(QWidget): """直方图显示组件""" def __init__(self, parent=None): super().__init__(parent) self.figure = Figure(figsize=(5, 3), dpi=100) self.canvas = FigureCanvas(self.figure) layout = QVBoxLayout(self) layout.addWidget(self.canvas) self.axes = self.figure.add_subplot(111) def update_histogram(self, image): """更新直方图显示""" self.axes.clear() if image.ndim == 3: # 彩色图像 colors = ('b', 'g', 'r') for i, color in enumerate(colors): hist = cv2.calcHist([image], [i], None, [256], [0, 256]) self.axes.plot(hist, color=color) else: # 灰度图像 hist = cv2.calcHist([image], [0], None, [256], [0, 256]) self.axes.plot(hist, color='black') self.axes.set_xlim([0, 256]) self.axes.set_title('图像直方图') self.axes.set_xlabel('像素值') self.axes.set_ylabel('像素数量') self.figure.tight_layout() self.canvas.draw() class GLCMWidget(QWidget): """灰度共生矩阵(GLCM)特征显示组件""" def __init__(self, parent=None): super().__init__(parent) layout = QVBoxLayout(self) self.text_edit = QTextEdit() self.text_edit.setReadOnly(True) layout.addWidget(self.text_edit) def update_glcm(self, image): """更新GLCM特征显示""" if image.ndim == 3: image = cv2.cvtColor(image, cv2.COLOR_BGR2GRAY) # 量化到16级灰度以减少计算量 image_quantized = (image // 16).astype(np.uint8) # 计算GLCM矩阵 (距离=1, 角度=0, 45, 90, 135度) glcm = graycomatrix(image_quantized, distances=[1], angles=[0, np.pi / 4, np.pi / 2, 3 * np.pi / 4], levels=16, symmetric=True, normed=True) # 计算各种特征 contrast = graycoprops(glcm, 'contrast')[0] dissimilarity = graycoprops(glcm, 'dissimilarity')[0] homogeneity = graycoprops(glcm, 'homogeneity')[0] energy = graycoprops(glcm, 'energy')[0] correlation = graycoprops(glcm, 'correlation')[0] asm = graycoprops(glcm, 'ASM')[0] # 显示结果 result = "灰度共生矩阵(GLCM)特征:\n\n" result += f"对比度: {contrast}\n" result += f"相异性: {dissimilarity}\n" result += f"同质性: {homogeneity}\n" result += f"能量: {energy}\n" result += f"相关性: {correlation}\n" result += f"角二阶矩: {asm}\n" self.text_edit.setText(result) class ProcessingDialog(QDialog): def __init__(self, title, parent=None): super().__init__(parent) self.setWindowTitle(title) self.layout = QGridLayout(self) self.setLayout(self.layout) self.row = 0 def add_slider(self, label_text, min_val, max_val, default_val, step=1, callback=None): """添加滑块控件""" label = QLabel(label_text) slider = QSlider(Qt.Horizontal) slider.setMinimum(min_val) slider.setMaximum(max_val) slider.setValue(default_val) slider.setSingleStep(step) spinbox = QSpinBox() # 修正拼写错误 spinbox.setMinimum(min_val) spinbox.setMaximum(max_val) spinbox.setValue(default_val) spinbox.setSingleStep(step) # 同步滑块和数值框 slider.valueChanged.connect(spinbox.setValue) spinbox.valueChanged.connect(slider.setValue) if callback: slider.valueChanged.connect(callback) self.layout.addWidget(label, self.row, 0) self.layout.addWidget(slider, self.row, 1) self.layout.addWidget(spinbox, self.row, 2) self.row += 1 return slider, spinbox def add_double_slider(self, label_text, min_val, max_val, default_val, step=0.1, decimals=1, callback=None): """添加浮点数滑块控件""" label = QLabel(label_text) slider = QSlider(Qt.Horizontal) slider.setMinimum(int(min_val * 10)) slider.setMaximum(int(max_val * 10)) slider.setValue(int(default_val * 10)) spinbox = QDoubleSpinBox() spinbox.setMinimum(min_val) spinbox.setMaximum(max_val) spinbox.setValue(default_val) spinbox.setSingleStep(step) spinbox.setDecimals(decimals) # 同步滑块和数值框 def update_slider(value): slider.setValue(int(value * 10)) def update_spinbox(value): spinbox.setValue(value / 10) slider.valueChanged.connect(update_spinbox) spinbox.valueChanged.connect(update_slider) if callback: slider.valueChanged.connect(lambda: callback(spinbox.value())) self.layout.addWidget(label, self.row, 0) self.layout.addWidget(slider, self.row, 1) self.layout.addWidget(spinbox, self.row, 2) self.row += 1 return slider, spinbox def add_combo_box(self, label_text, items, default_index=0, callback=None): """添加下拉选择框""" label = QLabel(label_text) combo_box = QComboBox() combo_box.addItems(items) combo_box.setCurrentIndex(default_index) if callback: combo_box.currentIndexChanged.connect(callback) self.layout.addWidget(label, self.row, 0) self.layout.addWidget(combo_box, self.row, 1, 1, 2) self.row += 1 return combo_box def add_checkbox(self, label_text, default_state=False, callback=None): """添加复选框""" checkbox = QCheckBox(label_text) checkbox.setChecked(default_state) if callback: checkbox.stateChanged.connect(callback) self.layout.addWidget(checkbox, self.row, 0, 1, 3) self.row += 1 return checkbox def add_radio_buttons(self, label_text, options, default_index=0, callback=None): """添加单选按钮组""" label = QLabel(label_text) button_group = QButtonGroup(self) layout = QHBoxLayout() for i, option in enumerate(options): radio = QRadioButton(option) if i == default_index: radio.setChecked(True) button_group.addButton(radio, i) layout.addWidget(radio) if callback: button_group.buttonClicked.connect(callback) self.layout.addWidget(label, self.row, 0) self.layout.addLayout(layout, self.row, 1, 1, 2) self.row += 1 return button_group def add_button_box(self): """添加确认和取消按钮""" button_layout = QHBoxLayout() ok_button = QPushButton("确定") cancel_button = QPushButton("取消") ok_button.clicked.connect(self.accept) cancel_button.clicked.connect(self.reject) button_layout.addStretch() button_layout.addWidget(ok_button) button_layout.addWidget(cancel_button) self.layout.addLayout(button_layout, self.row, 0, 1, 3) self.row += 1 return ok_button, cancel_button class MainWindow(QMainWindow): """主窗口类""" def __init__(self): super().__init__() self.setWindowTitle("数字图像处理系统") self.setGeometry(100, 100, 1200, 800) # 初始化变量 self.original_image = None # 原始图像 self.processed_image = None # 处理后的图像 self.current_image = None # 当前显示的图像 self.history = [] # 操作历史 self.history_index = -1 # 当前历史位置 # 创建中心部件 self.central_widget = QWidget() self.setCentralWidget(self.central_widget) # 创建主布局 self.main_layout = QHBoxLayout(self.central_widget) # 创建左侧面板 self.left_panel = QVBoxLayout() # 创建工具栏 self.create_toolbar() # 创建图像显示区域 self.create_image_viewer() # 创建右侧面板 self.right_panel = QVBoxLayout() # 创建处理历史标签页 self.create_history_tabs() # 添加分割器 self.splitter = QSplitter(Qt.Horizontal) left_widget = QWidget() left_widget.setLayout(self.left_panel) right_widget = QWidget() right_widget.setLayout(self.right_panel) self.splitter.addWidget(left_widget) self.splitter.addWidget(right_widget) self.splitter.setSizes([800, 400]) # 初始大小 self.main_layout.addWidget(self.splitter) # 创建菜单 self.create_menu() # 状态栏 self.statusBar().showMessage("就绪") def create_menu(self): """创建菜单栏""" # 文件菜单 file_menu = self.menuBar().addMenu("文件") open_action = QAction("打开", self) open_action.setShortcut(QKeySequence.Open) open_action.triggered.connect(self.open_image) file_menu.addAction(open_action) save_action = QAction("保存", self) save_action.setShortcut(QKeySequence.Save) save_action.triggered.connect(self.save_image) file_menu.addAction(save_action) save_as_action = QAction("另存为", self) save_as_action.setShortcut(QKeySequence.SaveAs) save_as_action.setShortcut("Ctrl+Shift+S") save_as_action.triggered.connect(self.save_image_as) file_menu.addAction(save_as_action) file_menu.addSeparator() exit_action = QAction("退出", self) exit_action.setShortcut(QKeySequence.Quit) exit_action.triggered.connect(self.close) file_menu.addAction(exit_action) # 编辑菜单 edit_menu = self.menuBar().addMenu("编辑") undo_action = QAction("撤销", self) undo_action.setShortcut(QKeySequence.Undo) undo_action.triggered.connect(self.undo) edit_menu.addAction(undo_action) redo_action = QAction("重做", self) redo_action.setShortcut(QKeySequence.Redo) redo_action.triggered.connect(self.redo) edit_menu.addAction(redo_action) # 处理菜单 process_menu = self.menuBar().addMenu("图像处理") # 图像转换子菜单 convert_menu = QMenu("图像转换", self) rgb_to_gray_action = QAction("RGB转灰度", self) rgb_to_gray_action.triggered.connect(self.rgb_to_gray) convert_menu.addAction(rgb_to_gray_action) resize_action = QAction("调整分辨率", self) resize_action.triggered.connect(self.resize_image) convert_menu.addAction(resize_action) process_menu.addMenu(convert_menu) # 图像增强子菜单 enhance_menu = QMenu("图像增强", self) histogram_equalization_action = QAction("直方图均衡化", self) histogram_equalization_action.triggered.connect(self.histogram_equalization) enhance_menu.addAction(histogram_equalization_action) log_transform_action = QAction("对数变换", self) log_transform_action.triggered.connect(self.log_transform) enhance_menu.addAction(log_transform_action) power_law_action = QAction("幂律变换", self) power_law_action.triggered.connect(self.power_law_transform) enhance_menu.addAction(power_law_action) blur_menu = QMenu("平滑滤波", self) mean_blur_action = QAction("均值滤波", self) mean_blur_action.triggered.connect(lambda: self.spatial_filtering("均值滤波")) blur_menu.addAction(mean_blur_action) gaussian_blur_action = QAction("高斯滤波", self) gaussian_blur_action.triggered.connect(lambda: self.spatial_filtering("高斯滤波")) blur_menu.addAction(gaussian_blur_action) median_blur_action = QAction("中值滤波", self) median_blur_action.triggered.connect(lambda: self.spatial_filtering("中值滤波")) blur_menu.addAction(median_blur_action) enhance_menu.addMenu(blur_menu) sharpen_menu = QMenu("锐化滤波", self) sobel_action = QAction("Sobel算子", self) sobel_action.triggered.connect(lambda: self.spatial_filtering("Sobel算子")) sharpen_menu.addAction(sobel_action) prewitt_action = QAction("Prewitt算子", self) prewitt_action.triggered.connect(lambda: self.spatial_filtering("Prewitt算子")) sharpen_menu.addAction(prewitt_action) laplacian_action = QAction("Laplacian算子", self) laplacian_action.triggered.connect(lambda: self.spatial_filtering("Laplacian算子")) sharpen_menu.addAction(laplacian_action) enhance_menu.addMenu(sharpen_menu) process_menu.addMenu(enhance_menu) # 图像复原子菜单 restore_menu = QMenu("图像复原", self) motion_deblur_action = QAction("运动模糊复原", self) motion_deblur_action.triggered.connect(self.motion_deblur) restore_menu.addAction(motion_deblur_action) gaussian_noise_removal_action = QAction("高斯噪声去除", self) gaussian_noise_removal_action.triggered.connect(lambda: self.noise_removal("高斯噪声")) restore_menu.addAction(gaussian_noise_removal_action) salt_pepper_noise_removal_action = QAction("椒盐噪声去除", self) salt_pepper_noise_removal_action.triggered.connect(lambda: self.noise_removal("椒盐噪声")) restore_menu.addAction(salt_pepper_noise_removal_action) process_menu.addMenu(restore_menu) # 几何变换子菜单 geometric_menu = QMenu("几何变换", self) translate_action = QAction("平移", self) translate_action.triggered.connect(self.translate_image) geometric_menu.addAction(translate_action) rotate_action = QAction("旋转", self) rotate_action.triggered.connect(self.rotate_image) geometric_menu.addAction(rotate_action) scale_action = QAction("缩放", self) scale_action.triggered.connect(self.scale_image) geometric_menu.addAction(scale_action) flip_action = QAction("镜像", self) flip_action.triggered.connect(self.flip_image) geometric_menu.addAction(flip_action) process_menu.addMenu(geometric_menu) # 形态学处理子菜单 morphology_menu = QMenu("形态学处理", self) erosion_action = QAction("腐蚀", self) erosion_action.triggered.connect(lambda: self.morphological_operation("腐蚀")) morphology_menu.addAction(erosion_action) dilation_action = QAction("膨胀", self) dilation_action.triggered.connect(lambda: self.morphological_operation("膨胀")) morphology_menu.addAction(dilation_action) opening_action = QAction("开运算", self) opening_action.triggered.connect(lambda: self.morphological_operation("开运算")) morphology_menu.addAction(opening_action) closing_action = QAction("闭运算", self) closing_action.triggered.connect(lambda: self.morphological_operation("闭运算")) morphology_menu.addAction(closing_action) edge_extraction_action = QAction("边界提取", self) edge_extraction_action.triggered.connect(self.edge_extraction) morphology_menu.addAction(edge_extraction_action) process_menu.addMenu(morphology_menu) # 图像分割子菜单 segmentation_menu = QMenu("图像分割", self) threshold_action = QAction("阈值分割", self) threshold_action.triggered.connect(self.threshold_segmentation) segmentation_menu.addAction(threshold_action) adaptive_threshold_action = QAction("自适应阈值分割", self) adaptive_threshold_action.triggered.connect(self.adaptive_threshold_segmentation) segmentation_menu.addAction(adaptive_threshold_action) watershed_action = QAction("分水岭分割", self) watershed_action.triggered.connect(self.watershed_segmentation) segmentation_menu.addAction(watershed_action) process_menu.addMenu(segmentation_menu) # 图像描述子菜单 description_menu = QMenu("图像描述", self) hu_moments_action = QAction("计算Hu不变矩", self) hu_moments_action.triggered.connect(self.calculate_hu_moments) description_menu.addAction(hu_moments_action) glcm_action = QAction("计算灰度共生矩阵", self) glcm_action.triggered.connect(self.calculate_glcm) description_menu.addAction(glcm_action) process_menu.addMenu(description_menu) # 视图菜单 view_menu = self.menuBar().addMenu("视图") zoom_in_action = QAction("放大", self) zoom_in_action.setShortcut("Ctrl++") zoom_in_action.triggered.connect(self.zoom_in) view_menu.addAction(zoom_in_action) zoom_out_action = QAction("缩小", self) zoom_out_action.setShortcut("Ctrl+-") zoom_out_action.triggered.connect(self.zoom_out) view_menu.addAction(zoom_out_action) fit_to_window_action = QAction("适应窗口", self) fit_to_window_action.setShortcut("Ctrl+F") fit_to_window_action.triggered.connect(self.fit_to_window) view_menu.addAction(fit_to_window_action) # 帮助菜单 help_menu = self.menuBar().addMenu("帮助") about_action = QAction("关于", self) about_action.triggered.connect(self.about) help_menu.addAction(about_action) help_action = QAction("帮助", self) help_action.triggered.connect(self.show_help) help_menu.addAction(help_action) def create_toolbar(self): """创建工具栏""" toolbar = QToolBar("工具栏") self.addToolBar(toolbar) # 文件操作 open_action = QAction(QIcon.fromTheme("document-open"), "打开", self) open_action.triggered.connect(self.open_image) toolbar.addAction(open_action) save_action = QAction(QIcon.fromTheme("document-save"), "保存", self) save_action.triggered.connect(self.save_image) toolbar.addAction(save_action) toolbar.addSeparator() # 编辑操作 undo_action = QAction(QIcon.fromTheme("edit-undo"), "撤销", self) undo_action.triggered.connect(self.undo) toolbar.addAction(undo_action) redo_action = QAction(QIcon.fromTheme("edit-redo"), "重做", self) redo_action.triggered.connect(self.redo) toolbar.addAction(redo_action) toolbar.addSeparator() # 视图操作 zoom_in_action = QAction(QIcon.fromTheme("zoom-in"), "放大", self) zoom_in_action.triggered.connect(self.zoom_in) toolbar.addAction(zoom_in_action) zoom_out_action = QAction(QIcon.fromTheme("zoom-out"), "缩小", self) zoom_out_action.triggered.connect(self.zoom_out) toolbar.addAction(zoom_out_action) fit_to_window_action = QAction(QIcon.fromTheme("zoom-fit-best"), "适应窗口", self) fit_to_window_action.triggered.connect(self.fit_to_window) toolbar.addAction(fit_to_window_action) toolbar.addSeparator() # 图像比较 compare_action = QAction(QIcon.fromTheme("view-compare"), "比较原图", self) compare_action.triggered.connect(self.compare_with_original) toolbar.addAction(compare_action) def create_image_viewer(self): """创建图像显示区域""" # 创建滚动区域 self.scroll_area = QScrollArea() self.scroll_area.setWidgetResizable(True) # 创建图像查看器 self.image_viewer = ImageViewer() self.scroll_area.setWidget(self.image_viewer) # 添加到左侧面板 self.left_panel.addWidget(self.scroll_area) # 创建直方图显示区域 self.histogram_widget = HistogramWidget() self.left_panel.addWidget(self.histogram_widget) def create_history_tabs(self): """创建历史标签页""" self.history_tabs = QTabWidget() # 原始图像标签页 self.original_tab = QWidget() self.original_tab_layout = QVBoxLayout(self.original_tab) self.original_viewer = ImageViewer() self.original_tab_layout.addWidget(self.original_viewer) self.history_tabs.addTab(self.original_tab, "原始图像") # 处理后图像标签页 self.processed_tab = QWidget() self.processed_tab_layout = QVBoxLayout(self.processed_tab) self.processed_viewer = ImageViewer() self.processed_tab_layout.addWidget(self.processed_viewer) self.history_tabs.addTab(self.processed_tab, "处理后图像") # 描述信息标签页 self.info_tab = QWidget() self.info_tab_layout = QVBoxLayout(self.info_tab) self.info_text = QTextEdit() self.info_text.setReadOnly(True) self.info_tab_layout.addWidget(self.info_text) self.history_tabs.addTab(self.info_tab, "图像信息") # GLCM特征标签页 self.glcm_tab = QWidget() self.glcm_tab_layout = QVBoxLayout(self.glcm_tab) self.glcm_widget = GLCMWidget() self.glcm_tab_layout.addWidget(self.glcm_widget) self.history_tabs.addTab(self.glcm_tab, "GLCM特征") # 添加到右侧面板 self.right_panel.addWidget(self.history_tabs) def open_image(self): """打开图像文件""" file_path, _ = QFileDialog.getOpenFileName( self, "打开图像", "", "图像文件 (*.png *.jpg *.jpeg *.bmp *.gif *.tiff)" ) if file_path: self.statusBar().showMessage(f"正在加载图像: {file_path}") # 在单独的线程中加载图像,避免界面卡顿 thread = ImageProcessingThread(self._load_image, file_path) thread.finished.connect(self._on_image_loaded) thread.start() def _load_image(self, file_path): """在线程中加载图像""" image = cv2.imread(file_path) if image is None: return None, file_path return image, file_path def _on_image_loaded(self, result): """图像加载完成后的回调函数""" image, file_path = result if image is None: QMessageBox.critical(self, "错误", f"无法加载图像: {file_path}") self.statusBar().showMessage("加载图像失败") return self.original_image = image self.processed_image = image.copy() self.current_image = image.copy() # 显示图像 self.display_image(self.current_image) # 更新原始图像查看器 self.original_viewer.set_image(self.cv_to_qimage(self.original_image)) # 更新图像信息 self.update_image_info() # 清空历史 self.history = [self.original_image.copy()] self.history_index = 0 self.statusBar().showMessage(f"已加载图像: {os.path.basename(file_path)}") def save_image(self): """保存当前图像""" if self.processed_image is None: QMessageBox.warning(self, "警告", "没有可保存的图像") return if not hasattr(self, 'current_file_path'): self.save_image_as() else: try: cv2.imwrite(self.current_file_path, self.processed_image) self.statusBar().showMessage(f"已保存图像: {os.path.basename(self.current_file_path)}") except Exception as e: QMessageBox.critical(self, "错误", f"保存图像失败: {str(e)}") self.statusBar().showMessage("保存图像失败") def save_image_as(self): """另存为图像""" if self.processed_image is None: QMessageBox.warning(self, "警告", "没有可保存的图像") return file_path, _ = QFileDialog.getSaveFileName( self, "保存图像", "", "PNG (*.png);;JPEG (*.jpg);;BMP (*.bmp);;TIFF (*.tiff)" ) if file_path: try: # 确保保存的是RGB格式 if len(self.processed_image.shape) == 3: image_to_save = cv2.cvtColor(self.processed_image, cv2.COLOR_BGR2RGB) else: image_to_save = self.processed_image cv2.imwrite(file_path, image_to_save) self.current_file_path = file_path self.statusBar().showMessage(f"已保存图像: {os.path.basename(file_path)}") except Exception as e: QMessageBox.critical(self, "错误", f"保存图像失败: {str(e)}") self.statusBar().showMessage("保存图像失败") def display_image(self, image): """显示图像""" if image is None: return qimage = self.cv_to_qimage(image) self.image_viewer.set_image(qimage) # 更新直方图 self.histogram_widget.update_histogram(image) # 更新处理后图像查看器 self.processed_viewer.set_image(qimage) def cv_to_qimage(self, cv_image): """将OpenCV图像转换为Qt图像""" if len(cv_image.shape) == 3: # 彩色图像 height, width, channel = cv_image.shape bytes_per_line = 3 * width qimage = QImage(cv_image.data, width, height, bytes_per_line, QImage.Format_BGR888) else: # 灰度图像 height, width = cv_image.shape bytes_per_line = width qimage = QImage(cv_image.data, width, height, bytes_per_line, QImage.Format_Grayscale8) return qimage def update_image_info(self): """更新图像信息""" if self.original_image is None: return info = "图像信息:\n\n" info += f"尺寸: {self.original_image.shape[1]} x {self.original_image.shape[0]} 像素\n" if len(self.original_image.shape) == 3: info += f"通道数: {self.original_image.shape[2]}\n" info += "类型: 彩色图像\n" else: info += "通道数: 1\n" info += "类型: 灰度图像\n" info += f"数据类型: {self.original_image.dtype}" self.info_text.setText(info) def add_to_history(self, processed_image, operation_name): """添加操作到历史记录""" # 如果当前不在历史的末尾,删除后面的所有历史 if self.history_index < len(self.history) - 1: self.history = self.history[:self.history_index + 1] # 添加新的历史记录 self.history.append(processed_image.copy()) self.history_index += 1 # 更新处理后图像标签页 self.processed_viewer.set_image(self.cv_to_qimage(processed_image)) # 更新历史标签页标题 self.history_tabs.setTabText(1, f"处理后图像 ({operation_name})") def undo(self): """撤销操作""" if self.history_index > 0: self.history_index -= 1 self.processed_image = self.history[self.history_index].copy() self.display_image(self.processed_image) self.statusBar().showMessage("已撤销操作") def redo(self): """重做操作""" if self.history_index < len(self.history) - 1: self.history_index += 1 self.processed_image = self.history[self.history_index].copy() self.display_image(self.processed_image) self.statusBar().showMessage("已重做操作") def zoom_in(self): """放大图像""" self.image_viewer.scale_factor *= 1.1 self.image_viewer.update_pixmap() def zoom_out(self): """缩小图像""" self.image_viewer.scale_factor *= 0.9 self.image_viewer.update_pixmap() def fit_to_window(self): """适应窗口显示""" if self.current_image is None: return # 计算适应窗口的缩放因子 scroll_area_width = self.scroll_area.width() - 20 # 减去边框 scroll_area_height = self.scroll_area.height() - 20 image_width = self.current_image.shape[1] image_height = self.current_image.shape[0] scale_x = scroll_area_width / image_width scale_y = scroll_area_height / image_height self.image_viewer.scale_factor = min(scale_x, scale_y) self.image_viewer.update_pixmap() def compare_with_original(self): """比较处理后的图像与原始图像""" if self.original_image is None or self.processed_image is None: return # 创建一个新窗口进行比较 compare_window = QMainWindow() compare_window.setWindowTitle("图像比较") compare_window.resize(1000, 500) # 创建分割器 splitter = QSplitter(Qt.Horizontal) # 左侧显示原始图像 left_widget = QWidget() left_layout = QVBoxLayout(left_widget) left_label = QLabel("原始图像") left_label.setAlignment(Qt.AlignCenter) left_viewer = ImageViewer() left_viewer.set_image(self.cv_to_qimage(self.original_image)) left_layout.addWidget(left_label) left_layout.addWidget(left_viewer) # 右侧显示处理后的图像 right_widget = QWidget() right_layout = QVBoxLayout(right_widget) right_label = QLabel("处理后图像") right_label.setAlignment(Qt.AlignCenter) right_viewer = ImageViewer() right_viewer.set_image(self.cv_to_qimage(self.processed_image)) right_layout.addWidget(right_label) right_layout.addWidget(right_viewer) # 添加到分割器 splitter.addWidget(left_widget) splitter.addWidget(right_widget) splitter.setSizes([500, 500]) compare_window.setCentralWidget(splitter) compare_window.show() def about(self): """显示关于对话框""" QMessageBox.about(self, "关于数字图像处理系统", "数字图像处理系统\n\n" "基于OpenCV和PySide6开发\n" "支持图像转换、增强、复原、几何变换、形态学处理、分割和描述等功能\n\n" "版本: 1.0.0" ) def show_help(self): """显示帮助对话框""" help_text = ( "数字图像处理系统帮助文档\n\n" "1. 文件操作:\n" " - 打开: 从文件系统加载图像\n" " - 保存: 保存当前处理的图像\n" " - 另存为: 以新文件名保存图像\n\n" "2. 编辑操作:\n" " - 撤销: 撤销上一步操作\n" " - 重做: 恢复撤销的操作\n\n" "3. 图像处理:\n" " - 图像转换: 支持模式转换和分辨率调整\n" " - 图像增强: 包括直方图均衡化、滤波等\n" " - 图像复原: 处理运动模糊和噪声\n" " - 几何变换: 平移、旋转、缩放和镜像\n" " - 形态学处理: 腐蚀、膨胀、开/闭运算等\n" " - 图像分割: 阈值分割和区域分割\n" " - 图像描述: 计算不变矩和灰度共生矩阵\n\n" "4. 视图操作:\n" " - 放大/缩小: 调整图像显示大小\n" " - 适应窗口: 自动调整图像大小以适应窗口\n\n" "5. 比较功能:\n" " - 比较原图: 同时显示原始图像和处理后图像进行对比" ) QMessageBox.information(self, "帮助", help_text) # 图像处理功能实现 def rgb_to_gray(self): """RGB转灰度""" if self.processed_image is None: return if len(self.processed_image.shape) == 2: QMessageBox.warning(self, "警告", "当前图像已经是灰度图像") return thread = ImageProcessingThread(cv2.cvtColor, self.processed_image, cv2.COLOR_BGR2GRAY) thread.finished.connect(lambda result: self._process_finished(result, "RGB转灰度")) thread.start() def resize_image(self): """调整图像分辨率""" if self.processed_image is None: return dialog = ProcessingDialog("调整分辨率") # 获取当前图像尺寸 current_width = self.processed_image.shape[1] current_height = self.processed_image.shape[0] # 添加宽度和高度输入框 width_spinbox = QSpinBox() width_spinbox.setRange(1, 10000) width_spinbox.setValue(current_width) height_spinbox = QSpinBox() height_spinbox.setRange(1, 10000) height_spinbox.setValue(current_height) # 保持比例复选框 keep_ratio_checkbox = QCheckBox("保持比例") keep_ratio_checkbox.setChecked(True) # 添加到对话框 dialog.layout.addWidget(QLabel("宽度:"), 0, 0) dialog.layout.addWidget(width_spinbox, 0, 1) dialog.layout.addWidget(QLabel("像素"), 0, 2) dialog.layout.addWidget(QLabel("高度:"), 1, 0) dialog.layout.addWidget(height_spinbox, 1, 1) dialog.layout.addWidget(QLabel("像素"), 1, 2) dialog.layout.addWidget(keep_ratio_checkbox, 2, 0, 1, 3) # 添加按钮 ok_button, cancel_button = dialog.add_button_box() # 保持比例功能 ratio = current_width / current_height def update_height(): if keep_ratio_checkbox.isChecked(): height_spinbox.setValue(int(width_spinbox.value() / ratio)) def update_width(): if keep_ratio_checkbox.isChecked(): width_spinbox.setValue(int(height_spinbox.value() * ratio)) width_spinbox.valueChanged.connect(update_height) height_spinbox.valueChanged.connect(update_width) if dialog.exec_(): new_width = width_spinbox.value() new_height = height_spinbox.value() # 添加插值方法选择 interpolation_dialog = ProcessingDialog("选择插值方法") methods = ["最近邻", "双线性", "双三次", "Lanczos"] method_combo = interpolation_dialog.add_combo_box("插值方法", methods) if interpolation_dialog.exec_(): method_index = method_combo.currentIndex() interpolation_methods = [ cv2.INTER_NEAREST, cv2.INTER_LINEAR, cv2.INTER_CUBIC, cv2.INTER_LANCZOS4 ] interpolation = interpolation_methods[method_index] thread = ImageProcessingThread(cv2.resize, self.processed_image, (new_width, new_height), interpolation=interpolation) thread.finished.connect(lambda result: self._process_finished(result, "调整分辨率")) thread.start() def histogram_equalization(self): """直方图均衡化""" if self.processed_image is None: return if len(self.processed_image.shape) == 3: # 彩色图像需要先转换到YUV空间 def equalize_color(image): yuv = cv2.cvtColor(image, cv2.COLOR_BGR2YUV) yuv[:, :, 0] = cv2.equalizeHist(yuv[:, :, 0]) return cv2.cvtColor(yuv, cv2.COLOR_YUV2BGR) thread = ImageProcessingThread(equalize_color, self.processed_image) else: # 灰度图像直接均衡化 thread = ImageProcessingThread(cv2.equalizeHist, self.processed_image) thread.finished.connect(lambda result: self._process_finished(result, "直方图均衡化")) thread.start() def log_transform(self): """对数变换""" if self.processed_image is None: return dialog = ProcessingDialog("对数变换") c_slider, c_spinbox = dialog.add_slider("常数C", 1, 100, 25) if dialog.exec_(): c = c_spinbox.value() def log_transform(image): # 确保图像是浮点类型 image_float = image.astype(np.float32) / 255.0 # 应用对数变换 result = c * np.log(1 + image_float) # 归一化到[0, 1] result = cv2.normalize(result, None, 0, 1, cv2.NORM_MINMAX) # 转回uint8 return (result * 255).astype(np.uint8) thread = ImageProcessingThread(log_transform, self.processed_image) thread.finished.connect(lambda result: self._process_finished(result, "对数变换")) thread.start() def power_law_transform(self): """幂律变换""" if self.processed_image is None: return dialog = ProcessingDialog("幂律变换") gamma_slider, gamma_spinbox = dialog.add_double_slider("伽马值", 0.1, 5.0, 1.0, 0.1, 1) if dialog.exec_(): gamma = gamma_spinbox.value() def power_law_transform(image): # 确保图像是浮点类型 image_float = image.astype(np.float32) / 255.0 # 应用幂律变换 result = np.power(image_float, gamma) # 归一化到[0, 1] result = cv2.normalize(result, None, 0, 1, cv2.NORM_MINMAX) # 转回uint8 return (result * 255).astype(np.uint8) thread = ImageProcessingThread(power_law_transform, self.processed_image) thread.finished.connect(lambda result: self._process_finished(result, f"幂律变换 (γ={gamma})")) thread.start() def spatial_filtering(self, filter_type): """空域滤波""" if self.processed_image is None: return dialog = ProcessingDialog(f"{filter_type}参数设置") if filter_type in ["均值滤波", "高斯滤波"]: kernel_size, _ = dialog.add_slider("核大小", 1, 21, 3, 2) # 奇数 elif filter_type == "中值滤波": kernel_size, _ = dialog.add_slider("孔径大小", 1, 21, 3, 2) # 奇数 elif filter_type in ["Sobel算子", "Prewitt算子"]: direction_combo = dialog.add_combo_box("方向", ["水平", "垂直", "两者"]) elif filter_type == "Laplacian算子": ksize_combo = dialog.add_combo_box("核大小", ["1", "3", "5", "7"], 1) if dialog.exec_(): if filter_type == "均值滤波": ksize = kernel_size.value() def mean_filter(image): return cv2.blur(image, (ksize, ksize)) thread = ImageProcessingThread(mean_filter, self.processed_image) elif filter_type == "高斯滤波": ksize = kernel_size.value() def gaussian_filter(image): return cv2.GaussianBlur(image, (ksize, ksize), 0) thread = ImageProcessingThread(gaussian_filter, self.processed_image) elif filter_type == "中值滤波": ksize = kernel_size.value() def median_filter(image): return cv2.medianBlur(image, ksize) thread = ImageProcessingThread(median_filter, self.processed_image) elif filter_type == "Sobel算子": direction = direction_combo.currentIndex() def sobel_filter(image): if len(image.shape) == 3: image = cv2.cvtColor(image, cv2.COLOR_BGR2GRAY) if direction == 0: # 水平 sobelx = cv2.Sobel(image, cv2.CV_64F, 1, 0, ksize=3) return cv2.convertScaleAbs(sobelx) elif direction == 1: # 垂直 sobely = cv2.Sobel(image, cv2.CV_64F, 0, 1, ksize=3) return cv2.convertScaleAbs(sobely) else: # 两者 sobelx = cv2.Sobel(image, cv2.CV_64F, 1, 0, ksize=3) sobely = cv2.Sobel(image, cv2.CV_64F, 0, 1, ksize=3) return cv2.addWeighted(cv2.convertScaleAbs(sobelx), 0.5, cv2.convertScaleAbs(sobely), 0.5, 0) thread = ImageProcessingThread(sobel_filter, self.processed_image) elif filter_type == "Prewitt算子": direction = direction_combo.currentIndex() def prewitt_filter(image): if len(image.shape) == 3: image = cv2.cvtColor(image, cv2.COLOR_BGR2GRAY) kernelx = np.array([[-1, 0, 1], [-1, 0, 1], [-1, 0, 1]], dtype=np.float32) kernely = np.array([[-1, -1, -1], [0, 0, 0], [1, 1, 1]], dtype=np.float32) if direction == 0: # 水平 prewittx = cv2.filter2D(image, -1, kernelx) return prewittx elif direction == 1: # 垂直 prewitty = cv2.filter2D(image, -1, kernely) return prewitty else: # 两者 prewittx = cv2.filter2D(image, -1, kernelx) prewitty = cv2.filter2D(image, -1, kernely) return cv2.addWeighted(prewittx, 0.5, prewitty, 0.5, 0) thread = ImageProcessingThread(prewitt_filter, self.processed_image) elif filter_type == "Laplacian算子": ksize = [1, 3, 5, 7][ksize_combo.currentIndex()] def laplacian_filter(image): if len(image.shape) == 3: image = cv2.cvtColor(image, cv2.COLOR_BGR2GRAY) return cv2.Laplacian(image, cv2.CV_64F, ksize=ksize) thread = ImageProcessingThread(laplacian_filter, self.processed_image) thread.finished.connect(lambda result: self._process_finished(result, filter_type)) thread.start() def motion_deblur(self): """运动模糊复原""" if self.processed_image is None: return dialog = ProcessingDialog("运动模糊复原参数设置") length_slider, length_spinbox = dialog.add_slider("运动长度", 1, 100, 15) angle_slider, angle_spinbox = dialog.add_slider("运动角度", 0, 360, 0) gamma_slider, gamma_spinbox = dialog.add_double_slider("噪声功率谱比", 0.01, 10.0, 0.1, 0.01, 2) if dialog.exec_(): length = length_spinbox.value() angle = angle_spinbox.value() gamma = gamma_spinbox.value() def deblur(image): # 确保图像是灰度图 if len(image.shape) == 3: gray = cv2.cvtColor(image, cv2.COLOR_BGR2GRAY) else: gray = image.copy() # 创建运动模糊核 kernel = np.zeros((length, length), dtype=np.float32) kernel[int((length - 1) / 2), :] = np.ones(length, dtype=np.float32) # 旋转核 M = cv2.getRotationMatrix2D((length / 2, length / 2), angle, 1.0) kernel = cv2.warpAffine(kernel, M, (length, length)) # 归一化 kernel /= length # 傅里叶变换 fft = np.fft.fft2(gray) fft_kernel = np.fft.fft2(kernel, s=gray.shape) # 维纳滤波 H_conj = np.conj(fft_kernel) H_squared = np.abs(fft_kernel) ** 2 G = (H_conj / (H_squared + gamma)) * fft # 逆傅里叶变换 deblurred = np.fft.ifft2(G) deblurred = np.abs(deblurred) # 归一化到0-255 deblurred = cv2.normalize(deblurred, None, 0, 255, cv2.NORM_MINMAX) deblurred = deblurred.ast(np.uint8) return deblurred thread = ImageProcessingThread(deblur, self.processed_image) thread.finished.connect(lambda result: self._process_finished(result, "运动模糊复原")) thread.start() def noise_removal(self, noise_type): """噪声去除""" if self.processed_image is None: return dialog = ProcessingDialog(f"{noise_type}去除") if noise_type == "高斯噪声": kernel_size, _ = dialog.add_slider("核大小", 1, 21, 3, 2) # 奇数 elif noise_type == "椒盐噪声": kernel_size, _ = dialog.add_slider("核大小", 1, 21, 3, 2) # 奇数 if dialog.exec_(): ksize = kernel_size.value() if noise_type == "高斯噪声": def remove_gaussian_noise(image): return cv2.GaussianBlur(image, (ksize, ksize), 0) thread = ImageProcessingThread(remove_gaussian_noise, self.processed_image) elif noise_type == "椒盐噪声": def remove_salt_pepper_noise(image): return cv2.medianBlur(image, ksize) thread = ImageProcessingThread(remove_salt_pepper_noise, self.processed_image) thread.finished.connect(lambda result: self._process_finished(result, f"{noise_type}去除")) thread.start() def translate_image(self): """平移图像""" if self.processed_image is None: return dialog = ProcessingDialog("平移图像") tx_slider, tx_spinbox = dialog.add_slider("水平偏移", -500, 500, 0) ty_slider, ty_spinbox = dialog.add_slider("垂直偏移", -500, 500, 0) if dialog.exec_(): tx = tx_spinbox.value() ty = ty_spinbox.value() def translate(image): M = np.float32([[1, 0, tx], [0, 1, ty]]) return cv2.warpAffine(image, M, (image.shape[1], image.shape[0])) thread = ImageProcessingThread(translate, self.processed_image) thread.finished.connect(lambda result: self._process_finished(result, f"平移 (tx={tx}, ty={ty})")) thread.start() def rotate_image(self): """旋转图像""" if self.processed_image is None: return dialog = ProcessingDialog("旋转图像") angle_slider, angle_spinbox = dialog.add_slider("旋转角度", -180, 180, 0) scale_slider, scale_spinbox = dialog.add_double_slider("缩放比例", 0.1, 5.0, 1.0, 0.1, 1) if dialog.exec_(): angle = angle_spinbox.value() scale = scale_spinbox.value() def rotate(image): center = (image.shape[1] // 2, image.shape[0] // 2) M = cv2.getRotationMatrix2D(center, angle, scale) return cv2.warpAffine(image, M, (image.shape[1], image.shape[0])) thread = ImageProcessingThread(rotate, self.processed_image) thread.finished.connect(lambda result: self._process_finished(result, f"旋转 ({angle}°, 缩放{scale}x)")) thread.start() def scale_image(self): """缩放图像""" if self.processed_image is None: return dialog = ProcessingDialog("缩放图像") scale_slider, scale_spinbox = dialog.add_double_slider("缩放比例", 0.1, 5.0, 1.0, 0.1, 1) if dialog.exec_(): scale = scale_spinbox.value() def scale_image(image): new_width = int(image.shape[1] * scale) new_height = int(image.shape[0] * scale) return cv2.resize(image, (new_width, new_height), interpolation=cv2.INTER_LINEAR) thread = ImageProcessingThread(scale_image, self.processed_image) thread.finished.connect(lambda result: self._process_finished(result, f"缩放 ({scale}x)")) thread.start() def flip_image(self): """镜像图像""" if self.processed_image is None: return dialog = ProcessingDialog("镜像图像") flip_type = dialog.add_combo_box("镜像类型", ["水平", "垂直", "水平和垂直"]) if dialog.exec_(): flip_code = flip_type.currentIndex() def flip(image): return cv2.flip(image, flip_code) flip_types = ["水平", "垂直", "水平和垂直"] thread = ImageProcessingThread(flip, self.processed_image) thread.finished.connect(lambda result: self._process_finished(result, f"镜像 ({flip_types[flip_code]})")) thread.start() def morphological_operation(self, operation_type): """形态学操作""" if self.processed_image is None: return dialog = ProcessingDialog(f"{operation_type}参数设置") kernel_size, _ = dialog.add_slider("核大小", 1, 21, 3) kernel_shape = dialog.add_combo_box("核形状", ["矩形", "椭圆", "十字形"]) if dialog.exec_(): ksize = kernel_size.value() shape_index = kernel_shape.currentIndex() kernel_shapes = [ cv2.MORPH_RECT, cv2.MORPH_ELLIPSE, cv2.MORPH_CROSS ] kernel = cv2.getStructuringElement(kernel_shapes[shape_index], (ksize, ksize)) if operation_type == "腐蚀": def erode(image): return cv2.erode(image, kernel) thread = ImageProcessingThread(erode, self.processed_image) elif operation_type == "膨胀": def dilate(image): return cv2.dilate(image, kernel) thread = ImageProcessingThread(dilate, self.processed_image) elif operation_type == "开运算": def opening(image): return cv2.morphologyEx(image, cv2.MORPH_OPEN, kernel) thread = ImageProcessingThread(opening, self.processed_image) elif operation_type == "闭运算": def closing(image): return cv2.morphologyEx(image, cv2.MORPH_CLOSE, kernel) thread = ImageProcessingThread(closing, self.processed_image) thread.finished.connect(lambda result: self._process_finished(result, operation_type)) thread.start() def edge_extraction(self): """边界提取""" if self.processed_image is None: return dialog = ProcessingDialog("边界提取参数设置") kernel_size, _ = dialog.add_slider("核大小", 1, 21, 3) kernel_shape = dialog.add_combo_box("核形状", ["矩形", "椭圆", "十字形"]) if dialog.exec_(): ksize = kernel_size.value() shape_index = kernel_shape.currentIndex() kernel_shapes = [ cv2.MORPH_RECT, cv2.MORPH_ELLIPSE, cv2.MORPH_CROSS ] kernel = cv2.getStructuringElement(kernel_shapes[shape_index], (ksize, ksize)) def extract_edge(image): if len(image.shape) == 3: gray = cv2.cvtColor(image, cv2.COLOR_BGR2GRAY) else: gray = image.copy() # 膨胀 dilated = cv2.dilate(gray, kernel) # 边界提取 return dilated - gray thread = ImageProcessingThread(extract_edge, self.processed_image) thread.finished.connect(lambda result: self._process_finished(result, "边界提取")) thread.start() def threshold_segmentation(self): """阈值分割""" if self.processed_image is None: return dialog = ProcessingDialog("阈值分割参数设置") threshold_slider, threshold_spinbox = dialog.add_slider("阈值", 0, 255, 127) max_value_slider, max_value_spinbox = dialog.add_slider("最大值", 0, 255, 255) threshold_type = dialog.add_combo_box("阈值类型", [ "二进制阈值", "反二进制阈值", "截断阈值", "零阈值", "反零阈值", "Otsu算法" ]) if dialog.exec_(): threshold = threshold_spinbox.value() max_value = max_value_spinbox.value() type_index = threshold_type.currentIndex() threshold_types = [ cv2.THRESH_BINARY, cv2.THRESH_BINARY_INV, cv2.THRESH_TRUNC, cv2.THRESH_TOZERO, cv2.THRESH_TOZERO_INV, cv2.THRESH_BINARY + cv2.THRESH_OTSU ] def threshold_segment(image): if len(image.shape) == 3: gray = cv2.cvtColor(image, cv2.COLOR_BGR2GRAY) else: gray = image.copy() if type_index == 5: # Otsu算法,忽略手动设置的阈值 _, thresh = cv2.threshold(gray, 0, max_value, threshold_types[type_index]) else: _, thresh = cv2.threshold(gray, threshold, max_value, threshold_types[type_index]) return thresh type_names = ["二进制阈值", "反二进制阈值", "截断阈值", "零阈值", "反零阈值", "Otsu算法"] thread = ImageProcessingThread(threshold_segment, self.processed_image) thread.finished.connect( lambda result: self._process_finished(result, f"阈值分割 ({type_names[type_index]})")) thread.start() def adaptive_threshold_segmentation(self): """自适应阈值分割""" if self.processed_image is None: return dialog = ProcessingDialog("自适应阈值分割参数设置") max_value_slider, max_value_spinbox = dialog.add_slider("最大值", 0, 255, 255) method_combo = dialog.add_combo_box("自适应方法", ["均值", "高斯"]) type_combo = dialog.add_combo_box("阈值类型", ["二进制阈值", "反二进制阈值"]) block_size_slider, block_size_spinbox = dialog.add_slider("块大小", 3, 101, 11, 2) # 奇数 c_slider, c_spinbox = dialog.add_double_slider("常数C", -10, 10, 2, 0.1, 1) if dialog.exec_(): max_value = max_value_spinbox.value() method_index = method_combo.currentIndex() type_index = type_combo.currentIndex() block_size = block_size_spinbox.value() c = c_spinbox.value() adaptive_methods = [ cv2.ADAPTIVE_THRESH_MEAN_C, cv2.ADAPTIVE_THRESH_GAUSSIAN_C ] threshold_types = [ cv2.THRESH_BINARY, cv2.THRESH_BINARY_INV ] def adaptive_threshold(image): if len(image.shape) == 3: gray = cv2.cvtColor(image, cv2.COLOR_BGR2GRAY) else: gray = image.copy() return cv2.adaptiveThreshold( gray, max_value, adaptive_methods[method_index], threshold_types[type_index], block_size, c ) method_names = ["均值", "高斯"] type_names = ["二进制阈值", "反二进制阈值"] thread = ImageProcessingThread(adaptive_threshold, self.processed_image) thread.finished.connect(lambda result: self._process_finished( result, f"自适应阈值分割 ({method_names[method_index]}, {type_names[type_index]})" )) thread.start() def watershed_segmentation(self): """分水岭分割""" if self.processed_image is None: return if len(self.processed_image.shape) != 3: QMessageBox.warning(self, "警告", "分水岭分割需要彩色图像") return dialog = ProcessingDialog("分水岭分割参数设置") threshold_slider, threshold_spinbox = dialog.add_slider("阈值", 0, 255, 100) morph_size_slider, morph_size_spinbox = dialog.add_slider("形态学操作核大小", 1, 21, 3) if dialog.exec_(): threshold = threshold_spinbox.value() morph_size = morph_size_spinbox.value() def watershed(image): # 转换为灰度图 gray = cv2.cvtColor(image, cv2.COLOR_BGR2GRAY) # 阈值处理 ret, thresh = cv2.threshold(gray, threshold, 255, cv2.THRESH_BINARY_INV + cv2.THRESH_OTSU) # 噪声去除 kernel = np.ones((morph_size, morph_size), np.uint8) opening = cv2.morphologyEx(thresh, cv2.MORPH_OPEN, kernel, iterations=2) # 确定背景区域 sure_bg = cv2.dilate(opening, kernel, iterations=3) # 确定前景区域 dist_transform = cv2.distanceTransform(opening, cv2.DIST_L2, 5) ret, sure_fg = cv2.threshold(dist_transform, 0.7 * dist_transform.max(), 255, 0) # 找到未知区域 sure_fg = np.uint8(sure_fg) unknown = cv2.subtract(sure_bg, sure_fg) # 标记标签 ret, markers = cv2.connectedComponents(sure_fg) # 为所有标签加1,确保背景不是0而是1 markers = markers + 1 # 将未知区域标记为0 markers[unknown == 255] = 0 # 应用分水岭算法 markers = cv2.watershed(image, markers) image[markers == -1] = [0, 0, 255] # 标记边界为红色 return image thread = ImageProcessingThread(watershed, self.processed_image) thread.finished.connect(lambda result: self._process_finished(result, "分水岭分割")) thread.start() def calculate_hu_moments(self): """计算Hu不变矩""" if self.processed_image is None: return def calculate_moments(image): if len(image.shape) == 3: gray = cv2.cvtColor(image, cv2.COLOR_BGR2GRAY) else: gray = image.copy() # 计算矩 moments = cv2.moments(gray) # 计算Hu不变矩 hu_moments = cv2.HuMoments(moments) # 对数变换,方便显示 for i in range(7): hu_moments[i] = -1 * np.copysign(1.0, hu_moments[i]) * np.log10(np.abs(hu_moments[i])) return hu_moments thread = ImageProcessingThread(calculate_moments, self.processed_image) thread.finished.connect(self._on_hu_moments_calculated) thread.start() def _on_hu_moments_calculated(self, hu_moments): """Hu不变矩计算完成后的回调""" result = "Hu不变矩:\n\n" for i, moment in enumerate(hu_moments): result += f"H{i + 1}: {moment[0]:.8f}\n" self.info_text.setText(result) self.history_tabs.setCurrentWidget(self.info_tab) self.statusBar().showMessage("Hu不变矩计算完成") def calculate_glcm(self): """计算灰度共生矩阵""" if self.processed_image is None: return thread = ImageProcessingThread(self._calculate_glcm_thread, self.processed_image) thread.finished.connect(self._on_glcm_calculated) thread.start() def _calculate_glcm_thread(self, image): """在线程中计算GLCM""" if len(image.shape) == 3: gray = cv2.cvtColor(image, cv2.COLOR_BGR2GRAY) else: gray = image.copy() # 量化到16级灰度以减少计算量 gray_quantized = (gray // 16).astype(np.uint8) # 计算GLCM矩阵 (距离=1, 角度=0, 45, 90, 135度) glcm = graycomatrix(gray_quantized, distances=[1], angles=[0, np.pi / 4, np.pi / 2, 3 * np.pi / 4], levels=16, symmetric=True, normed=True) return glcm def _on_glcm_calculated(self, glcm): """GLCM计算完成后的回调""" self.glcm_widget.update_glcm(self.processed_image) self.history_tabs.setCurrentWidget(self.glcm_tab) self.statusBar().showMessage("灰度共生矩阵计算完成") def _process_finished(self, result, operation_name): """图像处理完成后的回调""" self.processed_image = result self.display_image(result) self.add_to_history(result, operation_name) self.statusBar().showMessage(f"{operation_name}完成") if __name__ == "__main__": app = QApplication(sys.argv) window = MainWindow() window.show() sys.exit(app.exec())为什么运行后打开图片D:\python\python.exe D:\PythonProject\.venv\2.py 插入图片后闪退后显示 进程已结束,退出代码为 -1073740791 (0xC0000409)
最新发布
06-09
『软件说明』 —————————————————— 软件名称:ZoomIt v4.0.0.0 软件类别:微软放大镜 运行环境:Win2003, WinXp, Win2000, Win9x 授权方式:免费 软件介绍: ZoomIt(主页|介绍)是一款非常实用的投影演示辅助工具。它源自Sysinternals公司,后来此公司被微软收购,因此,有些网友也称 ZoomIt为微软放大镜。ZoomIt只有一个exe文件(0.5MB)、完全免费、易于使用。通过快捷键可以很方便地调用ZoomIt三项功能: 屏幕放大、屏幕注释、定时提醒。 附:软件更新情况 ZoomIt v4(2009-08-05):   修复bug;改善 Vista 和 Windows 7 下实时放大(live zoom)的性能。 ZoomIt v3.01:   增加 LiveZoom 模式,适用于Windows Vista 及更高版本;可自定义打字、计时字体(仍不支持中文);放大后的屏幕可以Ctrl+C复制到剪贴板。 ZoomIt v2.2 更新内容:   1、屏幕绘图时如果光标过小,则显示为十字形,以便看清   2、输入文字时可以用鼠标移动插入文字的位置 ZoomIt v2.11版更新内容:   1、可以改变倒计时文字的颜色   2、改变了截屏方式,可以包含工具提示 『汉化说明』 ———————————————————————— 此程序是由Borland Delphi 2.0 +Microsoft Visual Studio C++6.0编写,本人对Delphi不熟悉,所以点击托盘出现的英文没有汉化, 汉化不是很完美,但绝对满足你的使用,请大家多多包涵。 Gemgin 现在是一名软件工程师,收入来源用于自身疾病治疗,十分需要您的支持,如果您想支持 Gemgin 的话,请捐助 Gemgin 吧! 捐助地址: 暂时为空。 『Gemgin 说明』 ———————————————————————— 此汉化由Gemgin制作。原程序版权归其制作人所有,本汉化版权归Gemgin所有。 Gemgin汉化软件纯粹是为方便国人,没有任何商业目的。使用此汉化给您造成的任何损失,请自行承担! 此汉化可任意下载、拷贝、传播,但Gemgin不承担因此而产生的所有可能的责任。 若传播、拷贝、转发请保正原汉化包的完整,请不要删改任何文件。 未经本人允许,请勿将此汉化用于商业用途和一切与“钱”有关的任何行为,因此而产生的所有不良后果与Gemgin无关,由使用者自行承担责任。 本人水平有限,难免会有错误,如有发现,希望能够通知我一声,多谢。 『关于 Gemgin』 ———————————————————— QQ:308463776 E-mail: Gemgin@live.cn BLOG: http://hexun.com/ctfysj By Gemgin 2009.09/17 广东◎深圳
评论
添加红包

请填写红包祝福语或标题

红包个数最小为10个

红包金额最低5元

当前余额3.43前往充值 >
需支付:10.00
成就一亿技术人!
领取后你会自动成为博主和红包主的粉丝 规则
hope_wisdom
发出的红包
实付
使用余额支付
点击重新获取
扫码支付
钱包余额 0

抵扣说明:

1.余额是钱包充值的虚拟货币,按照1:1的比例进行支付金额的抵扣。
2.余额无法直接购买下载,可以购买VIP、付费专栏及课程。

余额充值