axios封装

vue中Axios的封装和API接口的管理 vue中Axios的封装和API接口的管理 一、axios的封装 npm install axios; // 安装axios 引入 一般我会在项目的src目录中,新建一个request文件夹,然后在里面新建一个http.js和一个api.js文件。http.js文件用来封装我们的axios,api.js用来统一管理我们的接口。 // 在http.js中引入axios import axios from 'axios'; // 引入axios import QS from 'qs'; // 引入qs 阅读详情
AI摘要

本文围绕Axios封装展开,介绍了Axios是基于promise的HTTP客户端,适用于node.js和浏览器。详细阐述了其安装、创建实例、封装请求拦截(含统一设置token、处理FormData等)、响应拦截、http请求封装及使用方法,最后给出完整代码并提醒按需调整。

什么是 Axios?


What is Axios?

Axios 是一个 基于 promise 的 HTTP 客户端,适用于 node.js 和浏览器。它提供了简洁的API、自动JSON数据转换、请求/响应拦截等强大功能。

一、安装

  • 使用 npm: npm install axios
  • 使用 yarn: yarn add axios

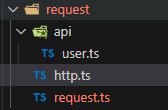
并在src文件夹下创建文件
在这里插入图片描述

二、创建Axios实例

在request文件下创建axios实例

import axios from 'axios'

const base = import.meta.env.VITE_APP_API // 接口地址

const service= axios.create({
  baseURL: base,
  timeout: 60000, // 设置超时时间 
})

这里需要注意两点

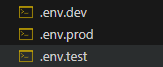
  1. 需要在项目根目录下配置env环境文件
    在这里插入图片描述
    在vite中需要这样配置
    必须使用VITE开头的配置信息 否则无法获取
NODE_ENV = "dev"
VITE_APP_ENV='dev'

//开发环境后端接口地址
VITE_APP_API='http://www.dev.com'
  1. 在package.json配置与env名字一样,来区分启动环境
    "dev": "vite --mode dev",
    "test": "vite build --mode test",
    "build": "vite build --mode prod",

三、封装请求拦截request

3.1 统一设置token

service.interceptors.request.use(
  (config: any) => {
    // Do something before request is sent
    const token = localStorage.getItem('access_token')
    config.headers['X-Token'] = `Bearer ${token}` // 设置token

    return config
  },
  (error) => {
    // Do something with request error
    return Promise.reject(error)
  },
)

3.2 处理无需token情况

service.interceptors.request.use(
  (config: any) => {
    // Do something before request is sent
    const needToken = !(config.params?.noToken || config.data?.noToken)
    
    // 示例1:添加token
    const token = localStorage.getItem('access_token')
    if (needToken) {
      config.headers['X-Token'] = `Bearer ${token}` // 设置token
    }
 
    delete config.params.noToken 

    return config
  },

使用方法

    let params = {
        noToken: true, 
    }
    const res = await getXXX(params)

3.3 动态处理FormData格式(比如文件上传)

   if (config.data instanceof FormData) {
      config.headers['Content-Type'] = 'multipart/form-data' // 文件上传
    }

3.4 请求重试

const RETRY_COUNT = 3
let retry = 0 // 重试次数

service.interceptors.request.use(
  (config: any) => {
    // Do something before request is sent
    config.metaData = { startTime: Date.now() }
    return config
  },
  (error) => {
    // Do something with request error
    if (retry < RETRY_COUNT) {
      retry++
      console.warn(`请求超时,正在进行第 ${retry} 次重试...`)
      return service.request(error.config)
    }
    return Promise.reject(error)
  },
)

响应拦截里面

service.interceptors.response.use(
  (response: any) => { 
    const endTime = Date.now()
    const duration = endTime - response.config.metaData.startTime
    console.log(`请求 ${response.config.url} 耗时 ${duration}ms`)
)

3.5 取消超时请求

应用条件:在某些情况下(例如网络连接不可用),尽早取消连接将使 axios 调用受益。如果不取消,axios 调用可能会挂起,直到父代码/堆栈超时(在服务器端应用中可能是几分钟)。
由于cancelToken 官网已经弃用这里就不再使用了,这里使用的是signal 这个方法。

在request文件下添加官网的这段代码

	function newAbortSignal(timeoutMs: number) { 
	  const abortController = new AbortController()
	  setTimeout(() => abortController.abort(), timeoutMs || 0)
	
	  return abortController.signal
	}

在请求拦截里面设置

    config.signal = newAbortSignal(config.timeout || 60000) //  超时控制
    delete config.params.signal //删除请求参数

在http文件中设置

	.catch((err) => {
      if (axios.isCancel(err)) {
        console.log('请求超时自动取消', err.message)
      }
    })

使用

const userLogin = async () => {
    const controller = new AbortController()
    let params = {
        signal: controller.signal,
    }
    const res = await postLogin(params)
    console.log(res)
}

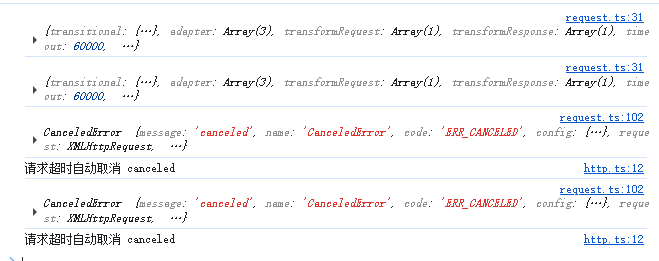
将网络降一下速测试
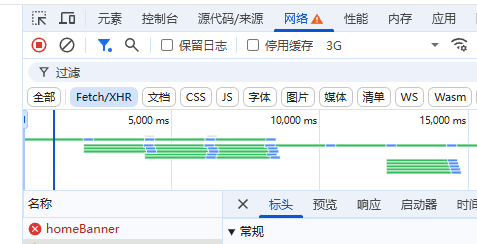
在这里插入图片描述

打印
在这里插入图片描述

3.6 取消重复请求

有时同一时间内多次重复请求一个相同的接口,这时需要把之前的请求取消掉。
在request文件下 添加这段代码

    //存储请求标识和控制器
	const pendingRequests = new Map<string, AbortController>() 
	// 生成请求标识(方法+url+参数)
	function generateReqKey(config: any) {
	  const { method, url, params, data } = config
	  return [method, url, JSON.stringify(params), JSON.stringify(data)].join('&')
	}

在请求拦截里面设置

    const requestKey = generateReqKey(config)
    // 检查重复请求
    if (pendingRequests.has(requestKey)) {
      const abortController = pendingRequests.get(requestKey)!
      abortController.abort() // 取消前一个相同请求
      pendingRequests.delete(requestKey)
    }
    // 创建新控制器并存储
    const controller = new AbortController()
    config.signal = controller.signal  
    pendingRequests.set(requestKey, controller)

在响应拦截器中设置

// 清理已完成请求 
service.interceptors.response.use(response => {
  const requestKey = generateReqKey(response.config)
  pendingRequests.delete(requestKey)
  return response
}, error => {
  if (!axios.isCancel(error)) { // 排除主动取消的请求
    const requestKey = generateReqKey(error.config)
    pendingRequests.delete(requestKey)
  }
  return Promise.reject(error)
})

最后看效果
在这里插入图片描述

四、封装响应拦截response

service.interceptors.response.use(
  (response: any) => { 
    // 2xx范围内的状态码触发 
    
    const res = response.data 
    // 自定义业务状态码处理
    if (res.code !== 200) {
      // 超出2xx范围的状态码 映射
      const ERROR_MAP: Record<number, string> = {
        400: '请求参数错误',
        401: '认证过期,请重新登录',
        403: '无权访问该资源',
        500: '服务器开小差了,请稍后再试',
        // 其他状态码
      } 
      const { errCode, errMsg } = res
      // HTTP状态码处理
      const message = ERROR_MAP[errCode] || errMsg || '请求处理失败'
      console.warn(message) // 错误信息提示
    } else {
      return res
    }
  },
  (error) => { 
    return Promise.reject(error)
  },
)

五、封装 http 请求

在http文件下创建axios实例

import service from './request'
import axios from 'axios'

const http = {
  get(url: string, params: object) {
    return service({
      url,
      method: 'GET',
      params,
    }).catch((err) => {
      if (axios.isCancel(err)) {
        console.log('请求超时自动取消', err.message)
      }
    })
  },
  post(url: string, data: any) {
    return service({
      url,
      method: 'POST',
      data,
    }).catch((err) => {
      if (axios.isCancel(err)) {
        console.log('请求超时自动取消', err.message)
      }
    })
  },
}

export default http 

六、使用

在api文件夹下新建文件并引入

import http from '../http'

export const getLogin = (params: object) => http.get('/login', params) // 登录

export const getUserLogin = (data = {}) => http.get('/user/login' , data) //获取当前登录人信息

注:如果后端接口前缀有很多一样的可以新建文件再统一 引入

import { base1 , base2} from '../XXX'
export const getLogin = (params: object) => http.get(base + '/XXX', params) // 登录
export const getUserLogin = (params: object) => http.get(base2 + '/XXX', params) // 获取当前登录人信息

页面中引入接口并使用

const handleLogin = async () => {
    const res = await getLogin ()
    console.log(res)
}

总结

完整的request代码 ,其中一些细节根据不同项目需要不同调整~

import axios from 'axios'

const base = import.meta.env.VITE_APP_API // 接口地址

const service = axios.create({
  baseURL: base,
  timeout: 60000, // 设置超时时间
  // headers: { 'X-Custom-Header': 'foobar' }, // 设置请求头
})

//超时辅助函数
function newAbortSignal(timeoutMs: number) {
  const abortController = new AbortController()
  setTimeout(() => abortController.abort(), timeoutMs || 0)

  return abortController.signal
}

const RETRY_COUNT = 3
let retry = 0 // 重试次数

service.interceptors.request.use(
  (config: any) => {
    // Do something before request is sent
    console.log(config)

    config.signal = newAbortSignal(config.timeout || 60000)

    const needToken = !(config.params?.noToken || config.data?.noToken)

    // 示例1:添加token
    const token = localStorage.getItem('access_token')
    if (needToken) {
      config.headers['X-Token'] = `Bearer ${token}` // 根据服务器设置请求头
    }

    //示例2:不验证token
    delete config.params.noToken
    delete config.params.signal

    // 示例3:Content-Type动态处理
    if (config.data instanceof FormData) {
      config.headers['Content-Type'] = 'multipart/form-data' // 文件上传
    }

    // 示例4:请求超时
    config.metaData = { startTime: Date.now() }

    return config
  },
  (error) => {
    // Do something with request error

    if (retry < RETRY_COUNT) {
      retry++
      console.warn(`请求超时,正在进行第 ${retry} 次重试...`)
      return service.request(error.config)
    }
    return Promise.reject(error)
  },
)

service.interceptors.response.use(
  (response: any) => {
    // Any status code that lie within the range of 2xx cause this function to trigger
    // Do something with response data
    console.log(response)

    const endTime = Date.now()
    const duration = endTime - response.config.metaData.startTime
    console.log(`请求 ${response.config.url} 耗时 ${duration}ms`)

    // 2xx范围内的状态码

    // 统一处理数据结构
    const res = response.data

    // 自定义业务状态码处理
    if (res.code !== 200) {
      // 超出2xx范围的状态码 映射
      const ERROR_MAP: Record<number, string> = {
        400: '请求参数错误',
        401: '认证过期,请重新登录',
        403: '无权访问该资源',
        500: '服务器开小差了,请稍后再试',
        // 其他状态码
      }
      // 错误信息解析
      const { errCode, errMsg } = res
      // HTTP状态码处理
      const message = ERROR_MAP[errCode] || errMsg || '请求处理失败'
      console.warn(message) // 错误信息提示
    } else {
      return res
    }
  },
  (error) => {
    // Any status codes that falls outside the range of 2xx cause this function to trigger
    // Do something with response error
    console.log(error)
    return Promise.reject(error)
  },
)

export default service

参考 :axios官网

axios接口请求封装 一、通常在src文件夹新建一个utils/request.js文件,对axios进行二次封装(记住先把axios安装了哦)二、在src文件夹新建一个api文件夹,在该文件夹写业务相关的请求(这里是api/user.js)三、页面中调用(有参数就传递相应参数) 阅读详情

相关推荐

day20JS-axios数据通信

简单介绍了axios的使用

kwj258036的博客 1854

axios 最详细封装

axios 最详细封装

m0_58481462的博客 5万+

如何封装一个axios,封装axios有哪些好处

如何封装一个axios,封装axios有哪些好处

Sherry Tian的博客 1347

vue中axios的二次封装——vue 封装axios详细步骤

通常我们的项目会越做越大,页面也会越来越多,如果页面非常的少,直接用axios也没有什么大的影响,那页面组件多了起来,上百个接口呢,这个时候后端改了接口,多加了一个参数什么的呢?那就只有找到那个页面,进去修改,整个过程很繁琐,不易于项目的维护和迭代。这个时候如果我们统一的区管理接口,需要修改某一个接口的时候直接在api里修改对应的请求,是不是很方便呢?因为我们用的最多的还是get post请求,我们就可以针对封装。

Vivien_CC的博客 3万+

用OpenCV+ROS实现焊接机器人智能纠偏:线激光视觉的算法调参全流程

本文详细介绍了基于OpenCV和ROS的焊接机器人智能纠偏系统全流程。通过线激光视觉系统实时感知焊缝,重点解析了抗干扰图像预处理、改进的Steger算法提取激光条纹中心线,以及从2D像素到机器人基坐标系的完整坐标变换。该系统为应对焊接飞溅、弧光等复杂工况,实现高精度实时路径纠偏提供了从算法优化到工程集成的完整解决方案。

vodka的博客 159

rv1126平台spi屏调试

st7789v2 i2c调试

zuoanyouzhuan_的博客 2038

什么是axios?怎么使用axios封装Ajax?

Axios 是一个基于 Promise 的 HTTP 客户端,它可以在浏览器和 Node.js 环境中使用。Axios 提供了简单易用的 API,用于执行各种 HTTP 请求操作,如 GET、POST、PUT、DELETE 等。基于 Promise:Axios 的 API 设计完全基于 Promise,这使得它能够很好地与 async/await 语法结合使用,从而简化了异步操作的处理。请求和响应的拦截器:Axios 支持请求和响应的拦截器,允许你在请求发送前或响应接收后对其进行处理。

上官花雨滴博客!!! 2179

VMware ESXi +DELL虚拟化存储磁盘容量处于紧急状态问题的处理

1、环境介绍 exsi server两台(DELL R730 ): 192.168.3.206 VMware EXSi6.5 192.168.3.207 VMware EXSi6.5 磁盘存储柜一台(DELL SC2000): 192.168.3.208 2、故障处理 由于前期规划的卷空间过大,虚拟机文件逐年增大以后,造成卷的磁盘占用过与整个磁盘空间的容量,虚拟化平台可用容量爆掉,DELL SC2000自动切换到紧急状态,禁止所有磁盘I/O,exsi主机上的虚拟机无法开机 首先,安装

wolf1105的博客 3533

Axios二次封装

为什么要二次封装axios,如何二次封装axios。

2202_75922690的博客 1772

给STM32F103的7寸屏找个新UI:LVGL 8.2裸机移植保姆级教程(附避坑清单)

本文详细介绍了如何将LVGL 8.2裸机移植到STM32F103开发板,特别针对7寸大屏(800×480分辨率)进行优化配置。从环境准备、工程搭建到显示驱动移植、内存优化与性能调优,提供完整的解决方案和避坑清单,帮助开发者快速实现美观的用户界面。

weixin_29181861的博客 415

RK3588高速接口实战-PCIE

摘要: RK3588的PCIe接口支持PCIe 3.0x4和PCIe 2.1x1/x2,具备Root Complex和Endpoint模式,适用于NVMe SSD、5G模块等高速设备。硬件设计需注意85Ω/100Ω阻抗匹配、220nF AC耦合电容及100MHz参考时钟。设备树需配置控制器节点、PHY模式和IOMMU映射(RC模式用iommu-map,EP模式用iommus)。调试时可通过lspci检查链路状态,dmesg查看训练日志,perf分析性能。常见问题包括设备识别失败(检查复位时序、PHY配置)、

weiyvyy的博客 505

关于Axios的二次封装

Axios用的好好的为什么要进行二次封装?二次封装的好处是什么?怎么样进行二次封装?这篇文章告诉朋友们。

weixin_45103901的博客 1379

【AI智能体】Dify 搭建个人专属简历美化助手操作详解

Dify 搭建个人专属简历诊断助手实战操作详解

congge 4382

axios 封装

最近一直在写Vue项目,和后台交互用的是官方推荐的axios。 Axios 是一个基于 promise 的 HTTP 库 官方教程里面有详细的使用方法,在此就不做详细描述了~ 我们如果在每个需要使用的页面都引入axios 然后写 get、post方法,代码就会变得非常的冗余,会有很多重复的代码,并且需要修改某些通用属性的时候,可能就要涉及到所有的文件。 哪些信息是可以作为公用的 一个完整项目中...

WangYangsea的博客 1400

fasterlio原理及代码框架梳理

Faster-LIO 的优势是在保持同等高精度的前提下,显著提升计算效率,以支持更极端的应用场景(如高速无人机)和更廉价的硬件平台。可以把 Faster-LIO 理解为用一把更快的“空间哈希筛子”(iVox)替换了原来精细的“动态平衡树”(ikd-Tree),从而在精度损失极小的情况下,实现了效率的显著提升。:只在实际有地图点的空间区域动态创建和保留体素单元,形成一个稀疏的体素地图。是关键:将去畸变点云中的每个点,在 iVox 维护的局部地图中搜索近邻(如5个最近点),构建点到面的距离残差。

Studying…… 246

瑞芯微RV1109平台GT911触摸屏驱动调试记录1

很明显这里可以看到系统已经配置了i2c-0、i2c-1、i2c-3、i2c-4、i2c-5,当开机的时候系统已经将相应的I2C节点注册成功了,说明I2C部分是没有问题的。

bingdund的博客 298

我是如何封装axios的

前言 在vue中最常用的应该就是axios了,这是一个很强大的处理ajax的库。今天我就分享一下我是如何封装axios的。axios的基本api不再赘述,提前安装一下也不用我说了吧 第一步:配置axios 首先,创建一个Service.js,这里面存放的时axios的配置以及拦截器等,最后导出一个axios对象。我平常elementUI用的比较多,这里你也可以使用自己的UI库。 impor...

weixin_34192816的博客 3410

Data-Structures-and-Algorithm-Analysis-in-Java.pdf

作者: Weiss, Mark A. 出版社: Addison Wesley Data Structures and Algorithm Analysis in Java is an “advanced algorithms” book that fits between traditional CS2 and Algorithms Analysis courses. In the old ACM Curriculum Guidelines, this course was known as CS7. This text is for readers who want to learn good programming and algorithm analysis skills simultaneously so that they can develop such programs with the maximum amo...

AXIOS的封装

1. 始vue化项目 https://www.cnblogs.com/xiaonq/p/11027880.html vue init webpack deaxios # 使用脚手架创建项目 deaxios(项目名,随便取得) cd deaxios # 进入项目 npm install axios@0.19.2 # 安装axios npm i element-ui -S # 安装element-ui到当前项目 前端项目结构规范 2.封装axios 2.1 创建 src/http

www_b的博客 526

深度学习工具包 DeepLearningToolbox

深度学习工具包Deprecation notice.-----This toolbox is outdated and no longer maintained.There are much better tools available for deep learning than this toolbox, e.g. [Theano](http://deeplearning.net/software/theano/), [torch](http://torch.ch/) or [tensorflow](http://www.tensorflow.org/)I would suggest you use one of the tools mentioned above rather than use this toolbox.Best, Rasmus.DeepLearnToolbox================A Matlab toolbox for Deep Learning.Deep Learning is a new subfield of machine learning that focuses on learning deep hierarchical models of data.It is inspired by the human brain's apparent deep (layered, hierarchical) architecture.A good overview of the theory of Deep Learning theory is[Learning Deep Architectures for AI](http://www.iro.umontreal.ca/~bengioy/papers/ftml_book.pdf)For a more informal introduction, see the following videos by Geoffrey Hinton and Andrew Ng.* [The Next Generation of Neural Networks](http://www.youtube.com/watch?v=AyzOUbkUf3M) (Hinton, 2007)* [Recent Developments in Deep Learning](http://www.youtube.com/watch?v=VdIURAu1-aU) (Hinton, 2010)* [Unsupervised Feature Learning and Deep Learning](http://www.youtube.com/watch?v=ZmNOAtZIgIk) (Ng, 2011)If you use this toolbox in your research please cite [Prediction as a candidate for learning deep hierarchical models of data](http://www2.imm.dtu.dk/pubdb/views/publication_details.php?id=6284)```@MASTERSTHESIS\{IMM2012-06284, author = "R. B. Palm", title = "Prediction as a candidate for learning deep hierarchical models of data", year = "2012",}```Contact: rasmusbergpalm at gmail dot comDirectories included in the toolbox-----------------------------------`NN/` - A library for Feedforward Backpropagation Neural Networks`CNN/` - A library for Convolutional Neural Networks`DBN/` - A library for Deep Belief Networks`SAE/` - A library for Stacked Auto-Encoders`CAE/` - A library for Convolutional Auto-Encoders`util/` - Utility functions used by the libraries`data/` - Data used by the examples`tests/` - unit tests to verify toolbox is workingFor references on each library check REFS.mdSetup-----1. Download.2. addpath(genpath('DeepLearnToolbox'));Example: Deep Belief Network---------------------```matlabfunction test_example_DBNload mnist_uint8;train_x = double(train_x) / 255;test_x = double(test_x) / 255;train_y = double(train_y);test_y = double(test_y);%% ex1 train a 100 hidden unit RBM and visualize its weightsrand('state',0)dbn.sizes = [100];opts.numepochs = 1;opts.batchsize = 100;opts.momentum = 0;opts.alpha = 1;dbn = dbnsetup(dbn, train_x, opts);dbn = dbntrain(dbn, train_x, opts);figure; visualize(dbn.rbm{1}.W'); % Visualize the RBM weights%% ex2 train a 100-100 hidden unit DBN and use its weights to initialize a NNrand('state',0)%train dbndbn.sizes = [100 100];opts.numepochs = 1;opts.batchsize = 100;opts.momentum = 0;opts.alpha = 1;dbn = dbnsetup(dbn, train_x, opts);dbn = dbntrain(dbn, train_x, opts);%unfold dbn to nnnn = dbnunfoldtonn(dbn, 10);nn.activation_function = 'sigm';%train nnopts.numepochs = 1;opts.batchsize = 100;nn = nntrain(nn, train_x, train_y, opts);[er, bad] = nntest(nn, test_x, test_y);assert(er < 0.10, 'Too big error');```Example: Stacked Auto-Encoders---------------------```matlabfunction test_example_SAEload mnist_uint8;train_x = double(train_x)/255;test_x = double(test_x)/255;train_y = double(train_y);test_y = double(test_y);%% ex1 train a 100 hidden unit SDAE and use it to initialize a FFNN% Setup and train a stacked denoising autoencoder (SDAE)rand('state',0)sae = saesetup([784 100]);sae.ae{1}.activation_function = 'sigm';sae.ae{1}.learningRate = 1;sae.ae{1}.inputZeroMaskedFraction = 0.5;opts.numepochs = 1;opts.batchsize = 100;sae = saetrain(sae, train_x, opts);visualize(sae.ae{1}.W{1}(:,2:end)')% Use the SDAE to initialize a FFNNnn = nnsetup([784 100 10]);nn.activation_function = 'sigm';nn.learningRate = 1;nn.W{1} = sae.ae{1}.W{1};% Train the FFNNopts.numepochs = 1;opts.batchsize = 100;nn = nntrain(nn, train_x, train_y, opts);[er, bad] = nntest(nn, test_x, test_y);assert(er < 0.16, 'Too big error');```Example: Convolutional Neural Nets---------------------```matlabfunction test_example_CNNload mnist_uint8;train_x = double(reshape(train_x',28,28,60000))/255;test_x = double(reshape(test_x',28,28,10000))/255;train_y = double(train_y');test_y = double(test_y');%% ex1 Train a 6c-2s-12c-2s Convolutional neural network %will run 1 epoch in about 200 second and get around 11% error. %With 100 epochs you'll get around 1.2% errorrand('state',0)cnn.layers = { struct('type', 'i') %input layer struct('type', 'c', 'outputmaps', 6, 'kernelsize', 5) %convolution layer struct('type', 's', 'scale', 2) %sub sampling layer struct('type', 'c', 'outputmaps', 12, 'kernelsize', 5) %convolution layer struct('type', 's', 'scale', 2) %subsampling layer};cnn = cnnsetup(cnn, train_x, train_y);opts.alpha = 1;opts.batchsize = 50;opts.numepochs = 1;cnn = cnntrain(cnn, train_x, train_y, opts);[er, bad] = cnntest(cnn, test_x, test_y);%plot mean squared errorfigure; plot(cnn.rL);assert(er<0.12, 'Too big error');```Example: Neural Networks---------------------```matlabfunction test_example_NNload mnist_uint8;train_x = double(train_x) / 255;test_x = double(test_x) / 255;train_y = double(train_y);test_y = double(test_y);% normalize[train_x, mu, sigma] = zscore(train_x);test_x = normalize(test_x, mu, sigma);%% ex1 vanilla neural netrand('state',0)nn = nnsetup([784 100 10]);opts.numepochs = 1; % Number of full sweeps through dataopts.batchsize = 100; % Take a mean gradient step over this many samples[nn, L] = nntrain(nn, train_x, train_y, opts);[er, bad] = nntest(nn, test_x, test_y);assert(er < 0.08, 'Too big error');%% ex2 neural net with L2 weight decayrand('state',0)nn = nnsetup([784 100 10]);nn.weightPenaltyL2 = 1e-4; % L2 weight decayopts.numepochs = 1; % Number of full sweeps through dataopts.batchsize = 100; % Take a mean gradient step over this many samplesnn = nntrain(nn, train_x, train_y, opts);[er, bad] = nntest(nn, test_x, test_y);assert(er < 0.1, 'Too big error');%% ex3 neural net with dropoutrand('state',0)nn = nnsetup([784 100 10]);nn.dropoutFraction = 0.5; % Dropout fraction opts.numepochs = 1; % Number of full sweeps through dataopts.batchsize = 100; % Take a mean gradient step over this many samplesnn = nntrain(nn, train_x, train_y, opts);[er, bad] = nntest(nn, test_x, test_y);assert(er < 0.1, 'Too big error');%% ex4 neural net with sigmoid activation functionrand('state',0)nn = nnsetup([784 100 10]);nn.activation_function = 'sigm'; % Sigmoid activation functionnn.learningRate = 1; % Sigm require a lower learning rateopts.numepochs = 1; % Number of full sweeps through dataopts.batchsize = 100; % Take a mean gradient step over this many samplesnn = nntrain(nn, train_x, train_y, opts);[er, bad] = nntest(nn, test_x, test_y);assert(er < 0.1, 'Too big error');%% ex5 plotting functionalityrand('state',0)nn = nnsetup([784 20 10]);opts.numepochs = 5; % Number of full sweeps through datann.output = 'softmax'; % use softmax outputopts.batchsize = 1000; % Take a mean gradient step over this many samplesopts.plot = 1; % enable plottingnn = nntrain(nn, train_x, train_y, opts);[er, bad] = nntest(nn, test_x, test_y);assert(er < 0.1, 'Too big error');%% ex6 neural net with sigmoid activation and plotting of validation and training error% split training data into training and validation datavx = train_x(1:10000,:);tx = train_x(10001:end,:);vy = train_y(1:10000,:);ty = train_y(10001:end,:);rand('state',0)nn = nnsetup([784 20 10]); nn.output = 'softmax'; % use softmax outputopts.numepochs = 5; % Number of full sweeps through dataopts.batchsize = 1000; % Take a mean gradient step over this many samplesopts.plot = 1; % enable plottingnn = nntrain(nn, tx, ty, opts, vx, vy); % nntrain takes validation set as last two arguments (optionally)[er, bad] = nntest(nn, test_x, test_y);assert(er < 0.1, 'Too big error');```[![Bitdeli Badge](https://d2weczhvl823v0.cloudfront.net/rasmusbergpalm/deeplearntoolbox/trend.png)](https://bitdeli.com/free "Bitdeli Badge")

霍尼韦尔SoftMaster使用说明

霍尼韦尔SoftMaster使用说明

axios的使用以及封装

axios 作为现代前端开发的核心工具,其灵活性和强大功能为 HTTP 请求处理提供了高效解决方案。通过原生使用和二次封装,开发者能够根据项目需求实现从基础到进阶的请求管理。封装后的代码不仅提升了可维护性,还通过统一配置和拦截机制增强了健壮性。接口解耦进一步优化了项目结构,使团队协作更加规范。掌握这些技巧将显著提升开发效率和代码质量,为复杂应用奠定坚实基础。

whhhhhhhhhw的博客 1182

ssm框架搭建

这个是一个在idea上成功跑起来的ssm框架项目,保存在这里方便以后使用直接下载

axios的二次封装,

大部分情况下,请求头都是固定的,只有少部分情况下,会需要一些特殊的请求头,这里将普适性的请求头作为基础配置。当需要特殊请求头时,将特殊请求头作为参数传入,覆盖基础配置。请求,就要把这些比如设置超时时间、设置请求头、根据项目环境判断使用哪个请求地址、错误处理等等操作,都需要写一遍。封装的同时,你需要和 后端协商好一些约定,请求头,状态码,请求超时时间.......如果每个页面都发送类似的请求,都要写一堆的配置与错误处理,就显得过于繁琐了。请求拦截器: 根据请求的请求头设定,来决定哪些请求可以访问。

JiQie_的博客 1133

axios的封装

掘金地址 一.axios的封装 在vue项目中,和后台交互获取数据这块,我们通常使用的是axios库,它是基于promise的http库,可运行在浏览器端和node.js中。他有很多优秀的特性,例如拦截请求和响应、取消请求、转换json、客户端防御XSRF等。所以我们的尤大大也是果断放弃了对其官方库vue-resource的维护,直接推荐我们使用axios库。如果还对axios不了解的,可以移步 axios文档。 安装 npm install axios; // 安装axios 引入 一般我会在项目的s

m0_53553562的博客 853

【axios】封装axios

Axios是一个基于 promise的 HTTP`库,可以用在浏览器和node.js中。(本文围绕XHR) axios提供两个http请求适配器,XHR和HTTP。 XHR的核心是浏览器端的XMLHttpRequest对象; HTTP的核心是node的http.request方法。

余浩的博客 3496

Axios的封装

封装axios的目的是为了简化 API 调用,统一处理请求和响应,以及提高代码的可维护性。下面是一个简单的封装示例,并对比封装前后的差异。

2301_78193510的博客 926

Axios封装

axios 是一个轻量的 HTTP客户端基于 XMLHttpRequest 服务来执行 HTTP 请求,支持丰富的配置,支持 Promise,支持浏览器端和 Node.js 端。自Vue2.0起,尤大宣布取消对 vue-resource 的官方推荐,转而推荐 axios。现在 axios 已经成为大部分 Vue 开发者的首选特性从浏览器中创建 XMLHttpRequests从 node.js 创建 http请求支持 Promise API拦截请求和响应转换请求数据和响应数据取消请求。

weixin_57844432的博客 3267
上一篇: 3分钟快速实现 在线使用Deepseek-R1大模型
下一篇: 实现高度自动过渡的几种方案
Jet_closer
博客等级 码龄7年 568粉丝 83原创
评论
成就一亿技术人!
拼手气红包6.0元
还能输入1000个字符
 
 条评论被折叠 查看
添加红包

请填写红包祝福语或标题

个

红包个数最小为10个

元

红包金额最低5元

当前余额3.43元 前往充值 >
需支付:10.00元
成就一亿技术人!
领取后你会自动成为博主和红包主的粉丝 规则
hope_wisdom
发出的红包

打赏作者

Jet_closer

你的鼓励将是我创作的最大动力

¥1 ¥2 ¥4 ¥6 ¥10 ¥20
扫码支付:¥1
获取中
扫码支付

您的余额不足,请更换扫码支付或充值

打赏作者

实付元
使用余额支付
点击重新获取
扫码支付
钱包余额 0

抵扣说明:

1.余额是钱包充值的虚拟货币,按照1:1的比例进行支付金额的抵扣。
2.余额无法直接购买下载,可以购买VIP、付费专栏及课程。

余额充值