


 本文介绍了如何在Spring Boot项目中实现自定义的Spring Security资源服务器。首先,新建Spring Boot项目并引入相关依赖,配置application.yml以指定授权服务器地址。接着,创建配置类以配置资源服务器并启用JWT令牌验证。此外,还创建了一个资源接口用于获取资源所有者信息。在客户端配置中,主要修改了user-name-attribute以匹配授权服务器返回的属性。完成这些步骤后,启动授权服务器和资源服务器,通过浏览器访问资源接口,可以看到整个OAuth2流程的运行效果,尤其强调了授权码模式的重要性。
安装资源服务器
1、 新建一个Spring Boot项目,命名为 spring-security-resource-server
2、引入pom.xml依赖
<pre class="prettyprint hljs xml" style="padding: 0.5em; font-family: Menlo, Monaco, Consolas, "Courier New", monospace; color: rgb(68, 68, 68); border-radius: 4px; display: block; margin: 0px 0px 1.5em; font-size: 14px; line-height: 1.5em; word-break: break-all; overflow-wrap: break-word; white-space: pre; background-color: rgb(246, 246, 246); border: none; overflow-x: auto;"><dependency>
<groupId>org.springframework.boot</groupId>
<artifactId>spring-boot-starter-security</artifactId>
</dependency>
<dependency>
<groupId>org.springframework.boot</groupId>
<artifactId>spring-boot-starter-oauth2-resource-server</artifactId>
</dependency>
<dependency>
<groupId>org.springframework.boot</groupId>
<artifactId>spring-boot-starter-web</artifactId>
</dependency>
其中与授权服务器依赖不同的是,资源服务器有spring boot版本,版本号会有spring boot进行管理,不需要显示声明。
配置资源服务器
1、配置application.yml 文件
<pre class="prettyprint hljs less" style="padding: 0.5em; font-family: Menlo, Monaco, Consolas, "Courier New", monospace; color: rgb(68, 68, 68); border-radius: 4px; display: block; margin: 0px 0px 1.5em; font-size: 14px; line-height: 1.5em; word-break: break-all; overflow-wrap: break-word; white-space: pre; background-color: rgb(246, 246, 246); border: none; overflow-x: auto;">spring:
security:
oauth2:
resourceserver:
jwt:
issuer-uri: http://localhost:9000
该配置用于指定授权服务器地址,资源服务器将从该地址获取JWT令牌,并根据JWT中的属性进一步自我配置,发现授权服务器的公钥、验证JWT令牌。
2、创建配置类
<pre class="prettyprint hljs less" style="padding: 0.5em; font-family: Menlo, Monaco, Consolas, "Courier New", monospace; color: rgb(68, 68, 68); border-radius: 4px; display: block; margin: 0px 0px 1.5em; font-size: 14px; line-height: 1.5em; word-break: break-all; overflow-wrap: break-word; white-space: pre; background-color: rgb(246, 246, 246); border: none; overflow-x: auto;">@EnableWebSecurity(debug = true)
public class ResoruceServerConfig {
@Bean
SecurityFilterChain securityFilterChain(HttpSecurity http) throws Exception {
http
.authorizeRequests()
.mvcMatchers("/userinfo/**").hasAuthority("SCOPE_userinfo")
.and()
.oauth2ResourceServer()
.jwt();
return http.build();
}
}
.mvcMatchers("/userinfo/**").hasAuthority("SCOPE_userinfo") 匹配 /userinfo/** 地址,允许访问范围是 SCOPE_userinfo
oauth2ResourceServer() 定义为资源服务器
jwt() 使用JWT令牌
3、 创建一个资源接口
/userinfo/ 用来获取资源所有者基本信息
<pre class="prettyprint hljs kotlin" style="padding: 0.5em; font-family: Menlo, Monaco, Consolas, "Courier New", monospace; color: rgb(68, 68, 68); border-radius: 4px; display: block; margin: 0px 0px 1.5em; font-size: 14px; line-height: 1.5em; word-break: break-all; overflow-wrap: break-word; white-space: pre; background-color: rgb(246, 246, 246); border: none; overflow-x: auto;">@Data
public class UserInfoRes {
private String username;
}
创建Rest接口
<pre class="prettyprint hljs kotlin" style="padding: 0.5em; font-family: Menlo, Monaco, Consolas, "Courier New", monospace; color: rgb(68, 68, 68); border-radius: 4px; display: block; margin: 0px 0px 1.5em; font-size: 14px; line-height: 1.5em; word-break: break-all; overflow-wrap: break-word; white-space: pre; background-color: rgb(246, 246, 246); border: none; overflow-x: auto;">@RestController
public class UserInfoController {
@GetMapping("/userinfo")
public UserInfoRes getUserInfo() {
UserInfoRes userInfoRes = new UserInfoRes();
userInfoRes.setUsername("阿提说说");
return userInfoRes;
}
}
配置客户端
目前我们客户端的配置是这样的:
<pre class="prettyprint hljs less" style="padding: 0.5em; font-family: Menlo, Monaco, Consolas, "Courier New", monospace; color: rgb(68, 68, 68); border-radius: 4px; display: block; margin: 0px 0px 1.5em; font-size: 14px; line-height: 1.5em; word-break: break-all; overflow-wrap: break-word; white-space: pre; background-color: rgb(246, 246, 246); border: none; overflow-x: auto;">spring:
security:
oauth2:
client:
registration:
gitee:
client-id: gitee_clientId
client-secret: gitee_secret
authorization-grant-type: authorization_code
redirect-uri: '{baseUrl}/login/oauth2/code/{registrationId}'
client-name: Gitee
github:
client-id: github_clientId
client-secret: github_secret
# 自定义
customize:
client-id: testClientId
client-secret: testClientSecret
authorization-grant-type: authorization_code
redirect-uri: '{baseUrl}/login/oauth2/code/{registrationId}'
client-name: Customize
scope:
- userinfo
provider:
gitee:
authorization-uri: https://gitee.com/oauth/authorize
token-uri: https://gitee.com/oauth/token
user-info-uri: https://gitee.com/api/v5/user
user-name-attribute: name
# 自定义
customize:
authorization-uri: http://localhost:9000/oauth2/authorize
token-uri: http://localhost:9000/oauth2/token
user-info-uri: http://localhost:9000/userinfo
user-name-attribute: username
这里我们只需要修改 customize 部分的 user-info-uri 和 user-name-attribute
调整后配置如下,其他部分跟原来是一样的。
<pre class="prettyprint hljs less" style="padding: 0.5em; font-family: Menlo, Monaco, Consolas, "Courier New", monospace; color: rgb(68, 68, 68); border-radius: 4px; display: block; margin: 0px 0px 1.5em; font-size: 14px; line-height: 1.5em; word-break: break-all; overflow-wrap: break-word; white-space: pre; background-color: rgb(246, 246, 246); border: none; overflow-x: auto;">customize:
authorization-uri: http://localhost:9000/oauth2/authorize
token-uri: http://localhost:9000/oauth2/token
user-info-uri: http://localhost:8090/userinfo
user-name-attribute: username
:exclamation: user-name-attribute的名字,必须在user-info-uri返回的属性名中存在
整流程体验
在如上三部分配置完成后,就可以体验了,启动 spring-security-resource-server 、 spring-security-authorization-server 、 spring-security-oauth2-client
浏览器访问地址: http://127.0.0.1:8080/hello ,在授权完成后,即跳转回并显示结果。
ResourceServer下能看到带着token的 /userinfo 请求日志。
<pre class="prettyprint hljs markdown" style="padding: 0.5em; font-family: Menlo, Monaco, Consolas, "Courier New", monospace; color: rgb(68, 68, 68); border-radius: 4px; display: block; margin: 0px 0px 1.5em; font-size: 14px; line-height: 1.5em; word-break: break-all; overflow-wrap: break-word; white-space: pre; background-color: rgb(246, 246, 246); border: none; overflow-x: auto;">************************************************************
Request received for GET '/userinfo':
org.apache.catalina.connector.RequestFacade@3418bfc9
servletPath:/userinfo
pathInfo:null
headers:
accept: application/json
authorization: Bearer eyJraWQiOiI5YjZjZWMzNi05ZDYyLTRkMWMtOWRiNi0wMWM1ODQzMDc1N2UiLCJhbGciOiJSUzI1NiJ9.eyJzdWIiOiJ1c2VyIiwiYXVkIjoidGVzdENsaWVudElkIiwibmJmIjoxNjYwOTU1ODQyLCJzY29wZSI6WyJ1c2VyaW5mbyJdLCJpc3MiOiJodHRwOlwvXC9sb2NhbGhvc3Q6OTAwMCIsImV4cCI6MTY2MDk1NjE0MiwiaWF0IjoxNjYwOTU1ODQyfQ.gVWwwfzB-xNuWWUBpgGokIOy5xwV9Wkd05k3rqpk1h92b-TWENB4ZArEL--zpngSyE8iuml0vG3veCv647FDx_EY56ClM-UxH-3Wq0D2f3b6WTgFO5RpCCwRLCHahBlV5g9plr7hWYY5uX2cQ4MsC4-ltZSR6wga5LSLDB-bIK46ZmJ3DOaQFwTTCpWB4OgOuq1j59i9XkgDUc_I8WUsHB4eEDEbBJeOmdimDn5O1Ux6nDhPgLMLcpnrt3lHLmXDTk8Q7hX7YBynO2VBm6wkTeYP4a2rfinfhW-LtF1o3hm8QAY0hn1QKSEeWU5K5qiIOVeSJ5FqrYJ_VQPadT1qAQ
user-agent: Java/11
host: localhost:8090
connection: keep-alive
Security filter chain: [
DisableEncodeUrlFilter
WebAsyncManagerIntegrationFilter
SecurityContextPersistenceFilter
HeaderWriterFilter
CsrfFilter
LogoutFilter
BearerTokenAuthenticationFilter
RequestCacheAwareFilter
SecurityContextHolderAwareRequestFilter
AnonymousAuthenticationFilter
SessionManagementFilter
ExceptionTranslationFilter
FilterSecurityInterceptor
]
到此,我们通过自己搭建的授权服务器和资源服务器,完整体验了OAuth2流程。
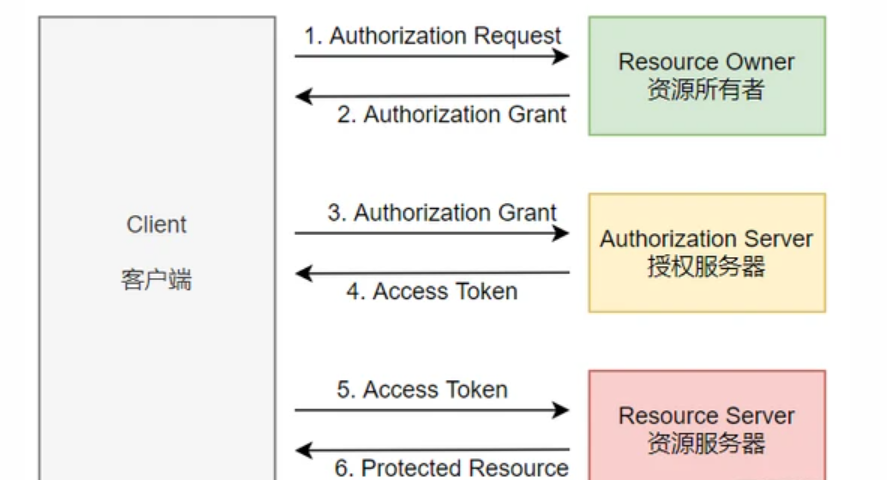
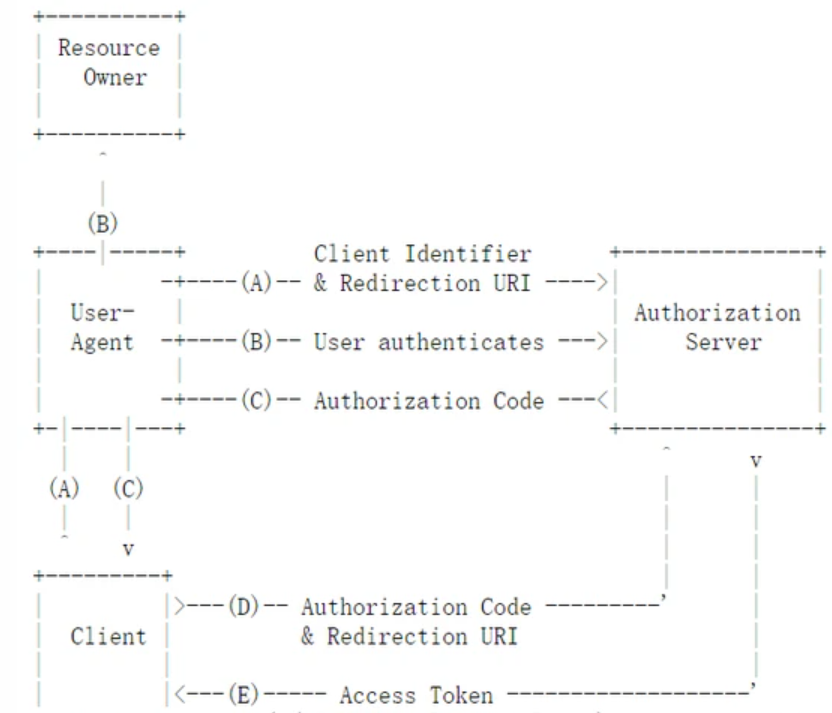
在整个流程中,我们使用的是最严密的授权码模式,它将用户引导到授权服务器进行身份验证,授权服务器将发放的访问令牌传递给客户端,目前主流都是使用该模式, 因此特别重要,要好好体会 。


 3632
3632

 被折叠的 条评论
为什么被折叠?
被折叠的 条评论
为什么被折叠?
 到【灌水乐园】发言


