


封装SvgIcon组件
1、认识SvgIcon组件作用
首先我们认识一下svg并且知道Svg格式图片的好处,这里可以去看一下之前我写的关于svg部分的文章。
为什么要将svg其封装成一个单独的组件
SvgIcon组件在Vue中用于专门展示SVG图标,可以充分利用SVG的优点,使得图标的显示和交互都能得到更好的支持。
- 可缩放性:SvgIcon组件可以利用SVG的特性,使得图标可以在不失真的情况下进行缩放。这对于需要根据用户需求动态调整大小或者需要在不同分辨率下都能清晰显示的图标来说非常有用。
- 可编辑性:由于SVG图标是由XML代码定义的,因此可以方便地进行修改和编辑。这在需要定制图标或者图标需要经常变动的情况下非常方便。
- 支持复杂交互:SVG图标可以支持鼠标事件(如点击、悬停等),这使得可以在图标上实现一些复杂的交互功能。
2、(项目采用)借vite-plugin-svg-icons -D 封装
这里我的项目采用的是这个方式
我们借助插件实现SvgIcon组件的封装,具体步骤如下:
把我们的svg组件都放到这个下面
(1)安装插件:yarn add -D vite-plugin-svg-icons
安装成功以后可以看到我们的依赖项
(2)配置vite.config.js(vite.config.ts)配置文件,导入,并将其插件配置到plugins数组当中
这里代表我们将svg的所有组件全部封装进入src/assets/svg 这个下面
在**vite.config.ts**中配置插件
注意这里的iconDirs 背后的地址就是你svg文件夹的那个地址:
(3)main.ts入口文件导入 (大坑)
配置main.js(main.ts),在其中注册svg图标
报错: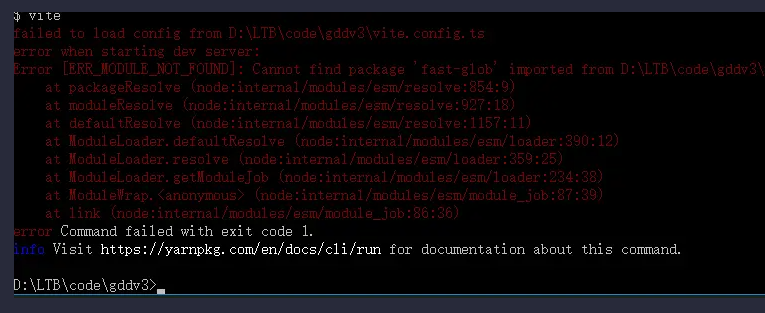
安装fast-glob依赖
☞ src下面新建立一个components文件夹,下面建立一个 SvgIcon
(4)页面使用
这里我们直接就已经可以使用了
Icon就可以正常显示了
(5)全局使用
完成!
3、 借助 svg-sprite-loader 封装
(1)安装
(2)SvgIcon.vue内容如下
(3)src下面新建文件夹plugins
在plugins文件夹创建svgBuilder.js插件


 596
596

 被折叠的 条评论
为什么被折叠?
被折叠的 条评论
为什么被折叠?
 到【灌水乐园】发言


