


 本文详细介绍了在CentOS系统下卸载旧版MySQL、安装MySQL5.5的过程,包括解决安装过程中遇到的常见问题,如权限设置、服务启动及连接速度优化等。
1、检查是否已经安装过mysql,执行命令
[root@VM_0_12_centos /]# rpm -qa | grep mysql
2、如果有安装过,执行以下卸载命令
[root@VM_0_12_centos /]# rpm -e --nodeps 查找到的mysql
3、再次执行查询命令,查看是否删除,如果没有查询结果,说明已经删除,如果有,继续执行上一步操作
4、查询所有Mysql对应的文件夹
[root@VM_0_12_centos /]# whereis mysql
查找结果如下:
mysql: /usr/lib64/mysql /usr/share/mysql
5、删除相关文件夹 ,执行命令 rm -rf 要删除的文件夹位置
[root@VM_0_12_centos /]# rm -rf  /usr/lib64/mysql
[root@VM_0_12_centos /]# rm -rf /usr/share/mysql
因为centos7的版本默认都安装了mariadb所以需要提前卸载掉
[root@iZbp1aatfjngnxw8r2xonwZ ~]# rpm -qa | grep  mariadb
mariadb-libs-5.5.60-1.el7_5.x86_64
[root@iZbp1aatfjngnxw8r2xonwZ ~]# rpm -e mariadb-libs --nodeps  mariadb-libs
6、再次查找Mysql对应的文件夹,如果有,继续执行第5步操作,没有,请继续下一步
7、从官网下载是用于Linux的Mysql安装包
Linux版本的Mysql的安装包
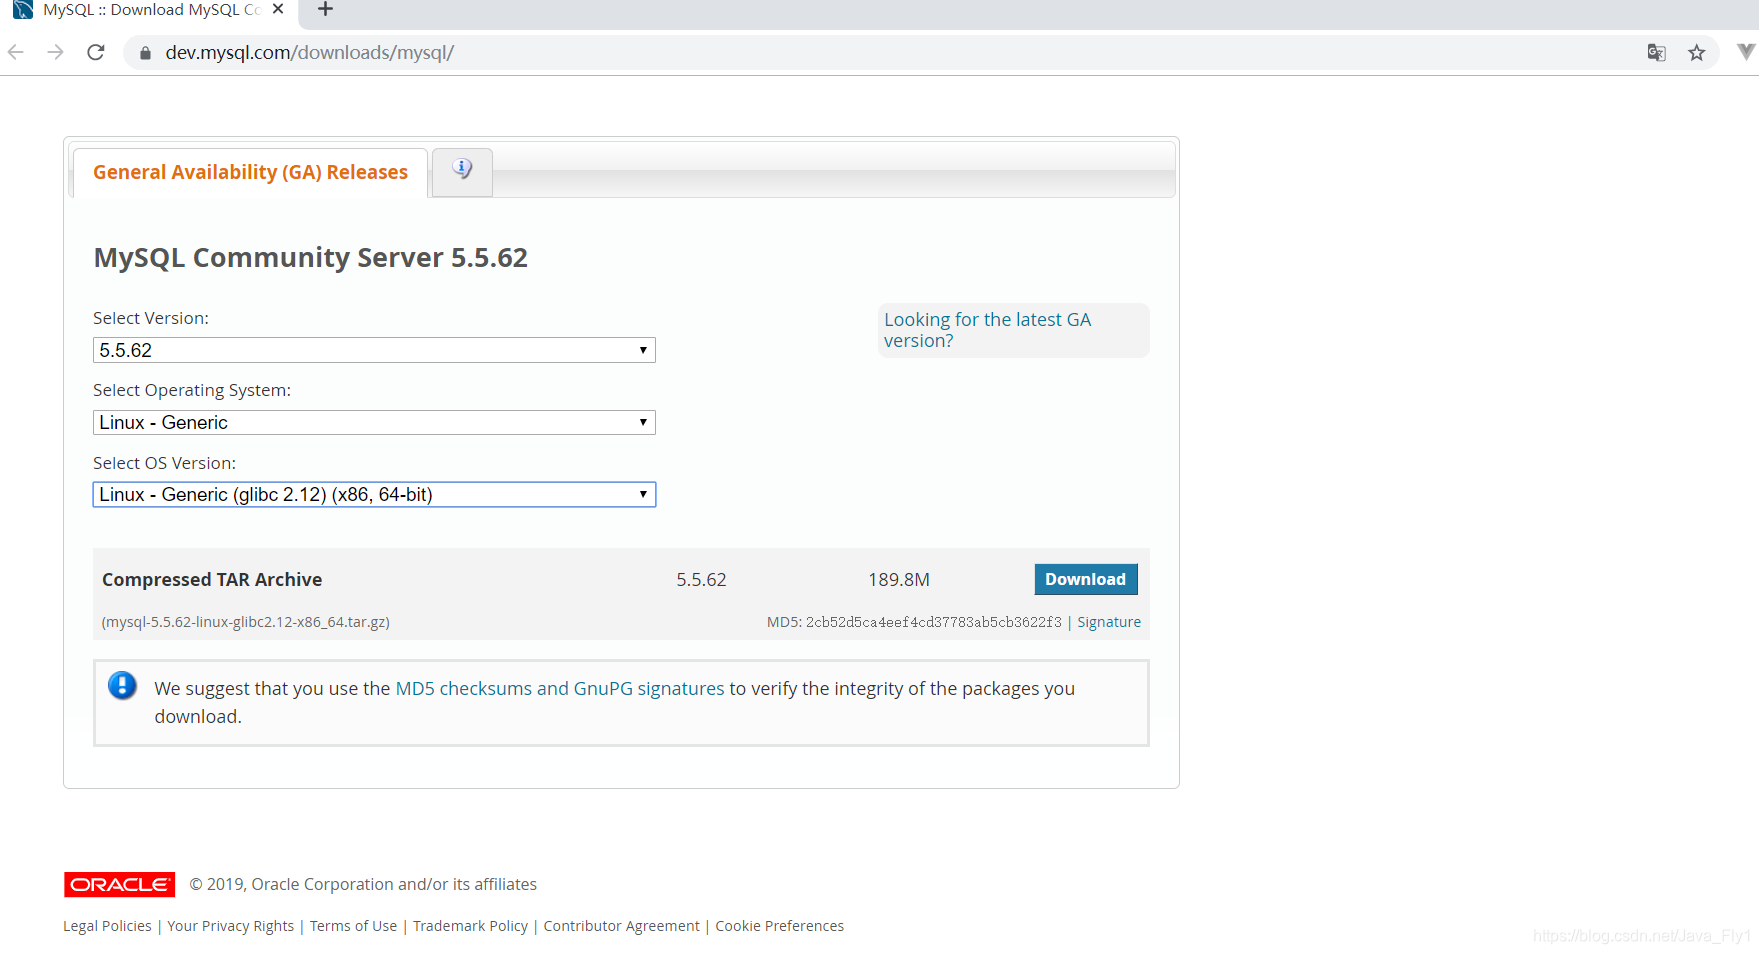
根据自己的需要选择,相应的版本,这里我选则的是Mysql5.5版本下linux的64位的安装包
8、切换到安装目录 /usr/local
mysql:[root@VM_0_12_centos /]# cd /usr/local
9、解压文件
[root@VM_0_12_centos java]# tar -zxvf mysql-5.5.62-linux-glibc2.12-x86_64.tar.gz
10.重命名文件夹为mysql
[root@VM_0_12_centos java]# mv mysql-5.5.62-linux-glibc2.12-x86_64 mysql
11、切换到mysql的安装目录
[root@VM_0_12_centos java]# cd /usr/local/mysql
12、添加系统mysql组和mysql用户:
[root@VM_0_12_centos mysql]# groupadd mysql
[root@VM_0_12_centos mysql]# useradd -r -g mysql mysql
13、安装数据库:
进入安装mysql软件目录:
[root@VM_0_12_centos java]# cd /usr/local/mysql
修改当前目录拥有者为mysql用户:
[root@VM_0_12_centos mysql]# chown -R mysql:mysql ./
安装数据库:
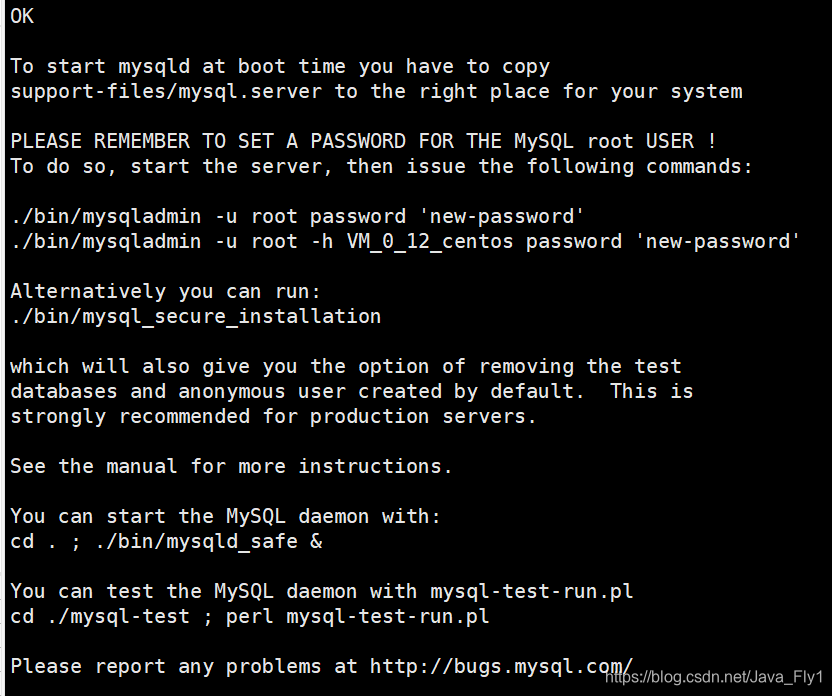
[root@VM_0_12_centos mysql]# ./scripts/mysql_install_db --user=mysql
安装成功
修改当前目录拥有者为root用户
[root@VM_0_12_centos mysql]# chown -R root:root ./
修改当前data目录拥有者为mysql用户
[root@VM_0_12_centos mysql]# chown -R mysql:mysql data
数据库安装完成!
mysql服务添加开机启动:
[root@VM_0_12_centos mysql]# cp support-files/mysql.server /etc/init.d/mysql
启动mysql服务:执行命令 service mysql start
[root@VM_0_12_centos mysql]# service mysql start
出现如下问题:

原因:
没有/var/log/mariadb/mariadb.log这个路径,那我们就创建, 并给mysql用户授权即可
解决方法:
输入以下命令
[root@VM_0_12_centos mysql]# mkdir /var/log/mariadb
[root@VM_0_12_centos mysql]# touch /var/log/mariadb/mariadb.log
[root@VM_0_12_centos mysql]# chown -R mysql:mysql  /var/log/mariadb/
再输入开启mysql服务,启动成功!
输入
ps -ef|grep mysql
[root@VM_0_12_centos mysql]# ps -ef|grep mysql
出现如下结果,就是mysql服务,启动成功

修改mysql的root用户密码,root初始密码为空的:
执行命令:./bin/mysqladmin -u root password ‘密码’
[root@VM_0_12_centos mysql]# ./bin/mysqladmin -u root password 'root'
出现如下问题:

解决方法:
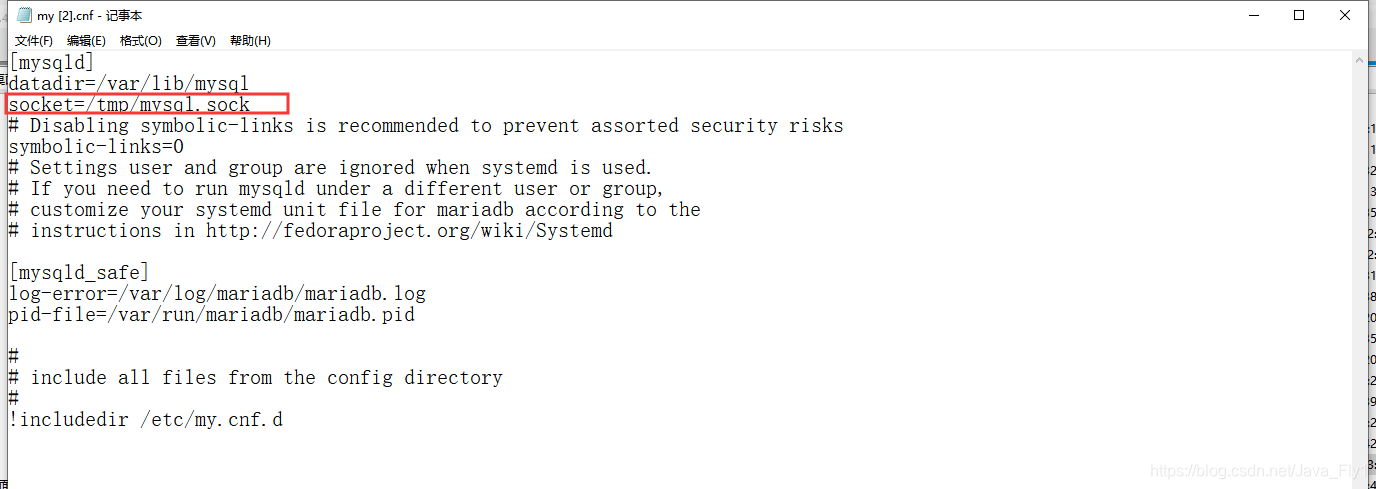
通过whereis my.cnf 数据库配置文件位置,通过编辑mysql.sock套接字文件位置:
[root@VM_0_12_centos mysql]# whereis my.cnf
my: /etc/my.cnf
使用XFTP连接服务器,使用记事本编辑my.cnf
通过命令 mkdir -p /tmp/mysql,然后执行 chmod 777 /tmp/mysql
[root@VM_0_12_centos ~]# mkdir -p /tmp/mysql
[root@VM_0_12_centos ~]# chmod 777 /tmp/mysql
重启mysql服务
[root@VM_0_12_centos ~]# service mysql reload
 SUCCESS! Reloading service MySQL
输入mysql -uroot -p
出现如下问题:
[root@VM_0_12_centos /]# mysql -uroot -p
-bash: mysql: command not found
解决方案,常见软连接
[root@VM_0_12_centos /]# ln -s /usr/local/mysql/bin/mysql /usr/local/bin/mysql
当whereis my.cnf找不到时
直接输入以下脚本,重启mysql
/etc/rc.d/init.d/mysql restart
出现如下问题

解决方案
查询my.cnf文件位置

在/etc/my.cnf配置文件中添加如下配置

保存退出,然后输入mysql -uroot -p
显示如下

输入密码root,显示如下:

mysql登录成功!
在Windows下使用Navicat连接Linux下的MySql
一、先使用root权限进入MySql
[root@host] # mysql -u root -p
[root@host] Enter password:*******
二、然后将权限授予其他电脑
mysql> GRANT ALL PRIVILEGES ON *.* TO 'root'@'%' IDENTIFIED BY 'root' WITH GRANT OPTION;
其中’root’就是你自己设置的密码
刷新mysql的权限表
flush privileges;
三、开放3306端口便于外网访问
[root@VM_0_12_centos /]# firewall-cmd --zone=public --add-port=3306/tcp --permanent
显示如下

提示防火墙未开启,开启防火墙 ,输入如下命令开启防火墙
systemctl start firewalld
没有任何提示返回表示开启成功

重新执行firewall-cmd --zone=public --add-port=3306/tcp --permanent,开启3306端口服务
四、重启服务器防火墙
[root@VM_0_12_centos /]# systemctl restart firewalld
到此,就可以使用navicat连接linux下的mysql了
Navicat连接linux下mysql数据库慢的问题
- 查找my.cnf
输入如下命令
whereis my.cnf

查找到my.cnf在/etc下,在/etc/my.cnf中添加如下配置:
在[mysqld]下添加skip-name-resolve,然后保存退出。

-
停止mysql服务 service mysql stop

-
开启mysql服务
service mysql start

-
使用navicat连接linux下Mysql,点击编辑连接

-
设置间隔时间为12秒,点击确定

-
再次使用navicat连接linux下mysql,进行查询,返回结果变得快多了


 4489
4489

 被折叠的 条评论
为什么被折叠?
被折叠的 条评论
为什么被折叠?
 到【灌水乐园】发言


