


在现代Web应用中,生成PDF文档是一项常见的需求。本文将介绍如何使用Spring Boot与thymeleaf和iText库生成PDF文档,并展示如何在控制器中处理请求和异常。
依赖配置
首先,我们需要在pom.xml中添加必要的依赖:
<dependencies>
    <dependency>
        <groupId>org.springframework.boot</groupId>
        <artifactId>spring-boot-starter-thymeleaf</artifactId>
    </dependency>
    <dependency>
        <groupId>com.itextpdf</groupId>
        <artifactId>html2pdf</artifactId>
        <version>2.0.2</version>
    </dependency>
    <dependency>
        <groupId>com.itextpdf</groupId>
        <artifactId>kernel</artifactId>
        <version>7.1.2</version>
    </dependency>
    <dependency>
        <groupId>com.itextpdf</groupId>
        <artifactId>font-asian</artifactId>
        <version>7.1.2</version>
    </dependency>
    <dependency>
        <groupId>commons-io</groupId>
        <artifactId>commons-io</artifactId>
        <version>2.11.0</version>
    </dependency>
</dependencies>
定义常量
public class ExamConstant {
    public static final String TYPEFACE = "fonts/simhei.ttf";
    public static final String VARIABLE = "examData";
    public static final String FILENAME = "exam.html";
    public static final String TEMPLATE = "模板名称-自定义";
}
PDF配置
接下来,我们需要配置PDF生成的相关信息。在PdfConfiguration类中,我们定义了字体提供者和转换器属性。
注意:这里有一个坑,输出后的PDF中,除了英文数字符号,剩下的中文字符全部不显示,需在项目跟路径:src/main/resources/fonts导入字体格式。
@Configuration
public class PdfConfiguration {

    private static final Logger log = LoggerFactory.getLogger(PdfConfiguration.class);

    @Value("${pdf.pdfUrl}")
    private String pdfUrl;

    @Bean
    public FontProvider getFontProvider() throws IOException {
        FontProvider provider = new DefaultFontProvider(true, true, false);
        try (InputStream in = PrintPdfController.class.getClassLoader().getResourceAsStream(ExamConstant.TYPEFACE)) {
            if (in == null) {
                throw new IOException("Font file not found: fonts/simhei.ttf");
            }
            PdfFont pdfFont = PdfFontFactory.createFont(ExamConstant.TYPEFACE, PdfEncodings.IDENTITY_H, true);
            provider.addFont(pdfFont.getFontProgram());
        }
        return provider;
    }

    @Bean
    public ConverterProperties converterProperties(FontProvider fontProvider) {
        ConverterProperties cp = new ConverterProperties();
        cp.setBaseUri(pdfUrl);
        cp.setFontProvider(fontProvider);
        return cp;
    }
}
控制器实现
接下来,我们创建一个控制器来处理PDF打印请求。在PrintPdfController中,我们定义了printExam方法,用于接收请求参数并生成PDF。
@Controller
@RequestMapping("print")
public class PrintPdfController {

    private static final Logger log = LoggerFactory.getLogger(PrintPdfController.class);

    @Autowired
    private PrintPdfService service;

    @GetMapping("/printExam.pdf")
    public void printExam(@RequestParam String name, @RequestParam String identity, HttpServletResponse resp) throws IOException {
        try {
            service.printExam(name, identity, resp);
            if (resp.getStatus() == HttpServletResponse.SC_OK) {
                log.info("打印考试信息成功: 姓名={}, 身份证={}", name, identity);
            }
        } catch (Exception e) {
            log.error("打印考试信息失败: 姓名={}, 身份证={}, 错误={}", name, identity, e.getMessage());
            resp.setStatus(HttpServletResponse.SC_INTERNAL_SERVER_ERROR);
            resp.getWriter().write("打印考试信息时发生错误,请稍后再试。");
        }
    }
}
错误处理
在printExam方法中,我们进行了参数校验和异常处理:
public void printExam(String name, String identity, HttpServletResponse resp) {
    if (name == null || name.isEmpty() || identity == null || identity.isEmpty()) {
        log.warn("打印考试信息失败:姓名或身份证号为空");
        try {
            resp.sendError(HttpServletResponse.SC_BAD_REQUEST, "姓名或身份证号不能为空");
        } catch (IOException e) {
            log.error("发送错误响应失败:{}", e.getMessage(), e);
        }
        return;
    }

    /**
    *获取自己数据库信息
    **/
    ZrcExamdemo one = service.getOne(new LambdaQueryWrapper<ZrcExamdemo>()
            .eq(ZrcExamdemo::getName, name)
            .eq(ZrcExamdemo::getIdentity, identity));

    if (one == null) {
        log.warn("订单信息不存在:姓名={}, 身份证号={}", name, identity);
        try {
            resp.sendError(HttpServletResponse.SC_NOT_FOUND, "订单信息不存在");
        } catch (IOException e) {
            log.error("发送错误响应失败:{}", e.getMessage(), e);
        }
        return;
    }

    Context context = new Context();
    context.setVariable(ExamConstant.VARIABLE, one);
    processPdf(context, ExamConstant.FILENAME, ExamConstant.TEMPLATE, resp);
}
HTML页面
<!DOCTYPE html>
<html lang="en">
<head>
  <meta charset="UTF-8"/>
  <title>准考证</title>
  <style>
    body {
      font-family: SimHei;
      margin: 0;
      padding: 20px;
    }
    .container {
      max-width: 800px; /* 最大宽度为800px */
      margin: 0 auto; /* 水平居中 */
      border: 1px solid black;
      text-align: center;
    }
    table {
      width: 100%;
      border-collapse: collapse;
      margin-top: 30px;
    }
    th, td {
      padding: 10px;
      border: 1px solid black;
      text-align: center; /* 内容居中 */
    }
    th {
      background-color: #f2f2f2;
      font-weight: normal; /* 去除加粗 */
    }
    .header {
      padding-top: 30px;
      margin-bottom: 20px;
      font-size: 20px; /* 调整字体大小 */
    }
    .sub-header {
      font-size: 23px;
      font-weight: bold;
      letter-spacing: 20px; /* 设置每个字之间的间距 */
      margin-top: 30px;
    }
    p {
      margin-top: 20px;
      font-size: 16px;
    }
  </style>
</head>
<body>
<div class="container">
  <div class="header">文件名</div>
  <div class="sub-header">准    考    证</div>
  <p>此证必须与有效的身份证原件同时使用,缺一不得进入考场</p>

  <table>
    <tr>
      <th >姓名:</th>
      <td th:text="${examData.name}"></td>
      <th>性别:</th>
      <td th:text="${examData.gender}"></td>
      <th>身份证号:</th>
      <td th:text="${examData.identity}"></td>
    </tr>
    <tr>
      <th>准考证号:</th>
      <td th:text="${examData.examId}"></td>
      <th>试场号:</th>
      <td th:text="${examData.roomId}"></td>
      <th>座位号:</th>
      <td th:text="${examData.seatsId}"></td>
    </tr>
    <tr>
      <th>报考单位:</th>
      <td th:text="${examData.organization}"></td>
      <th>职位:</th>
      <td colspan="3" th:text="${examData.occupation}"></td>
    </tr>
    <tr>
      <th>考点地址:</th>
      <td colspan="5" th:text="${examData.address}"></td>
    </tr>
      <tr>
        <th>考试科目</th>
        <th>考试日期</th>
        <th>考试时间</th>
        <th colspan="4">监考人员收卷签名</th>
      </tr>
      <!-- 数据行,对应<th>下的<td> -->
      <tr>
        <td th:text="${examData.subject1}"></td>
        <td th:text="${examData.subject1Date}"></td>
        <td th:text="${examData.subject1Starttime} + ' - ' + ${examData.subject1Endtime}"></td>
        <!-- 这里使用rowspan合并 -->
        <td rowspan="2" colspan="4"></td>
      </tr>
      <tr>
        <td th:text="${examData.subject2}"></td>
        <td th:text="${examData.subject2Date}"></td>
        <td th:text="${examData.subject2Starttime} + ' - ' + ${examData.subject2Endtime}"></td>
      </tr>
    <tr>
      <td colspan="6" style="text-align: center;">交卷后,此证须经监考人员收签名,否则,答卷缺少责任由考生自负。</td>
    </tr>
  </table>
</div>
</body>
</html>
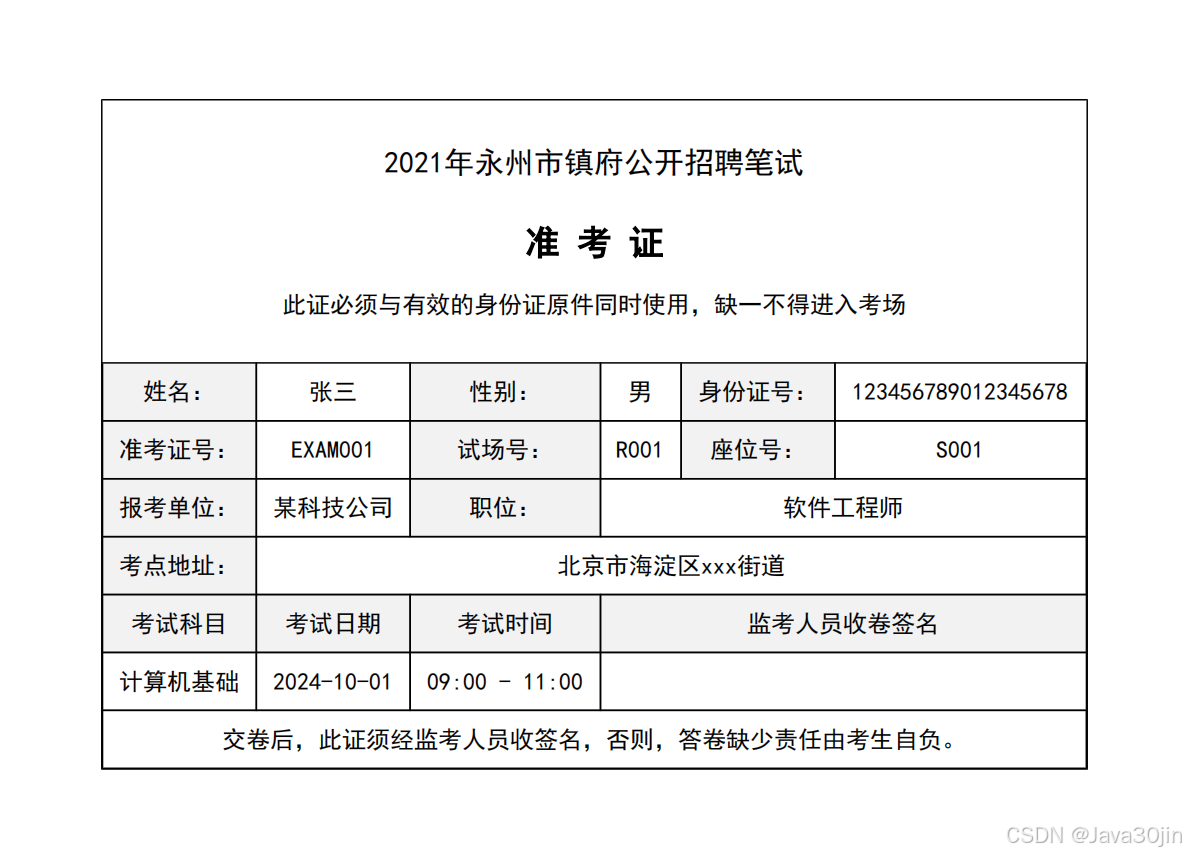
实现效果
总结
通过以上步骤,我们成功实现了一个PDF生成的功能。我们利用Spring Boot的特性,结合iText库,能够灵活地生成和下载PDF文档。同时,良好的错误处理机制确保了用户在操作过程中能够获得及时的反馈。希望本文对你理解PDF生成有所帮助!


 3645
3645

 被折叠的 条评论
为什么被折叠?
被折叠的 条评论
为什么被折叠?
 到【灌水乐园】发言


