


 本文介绍了如何使用FasterNet替换YOLOv5s的主干网络,包括下载预训练权重、添加模型文件、修改yolo.py文件、配置yaml文件以及训练模型的过程。
引言
FasterNet是一种轻量化主干网络,因此我考虑是否可以用于替换YOLOv5s(其他也可),因此有了本文的教程。
先来展示一下我的实验参数量结果。

YOLOv5s参数量

YOLOv5s使用FasterNet作为Backbone的参数量
思想:使用Timm库
Timm库包含了许多常见的卷积神经网络(CNN)架构,例如 MobileNet、GhostNet、ViT(Vision Transformer)等,并支持各种预训练权重。使用 Timm库,你可以轻松地加载这些预训练的模型,并在自己的任务中进行微调或特征提取。
可以新建一个py文件,使用下面的代码打印出Timm库当中支持的网络模型
import timm

models = timm.list_models()

# 每行显示的模型数量,如果直接print(timm.list_models()),输出都在一行上,太长了,我这边加了一点代码,每输出7个模型,换行一下
models_per_line = 7

# 分割列表并打印
for i in range(0, len(models), models_per_line):
    print(" ".join(models[i:i+models_per_line]))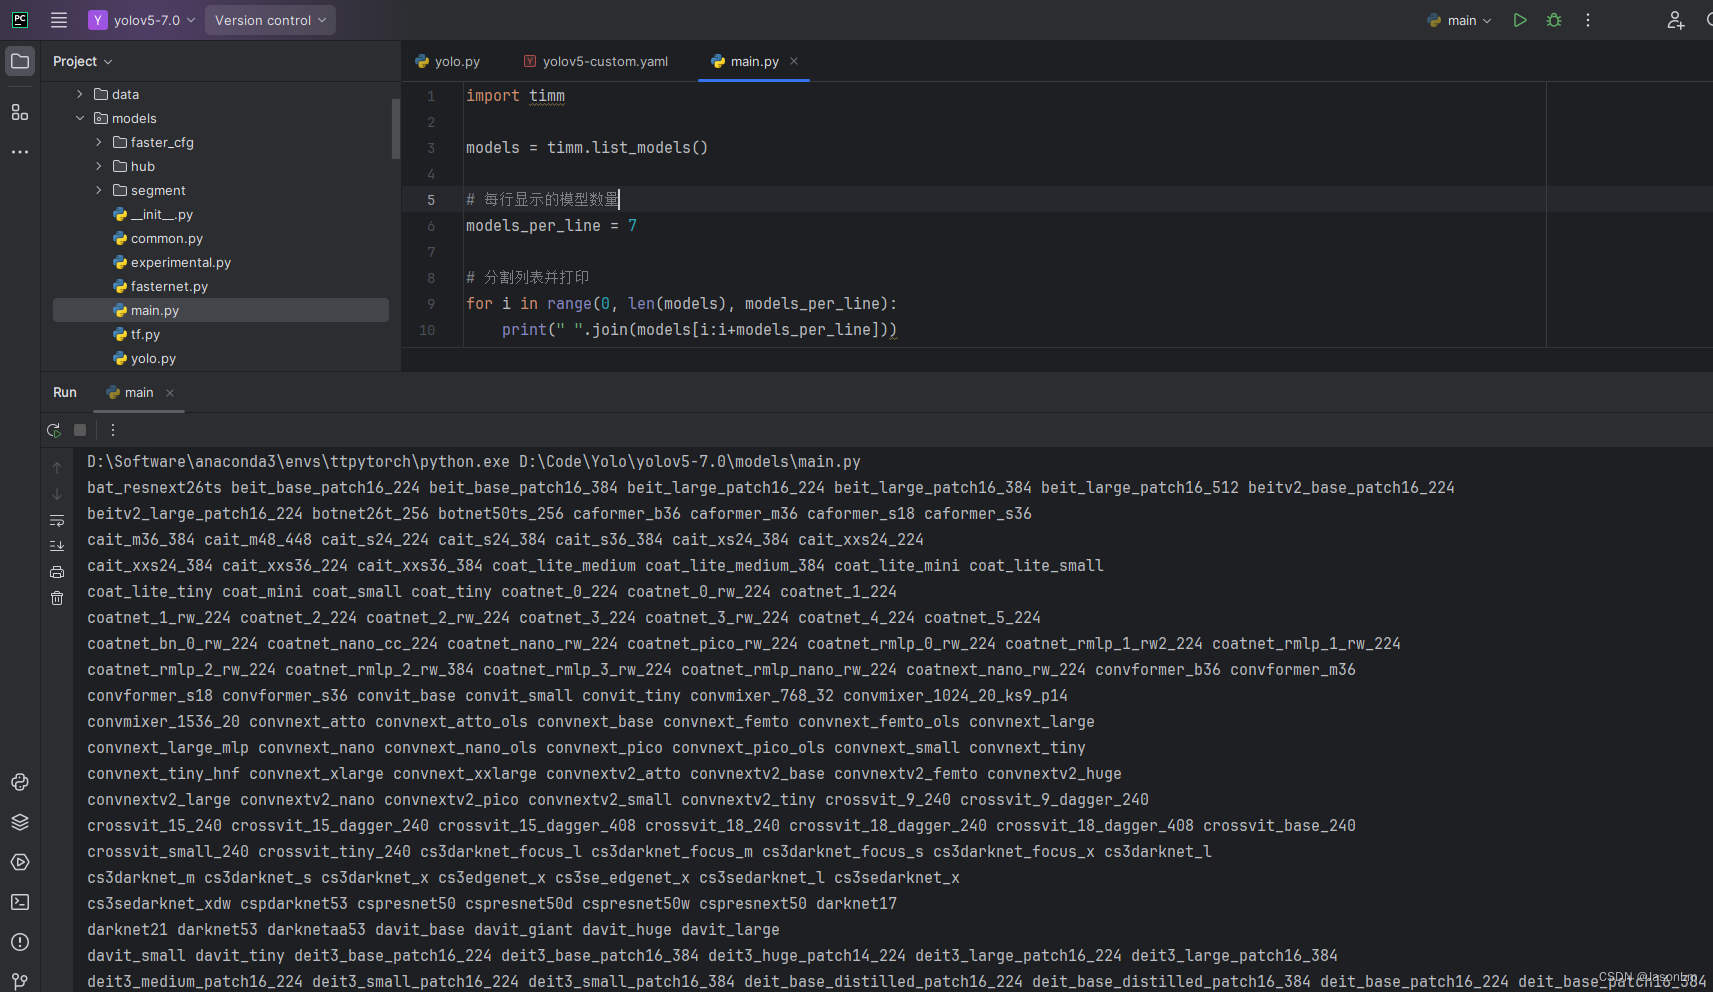
可以看到,这个是Timm当中所支持的网络模型,有很多。
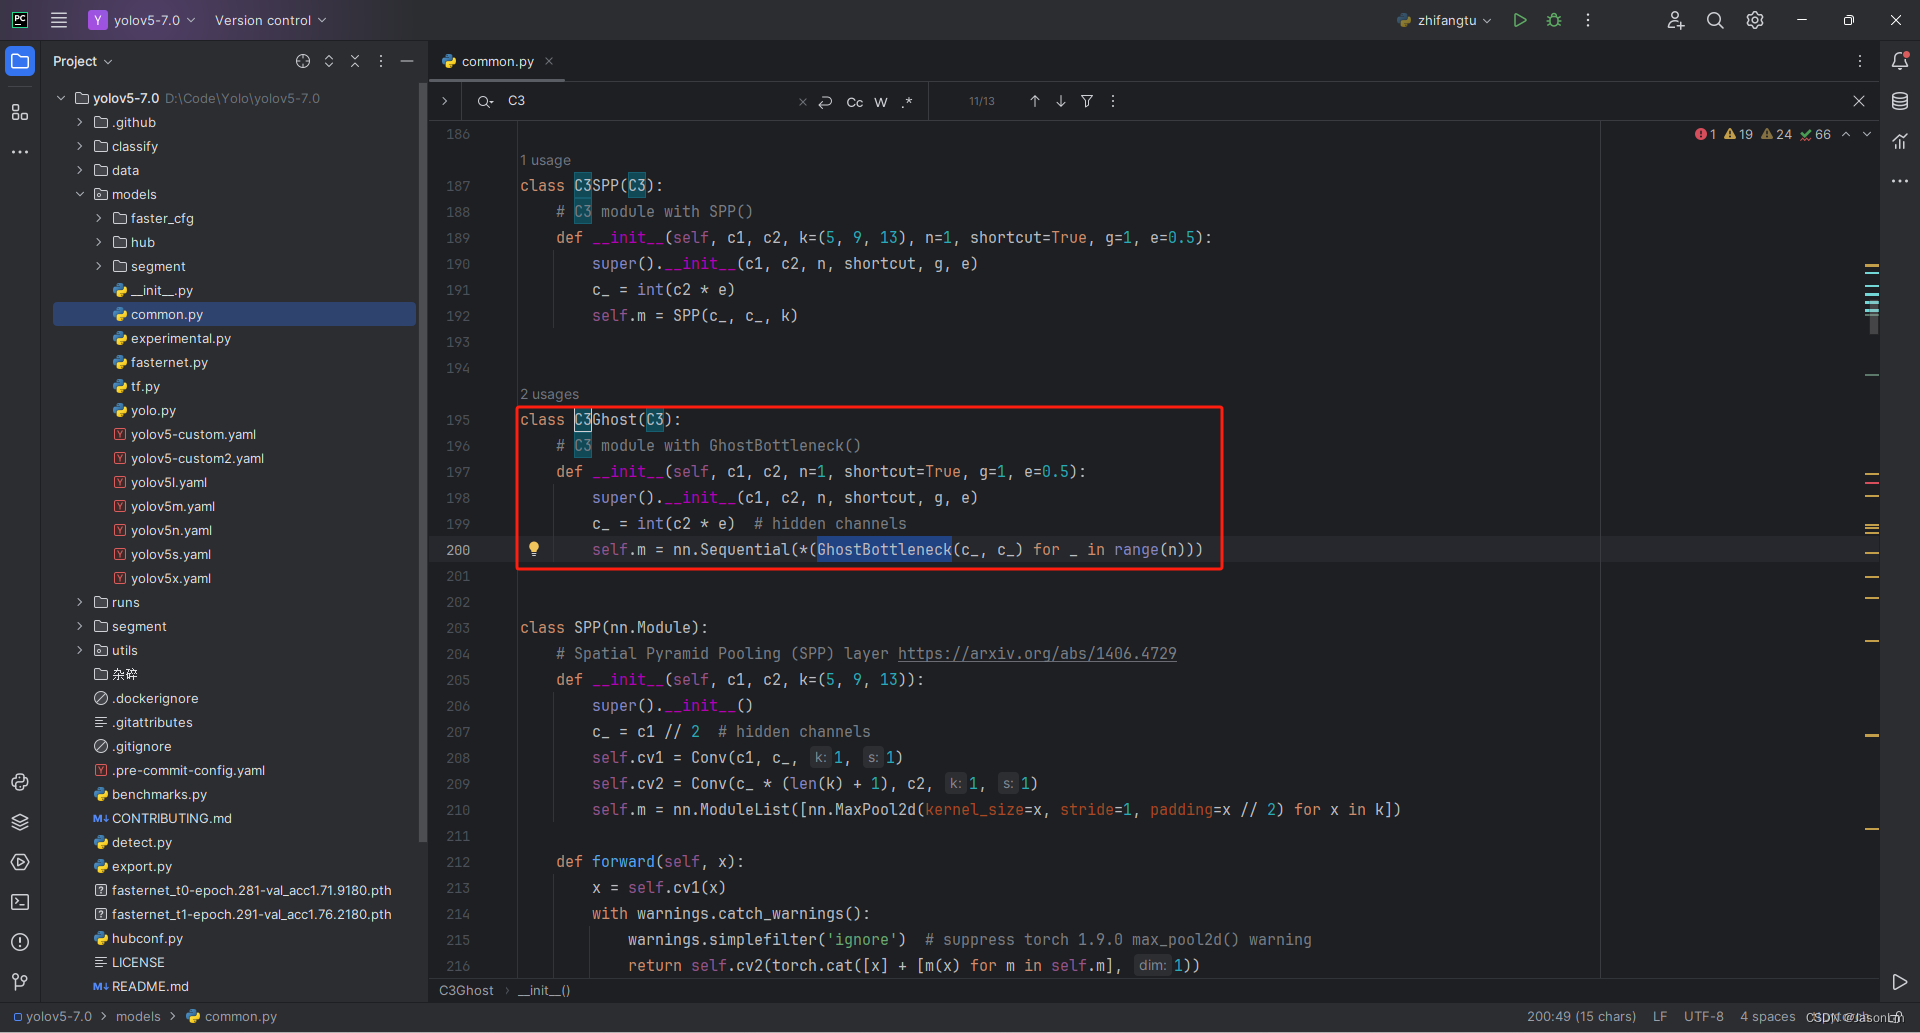
那么我们用FasterNet替换YOLOv5主干的核心是用FasterBlock替换原本的C3Ghost
第一步:下载权重文件
到FasterNet的Github仓库下载你所需要版本的FasterNet预训练权重文件
https://github.com/JierunChen/FasterNet
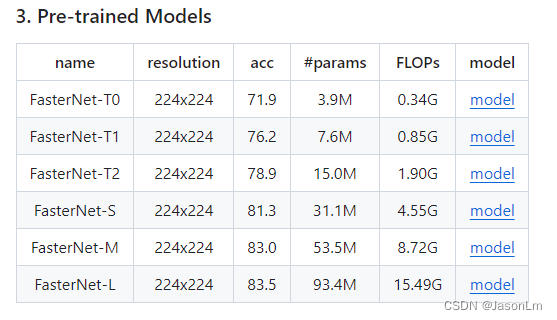
我这边下载的是t0权重文件
第二步:补充项目文件
将faster_cfg和fasternet.py两个文件添加到到自己的YOLOv5项目文件的models文件夹底下。这两个文件可以在下方链接中获取。


如上图所示
第三步:替换yolo.py中的关键函数
修改原本项目中的yolo.py文件,将parse_model和_forward_once函数用下列yolo.py文件中对应的函数替换。我也将parse_model和_forward_once的代码分别放置在下方,可以直接复制用于替换。
https://github.com/z1069614715/objectdetection_script/tree/master/yolo-improve/yolov5-backbone
parse_model代码(将原先yolo.py文件中parse_model用下面代码替换)
def parse_model(d, ch):  # model_dict, input_channels(3)
    # Parse a YOLOv5 model.yaml dictionary
    LOGGER.info(f"\n{'':>3}{'from':>18}{'n':>3}{'params':>10}  {'module':<40}{'arguments':<30}")
    anchors, nc, gd, gw, act = d['anchors'], d['nc'], d['depth_multiple'], d['width_multiple'], d.get('activation')
    if act:
        Conv.default_act = eval(act)  # redefine default activation, i.e. Conv.default_act = nn.SiLU()
        LOGGER.info(f"{colorstr('activation:')} {act}")  # print
    na = (len(anchors[0]) // 2) if isinstance(anchors, list) else anchors  # number of anchors
    no = na * (nc + 5)  # number of outputs = anchors * (classes + 5)

    is_backbone = False
    layers, save, c2 = [], [], ch[-1]  # layers, savelist, ch out
    for i, (f, n, m, args) in enumerate(d['backbone'] + d['head']):  # from, number, module, args
        try:
            t = m
            m = eval(m) if isinstance(m, str) else m  # eval strings
        except:
            pass
        for j, a in enumerate(args):
            with contextlib.suppress(NameError):
                try:
                    args[j] = eval(a) if isinstance(a, str) else a  # eval strings
                except:
                    args[j] = a

        n = n_ = max(round(n * gd), 1) if n > 1 else n  # depth gain
        if m in {
                Conv, GhostConv, Bottleneck, GhostBottleneck, SPP, SPPF, DWConv, MixConv2d, Focus, CrossConv,
                BottleneckCSP, C3, C3TR, C3SPP, C3Ghost, nn.ConvTranspose2d, DWConvTranspose2d, C3x}:
            c1, c2 = ch[f], args[0]
            if c2 != no:  # if not output
                c2 = make_divisible(c2 * gw, 8)

            args = [c1, c2, *args[1:]]
            if m in {BottleneckCSP, C3, C3TR, C3Ghost, C3x}:
                args.insert(2, n)  # number of repeats
                n = 1
        elif m is nn.BatchNorm2d:
            args = [ch[f]]
        elif m is Concat:
            c2 = sum(ch[x] for x in f)
        # TODO: channel, gw, gd
        elif m in {Detect, Segment}:
            args.append([ch[x] for x in f])
            if isinstance(args[1], int):  # number of anchors
                args[1] = [list(range(args[1] * 2))] * len(f)
            if m is Segment:
                args[3] = make_divisible(args[3] * gw, 8)
        elif m is Contract:
            c2 = ch[f] * args[0] ** 2
        elif m is Expand:
            c2 = ch[f] // args[0] ** 2
        elif isinstance(m, str):
            t = m
            m = timm.create_model(m, pretrained=args[0], features_only=True)
            c2 = m.feature_info.channels()
        # elif m in {}:
        #     m = m(*args)
        #     c2 = m.channel
        else:
            c2 = ch[f]
        if isinstance(c2, list):
            is_backbone = True
            m_ = m
            m_.backbone = True
        else:
            m_ = nn.Sequential(*(m(*args) for _ in range(n))) if n > 1 else m(*args)  # module
            t = str(m)[8:-2].replace('__main__.', '')  # module type
        np = sum(x.numel() for x in m_.parameters())  # number params
        m_.i, m_.f, m_.type, m_.np = i + 4 if is_backbone else i, f, t, np  # attach index, 'from' index, type, number params
        LOGGER.info(f'{i:>3}{str(f):>18}{n_:>3}{np:10.0f}  {t:<40}{str(args):<30}')  # print
        save.extend(x % (i + 4 if is_backbone else i) for x in ([f] if isinstance(f, int) else f) if x != -1)  # append to savelist
        layers.append(m_)
        if i == 0:
            ch = []
        if isinstance(c2, list):
            ch.extend(c2)
            for _ in range(5 - len(ch)):
                ch.insert(0, 0)
        else:
            ch.append(c2)
    return nn.Sequential(*layers), sorted(save)
_forward_once代码(将原先yolo.py文件中_forward_once用下面代码替换)
def _forward_once(self, x, profile=False, visualize=False):
y, dt = [], [] # outputs
for m in self.model:
if m.f != -1: # if not from previous layer
x = y[m.f] if isinstance(m.f, int) else [x if j == -1 else y[j] for j in m.f] # from earlier layers
if profile:
self._profile_one_layer(m, x, dt)
if hasattr(m, 'backbone'):
x = m(x)
for _ in range(5 - len(x)):
x.insert(0, None)
for i_idx, i in enumerate(x):
if i_idx in self.save:
y.append(i)
else:
y.append(None)
x = x[-1]
else:
x = m(x) # run
y.append(x if m.i in self.save else None) # save output
if visualize:
feature_visualization(x, m.type, m.i, save_dir=visualize)
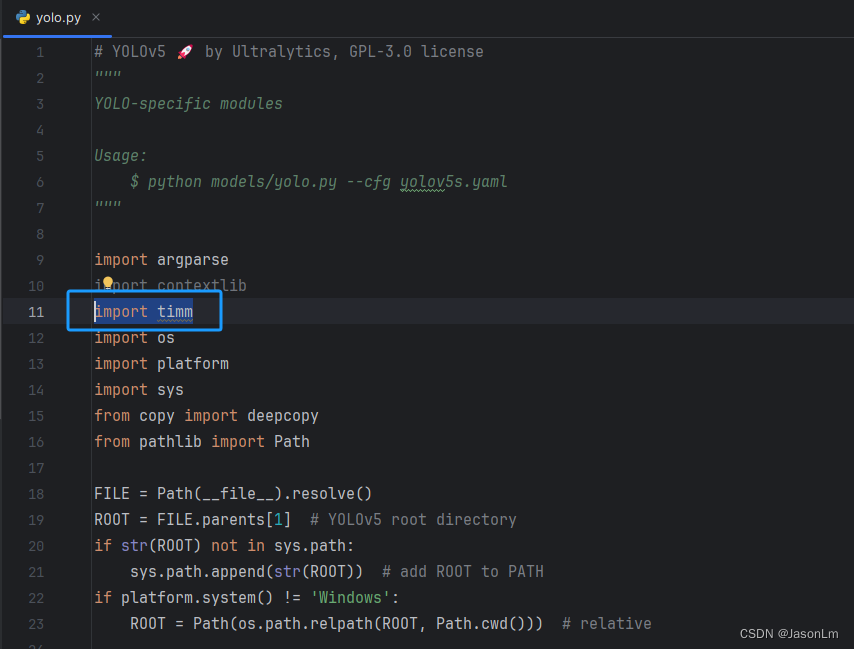
return x修改两个函数之后,记得在yolo.py头部,添加引用import timm库
第四步:新建yaml文件
在自己的项目models文件夹底下,新建一个yaml文件,yaml文件内容如下,或者可在下方链接获得。
# YOLOv5 🚀 by Ultralytics, GPL-3.0 license

# Parameters
nc: 80  # number of classes
depth_multiple: 0.33  # model depth multiple
width_multiple: 0.25  # layer channel multiple
anchors:
  - [10,13, 16,30, 33,23]  # P3/8
  - [30,61, 62,45, 59,119]  # P4/16
  - [116,90, 156,198, 373,326]  # P5/32

# 0-P1/2
# 1-P2/4
# 2-P3/8
# 3-P4/16
# 4-P5/32

# YOLOv5 v6.0 backbone
backbone:
  # [from, number, module, args]
  [[-1, 1, vovnet39a, [False]], # 4
   [-1, 1, SPPF, [1024, 5]],  # 5
  ]

# YOLOv5 v6.0 head
head:
  [[-1, 1, Conv, [512, 1, 1]], # 6
   [-1, 1, nn.Upsample, [None, 2, 'nearest']], # 7
   [[-1, 3], 1, Concat, [1]],  # cat backbone P4 8
   [-1, 3, C3, [512, False]],  # 9

   [-1, 1, Conv, [256, 1, 1]], # 10
   [-1, 1, nn.Upsample, [None, 2, 'nearest']], # 11
   [[-1, 2], 1, Concat, [1]],  # cat backbone P3 12
   [-1, 3, C3, [256, False]],  # 13 (P3/8-small)

   [-1, 1, Conv, [256, 3, 2]], # 14
   [[-1, 10], 1, Concat, [1]],  # cat head P4 15
   [-1, 3, C3, [512, False]],  # 16 (P4/16-medium)

   [-1, 1, Conv, [512, 3, 2]], # 17
   [[-1, 5], 1, Concat, [1]],  # cat head P5 18
   [-1, 3, C3, [1024, False]],  # 19 (P5/32-large)

   [[13, 16, 19], 1, Detect, [nc, anchors]],  # Detect(P3, P4, P5)
  ]
这里有一个小细节很重要!!!注意看下面这个点。 上面代码中的这三行,如下代码所示,这三行需要根据你的需要进行修改。深度和宽度根据你要改的yolov5模型大小进行修改,下方的深度和宽度是yolov5n的,如果你改的是yolov5s,那深度和宽度要换成v5s的深度和宽度。
# Parameters
nc: x  # 检测物体的类别有几种,x就填写多少
# 下面是网络模型的深度和宽度,这边默认是YOLOv5n的深度和宽度
# 你如果替换的是yolov5s的主干,那这边的深度和宽度值要改成yolov5s对应的深度和宽度!!!
depth_multiple: 0.33  # model depth multiple 这里是yolov5n的深度,根据你改的网络进行修改
width_multiple: 0.25  # layer channel multiple 这里是yolov5n的宽度
第五步:补充关键代码
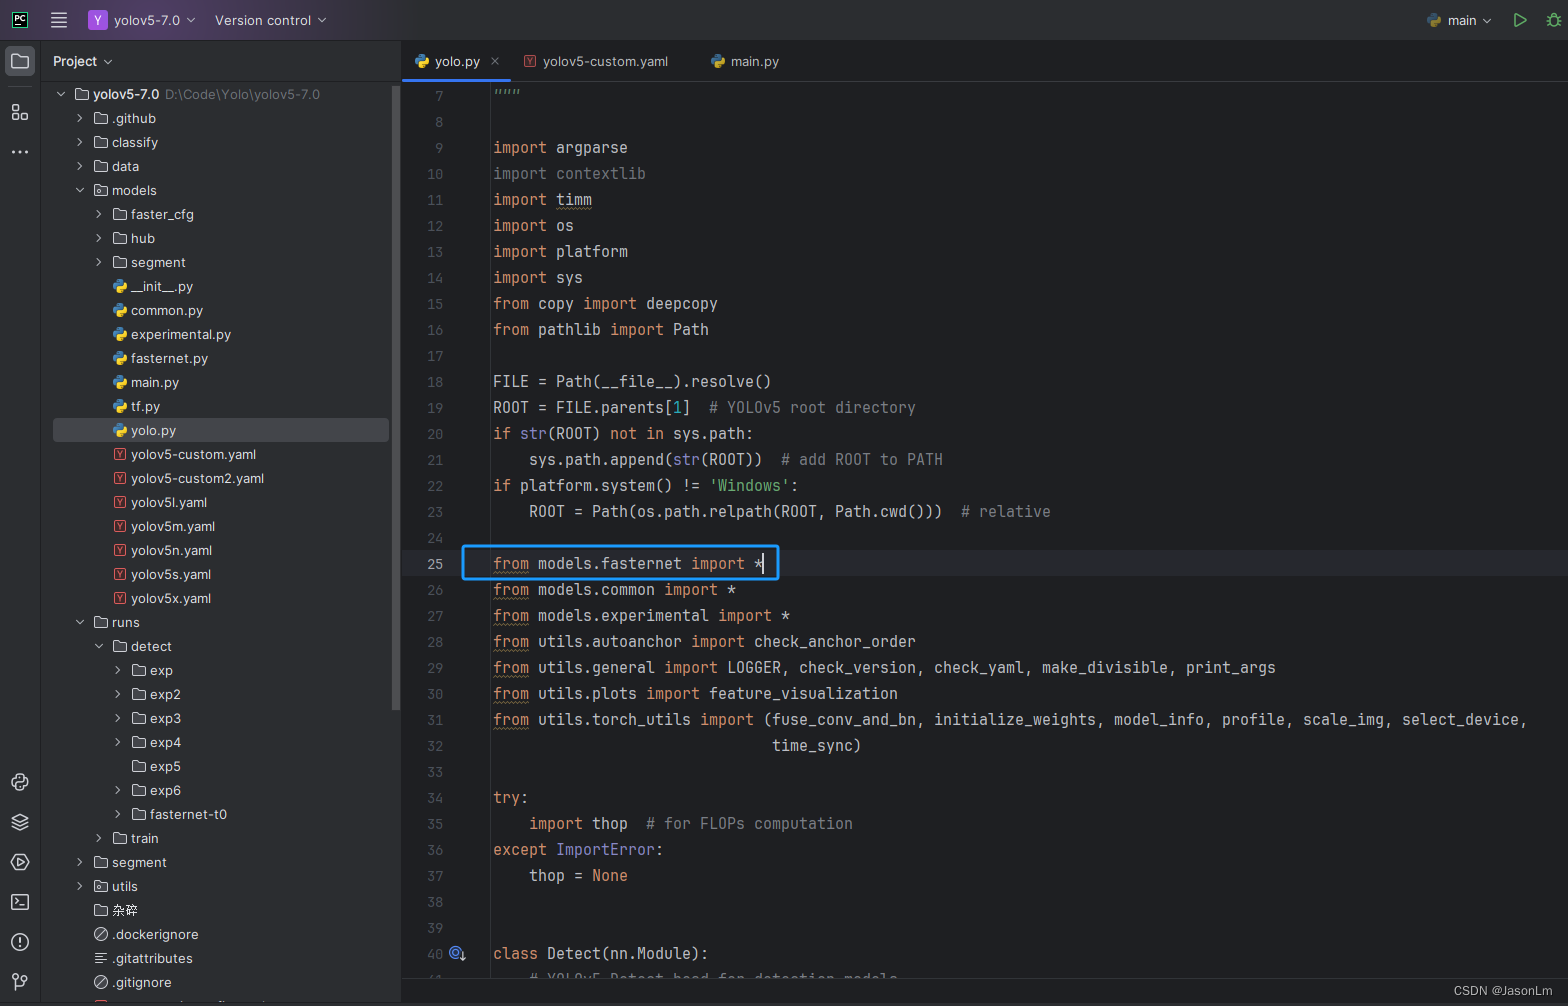
# 在yolo.py导入该模块
from models.fasternet import *
首先,请在yolo.py文件当中,添加import代码,添加后效果如下图。
接着,在yolo.py文件当中找到下图蓝框中的代码,取消其注释
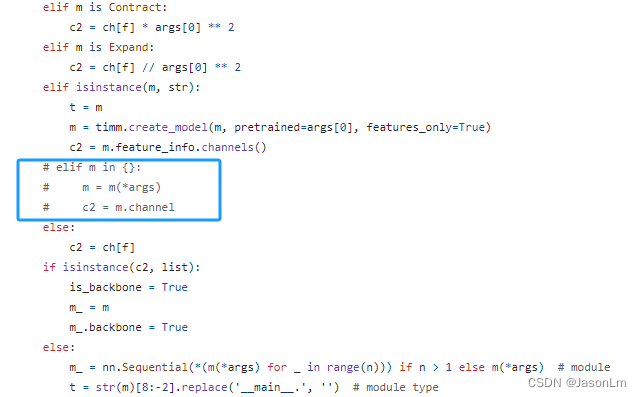
取消注释后,往{ }内添加fasternet_t0 ......fasternet_l,如下方所示
        ...
        ...
        ...
        elif isinstance(m, str):
            t = m
            m = timm.create_model(m, pretrained=args[0], features_only=True)
            c2 = m.feature_info.channels()
        elif m in {fasternet_t0, fasternet_t1, fasternet_t2, fasternet_s, fasternet_m, fasternet_l}:
            m = m(*args)
            c2 = m.channel
        elif m is CARAFE:
            c2 = ch[f]
            args = [c2, *args]
        ...
        ...
        ...
第六步:选择你需要的主干网络
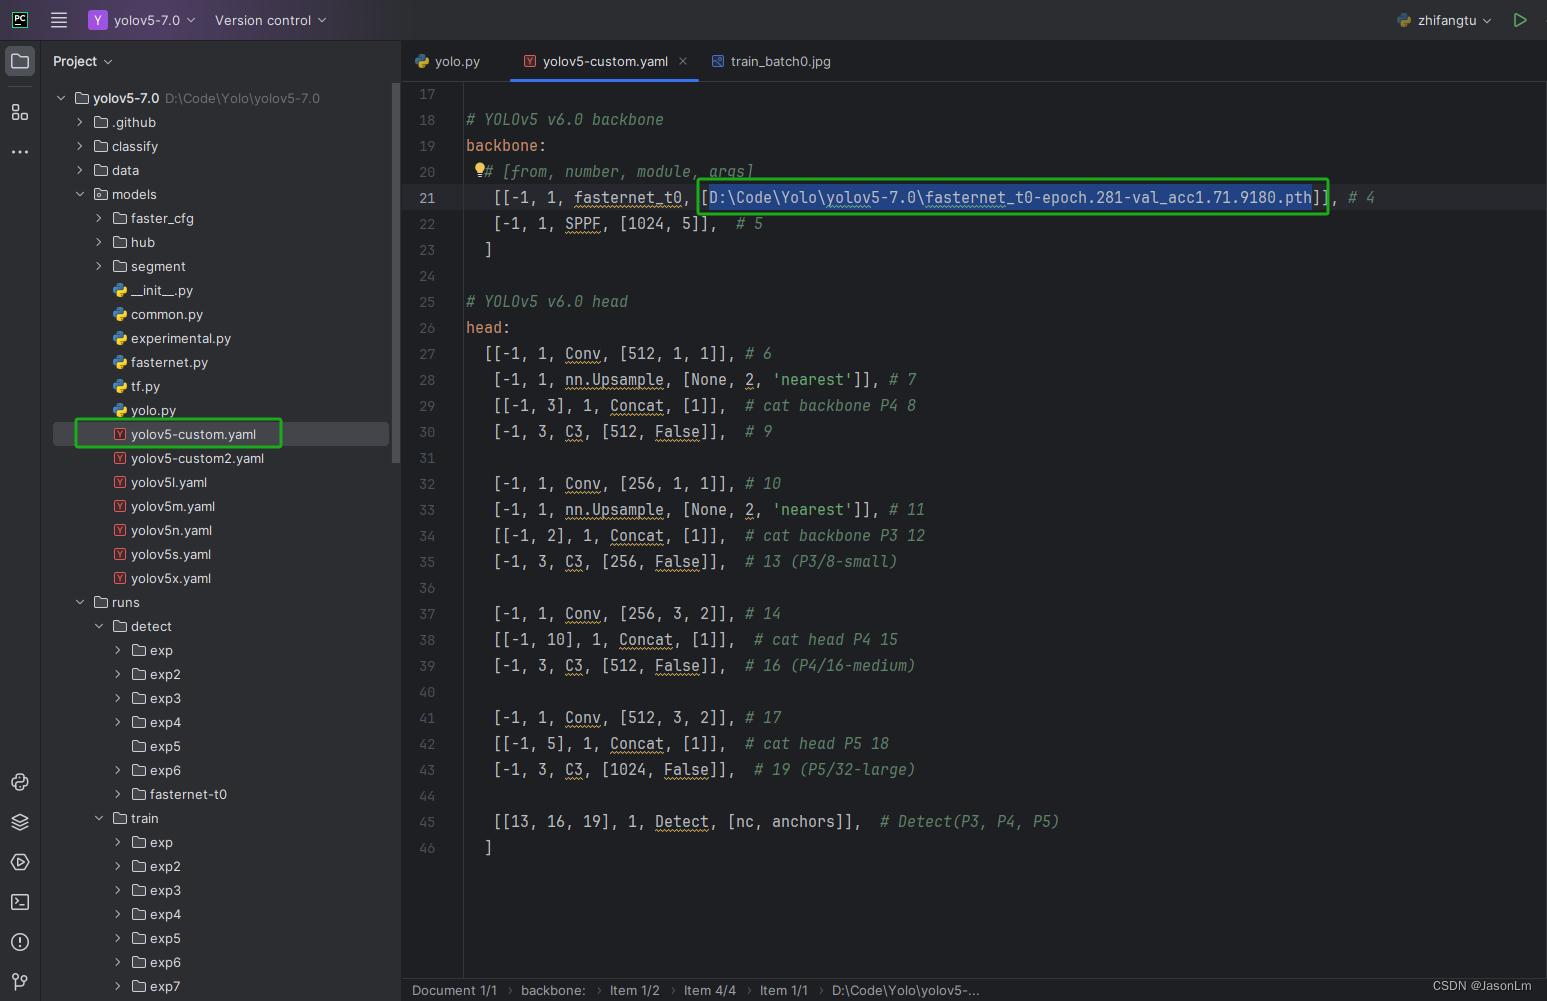
打开我们先前新建的yaml文件,在左边篮框中填写你需要的主干网络,右边篮框内放置该主干网络所对应的预训练权重。如果不想加载预训练权重,可以空着不写。

我这边加载fasternet-t0对应的预训练权重,因此填写预训练权重pth的存储路径。fasternet的权重文件获取方式见 步骤一。

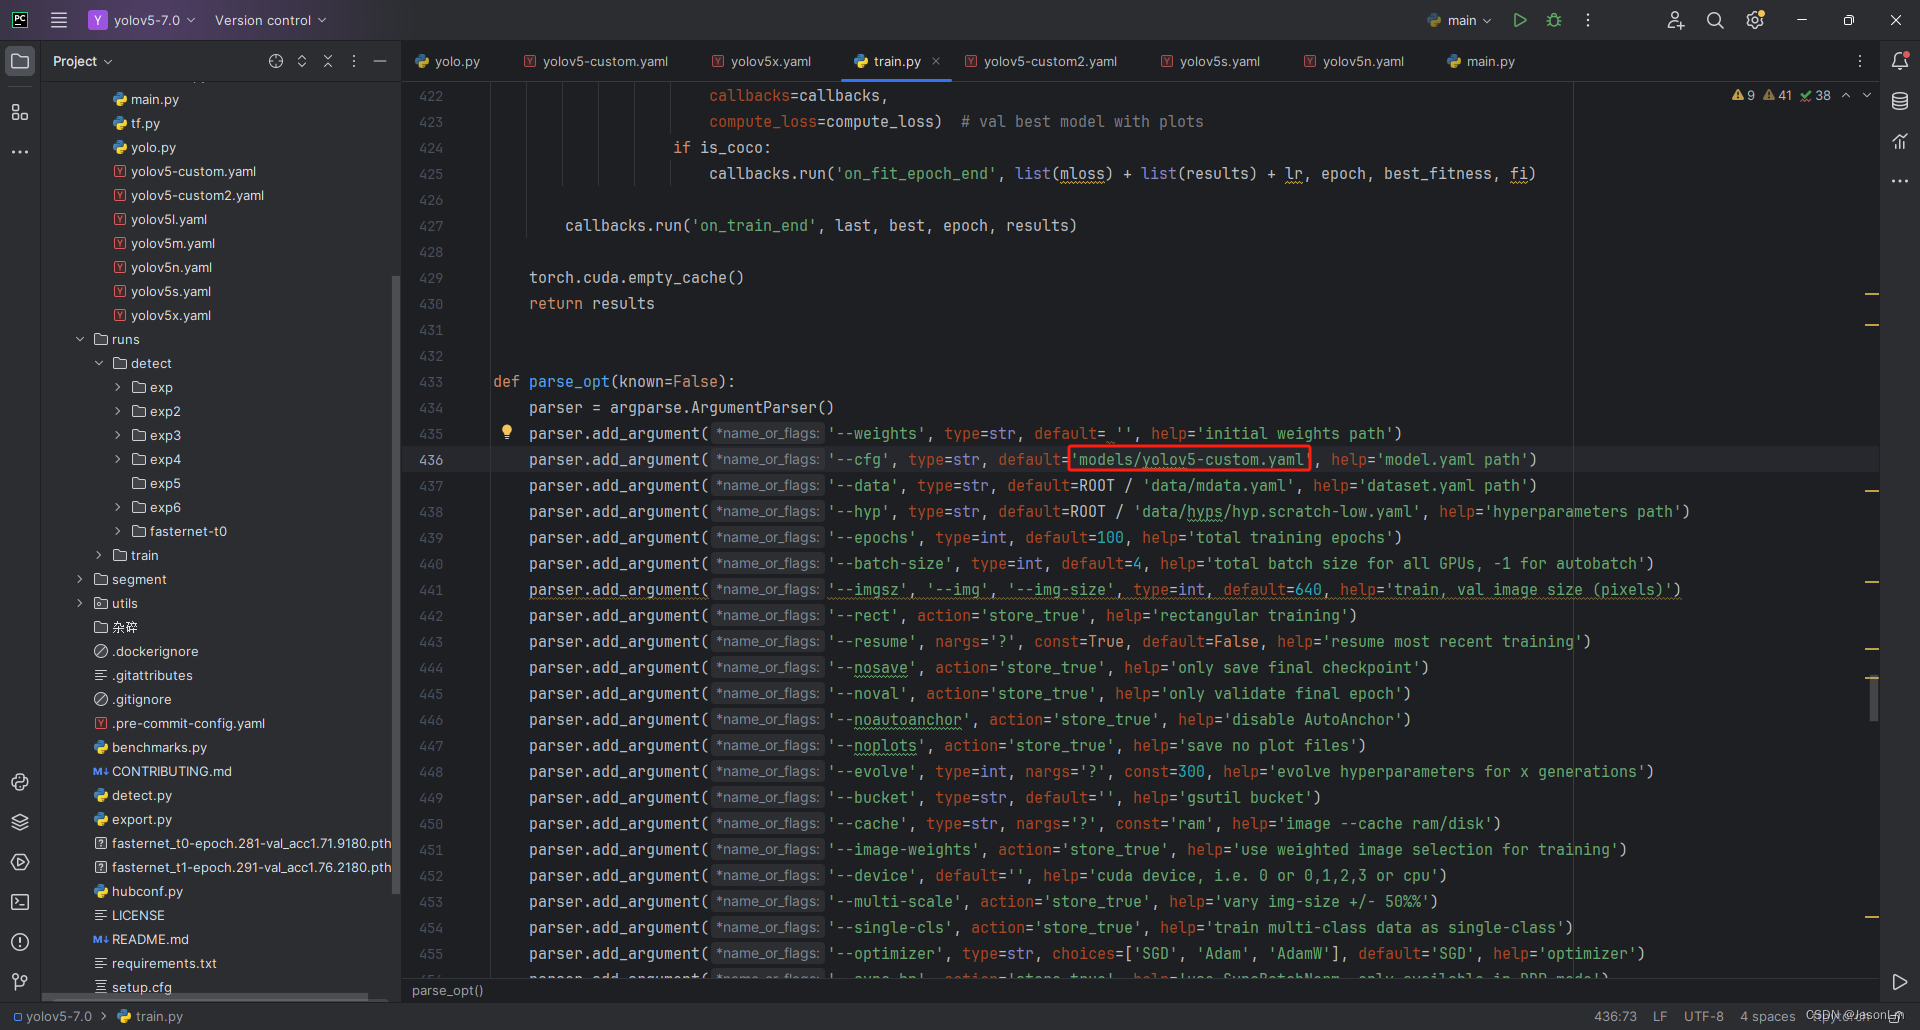
第七步:训练模型
终于可以愉快的使用替换Backbone之后的模型来训练了。在train.py当中,在 --cfg中,将default路径改为上述新建yaml文件的路径就可以了。至此,对于主干网络的替换步骤都结束了。
然后设置好其他epoch、batch等常规参数,你就可以愉快的开始训练了。
学习参考链接如下,特别鸣谢下方视频up主https://www.bilibili.com/video/BV1ra4y1K77u/?spm_id_from=333.337.search-card.all.click&vd_source=aed42df4b6ffa54b23d443fb8f0ecd1b


 4971
4971


 到【灌水乐园】发言


