


 本文介绍如何在Spring Boot项目中整合MyBatis,包括添加依赖、配置数据源、编写Mapper接口、使用二级缓存等内容。
【1】pom文件添加依赖
依赖如下所示:
	<dependency>
			<groupId>org.springframework.boot</groupId>
			<artifactId>spring-boot-starter-jdbc</artifactId>
		</dependency>
		<dependency>
			<groupId>org.springframework.boot</groupId>
			<artifactId>spring-boot-starter-web</artifactId>
		</dependency>
		<!--mybatis-->
		<dependency>
			<groupId>org.mybatis.spring.boot</groupId>
			<artifactId>mybatis-spring-boot-starter</artifactId>
			<version>1.3.1</version>
		</dependency>
		<!-- mysql-connector-java-->
		<dependency>
			<groupId>mysql</groupId>
			<artifactId>mysql-connector-java</artifactId>
			<scope>runtime</scope>
		</dependency>
		<!-- https://mvnrepository.com/artifact/com.alibaba/druid -->
		<dependency>
			<groupId>com.alibaba</groupId>
			<artifactId>druid</artifactId>
			<version>1.1.10</version>
		</dependency>

		<dependency>
			<groupId>org.springframework.boot</groupId>
			<artifactId>spring-boot-starter-test</artifactId>
			<scope>test</scope>
		</dependency>
【2】配置数据源,数据库建立表,并生成pojo
数据源配置
spring:
  datasource:
    url: jdbc:mysql://localhost:3306/test
    username: root
    password: 123456
    driver-class-name: com.mysql.jdbc.Driver
    type: com.alibaba.druid.pool.DruidDataSource

    initialSize: 5
    minIdle: 5
    maxActive: 20
    maxWait: 60000
    timeBetweenEvictionRunsMillis: 60000
    minEvictableIdleTimeMillis: 300000
    validationQuery: SELECT 1 FROM DUAL
    testWhileIdle: true
    testOnBorrow: true
    testOnReturn: false
    poolPreparedStatements: true
#   配置监控统计拦截的filters,去掉后监控界面sql无法统计,'wall'用于防火墙
    filters: stat,wall,log4j
    maxPoolPreparedStatementPerConnectionSize: 20
    useGlobalDataSourceStat: true
    connectionProperties: druid.stat.mergeSql=true;druid.stat.slowSqlMillis=500
两个JavaBean
这里使用两个类,department和employee
Department源码如下:
public class Department implements Serializable  {

    private Integer id;
    private String departmentName;

    public void setId(Integer id) {
        this.id = id;
    }

    public void setDepartmentName(String departmentName) {
        this.departmentName = departmentName;
    }

    public Integer getId() {
        return id;
    }

    public String getDepartmentName() {
        return departmentName;
    }
}
Employee源码如下:
public class Employee implements Serializable {

    private Integer id;
    private String lastName;
    private Integer gender;
    private String email;
    private Integer dId;

    public void setId(Integer id) {
        this.id = id;
    }

    public void setLastName(String lastName) {
        this.lastName = lastName;
    }

    public void setGender(Integer gender) {
        this.gender = gender;
    }

    public void setEmail(String email) {
        this.email = email;
    }

    public void setdId(Integer dId) {
        this.dId = dId;
    }

    public Integer getId() {
        return id;
    }

    public String getLastName() {
        return lastName;
    }

    public Integer getGender() {
        return gender;
    }

    public String getEmail() {
        return email;
    }

    public Integer getdId() {
        return dId;
    }
}
【3】编写注解版的Mapper
DepartmentMapper 源码
//指定这是一个操作数据库的mapper
@Mapper
public interface DepartmentMapper {

    @Select("select id,department_name as departmentName from department where id=#{id}")
    public Department getDeptById(Integer id);

    @Delete("delete from department where id=#{id}")
    public int deleteDeptById(Integer id);

    @Options(useGeneratedKeys = true,keyProperty = "id")
    @Insert("insert into department(department_name) values(#{departmentName})")
    public int insertDept(Department department);

    @Update("update department set department_name=#{departmentName} where id=#{id}")
    public int updateDept(Department department);
}
EmployeeMapper源码
//@Mapper或者@MapperScan将接口扫描装配到容器中
public interface EmployeeMapper {

    @Select("select * from employee where id=#{id}")
    public Employee getEmpById(Integer id);

    @Insert("insert into employee(lastName,email,gender,d_id) values(#{lastName},#{email},#{gender},#{dId})")
    public void insertEmp(Employee employee);
}
注意事项
第一对象的属性与数据表列属性不完全一直,如department的departmentName与数据表中department_name列对应。
解决方法:
-
① SQL中使用别名方式;
-
② 向容器中注册自定义的ConfigurationCustomizer
@org.springframework.context.annotation.Configuration
public class MyBatisConfig {

    @Bean
    public ConfigurationCustomizer configurationCustomizer(){
        return new ConfigurationCustomizer(){

            @Override
            public void customize(Configuration configuration) {
	            //这里表示开启驼峰命名
                configuration.setMapUnderscoreToCamelCase(true);
            }
        };
    }
}
第二,数据表中department的id为自增,则默认情况下插入department后,department对象的id为null(数据表有值,id列为自增),如下图所示:
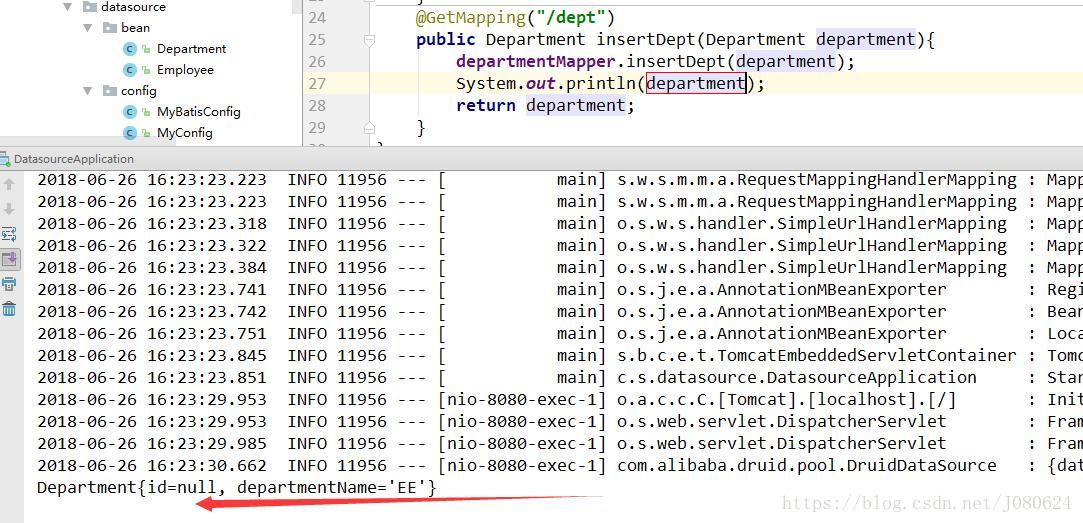
解决办法如下:添加@Options注解
	@Options(useGeneratedKeys = true,keyProperty = "id")
    @Insert("insert into department(department_name) values(#{departmentName})")
    public int insertDept(Department department);
编写Controller进行简单测试
DeptController 源码如下:
@RestController
public class DeptController {

    @Autowired
    DepartmentMapper departmentMapper;

    @RequestMapping("/dept/{id}")
    public Department getDepartment(@PathVariable("id") Integer id){
        return departmentMapper.getDeptById(id);
    }
    @GetMapping("/dept")
    public Department insertDept(Department department){
        departmentMapper.insertDept(department);
        System.out.println(department);
        return department;
    }
}
【4】@MapperScan注解
配置该注解后即可不用在每个mapper上面添加注解,示例如下:
@org.springframework.context.annotation.Configuration
@MapperScan(basePackages = {"com.springboot.datasource.mapper"})
public class MyBatisConfig {

    @Bean
    public ConfigurationCustomizer configurationCustomizer(){
        return new ConfigurationCustomizer(){

            @Override
            public void customize(Configuration configuration) {
                configuration.setMapUnderscoreToCamelCase(true);
            }
        };
    }
}
注解源码与说明
在Java配置类上面使用该注解可以注册Mybatis mapper接口,效果等同于通过MapperScannerRegistrar注册的MapperScannerConfigurer。
配置实例如下:
  @Configuration
  @MapperScan("org.mybatis.spring.sample.mapper")
  public class AppConfig {

    @Bean
    public DataSource dataSource() {
      return new EmbeddedDatabaseBuilder()
               .addScript("schema.sql")
               .build();
    }

    @Bean
    public DataSourceTransactionManager transactionManager() {
      return new DataSourceTransactionManager(dataSource());
    }

    @Bean
    public SqlSessionFactory sqlSessionFactory() throws Exception {
      SqlSessionFactoryBean sessionFactory = new SqlSessionFactoryBean();
      sessionFactory.setDataSource(dataSource());
      return sessionFactory.getObject();
    }
  }
源码如下
@Retention(RetentionPolicy.RUNTIME)
@Target(ElementType.TYPE)
@Documented
@Import(MapperScannerRegistrar.class)
public @interface MapperScan {

   //basePackages 的别名,更简洁的注解声明,如下所示
   //* @EnableMyBatisMapperScanner("org.my.pkg")}
   //* @EnableMyBatisMapperScanner(basePackages= "org.my.pkg"})
  String[] value() default {};

   //MyBatis接口的基础包
  String[] basePackages() default {};

   //一种类型安全的选择,效果等同于basePackages
  Class<?>[] basePackageClasses() default {};

   //指定BeanNameGenerator
  Class<? extends BeanNameGenerator> nameGenerator() default BeanNameGenerator.class;

   //指定base package下的包含的注解的类,可以与markerInterface联合使用
  Class<? extends Annotation> annotationClass() default Annotation.class;

   //指定需要扫描注册的接口 ,可以与注解配置使用
  Class<?> markerInterface() default Class.class;

   //当你有多个数据源的时候,这里指定你需要哪个SqlSessionTemplate
  String sqlSessionTemplateRef() default "";

   //当你有多个数据源的时候,这里指定你需要哪个SqlSessionFactory
  String sqlSessionFactoryRef() default "";

   //指定一个自定义的MapperFactoryBean(该bean用来生成mybatis proxy bean)
  Class<? extends MapperFactoryBean> factoryBean() default MapperFactoryBean.class;

}
【5】MyBatis的自动配置
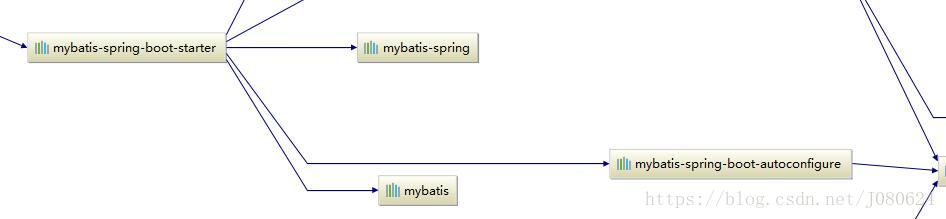
如下图所示,添加后mybatis-spring-boot-starter依赖如下图:
其中MyBatis的自动配置如下图:
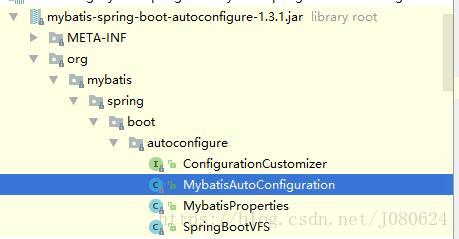
在类MybatisAutoConfiguration 注册了许多以前我们在XML中配置的bean,如SqlSessionFactory。
MybatisAutoConfiguration 源码
@Configuration
@ConditionalOnClass({SqlSessionFactory.class, SqlSessionFactoryBean.class})
@ConditionalOnBean({DataSource.class})
//MyBatis的属性对应类
@EnableConfigurationProperties({MybatisProperties.class})
@AutoConfigureAfter({DataSourceAutoConfiguration.class})
public class MybatisAutoConfiguration {
    private static final Logger logger = LoggerFactory.getLogger(MybatisAutoConfiguration.class);
    private final MybatisProperties properties;
    private final Interceptor[] interceptors;
    private final ResourceLoader resourceLoader;
    private final DatabaseIdProvider databaseIdProvider;
    private final List<ConfigurationCustomizer> configurationCustomizers;

    public MybatisAutoConfiguration(MybatisProperties properties, ObjectProvider<Interceptor[]> interceptorsProvider, ResourceLoader resourceLoader, ObjectProvider<DatabaseIdProvider> databaseIdProvider, ObjectProvider<List<ConfigurationCustomizer>> configurationCustomizersProvider) {
        this.properties = properties;
        this.interceptors = (Interceptor[])interceptorsProvider.getIfAvailable();
        this.resourceLoader = resourceLoader;
        this.databaseIdProvider = (DatabaseIdProvider)databaseIdProvider.getIfAvailable();
        this.configurationCustomizers = (List)configurationCustomizersProvider.getIfAvailable();
    }

    @PostConstruct
    public void checkConfigFileExists() {
        if(this.properties.isCheckConfigLocation() && StringUtils.hasText(this.properties.getConfigLocation())) {
            Resource resource = this.resourceLoader.getResource(this.properties.getConfigLocation());
            Assert.state(resource.exists(), "Cannot find config location: " + resource + " (please add config file or check your Mybatis configuration)");
        }
    }
    //...
 }
解释如下:
- 使用properties、interceptors 、resourceLoader 、databaseIdProvider 以及configurationCustomizers 创建MybatisAutoConfiguration
- checkConfigFileExists,检测配置文件是否存在
@PostConstruct
@PostConstruct注解作用在方法上,在依赖注入完成后进行一些初始化操作。这个方法在类被放入service之前被调用,所有支持依赖项注入的类都必须支持此注解。
注册SqlSessionFactory
    @Bean
    @ConditionalOnMissingBean
    public SqlSessionFactory sqlSessionFactory(DataSource dataSource) throws Exception {
        SqlSessionFactoryBean factory = new SqlSessionFactoryBean();
        factory.setDataSource(dataSource);
        factory.setVfs(SpringBootVFS.class);
        if(StringUtils.hasText(this.properties.getConfigLocation())) {
            factory.setConfigLocation(this.resourceLoader.getResource(this.properties.getConfigLocation()));
        }

        org.apache.ibatis.session.Configuration configuration = this.properties.getConfiguration();
        if(configuration == null && !StringUtils.hasText(this.properties.getConfigLocation())) {
            configuration = new org.apache.ibatis.session.Configuration();
        }

        if(configuration != null && !CollectionUtils.isEmpty(this.configurationCustomizers)) {
            Iterator var4 = this.configurationCustomizers.iterator();

            while(var4.hasNext()) {
                ConfigurationCustomizer customizer = (ConfigurationCustomizer)var4.next();
                customizer.customize(configuration);
            }
        }

        factory.setConfiguration(configuration);
        if(this.properties.getConfigurationProperties() != null) {
            factory.setConfigurationProperties(this.properties.getConfigurationProperties());
        }

        if(!ObjectUtils.isEmpty(this.interceptors)) {
            factory.setPlugins(this.interceptors);
        }

        if(this.databaseIdProvider != null) {
            factory.setDatabaseIdProvider(this.databaseIdProvider);
        }

        if(StringUtils.hasLength(this.properties.getTypeAliasesPackage())) {
            factory.setTypeAliasesPackage(this.properties.getTypeAliasesPackage());
        }

        if(StringUtils.hasLength(this.properties.getTypeHandlersPackage())) {
            factory.setTypeHandlersPackage(this.properties.getTypeHandlersPackage());
        }

        if(!ObjectUtils.isEmpty(this.properties.resolveMapperLocations())) {
            factory.setMapperLocations(this.properties.resolveMapperLocations());
        }

        return factory.getObject();
    }
代码解释如下:
- 创建SqlSessionFactoryBean实例
- 设置dataSource
- 设置SpringBootVFS
- 设置ConfigLocation
- 设置configuration
- 设置ConfigurationProperties
- 设置.Plugins(this.interceptors)
- 设置DatabaseIdProvider
- 设置TypeAliasesPackage
- 设置TypeHandlersPackage
- 设置MapperLocations
- 获取SqlSessionFactory(factory.getObject())
注册SqlSessionTemplate
    @Bean
    @ConditionalOnMissingBean
    public SqlSessionTemplate sqlSessionTemplate(SqlSessionFactory sqlSessionFactory) {
        ExecutorType executorType = this.properties.getExecutorType();
        return executorType != null?new SqlSessionTemplate(sqlSessionFactory, executorType):new SqlSessionTemplate(sqlSessionFactory);
    }
根据sqlSessionFactory和executorType创建SqlSessionTemplate实例。SqlSessionTemplate是spring提供的一个线程安全的sqlSession管理工具,可以管理session的生命周期包括提交、回滚以及关闭session。

AutoConfiguredMapperScannerRegistrar
    @Configuration
    @Import({MybatisAutoConfiguration.AutoConfiguredMapperScannerRegistrar.class})
    @ConditionalOnMissingBean({MapperFactoryBean.class})
    public static class MapperScannerRegistrarNotFoundConfiguration {
        public MapperScannerRegistrarNotFoundConfiguration() {
        }

        @PostConstruct
        public void afterPropertiesSet() {
            MybatisAutoConfiguration.logger.debug("No {} found.", MapperFactoryBean.class.getName());
        }
    }

    public static class AutoConfiguredMapperScannerRegistrar implements BeanFactoryAware, ImportBeanDefinitionRegistrar, ResourceLoaderAware {
        private BeanFactory beanFactory;
        private ResourceLoader resourceLoader;

        public AutoConfiguredMapperScannerRegistrar() {
        }

        public void registerBeanDefinitions(AnnotationMetadata importingClassMetadata, BeanDefinitionRegistry registry) {
            MybatisAutoConfiguration.logger.debug("Searching for mappers annotated with @Mapper");
            ClassPathMapperScanner scanner = new ClassPathMapperScanner(registry);

            try {
                if(this.resourceLoader != null) {
                    scanner.setResourceLoader(this.resourceLoader);
                }

                List<String> packages = AutoConfigurationPackages.get(this.beanFactory);
                if(MybatisAutoConfiguration.logger.isDebugEnabled()) {
                    Iterator var5 = packages.iterator();

                    while(var5.hasNext()) {
                        String pkg = (String)var5.next();
                        MybatisAutoConfiguration.logger.debug("Using auto-configuration base package '{}'", pkg);
                    }
                }

                scanner.setAnnotationClass(Mapper.class);
                scanner.registerFilters();
                scanner.doScan(StringUtils.toStringArray(packages));
            } catch (IllegalStateException var7) {
                MybatisAutoConfiguration.logger.debug("Could not determine auto-configuration package, automatic mapper scanning disabled.", var7);
            }

        }
	//...
    }
}
【6】注解开启二级缓存
Spring与MyBatis整合时,MyBatis的一级缓存在没有事务存在的时候失效。
在未开启事务的情况之下,每次查询,spring都会关闭旧的sqlSession而创建新的sqlSession,因此此时的一级缓存是没有启作用的;
在开启事务的情况之下,spring使用threadLocal获取当前资源绑定同一个sqlSession,因此此时一级缓存是有效的。
配置实例与测试
SpringBoot中默认帮我们全局开启了二级缓存,如果想要使用二级缓存还需要在mapper上注明。
源码示例如下:
@CacheNamespace
public interface EmployeeMapper {

    @Select("select * from employee where id=#{id}")
    public Employee getEmpById(Integer id);

    @Insert("insert into employee(lastName,email,gender,d_id) values(#{lastName},#{email},#{gender},#{dId})")
    public void insertEmp(Employee employee);
}
这里使用@CacheNamespace注解(为给定的命名空间(比如类)配置缓存,对应xml<cache>)在该mapper上使用二级缓存。
<mapper namespace="xxx.***.EmployeeMapper ">

    <cache/>

</mapper>
连续发起两次查询语句,查询同一个id的Employee,控制台日志如下:

@CacheNamespace源码
@Documented
@Retention(RetentionPolicy.RUNTIME)
@Target(ElementType.TYPE)
public @interface CacheNamespace {
/**
mybatis的一级缓存,默认情况下都处于开启状态,只能使用自带的PerpetualCache,无法配置第三方缓存;
mybatis的二级缓存,可以配置开关状态,默认使用自带的PerpetualCache,但功能比较弱,能够配置第三方缓存。
*/
  Class<? extends org.apache.ibatis.cache.Cache> implementation() default PerpetualCache.class;
//回收策略--最近最少使用
  Class<? extends org.apache.ibatis.cache.Cache> eviction() default LruCache.class;

  long flushInterval() default 0;

  int size() default 1024;

  boolean readWrite() default true;

  boolean blocking() default false;

   //为实现类提供Property 配置,3.4.2+版本支持
  Property[] properties() default {};

}
【7】MyBatis中Cache解析处理过程
如下图所示:
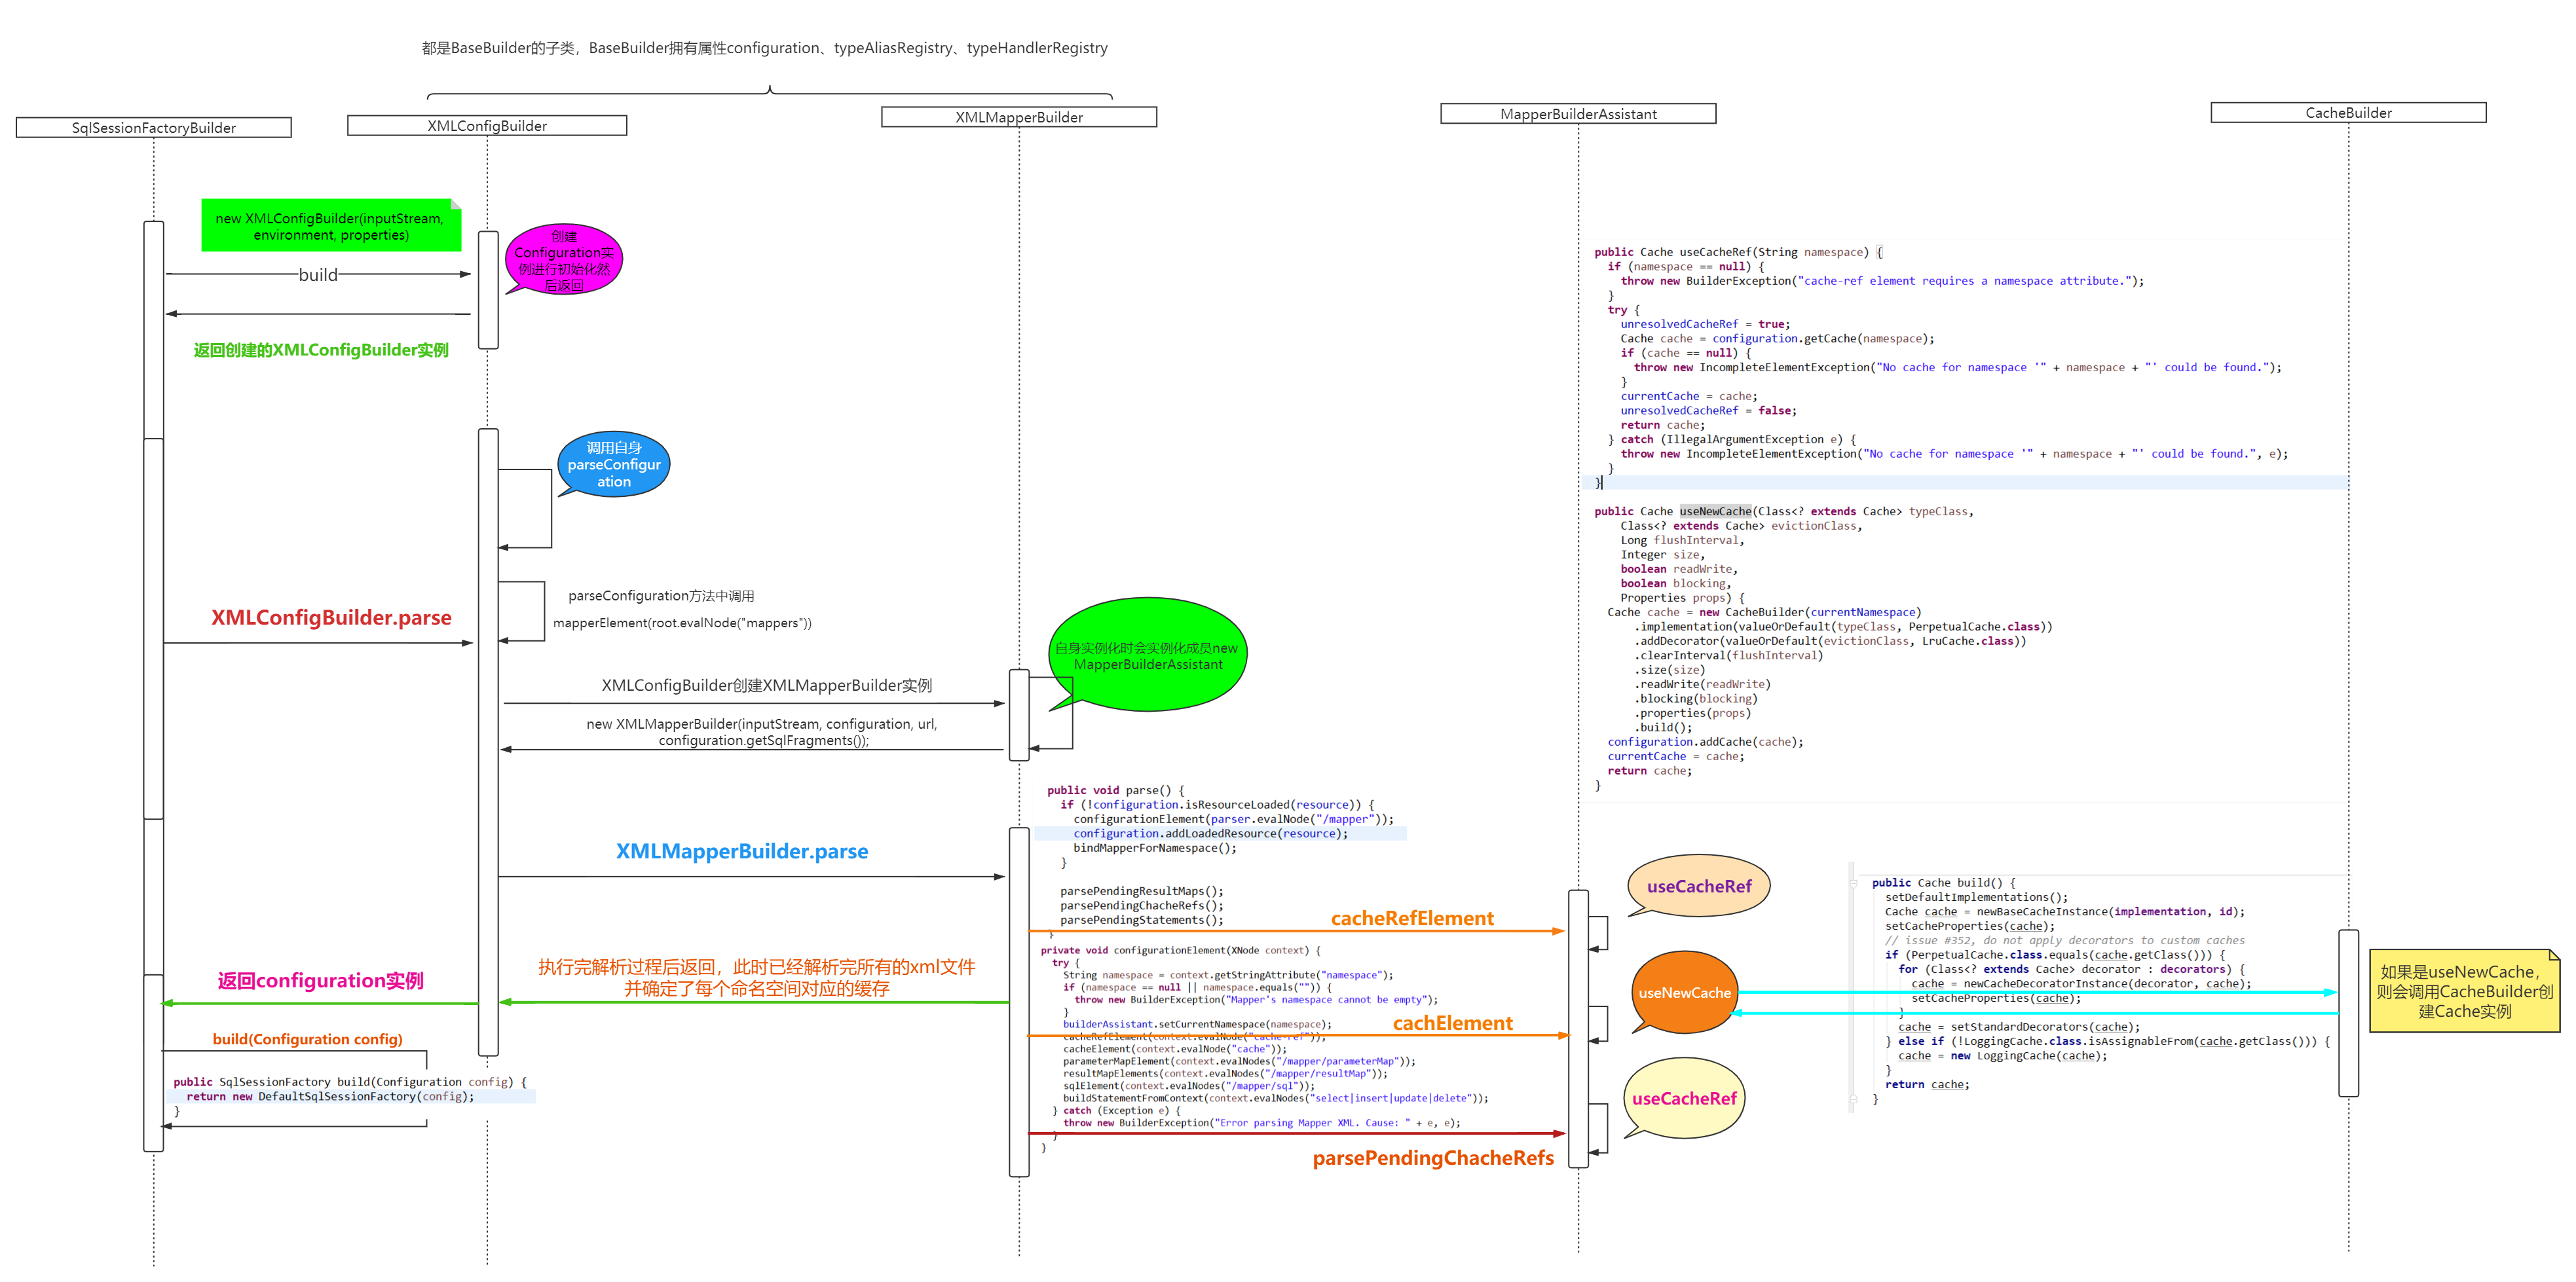
通过源码查看MyBatis中二级缓存的默认配置如下。
XMLMapperBuilder.cacheElement:
private void cacheElement(XNode context) throws Exception {
    if (context != null) {
    //获取配置的type值,默认值为PERPETUAL
      String type = context.getStringAttribute("type", "PERPETUAL");
      //获取type的class
      Class<? extends Cache> typeClass = typeAliasRegistry.resolveAlias(type);
       //获取配置过期策略,默认值为LRU
      String eviction = context.getStringAttribute("eviction", "LRU");
      Class<? extends Cache> evictionClass = typeAliasRegistry.resolveAlias(eviction);
       //获取配置的刷新间隔
      Long flushInterval = context.getLongAttribute("flushInterval");
       //获取配置的缓存大小
      Integer size = context.getIntAttribute("size");
      //是否配置了只读,默认为false
      boolean readWrite = !context.getBooleanAttribute("readOnly", false);
       //是否配置了阻塞,默认为false
      boolean blocking = context.getBooleanAttribute("blocking", false);
      Properties props = context.getChildrenAsProperties();
      builderAssistant.useNewCache(typeClass, evictionClass, flushInterval, size, readWrite, blocking, props);
    }
  }
MapperBuilderAssistant.useNewCache:
public Cache useNewCache(Class<? extends Cache> typeClass,
      Class<? extends Cache> evictionClass,
      Long flushInterval,
      Integer size,
      boolean readWrite,
      boolean blocking,
      Properties props) {
    Cache cache = new CacheBuilder(currentNamespace)
        .implementation(valueOrDefault(typeClass, PerpetualCache.class))
        .addDecorator(valueOrDefault(evictionClass, LruCache.class))
        .clearInterval(flushInterval)
        .size(size)
        .readWrite(readWrite)
        .blocking(blocking)
        .properties(props)
        .build();
    configuration.addCache(cache);
    currentCache = cache;
    return cache;
  }
Cache支持的过期策略:
typeAliasRegistry.registerAlias("FIFO", FifoCache.class);
typeAliasRegistry.registerAlias("LRU", LruCache.class);
typeAliasRegistry.registerAlias("SOFT", SoftCache.class);
typeAliasRegistry.registerAlias("WEAK", WeakCache.class);
PerpetualCache缓存实现源码:
public class PerpetualCache implements Cache {
//缓存ID
  private final String id;
//缓存
  private Map<Object, Object> cache = new HashMap<Object, Object>();

  public PerpetualCache(String id) {
    this.id = id;
  }

  @Override
  public String getId() {
    return id;
  }

  @Override
  public int getSize() {
    return cache.size();
  }

  @Override
  public void putObject(Object key, Object value) {
    cache.put(key, value);
  }

  @Override
  public Object getObject(Object key) {
    return cache.get(key);
  }

  @Override
  public Object removeObject(Object key) {
    return cache.remove(key);
  }

  @Override
  public void clear() {
    cache.clear();
  }

  @Override
  public ReadWriteLock getReadWriteLock() {
    return null;
  }

  @Override
  public boolean equals(Object o) {
    if (getId() == null) {
      throw new CacheException("Cache instances require an ID.");
    }
    if (this == o) {
      return true;
    }
    if (!(o instanceof Cache)) {
      return false;
    }

    Cache otherCache = (Cache) o;
    return getId().equals(otherCache.getId());
  }

  @Override
  public int hashCode() {
    if (getId() == null) {
      throw new CacheException("Cache instances require an ID.");
    }
    return getId().hashCode();
  }

}
【8】高版本中url和驱动不同
在SpringBoot2.0等更高版本时,如果MySQL驱动使用的是8版本,那么可能会出现如下异常:
java.sql.SQLException: The server time zone value 'Öйú±ê׼ʱ¼ä' is unrecognized
并且还可能提示你驱动需要更换为如下:
com.mysql.cj.jdbc.Driver
此时只需要更改为如下则可:
spring.datasource.url=jdbc:mysql://localhost:3306/test?serverTimezone=GMT%2B8
spring.datasource.username=root
spring.datasource.password=123456
spring.datasource.driver-class-name=com.mysql.cj.jdbc.Driver


 21万+
21万+

 被折叠的 条评论
为什么被折叠?
被折叠的 条评论
为什么被折叠?
 到【灌水乐园】发言


