


 本文介绍了Spring框架中如何通过@Profile注解实现不同环境下的Bean动态激活与配置。包括@Profile注解的基本使用方法、如何指定Bean生效的环境及激活环境的多种方式。
@Profile注解
Spring为我们提供的可以根据当前环境,动态的激活和切换一系列组件的功能。指定组件在哪个环境的情况下才能被注册到容器中,不指定则任何环境下都能注册这个组件。
可以通过如下四种方式指定Bean生效的环境。
ConfigurableEnvironment.setActiveProfiles
AbstractEnvironment.ACTIVE_PROFILES_PROPERTY_NAME =spring.profiles.active
web.xml配置
@ActiveProfiles注解
接口类如下:
@Target({ElementType.TYPE, ElementType.METHOD})
@Retention(RetentionPolicy.RUNTIME)
@Documented
@Conditional(ProfileCondition.class)
public @interface Profile {

	/**
	 * The set of profiles for which the annotated component should be registered.
	 */
	String[] value();

}
① 如果不加@Profile注解,则该bean在任何环境下都被注入
@Bean
public Yellow yellow(){
	return new Yellow();
}
② 如果指定了@Profile,则只有该环境被激活的时候bean才会被注入
@Profile("dev")
@Bean("devDataSource")
public DataSource dataSourceDev(@Value("${db.password}")String pwd) throws Exception{
	ComboPooledDataSource dataSource = new ComboPooledDataSource();
	dataSource.setUser(user);
	dataSource.setPassword(pwd);
	dataSource.setJdbcUrl("jdbc:mysql://localhost:3306/xian");
	dataSource.setDriverClass(driverClass);
	return dataSource;
}
③ 如果指定了@Profile(“default”),那么默认环境下bean会被注入
@Profile("default")
@Bean("testDataSource")
public DataSource dataSourceTest(@Value("${db.password}")String pwd) throws Exception{
	ComboPooledDataSource dataSource = new ComboPooledDataSource();
	dataSource.setUser(user);
	dataSource.setPassword(pwd);
	dataSource.setJdbcUrl("jdbc:mysql://localhost:3306/test");
	dataSource.setDriverClass(driverClass);
	return dataSource;
}
④ 如果@Profile配置于类上,则该类下的bean想起作用,Spring激活的环境首先要与类配置@Profile指定的环境一致,其次再看类中方法上的@Profile注解配置。
@PropertySource("classpath:/dbconfig.properties")
@Profile("dev")
@Configuration
public class MainConfigOfProfile implements EmbeddedValueResolverAware{

	@Value("${db.user}")
	private String user;

	private StringValueResolver valueResolver;

	private String  driverClass;

	@Bean
	public Yellow yellow(){
		return new Yellow();
	}

	@Profile("default")
//	@Profile("test")
	@Bean("testDataSource")
	public DataSource dataSourceTest(@Value("${db.password}")String pwd) throws Exception{
		ComboPooledDataSource dataSource = new ComboPooledDataSource();
		dataSource.setUser(user);
		dataSource.setPassword(pwd);
		dataSource.setJdbcUrl("jdbc:mysql://localhost:3306/test");
		dataSource.setDriverClass(driverClass);
		return dataSource;
	}

	@Profile("dev")
	@Bean("devDataSource")
	public DataSource dataSourceDev(@Value("${db.password}")String pwd) throws Exception{
		ComboPooledDataSource dataSource = new ComboPooledDataSource();
		dataSource.setUser(user);
		dataSource.setPassword(pwd);
		dataSource.setJdbcUrl("jdbc:mysql://localhost:3306/xian");
		dataSource.setDriverClass(driverClass);
		return dataSource;
	}
}
激活环境的几种方式
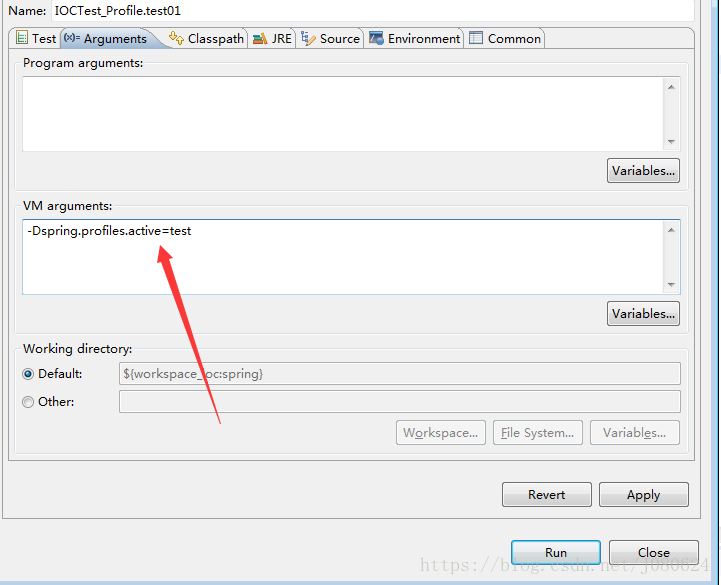
① 虚拟机参数
② 代码激活
@Test
public void test01(){
	//1、创建一个applicationContext
	AnnotationConfigApplicationContext applicationContext =
			new AnnotationConfigApplicationContext();
	//2、设置需要激活的环境
	applicationContext.getEnvironment().setActiveProfiles("dev");

	//3、注册主配置类
	applicationContext.register(MainConfigOfProfile.class);
	//4、启动刷新容器
	applicationContext.refresh();

	String[] namesForType = applicationContext.getBeanNamesForType(DataSource.class);
	for (String string : namesForType) {
		System.out.println(string);
	}

	Yellow bean = applicationContext.getBean(Yellow.class);
	System.out.println(bean);
	applicationContext.close();
}
③ web.xml
<!-- 在上下文中设置profile的默认值 -->
<context-param>
    <param-name>spring.profiles.default</param-name>
    <param-value>dev</param-value>
</context-param>

<servlet>
    <servlet-name>appServlet</servlet-name>
    <servlet-class>org.springframework.web.servlet.DispatcherServlet</servlet-class>
    <!-- 在servlet中设置profile的默认值 -->
    <init-param>
     <param-name>spring.profiles.default</param-name>
     <param-value>dev</param-value>
    </init-param>
    <load-on-startup>1</load-on-startup>
</servlet>


 1097
1097

 被折叠的 条评论
为什么被折叠?
被折叠的 条评论
为什么被折叠?
 到【灌水乐园】发言


