


了解device_node 转换成platform_device
文章目录
一、前言
前面通过设设备树了解过设备树语法、中断、时钟、GPIO、pinctrl,设备树描述设备属性,同时部分硬件设备描述放在设备树里面。 对于硬件外设等接口放到设备树中,在平台总线篇章 是需要驱动和设备匹配的。 那么现在的问题就是如何在设备树中描述硬件信息,驱动起来后自动和设备树中的设备匹配起来,建立通信桥梁?
这里有几个过程:设备树不可能直接加载在内存,驱动直接读取设备数的,这里面有个过程:
设备树展开过程
设备树无法直接应用于系统,dtc 编译后形成dtb,dtb 中数据映射到内存中去。
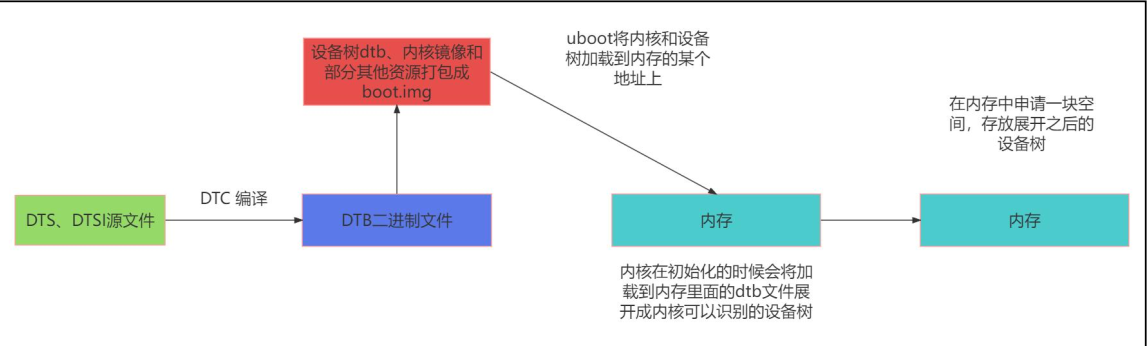
这里把dts 加载到内存的过程,可以参考如下流程图,如果有必要可以跟一下kernel 代码,了解流程:
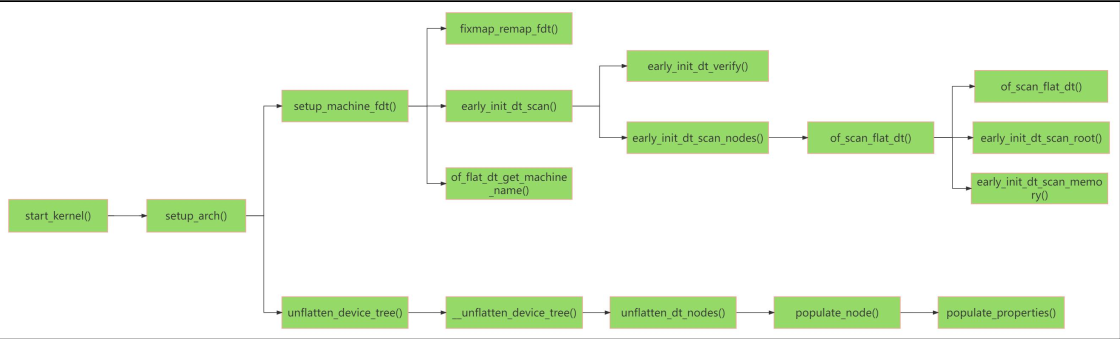
最终会在内存中形成一个结构体 device_node,device_node 我理解为 xml/json 里面的节点,就是一个树节点,但是device_node 并不能够被driver 识别,driver 识别的是device . 所以 还需要把device_node 转换成device
device_node 转换成 platform_device 转换规则
内核加载了device_node ,接下来device_node 转换成platform_device,但是并不是所有的节点都可以被转换成device.
这个很好理解:设备树中那么多属性,虽然都是描述硬件信息的,但是并不是所有的节点都是device 相关的。 那么就有个规则了,哪些才能转换成device 这些都是必须掌握基础知识。
- 根据规则 1: 首先遍历根节点下包含 compatible 属性的子节点, 对于每个子节点, 创建一个对应的 platform_device。
- 据规则 2 : 遍历包含 compatible 属性为 “simple-bus”、 “simple-mfd” 或 “isa” 的节点以及它们的子节点。 如果子节点包含 compatible 属性值则会创建一个对应的 platform_device。
- 根据规则 3: 检查节点的 compatible 属性是否包含 “arm” 或 “primecell”。 如果是, 则不将该节点转换为 platform_device, 而是将其识别为 AMBA 设备
举例 示例说明:
示例一:
/dts-v1/;
/ {


model = "This is my devicetree!";
#address-cells = <1>;
#size-cells = <1>;
chosen {


bootargs = "root=/dev/nfs rw nfsroot=192.168.1.1 console=ttyS0, 115200";
};
cpu1: cpu@1 {


device_type = "cpu";
compatible = "arm,cortex-a35", "arm,armv8";
reg = <0x0 0x1>;
};
aliases {


led1 = "/gpio@22020101";
};
node1 {


#address-cells = <1>;
#size-cells = <1>;
gpio@22020102 {


reg = <0x20220102 0x40>;
};
};
node2 {


node1-child {


pinnum = <01234>;
};
};
gpio@22020101 {


compatible = "led";
reg = <0x20220101 0x40>;
status = "okay";
};
};
在上面的设备树中, 总共有 chosen、 cpu1: cpu@1、 aliases、 node1、 node2、 gpio@22020101这六个节点, 其中前五个节点都没有 compatible 属性, 所以并不会被转换为 platform_device,而最后一个 gpio@22020101 节点符合规则一, 在根节点下, 且有 compatible 属性, 所以最后会转换为platform_device。
示例二:
/dts-v1/;
/ {


model = "This is my devicetree!";
#address-cells = <1>;
#size-cells = <1>;
42
chosen {


bootargs = "root=/dev/nfs rw nfsroot=192.168.1.1 console=ttyS0, 115200";
};
cpu1: cpu@1 {


device_type = "cpu";
compatible = "arm,cortex-a35", "arm,armv8";
reg = <0x0 0x1>;
};
aliases {


led1 = "/gpio@22020101";
};
node1 {


#address-cells = <1>;
#size-cells = <1>;
compatible = "simple-bus";
gpio@22020102 {


reg = <0x20220102 0x40>;
};
};
node2 {


node1-child {


pinnum = <01234>;
};
};
gpio@22020101 {


compatible = "led";
reg = <0x20220101 0x40>;
status = "okay";
};
};
相较于示例 1 的设备树, 这里在 node1 节点中添加了 compatible 属性, 但是这个 compatible 属性值为 simple-bus, 我们需要继续看他的子节点, 子节点 gpio@22020102 并没有 compatible 属性值, 所以这里的 node1 节点不会被转换。
示例三:
/dts-v1/;
/ {


model = "This is my devicetree!";
#address-cells = <1>;
#size-cells = <1>;
chosen {


bootargs = "root=/dev/nfs rw nfsroot=192.168.1.1 console=ttyS0, 115200";
};
cpu1: cpu@1 {


device_type = "cpu";
compatible = "arm,cortex-a35", "arm,armv8";
reg = <0x0 0x1>;
};
aliases {


led1 = "/gpio@22020101";
};
node1 {


#address-cells =
最低0.47元/天 解锁文章


 被折叠的 条评论
为什么被折叠?
被折叠的 条评论
为什么被折叠?
 到【灌水乐园】发言


