


一、基础内容
1.1 介绍
Dubbo是一款高性能、轻量级的开源 Java RPC 远程过程调用框架。其拥有面向接口的远程方法调用,智能容错和负载均衡,以及服务自动注册和发现的能力。RPC指的是远程过程调用,一种进行通信方式。 它允许程序调用另一个地址空间(网络的另一台机器上)的过程或函 数,而不用开发人员显式编码这个调用的细节。
Dubbo架构图:
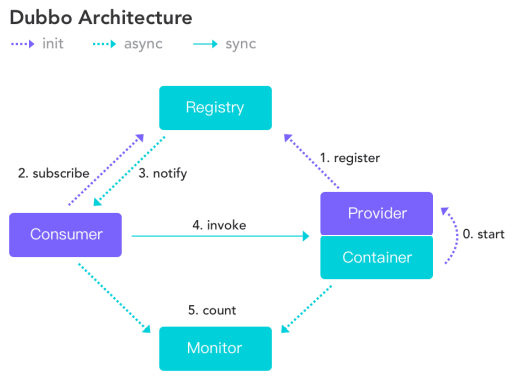
Dubbo的角色主要是:
- 服务提供者(Provider):暴露服务的服务提供方,服务提供者在启动时,向注册中心注册自己提供的服务;
- 服务消费者(Consumer): 调用远程服务的服务消费方,服务消费者在启动时,向注册中心订阅自己所需的服务,服务消费者,从提供者地址列表中,基于软负载均衡算法,选一 台提供者进行调用,如果调用失败,再选另一台调用;
- 注册中心(Registry):注册中心返回服务提供者地址列表给消费者,如果有变更,注册中心将基于长连接推送变更数据给消费者;
- 监控中心(Monitor):服务消费者和提供者,在内存中累计调用次数和调用时间,定时每分钟发送一次统计数据到监控中心。
根据架构图中的内容,对应其中编号0-5的步骤,其调用行为主要包括:
〇服务容器负责启动、加载、运行服务提供者;
①服务提供者在启动时,向注册中心注册自己提供的服务;
②服务消费者在启动时,向注册中心订阅自己所需的服务;
③注册中心返回服务提供者地址列表给消费者,如果有变更,注册中心将基于长连接推送变更数据给消费者;
④服务消费者,从提供者地址列表中,基于软负载均衡算法,选一台提供者进行调用,如果调用失败,再选另一台调用;
⑤服务消费者和提供者,在内存中累计调用次数和调用时间,定时每分钟发送一次统计数据到监控中心。
1.2 直连案例
1.2.1 案例代码
要实现整个案例,首先便是要定义架构图中的两个主要角色:服务提供者和服务发现者,分别使用link-privider和link-consumer两个module来进行演示。
首先对服务提供者而言,要开启Dubbo,就要新建Maven工程,然后在pom.xml中导入依赖:
    <dependency>
      <groupId>org.springframework</groupId>
      <artifactId>spring-context</artifactId>
      <version>5.2.9.RELEASE</version>
    </dependency>

    <dependency>
      <groupId>org.springframework</groupId>
      <artifactId>spring-webmvc</artifactId>
      <version>5.2.9.RELEASE</version>
    </dependency>

    <!-- https://mvnrepository.com/artifact/com.alibaba/dubbo -->
    <dependency>
      <groupId>com.alibaba</groupId>
      <artifactId>dubbo</artifactId>
      <version>2.6.2</version>
    </dependency>
配置接口和实现类:
// Hello接口
public interface SomeServices {
    String hello(String msg);
}

// 实现类
public class SomeServiceImpl implements SomeServices {
    @Override
    public String hello(String msg) {
        return "Hello " + msg;
    }
}
在resources目录下,新建XML配置文件进行服务、对象、接口等有关的配置:
<?xml version="1.0" encoding="UTF-8"?>
<beans xmlns="http://www.springframework.org/schema/beans"
       xmlns:xsi="http://www.w3.org/2001/XMLSchema-instance" xmlns:dubbo="http://code.alibabatech.com/schema/dubbo"
       xsi:schemaLocation="http://www.springframework.org/schema/beans http://www.springframework.org/schema/beans/spring-beans.xsd http://code.alibabatech.com/schema/dubbo http://code.alibabatech.com/schema/dubbo/dubbo.xsd">

<!--    声明服务提供者的名称,保证唯一性,是Dubbo的唯一标识-->
    <dubbo:application name="link-provider"/>
<!--    指定Dubbo的协议名称和端口号
    端口号默认20880
-->
    <dubbo:protocol name="dubbo" port="20880"/>
<!--暴露服务
    interface:暴露服务的接口全限定类名
    ref:引用接口在Spring容器中的标识名称
    registry:使用直连方式,不使用注册中心,则配置为N/A
-->
    <dubbo:service interface="com.demo.dubbo.service.SomeServices" ref="someServiceImpl" register="N/A"/>
<!--    加载接口实现类-->
    <bean id="someServiceImpl" class="com.demo.dubbo.service.impl.SomeServiceImpl"/>
</beans>
然后便是配置xml配置文件生效:
<?xml version="1.0" encoding="UTF-8"?>
<web-app xmlns="http://xmlns.jcp.org/xml/ns/javaee"
         xmlns:xsi="http://www.w3.org/2001/XMLSchema-instance"
         xsi:schemaLocation="http://xmlns.jcp.org/xml/ns/javaee
                  http://xmlns.jcp.org/xml/ns/javaee/web-app_4_0.xsd"
         version="4.0">
  <display-name>Archetype Created Web Application</display-name>
  <context-param>
    <param-name>contextConfigLocation</param-name>
    <param-value>classpath:dubbo-link-provider.xml</param-value>
  </context-param>
  <listener>
    <listener-class>org.springframework.web.context.ContextLoaderListener</listener-class>
  </listener>
</web-app>
对于服务消费者而言,最主要的便是如何知道服务提供者暴露的接口。配置服务提供者,关闭打war包,然后进行maven的install操作,打包并发布到本地仓库。
<!--    添加服务提供者接口依赖-->
    <dependency>
      <groupId>org.example</groupId>
      <artifactId>link-provider</artifactId>
      <version>1.0-SNAPSHOT</version>
    </dependency>
然后便是最重要的:配置消费者的核心配置文件:
<?xml version="1.0" encoding="UTF-8"?>
<beans xmlns="http://www.springframework.org/schema/beans"
       xmlns:xsi="http://www.w3.org/2001/XMLSchema-instance" xmlns:dubbo="http://code.alibabatech.com/schema/dubbo"
       xsi:schemaLocation="http://www.springframework.org/schema/beans http://www.springframework.org/schema/beans/spring-beans.xsd http://code.alibabatech.com/schema/dubbo http://code.alibabatech.com/schema/dubbo/dubbo.xsd">

<!--    声明服务消费者,保证唯一性-->
    <dubbo:application name="link-consumer"/>

<!--    引用远程接口
    interface:接口的全限定名
    url:调用远程接口服务的url地址
    registry:直连方式,不使用注册中心
-->
    <dubbo:reference id="someService"
                     interface="com.demo.dubbo.service.SomeService"
                     url="dubbo://localhost:20880"
                     registry="N/A"/>
</beans>
核心配置文件非常重要,关系到消费端如何通过端口与服务端相连接的问题。在所有配置完成,服务启动后,也会看到:

消费端在启动时,就会根据核心配置文件,进行服务端接口调用的全类名拼接,从而开启远程调用。
然后,如果是使用SpringMVC,那需要编写的Controller代码和xml配置如下:
@Controller
public class SomeController {

    @Autowired
    private SomeService someService;

    @RequestMapping(value = "/hello")
    public String hello(Model model){
        // 调用远程接口服务
        String hello = someService.hello("Dubbo");
        model.addAttribute("hello",hello);
        return "hello";
    }
}
<?xml version="1.0" encoding="UTF-8"?>
<beans xmlns="http://www.springframework.org/schema/beans"
       xmlns:xsi="http://www.w3.org/2001/XMLSchema-instance"
       xmlns:context="http://www.springframework.org/schema/context"
       xmlns:mvc="http://www.springframework.org/schema/mvc"
       xsi:schemaLocation="http://www.springframework.org/schema/beans http://www.springframework.org/schema/beans/spring-beans.xsd http://www.springframework.org/schema/context https://www.springframework.org/schema/context/spring-context.xsd http://www.springframework.org/schema/mvc https://www.springframework.org/schema/mvc/spring-mvc.xsd">

<!--    扫描组件-->
    <context:component-scan base-package="com.demo.dubbo.web"/>

<!--    注解驱动-->
    <mvc:annotation-driven/>

<!--    视图解析器-->
    <bean class="org.springframework.web.servlet.view.InternalResourceViewResolver">
        <property name="prefix" value=""/>
        <property name="suffix" value=".jsp"/>
    </bean>

</beans>
最后是配置中央调试器:
<?xml version="1.0" encoding="UTF-8"?>
<web-app xmlns="http://xmlns.jcp.org/xml/ns/javaee"
         xmlns:xsi="http://www.w3.org/2001/XMLSchema-instance"
         xsi:schemaLocation="http://xmlns.jcp.org/xml/ns/javaee
                  http://xmlns.jcp.org/xml/ns/javaee/web-app_4_0.xsd"
         version="4.0">
  <servlet>
    <servlet-name>dispatcherServlet</servlet-name>
    <servlet-class>org.springframework.web.servlet.DispatcherServlet</servlet-class>
    <init-param>
      <param-name>contextConfigLocation</param-name>
      <param-value>classpath:dubbo-link-consumer.xml,classpath:springmvc.xml</param-value>
    </init-param>
    <load-on-startup>1</load-on-startup>
  </servlet>
  <servlet-mapping>
    <servlet-name>dispatcherServlet</servlet-name>
    <url-pattern>/</url-pattern>
  </servlet-mapping>
</web-app>
全部配置好之后,将服务端和消费端依次启动即可。
1.2.2 案例解读
直连方式简化了开发流程,不需要再配置注册中心。但是直连方式不仅仅能获得远程接口,还能直接获得接口的实现类,从而知道其实现细节。这是很不好的一个点。这与Dubbo服务以接口为粒度,为开发者屏蔽远程调用细节相违背。
当然,如果要对直连模式进行修改,官方有推荐的项目结构:就是在服务提供者和服务消费者的基础上,再增加接口工程,专门用来存储业务接口和实体类。
1.2.3 增加接口工程
为了进一步优化项目,增加接口工程,然后将实体类和接口都放在接口工程中。再让服务提供者依赖接口工程,实现其接口,最后由服务消费者调用。其中,服务提供者配置Maven:
    <dependency>
      <groupId>com.demo.dubbo</groupId>
      <artifactId>link-interface</artifactId>
      <version>1.0-SNAPSHOT</version>
    </dependency>
对服务提供者和服务消费者而言,其他配置不变。但是此处会有一个坑,就是实体类的序列化问题。对自定义的实体类,如果不implements Serializable,那就会报错,这里是需要注意的点。
1.3 Dubbo的其他配置
1.3.1 关闭检查
Dubbo会在启动时检查依赖的服务是否可用。如果不可用会抛出异常,阻止Spring初始化完成。默认check=true。可以进行配置:
<!-- 关闭某个服务的启动时检查 -->
<dubbo:reference interface="com.foo.BarService" check="false" />

<!-- 关闭注册中心的启动时检查 -->
<dubbo:registry check="false" />
这个配置一般是应用在开发环境。因为在开发过程中可能会有未开发完的功能,存在服务不可用的情况。此时就需要关闭检查,从而对已完成的部分进行开发测试,而不会因为异常而无法测试。
1.3.2 重试次数
消费者访问提供者,如果访问失败,则切换重试访问其它服务器,但重试会带来更长延迟。 访问时间变长,用户的体验较差。这个配置项感觉比较鸡肋,一般来说设为一次即可。如果不能访问,那多试很多次,那成功的概率也会比较低,且还会大大增加延迟。
<!-- 重试次数配置如下: -->
<dubbo:service retries="2" />
<dubbo:reference retries="2" />
1.3.3 超时时间
由于网络或服务端不可靠,会导致调用出现一种不确定的中间状态(超时)。为了避免超时导致客户端资源(线程)挂起耗尽,必须设置超时时间。配置方式:
<!-- 服务消费者配置 -->
<dubbo:reference interface="com.foo.BarService" timeout="2000" />
<!-- 服务提供者配置 -->
<dubbo:server interface="com.foo.BarService" timeout="2000" />
1.3.4 版本号
每个接口都应定义版本号,为后续不兼容升级提供可能。当一个接口有不同的实现,项目早期使用的一个实现类, 之后创建接口的新的实现类。区分不同的接口实现使用version。 特别是项目需要把早期接口的实现全部换位新的实现类,也需要使用version。
<double:service interface="com.demo.dubbo.service.SomeService"
                ref="someServiceImpl"
                version="1.0"/>
<dubbo:reference id="someService"
                     interface="com.demo.dubbo.service.SomeService"
                     url="dubbo://localhost:20880"
                     registry="N/A"
                     version="1.0"/>
二、原理
2.1 RPC原理
RPC的同步调用流程可以用一张图来进行说明:
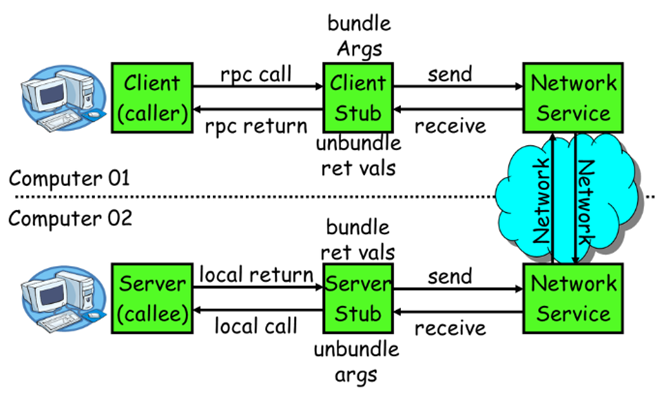
其中,Computer01是Client服务消费方,而Computer02是Server服务提供方。具体过程如下:
1)rpc call:Client以本地调用方式调用服务;
2)bundle Args:Client Stub接收到调用后,将方法、参数等组成为能进行网络传输的消息体;
3)send:Client Stub找到服务地址,将消息通过网络服务发送给服务端;
4)receive + unbundle args:服务端的Server Stub收到消息后进行解码;
5)local call:Server Stub根据解码结果调用本地服务;
6)local return:本地服务之星并将结果返回给Server Stub;
7)send:Server Stub将返回结果打包成消息发送给服务消费方;
8)receive + unbundle ret vals:Client Stub收到消息,进行解码;
9)rpc return:Client得到最终结果。
以上过程中,2-8过程是被RPC框架封装的,对用户来说是不可见的。这些过程也就是RPC框架的基本原理。至于实现细节,不同的框架会有出入,但是总体来说提供的功能都是类似的。
2.2 Dubbo原理
2.2.1 框架设计
Dubbo官方对框架设计就有详细的解读文档:
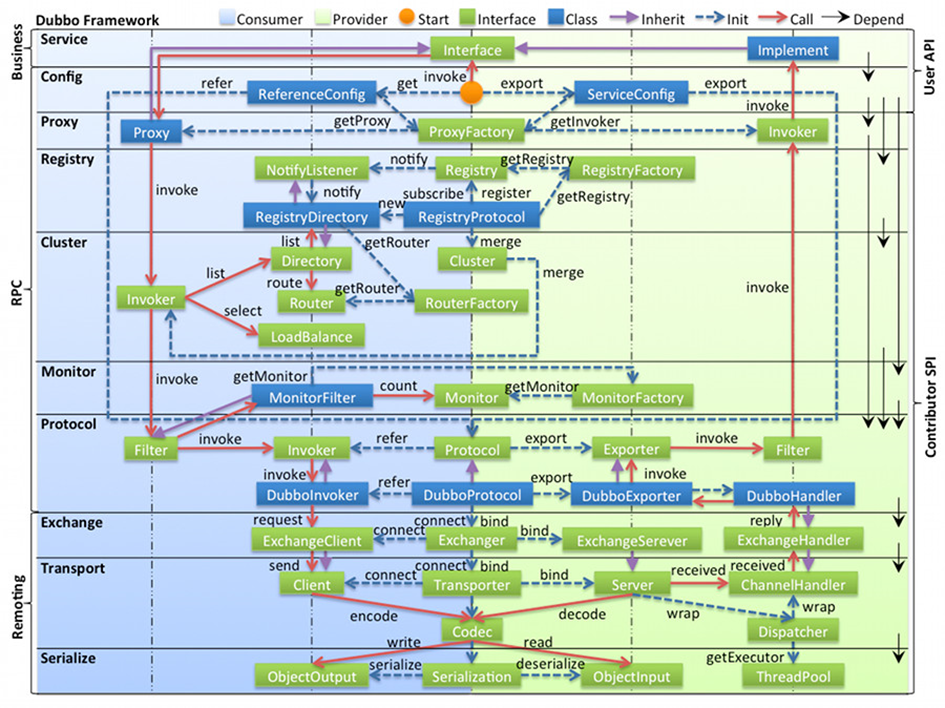
- Server 服务层:对外提供调用的接口;
- config 配置层:对外配置接口,以 ServiceConfig, ReferenceConfig 为中心,可以直接初始化配置类,也可以通过 spring 解析配置生成配置类;
- proxy 服务代理层:服务接口透明代理,生成服务的客户端 Stub 和服务器端 Skeleton, 以 ServiceProxy 为中心,扩展接口为 ProxyFactory;
- registry 注册中心层:封装服务地址的注册与发现,以服务 URL 为中心,扩展接口为 RegistryFactory, Registry, RegistryService;
- cluster 路由层:封装多个提供者的路由及负载均衡,并桥接注册中心,以 Invoker 为中心,扩展接口为 Cluster, Directory, Router, LoadBalance;
- monitor 监控层:RPC 调用次数和调用时间监控,以 Statistics 为中心,扩展接口为 MonitorFactory, Monitor, MonitorService;
- protocol 远程调用层:封装 RPC 调用,以 Invocation, Result 为中心,扩展接口为 Protocol, Invoker, Exporter;
- exchange 信息交换层:封装请求响应模式,同步转异步,以 Request, Response 为中心,扩展接口为 Exchanger, ExchangeChannel, ExchangeClient, ExchangeServer;
- transport 网络传输层:抽象 mina 和 netty 为统一接口,以 Message 为中心,扩展接口为 Channel, Transporter, Client, Server, Codec;
- serialize 数据序列化层:可复用的一些工具,扩展接口为 Serialization, ObjectInput, ObjectOutput, ThreadPool;
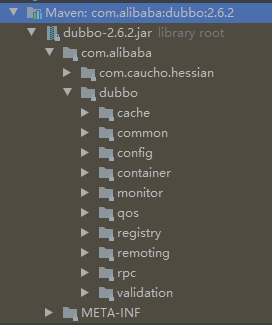
Dubbo自己的jar包排列也是根据其框架来进行排布的:
2.2.2 解析、加载配置信息
Spring解析配置文件中每个标签,有一个总接口:BeanDefinitionParser。
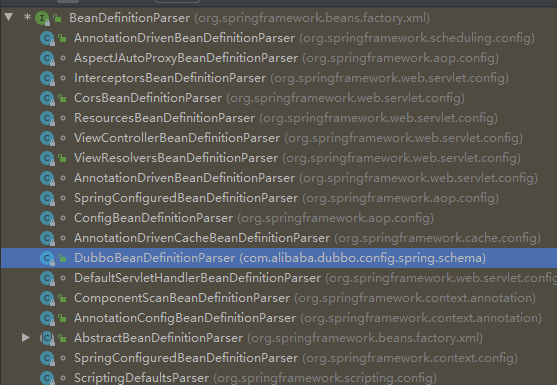
通过查看其继承树,可以看出,DubboBeanDefinitionParser就是对其进行的实现,专用于Dubbo的专用标签解析。解析过程的源码为该类中的parse方法:
private static BeanDefinition parse(Element element, ParserContext parserContext, Class<?> beanClass, boolean required) {
        RootBeanDefinition beanDefinition = new RootBeanDefinition();
        beanDefinition.setBeanClass(beanClass);
        beanDefinition.setLazyInit(false);
        // 获取标签id
        String id = element.getAttribute("id");
        // 标签id为空,采用其他方式增加唯一标识
        if ((id == null || id.length() == 0) && required) {
            // 转而获取标签name
            String generatedBeanName = element.getAttribute("name");
            // 如果标签name还为空,则配置使用默认名称
            if (generatedBeanName == null || generatedBeanName.length() == 0) {
                if (ProtocolConfig.class.equals(beanClass)) {
                    generatedBeanName = "dubbo";
                } else {
                    generatedBeanName = element.getAttribute("interface");
                }
            }
            if (generatedBeanName == null || generatedBeanName.length() == 0) {
                generatedBeanName = beanClass.getName();
            }
            // 唯一标识配置完毕
            id = generatedBeanName;
            int counter = 2;
            while (parserContext.getRegistry().containsBeanDefinition(id)) {
                id = generatedBeanName + (counter++);
            }
        }
        if (id != null && id.length() > 0) {
            if (parserContext.getRegistry().containsBeanDefinition(id)) {
                throw new IllegalStateException("Duplicate spring bean id " + id);
            }
            parserContext.getRegistry().registerBeanDefinition(id, beanDefinition);
            beanDefinition.getPropertyValues().addPropertyValue("id", id);
        }
        // 进来的配置项为dubbo:protocol,进行此项配置的解读
        if (ProtocolConfig.class.equals(beanClass)) {
            for (String name : parserContext.getRegistry().getBeanDefinitionNames()) {
                BeanDefinition definition = parserContext.getRegistry().getBeanDefinition(name);
                PropertyValue property = definition.getPropertyValues().getPropertyValue("protocol");
                if (property != null) {
                    Object value = property.getValue();
                    if (value instanceof ProtocolConfig && id.equals(((ProtocolConfig) value).getName())) {
                        definition.getPropertyValues().addPropertyValue("protocol", new RuntimeBeanReference(id));
                    }
                }
            }
        // 进来的配置项为dubbo:service,进行此项配置的解读
        } else if (ServiceBean.class.equals(beanClass)) {
            String className = element.getAttribute("class");
            if (className != null && className.length() > 0) {
                RootBeanDefinition classDefinition = new RootBeanDefinition();
                classDefinition.setBeanClass(ReflectUtils.forName(className));
                classDefinition.setLazyInit(false);
                parseProperties(element.getChildNodes(), classDefinition);
                beanDefinition.getPropertyValues().addPropertyValue("ref", new BeanDefinitionHolder(classDefinition, id + "Impl"));
            }
        // 进来的配置项为ProviderConfig,进行此项配置的解读
        } else if (ProviderConfig.class.equals(beanClass)) {
            parseNested(element, parserContext, ServiceBean.class, true, "service", "provider", id, beanDefinition);
        // 进来的配置项为ConsumerConfig,进行此项配置的解读
        } else if (ConsumerConfig.class.equals(beanClass)) {
            parseNested(element, parserContext, ReferenceBean.class, false, "reference", "consumer", id, beanDefinition);
        }
        Set<String> props = new HashSet<String>();
        ManagedMap parameters = null;
        for (Method setter : beanClass.getMethods()) {
            String name = setter.getName();
            if (name.length() > 3 && name.startsWith("set")
                    && Modifier.isPublic(setter.getModifiers())
                    && setter.getParameterTypes().length == 1) {
                Class<?> type = setter.getParameterTypes()[0];
                String property = StringUtils.camelToSplitName(name.substring(3, 4).toLowerCase() + name.substring(4), "-");
                props.add(property);
                Method getter = null;
                try {
                    getter = beanClass.getMethod("get" + name.substring(3), new Class<?>[0]);
                } catch (NoSuchMethodException e) {
                    try {
                        getter = beanClass.getMethod("is" + name.substring(3), new Class<?>[0]);
                    } catch (NoSuchMethodException e2) {
                    }
                }
                if (getter == null
                        || !Modifier.isPublic(getter.getModifiers())
                        || !type.equals(getter.getReturnType())) {
                    continue;
                }
                if ("parameters".equals(property)) {
                    parameters = parseParameters(element.getChildNodes(), beanDefinition);
                } else if ("methods".equals(property)) {
                    parseMethods(id, element.getChildNodes(), beanDefinition, parserContext);
                } else if ("arguments".equals(property)) {
                    parseArguments(id, element.getChildNodes(), beanDefinition, parserContext);
                } else {
                    String value = element.getAttribute(property);
                    if (value != null) {
                        value = value.trim();
                        if (value.length() > 0) {
                            if ("registry".equals(property) && RegistryConfig.NO_AVAILABLE.equalsIgnoreCase(value)) {
                                RegistryConfig registryConfig = new RegistryConfig();
                                registryConfig.setAddress(RegistryConfig.NO_AVAILABLE);
                                beanDefinition.getPropertyValues().addPropertyValue(property, registryConfig);
                            } else if ("registry".equals(property) && value.indexOf(',') != -1) {
                                parseMultiRef("registries", value, beanDefinition, parserContext);
                            } else if ("provider".equals(property) && value.indexOf(',') != -1) {
                                parseMultiRef("providers", value, beanDefinition, parserContext);
                            } else if ("protocol".equals(property) && value.indexOf(',') != -1) {
                                parseMultiRef("protocols", value, beanDefinition, parserContext);
                            } else {
                                Object reference;
                                if (isPrimitive(type)) {
                                    if ("async".equals(property) && "false".equals(value)
                                            || "timeout".equals(property) && "0".equals(value)
                                            || "delay".equals(property) && "0".equals(value)
                                            || "version".equals(property) && "0.0.0".equals(value)
                                            || "stat".equals(property) && "-1".equals(value)
                                            || "reliable".equals(property) && "false".equals(value)) {
                                        // backward compatibility for the default value in old version's xsd
                                        value = null;
                                    }
                                    reference = value;
                                } else if ("protocol".equals(property)
                                        && ExtensionLoader.getExtensionLoader(Protocol.class).hasExtension(value)
                                        && (!parserContext.getRegistry().containsBeanDefinition(value)
                                        || !ProtocolConfig.class.getName().equals(parserContext.getRegistry().getBeanDefinition(value).getBeanClassName()))) {
                                    if ("dubbo:provider".equals(element.getTagName())) {
                                        logger.warn("Recommended replace <dubbo:provider protocol=\"" + value + "\" ... /> to <dubbo:protocol name=\"" + value + "\" ... />");
                                    }
                                    // backward compatibility
                                    ProtocolConfig protocol = new ProtocolConfig();
                                    protocol.setName(value);
                                    reference = protocol;
                                } else if ("onreturn".equals(property)) {
                                    int index = value.lastIndexOf(".");
                                    String returnRef = value.substring(0, index);
                                    String returnMethod = value.substring(index + 1);
                                    reference = new RuntimeBeanReference(returnRef);
                                    beanDefinition.getPropertyValues().addPropertyValue("onreturnMethod", returnMethod);
                                } else if ("onthrow".equals(property)) {
                                    int index = value.lastIndexOf(".");
                                    String throwRef = value.substring(0, index);
                                    String throwMethod = value.substring(index + 1);
                                    reference = new RuntimeBeanReference(throwRef);
                                    beanDefinition.getPropertyValues().addPropertyValue("onthrowMethod", throwMethod);
                                } else if ("oninvoke".equals(property)) {
                                    int index = value.lastIndexOf(".");
                                    String invokeRef = value.substring(0, index);
                                    String invokeRefMethod = value.substring(index + 1);
                                    reference = new RuntimeBeanReference(invokeRef);
                                    beanDefinition.getPropertyValues().addPropertyValue("oninvokeMethod", invokeRefMethod);
                                }else {
                                    if ("ref".equals(property) && parserContext.getRegistry().containsBeanDefinition(value)) {
                                        BeanDefinition refBean = parserContext.getRegistry().getBeanDefinition(value);
                                        if (!refBean.isSingleton()) {
                                            throw new IllegalStateException("The exported service ref " + value + " must be singleton! Please set the " + value + " bean scope to singleton, eg: <bean id=\"" + value + "\" scope=\"singleton\" ...>");
                                        }
                                    }
                                    reference = new RuntimeBeanReference(value);
                                }
                                beanDefinition.getPropertyValues().addPropertyValue(property, reference);
                            }
                        }
                    }
                }
            }
        }
        NamedNodeMap attributes = element.getAttributes();
        int len = attributes.getLength();
        for (int i = 0; i < len; i++) {
            Node node = attributes.item(i);
            String name = node.getLocalName();
            if (!props.contains(name)) {
                if (parameters == null) {
                    parameters = new ManagedMap();
                }
                String value = node.getNodeValue();
                parameters.put(name, new TypedStringValue(value, String.class));
            }
        }
        if (parameters != null) {
            beanDefinition.getPropertyValues().addPropertyValue("parameters", parameters);
        }
        return beanDefinition;
    }
实际进入的BeanClass解析标签会根据标签的配置顺序依次进入parse方法进行解析。 而每种标签具体的类型初始化,是在parse方法之前,在NamespaceHandlerSupport函数中:
public class DubboNamespaceHandler extends NamespaceHandlerSupport {

    static {
        Version.checkDuplicate(DubboNamespaceHandler.class);
    }

    @Override
    public void init() {
        registerBeanDefinitionParser("application", new DubboBeanDefinitionParser(ApplicationConfig.class, true));
        registerBeanDefinitionParser("module", new DubboBeanDefinitionParser(ModuleConfig.class, true));
        registerBeanDefinitionParser("registry", new DubboBeanDefinitionParser(RegistryConfig.class, true));
        registerBeanDefinitionParser("monitor", new DubboBeanDefinitionParser(MonitorConfig.class, true));
        registerBeanDefinitionParser("provider", new DubboBeanDefinitionParser(ProviderConfig.class, true));
        registerBeanDefinitionParser("consumer", new DubboBeanDefinitionParser(ConsumerConfig.class, true));
        registerBeanDefinitionParser("protocol", new DubboBeanDefinitionParser(ProtocolConfig.class, true));
        registerBeanDefinitionParser("service", new DubboBeanDefinitionParser(ServiceBean.class, true));
        registerBeanDefinitionParser("reference", new DubboBeanDefinitionParser(ReferenceBean.class, false));
        registerBeanDefinitionParser("annotation", new AnnotationBeanDefinitionParser());
    }

}


 1412
1412

 被折叠的 条评论
为什么被折叠?
被折叠的 条评论
为什么被折叠?
 到【灌水乐园】发言


