


 该博客是二手交易市场操作备忘录,记录了开发过程中遇到的各类问题及解决方案,如smtp服务器无法链接、path中使用正则失败等,还涉及数据库操作、文件传输、nginx安装、虚拟环境创建等信息技术相关内容。
二手交易市场操作备忘录
-
【smtp服务器无法链接】使用celery异步发送激活邮件时,在worker端显示smtplib.SMTPServerDisconnected: Connection unexpectedly closed
解决方案:修改setting.py的数值(注意:发送端(pycharm)和worker端都要修改)

-
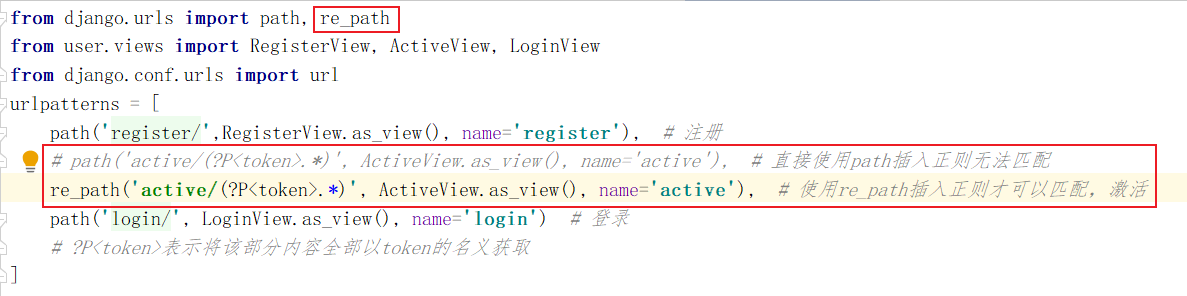
【path中使用正则】在通过激活邮箱地址来获取秘钥时在path路径使用正则表达式匹配网址中的路径失败
当要在path中使用正则时要用re_path来代替path,否则无法进行正则匹配
-
【redis接受celery异步处理】celery异步发送邮件worker端开启监听处理准备接受redis端的任务
celery -A celery_tasks.tasks worker -l info # celery_tasks文件夹下的task.py文件中包括一些需要异步处理的任务,这里就是异步发送电子邮件 -
【mysql竖向显示数据】select * from df_address \G
表示读取df_address表中的所有数据,\G表示以竖向排列
-
【Mac传输文件到ubuntu】在mac上传输文件到ubuntu虚拟机中(似乎不能直接传输文件,只能传输压缩包)
scp /Volumes/MacData/Pycharm/projectFile/SecondHandMarket.zip yfx@172.16.136.128:/home/yfx/桌面/ -
【异步发送文件】异步发送邮件时报错:django.core.exceptions.ImproperlyConfigured: Requested setting EMAIL_FROM
在redis端task.py中添加如下代码(task.py是redis端发送邮件的代码处)
import django, os os.environ.setdefault('DJANGO_SETTINGS_MODULE', 'SecondHandMarket.settings') django.setup() -
【session数据查询/cache缓存查询】查看session数据是否保存在redis数据库中
redis-cli -h 172.16.136.128 select 9 keys * -
【文件只读】mac下出现只读文件无法写入的问题
sudo mount -uw / -
【tracker和storage服务器启动】启动tracker和storage服务器时报错:Failed to start fdfs_trackerd.service: Unit fdfs_trackerd.service not found
如果虚拟机的网络连接方式不是net则修改为net链接,如果是则直接重启Linux虚拟机(不是挂起)
-
【Linux解压】linux解压命令总结
- unzip filename. zip
- tar -zxvf filename. tar.gz
- tar -Jxvf filename. tar.xz
- tar -Zxvf filename. tar.Z
- tar --help
- tar -xvf filename. tar.gz tar -xvf filename
-
nginx安装错误汇总及解决方案
-
错误提示:the HTTP rewrite module requires the PCRE library
解决方案:sudo apt-get install libpcre3 libpcre3-dev
-
错误提示:the HTTP gzip module requires the zlib library
解决方案:apt-get install zlib1g-dev
-
nginx安装时报错/ngx_murmurhash.c:37:11: error: this statement may fall through [-Werror=implicit-fallthroug……
解决方案:找到/nginx-1.8/objs/Makefile文件,删除-Werrori字眼即可
-
执行./mask显示文件夹不存在,直接输入mask和mask install
-
-
开启nginx和关闭nginx的命令
/usr/local/nginx/sbin/nginx # 开启nginx /usr/local/nginx/sbin/nginx -s stop # 关闭nginx ps aux | grep nginx # 查看nginx服务器是否开启 -
vim常用编辑命令
- :$跳转到最后一行
- :1 跳转到第一行,数字为要跳转的指定行
- 查找关键字:命令模式下:/关键字 然后回车,n继续向下查找,N继续向上查找
-
创建管理员
python manage.py createsuperuser -
ModuleNotFoundError: No module named ‘mutagen._compat’

找到报错部分对应的文件utils.py,进行下面的修改

-
worker端创建index模版文件出错汇总
-
ModuleNotFoundError: No module named ‘ConfigParser’
修改报错文件的ConfigParser为configparser
-
ModuleNotFoundError: No module named ‘StringIO’
将报错文件的import StringIO 修改为 from io import StringIO
-
-
vim永久显示行号
vim /etc/vim/vimrc 在文件末尾添加:set number -
使用admin添加数据时显示A server error occurred. Please contact the administrator
原因是fdfs文件系统没有开启
service fdfs_trackerd start service fdfs_storaged start ps aux | grep fdfs -
if user.is_authenticated() 处报错:TypeError: ‘bool’ object is not callable
修改if user.is_authenticated()为if user.is_authenticated
-
建立搜索的索引文件
python manage.py rebuild_index -
在redis-cli中查看购物车的内容
hgetall cart_7 -
修改表中的每一条数据在admin中的显示
修改前的显示

需要修改的内容

修改后的显示

-
ps中拓展图片到指定画布大小
- 保存要拓展的图像并命名

- 新建一个指定像素大小的画布并点击图层上面的锁按钮使其消失
- 进行图层叠加

- 选择要叠加的图层并进行调整大小


-
设置mysql数据库的事务的隔离级别
vim /etc/mysql/mysql.conf.d/mysqld.cnf

```
service mysql restart
```
-
连接支付宝付款接口时常见的报错
-
TypeError: init() got an unexpected keyword argument ‘app_private_key_path’
修改app_private_key_path为app_private_key_string
修改alipay_public_key_path为alipay_public_key_string
-
ValueError: RSA key format is not supported
修改以下两行代码
app_private_key_string=os.path.join(settings.BASE_DIR, ‘apps/order/app_private_key.pem’),
alipay_public_key_string=os.path.join(settings.BASE_DIR, ‘apps/order/alipay_public_key.pem’),修改为:
app_private_key_string = open(os.path.join(settings.BASE_DIR, ‘apps/order/app_private_key.pem’)).read(),
alipay_public_key_string = open(os.path.join(settings.BASE_DIR, ‘apps/order/alipay_public_key.pem’)).read(),以上两句代码写在AliPay()外,在AliPay()中写入以下两句代码
app_private_key_string = app_private_key_string,
alipay_public_key_string = alipay_public_key_string, -
alipay.api_alipay_trade_page_pay报错type error: quote_from_bytes() expected bytes
-

-
支付宝跳转支付页面显示【错误代码 invalid-signature 错误原因: 验签出错,建议检查签名字符串或签名私钥与应用公钥是否匹配】,首先考虑代码中添加的公钥是支付宝的公钥而不是应用的公钥,私钥是应用的私钥,如果发现不是这个错误则判断以下代码是否书写错误

-
创建虚拟环境
-
pip install virtualenvwrapper
-
查看virtualenvwrapper.sh的安装位置,后面要用
which virtualenvwrapper.sh
-
在任意位置新建一个目录用来存放虚拟环境,一般命名为.virtualenvs,路径后面要用
mkdir /Volumes/MacData/VirtualEnvironment/.virtualenvs
-
在.zshrc下配置环境变量
-
首先进入到自己的家目录下(就是带有用户名的目录下)
cd /Users/dedicationyu
-
查看是否有.zshrc
ls -a
-
编辑.zshrc
vim .zshrc
-
在.zshrc下添加如下两行代码,路径就是上面说到的内容
export WORKON_HOME=/Volumes/MacData/VirtualEnvironment/.virtualenvs
source /Users/dedicationyu/opt/anaconda3/bin/virtualenvwrapper.sh
-
以上两行代码说明:
WORKON_HOME用来存放虚拟环境,以后你创建的虚拟环境就会在该目录下
source用来激活virtualenvwrapper这个工具
-
启动一下我们的配置文件.zshrc,使其修改生效
source /Users/dedicationyu/.zshrc
-
会发现.virtualenvs环境目录下多了很多文件就表示修改成功
-
-
使用mkvirtualenv创建虚拟环境
mkvirtualenv -p python版本 虚拟环境名称 # -p参数用来创建指定python版本的虚拟环境 mkvirtualenv 虚拟环境名称 # 用默认已安装的python版本来创建虚拟环境 -
进入虚拟环境:workon 虚拟环境名
-
常用命令
deactivate  # 退出虚拟环境
rmvirtualenv 虚拟环境名称  # 删除虚拟环境
workon  # 列出当前所有的虚拟环境
-
-
anaconda创建虚拟环境
-
常见虚拟环境的方法(说明:所有的虚拟环境都默认安装在anaconda下envs目录下)
conda create --name env1 python=3.6.4 # 指定python版本创建虚拟环境 conda create --name test1 # 使用anaconda默认的最高版本python创建虚拟环境 conda create --name test3 python=3.6.4 requests flask # 创建虚拟环境的同时安装第三方包 conda create --prefix=D:\python36\py36 python=3.6 # 指定创建虚拟环境的目录为python36,py36为虚拟环境的名称,进入虚拟环境需要完整路径:conda activate D:\python36\py36 -
常用命令
conda activate env1  # 进入虚拟环境
conda deactivate  # 退出虚拟环境
conda remove -n 虚拟环境名称 --all  # 删除虚拟环境
conda remove --name $虚拟环境  $包名  # 删除虚拟环境中指定的包
conda remove --prefix=D:\python36\py36 --all  # 删除指定文件下的虚拟环境
-
-
Mac下修改conda的源为清华的源
conda config --add channels https://mirrors.tuna.tsinghua.edu.cn/anaconda/pkgs/free conda config --add channels https://mirrors.tuna.tsinghua.edu.cn/anaconda/pkgs/main conda config --set show_channel_urls yes -
Mac下在虚拟环境中安装uwsgi
# pip install uwsgi -i https://pypi.douban.com/simple
conda install -c conda-forge uwsgi
# 如果直接pip install uwsgi在Mac下安装会出错


 1976
1976

 被折叠的 条评论
为什么被折叠?
被折叠的 条评论
为什么被折叠?
 到【灌水乐园】发言


