


 本文详细记录了使用Pytorch微调Mask-RCNN过程中遇到的问题,包括官方说明不清晰、依赖文件缺失、pycocotools安装、模型加载以及numpy版本过高导致的错误。通过手动添加所需文件,解决安装问题,并调整numpy版本,最终成功完成训练。在10个epoch的训练中,模型显示出良好的性能。
已经成功做好了这个实验,但是不得不吐槽一下官方的说明书,做实验的前提不交代好,尤其是这句话:
In references/detection/, we have a number of helper functions to simplify training and evaluating detection models. Here, we will use references/detection/engine.py, references/detection/utils.py and references/detection/transforms.py. Just copy them to your folder and use them here.
让人百思不得其解,references/detection/在哪?没有交代,这里附上链接:
https://github.com/pytorch/vision/tree/master/references/detection
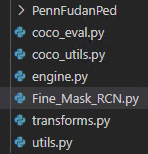
做实验你会发现,光这3个文件还不够,因为这3个文件还依赖其他文件,依赖的文件其实就在/references/detection目录下,我们把coco_eval.py,coco_utils.py一并拷过来,好了,我们把这5个文件都拷到当前文件夹下,结构如下所示:
到了这一步,你以为一切都好了,运行后又出现bug,你会发现coco_eval.py和coco_utils.py都依赖于pycocotools,接下来就去安装pycocotools。
方法一:在window下使用如下命令,前提要安装了git
pip install git+https://github.com/philferriere/cocoapi.git#subdirectory=PythonAPI
方法二:https://github.com/philferriere/cocoapi下载源码,并进行解压。切换到anncoda的虚拟环境,并切换到 cocoapi\PythonAPI目录。运行以下指令:
# install pycocotools locally
python setu
最低0.47元/天 解锁文章


 4600
4600

 被折叠的 条评论
为什么被折叠?
被折叠的 条评论
为什么被折叠?
 到【灌水乐园】发言


