


前言
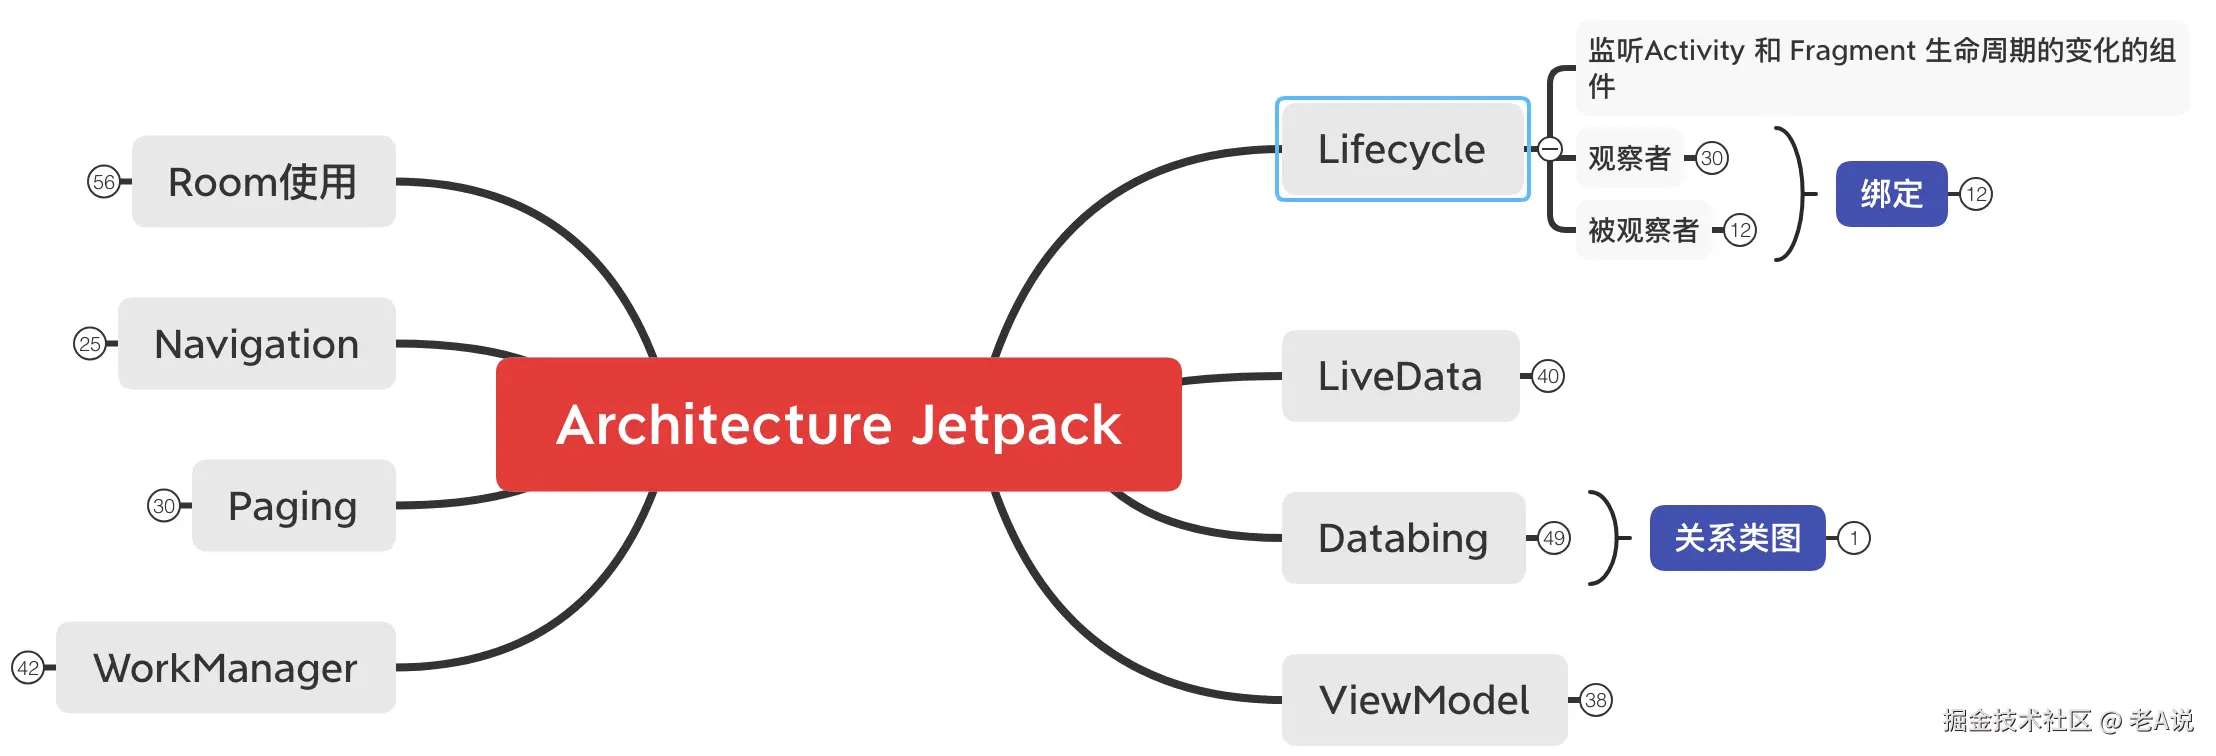
本章开始 Lifecycle 的讲解;
基础理解
什么是 Lifecycle?
Jetpack 中的 Lifecycle 能够监听 Activity/Fragment 生命周期行为的各种变化,可以有效避免内存泄露和解决 Android 生命周期常见难题;
是一个表示 Android 生命周期及状态的对象;使用观察者模式实现观察者监听被观察者的生命周期变化;
LifecycleOwner 用于连接有生命周期的对象,如 Activity、Fragment;
LifecycleObserver 用于观察 LifecycleOwner;
基础使用
基础依赖
下面是 Jetpack 全家桶导入
def lifecycle_version = "2.2.0"
def arch_version = "2.1.0"

// ViewModel
implementation "androidx.lifecycle:lifecycle-viewmodel:$lifecycle_version"

// LiveData
implementation "androidx.lifecycle:lifecycle-livedata:$lifecycle_version"

// 只有 Lifecycle (不带 ViewModel or LiveData)
implementation "androidx.lifecycle:lifecycle-runtime:$lifecycle_version"

// Saved state module for ViewModel
implementation "androidx.lifecycle:lifecycle-viewmodel-savedstate:$lifecycle_version"

// lifecycle 注解处理器
annotationProcessor "androidx.lifecycle:lifecycle-compiler:$lifecycle_version"
// 替换 - 如果使用Java8,就用这个替换上面的lifecycle-compiler
implementation "androidx.lifecycle:lifecycle-common-java8:$lifecycle_version"

//以下按需引入
// 可选 - 帮助实现Service的LifecycleOwner
implementation "androidx.lifecycle:lifecycle-service:$lifecycle_version"
// 可选 - ProcessLifecycleOwner 给整个 app 进程 提供一个 lifecycle
implementation "androidx.lifecycle:lifecycle-process:$lifecycle_version"
// 可选 - ReactiveStreams support for LiveData
implementation "androidx.lifecycle:lifecycle-reactivestreams:$lifecycle_version"
// 可选 - Test helpers for LiveData
testImplementation "androidx.arch.core:core-testing:$arch_version"
精简依赖
implementation "androidx.lifecycle:lifecycle-runtime:2.0.0"
implementation "androidx.lifecycle:lifecycle-extensions:2.0.0"
implementation "androidx.lifecycle:lifecycle-common-java8:2.0.0"
annotationProcessor  "androidx.lifecycle:lifecycle-compiler:2.0.0
我们经常在 MVP 模式下使用 Lifecycle 比较方便管理生命周期,通过 Presenter 实现 LifecycleObserver 接口(或者 DefaultLifecycleObser),让 Presenter 具备了观察 LifecycleOwner;
interface IPresenter : LifecycleObserver {

    @OnLifecycleEvent(Lifecycle.Event.ON_RESUME)
    fun onResume()

    @OnLifecycleEvent(Lifecycle.Event.ON_PAUSE)
    fun onPause()

}
我们接着来实现 IPresenter
class MyPresenter : IPresenter {
    private val TAG = "test"

    override fun onResume() {
        Log.d(TAG, "Lifecycle call onResume")
    }

    override fun onPause() {
        Log.d(TAG, "Lifecycle call onPause")
    }
}
接着我们在 Activity 或者 Fragment 中注册监听
class MainActivity : AppCompatActivity() {

    private val TAG = "MainActivity"
    private var myPresenter : IPresenter? = null

    override fun onCreate(savedInstanceState: Bundle?) {
        super.onCreate(savedInstanceState)
        setContentView(R.layout.activity_main)
        myPresenter = MyPresenter()
        myPresenter?.let {
            lifecycle.addObserver(it)
        }
    }
}
可以看到,我们并不需要在 Activity 的 onResume、onPause 方法中手动调用 presenter.onResume() 或者 presenter.onPasue() 方法来处理生命周期事件;
Jetpack 也帮我们封装了一层,DefaultLifecycleObserver,可以看到,它在每个方法中都传递了 LifecycleOwner,这样我们就可以拿到当前的 Context 了;
public interface DefaultLifecycleObserver extends FullLifecycleObserver {

    /**
     * Notifies that {@code ON_CREATE} event occurred.
     * <p>
     * This method will be called after the {@link LifecycleOwner}'s {@code onCreate}
     * method returns.
     *
     * @param owner the component, whose state was changed
     */
    @Override
    default void onCreate(@NonNull LifecycleOwner owner) {
    }

    /**
     * Notifies that {@code ON_START} event occurred.
     * <p>
     * This method will be called after the {@link LifecycleOwner}'s {@code onStart} method returns.
     *
     * @param owner the component, whose state was changed
     */
    @Override
    default void onStart(@NonNull LifecycleOwner owner) {
    }

    /**
     * Notifies that {@code ON_RESUME} event occurred.
     * <p>
     * This method will be called after the {@link LifecycleOwner}'s {@code onResume}
     * method returns.
     *
     * @param owner the component, whose state was changed
     */
    @Override
    default void onResume(@NonNull LifecycleOwner owner) {
    }

    /**
     * Notifies that {@code ON_PAUSE} event occurred.
     * <p>
     * This method will be called before the {@link LifecycleOwner}'s {@code onPause} method
     * is called.
     *
     * @param owner the component, whose state was changed
     */
    @Override
    default void onPause(@NonNull LifecycleOwner owner) {
    }

    /**
     * Notifies that {@code ON_STOP} event occurred.
     * <p>
     * This method will be called before the {@link LifecycleOwner}'s {@code onStop} method
     * is called.
     *
     * @param owner the component, whose state was changed
     */
    @Override
    default void onStop(@NonNull LifecycleOwner owner) {
    }

    /**
     * Notifies that {@code ON_DESTROY} event occurred.
     * <p>
     * This method will be called before the {@link LifecycleOwner}'s {@code onDestroy} method
     * is called.
     *
     * @param owner the component, whose state was changed
     */
    @Override
    default void onDestroy(@NonNull LifecycleOwner owner) {
    }
}
原理篇
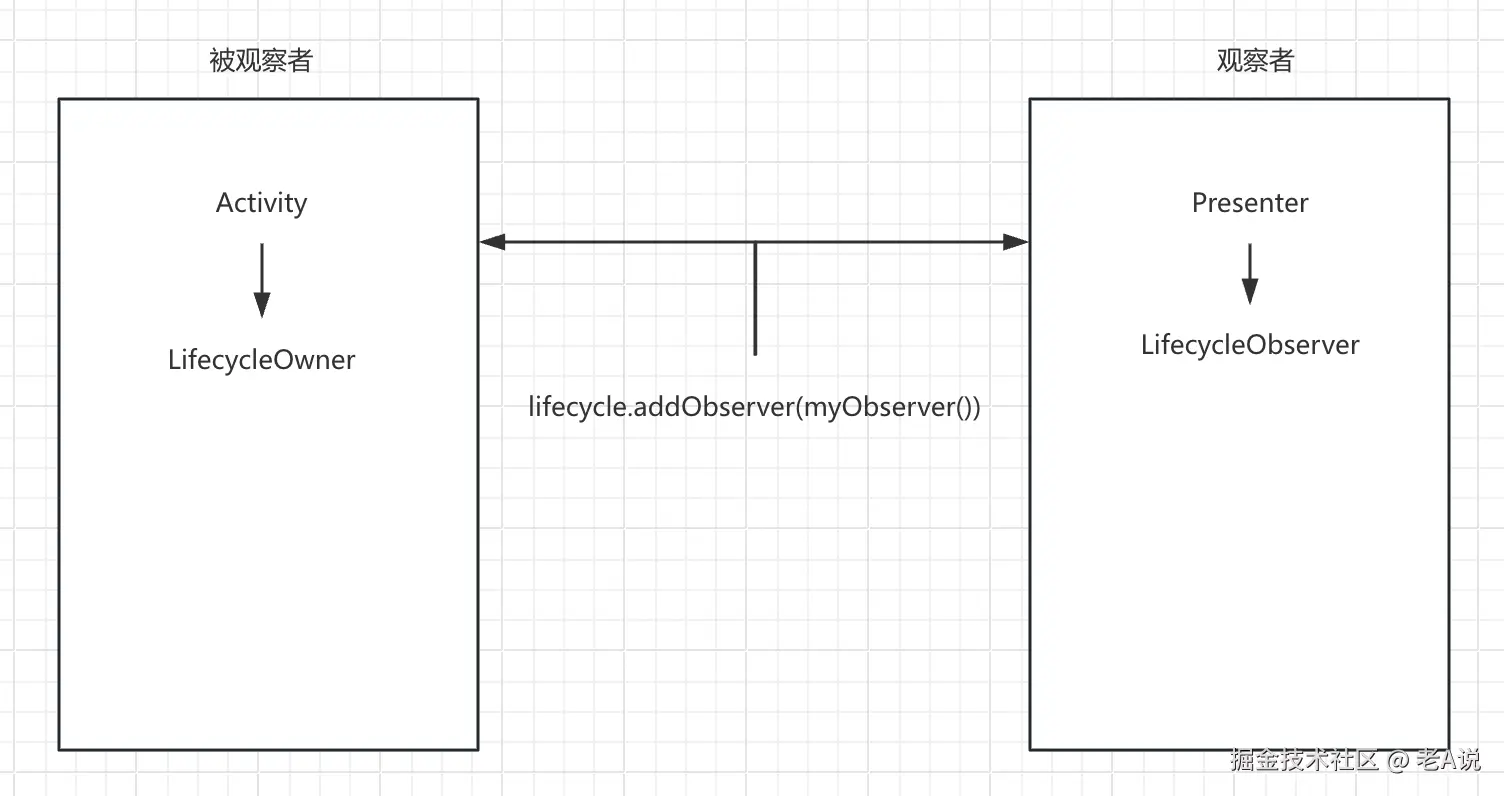
通过 getLifecycle().addObserver(xxx) 将观察者和被观察者绑定到了一起;
观察者和被观察者具体是如和关联起来的?
我们进入 addObserver 方法看下
public void addObserver(@NonNull LifecycleObserver observer) {
    ...
    //
    ObserverWithState statefulObserver = new ObserverWithState(observer, initialState);
    ...
}
我们进入 ObserverWithState 的构造方法看下:
static class ObserverWithState {

    ObserverWithState(LifecycleObserver observer, State initialState) {
        mLifecycleObserver = Lifecycling.lifecycleEventObserver(observer);
        mState = initialState;
    }

}
然后我们进入 lifecycleEventObserver 看下:
static LifecycleEventObserver lifecycleEventObserver(Object object) {
    ...
    return new ReflectiveGenericLifecycleObserver(object);
}
然后我们进入 ReflectiveGenericLifecycleObserver 的构造方法看下:
class ReflectiveGenericLifecycleObserver implements LifecycleEventObserver {
    private final Object mWrapped;
    private final CallbackInfo mInfo;

    // 构造方法
    ReflectiveGenericLifecycleObserver(Object wrapped) {
        mWrapped = wrapped;
        // 核心逻辑:getInfo
        mInfo = ClassesInfoCache.sInstance.getInfo(mWrapped.getClass());
    }

    @Override
    public void onStateChanged(LifecycleOwner source, Event event) {
        mInfo.invokeCallbacks(source, event, mWrapped);
    }
}
这个 wrapped 就是我们一开始传递进来的 LifecycleObserver(MyPresenter),可以看到这里调用了 MyPresenter.getClass() 方法;
说明要通过反射拿这个类中我们标记的相关注解 @OnLifecycleEvent(Lifecycle.Event.ON_RESUME) 以及每个方法;
我们进入这个 getInfo 方法看下:
CallbackInfo getInfo(Class klass) {
    CallbackInfo existing = mCallbackMap.get(klass);
    if (existing != null) {
        return existing;
    }
    existing = createInfo(klass, null);
    return existing;
}
这里核心逻辑在 createInfo 方法,我们进入这个方法看下:
private CallbackInfo createInfo(Class klass, @Nullable Method[] declaredMethods) {
    ....
    //
    Method[] methods = declaredMethods != null ? declaredMethods : getDeclaredMethods(klass);
    boolean hasLifecycleMethods = false;
    for (Method method : methods) {
        // 核心逻辑 1 拿到被注解标记的方法
        OnLifecycleEvent annotation = method.getAnnotation(OnLifecycleEvent.class);

        ...

        // 核心逻辑 2 拿到对应的生命周期 Event
        Lifecycle.Event event = annotation.value();

        ...

        // 核心逻辑 3
        MethodReference methodReference = new MethodReference(callType, method);
        verifyAndPutHandler(handlerToEvent, methodReference, event, klass);
    }
    // 核心逻辑 4 包装并返回 CallbackInfo,让 ReflectiveGenericLifecycleObserver 持有这个 CallbackInfo
    CallbackInfo info = new CallbackInfo(handlerToEvent);
    mCallbackMap.put(klass, info);
    mHasLifecycleMethods.put(klass, hasLifecycleMethods);
    return info;
}
总结
- 反射拿到 LifecycleObserver 的所有 OnLifecycleEvent 标记的方法,并存入到 CallbackInfo 中
- 以 LifecycleObserver.getClass 为 key,CallbackInfo 为 value 存入到 map 中
- 将创建的 CallbackInfo 赋值给 ReflectiveGenericLifecycleObserver 中的 mInfo
被观察者生命周期变化的时候是如何通知观察者的?
本质就是: Activity 的 onCreate 方法执行的时候,是怎么通知到 presenter 的 onCreate 方法的;
我们进入顶层的 Activity,也就是 androidx.activity.ComponentActivity 的 onCreate 方法看下:
protected void onCreate(@Nullable Bundle savedInstanceState) {
    super.onCreate(savedInstanceState);
    mSavedStateRegistryController.performRestore(savedInstanceState);
    // 核心逻辑在 ReportFragment 中
    ReportFragment.injectIfNeededIn(this);
    if (mContentLayoutId != 0) {
        setContentView(mContentLayoutId);
    }
}
核心逻辑在 ReportFragment 中,我们进入这个 injectIfNeededIn 方法看下:
public static void injectIfNeededIn(Activity activity) {
    android.app.FragmentManager manager = activity.getFragmentManager();
    if (manager.findFragmentByTag(REPORT_FRAGMENT_TAG) == null) {
        // 核心逻辑在这个 new ReportFragment()
        manager.beginTransaction().add(new ReportFragment(), REPORT_FRAGMENT_TAG).commit();
        manager.executePendingTransactions();
    }
}
这里和 Glide 一样,通过创建一个空白的 Fragment,让这个空白的 Fragment 来监听 Activity 的各个生命周期;
核心逻辑在这个 new ReportFragment(),也就是说:Activity 的生命周期已经被这个 ReportFragment 拿到了;
Fragment 可以自动监听 Activity 的生命周期,所以:当执行 Activity 的 onCreate 的时候,就会执行 ReportFragment onActivityCreate 方法,我们进入这个方法看下:
public void onActivityCreated(Bundle savedInstanceState) {
    super.onActivityCreated(savedInstanceState);
    dispatchCreate(mProcessListener);
    // 核心逻辑在这里
    dispatch(Lifecycle.Event.ON_CREATE);
}
我们进入这个 dispatch 方法看下:
private void dispatch(Lifecycle.Event event) {
    Activity activity = getActivity();
    if (activity instanceof LifecycleRegistryOwner) {
        ((LifecycleRegistryOwner) activity).getLifecycle().handleLifecycleEvent(event);
        return;
    }

    if (activity instanceof LifecycleOwner) {
        Lifecycle lifecycle = ((LifecycleOwner) activity).getLifecycle();
        if (lifecycle instanceof LifecycleRegistry) {
            ((LifecycleRegistry) lifecycle).handleLifecycleEvent(event);
        }
    }
}
我们的 Activity 最终实现的是 LifecycleOwner 这个接口,所以最终走到的是 ((LifecycleRegistry) lifecycle).handleLifecycleEvent(event); 这个 handleLifecycleEvent 方法;
我们进入这个 handleLifecycleEvent 方法看下:
public void handleLifecycleEvent(@NonNull Lifecycle.Event event) {
    // 两行代码都是核心逻辑,我们来一个一个的分析;
    State next = getStateAfter(event);
    moveToState(next);
}
首先,我们来看下 getStateAfter 这个方法:
static State getStateAfter(Event event) {
    switch (event) {
        case ON_CREATE:
        case ON_STOP:
            return CREATED;
        case ON_START:
        case ON_PAUSE:
            return STARTED;
        case ON_RESUME:
            return RESUMED;
        case ON_DESTROY:
            return DESTROYED;
        case ON_ANY:
            break;
    }
    throw new IllegalArgumentException("Unexpected event value " + event);
}
也就是说:当 dispatch 方法分发 Lifecycle.Event.ON_CREATE 事件的时候,内部状态是从:初始化状态(INITIALIZED) 流转到创建状态(CREATED)
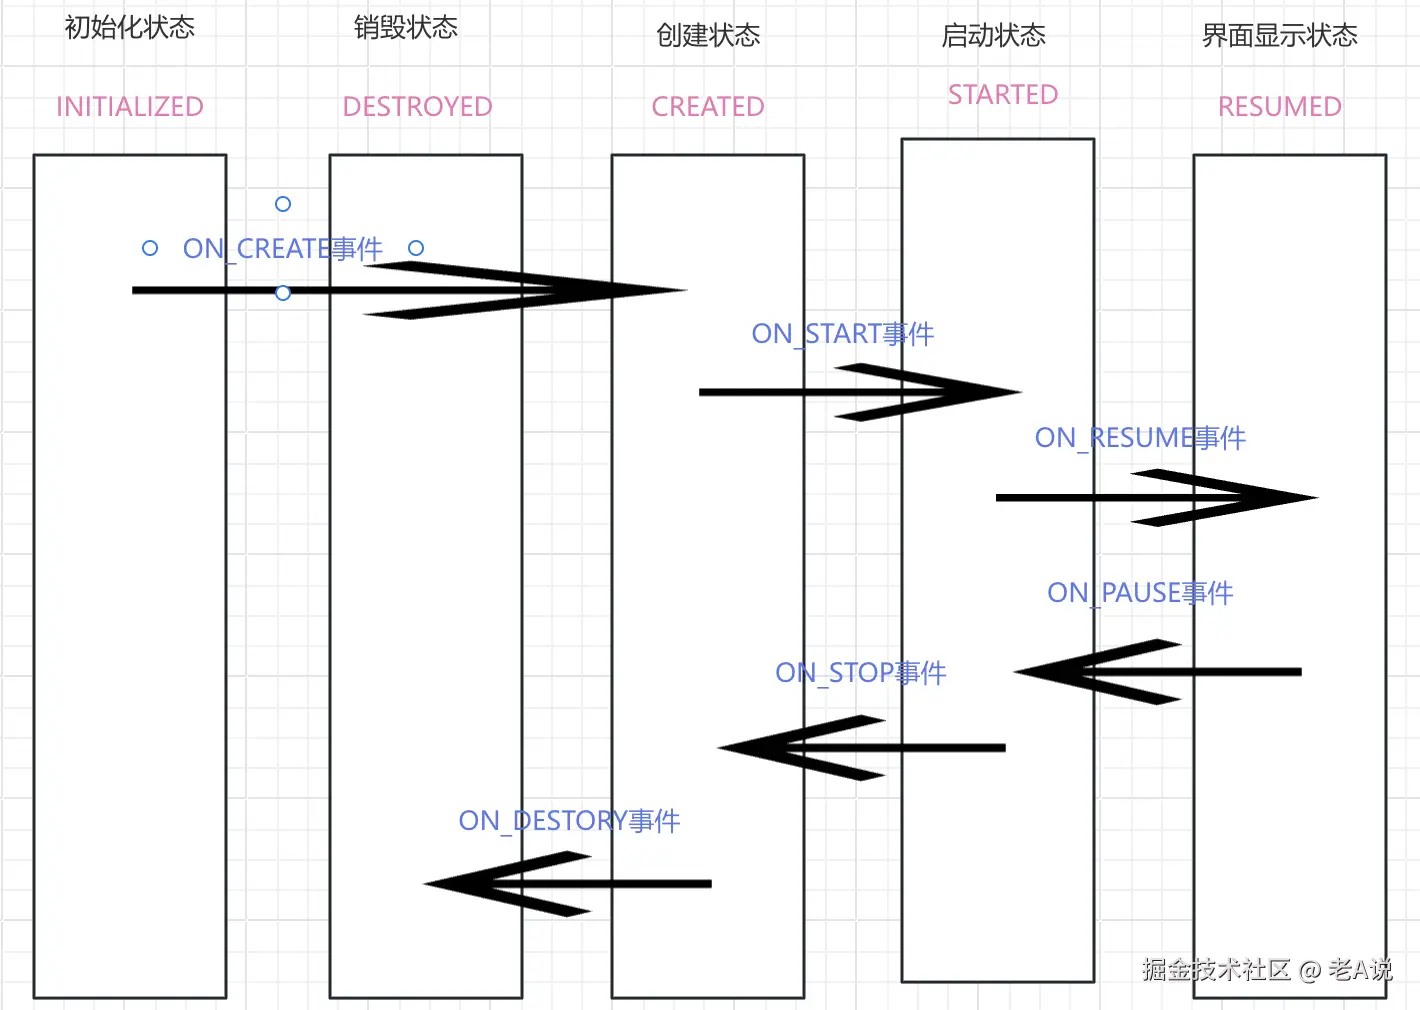
也就是说 ON_CREATE ON_STOP 对应的都是 CREATED 状态;
我们接下来看下 moveToState 方法:
private void moveToState(State next) {
    if (mState == next) {
        return;
    }
    mState = next;
    if (mHandlingEvent || mAddingObserverCounter != 0) {
        mNewEventOccurred = true;
        return;
    }
    mHandlingEvent = true;
    // 核心逻辑在这里,平移状态,让观察者和被观察者的状态对齐;
    sync();
    mHandlingEvent = false;
}
我们进入这个 sync 方法看下,状态是如何对齐的
private void sync() {
    LifecycleOwner lifecycleOwner = mLifecycleOwner.get();
    // 如果同步成功,就退出循环,如果没有同步成功,就循环同步,直到成功为止
    while (!isSynced()) {
        mNewEventOccurred = false;
        if (mState.compareTo(mObserverMap.eldest().getValue().mState) < 0) {
            // 核心逻辑 - 回退状态
            backwardPass(lifecycleOwner);
        }
        Entry<LifecycleObserver, ObserverWithState> newest = mObserverMap.newest();
        if (!mNewEventOccurred && newest != null
                && mState.compareTo(newest.getValue().mState) > 0) {
            // 核心逻辑 - 向前状态
            forwardPass(lifecycleOwner);
        }
    }
    mNewEventOccurred = false;
}
通过『枚举』比大小,来决定是前进还是回退;
我们先来看下回退流程,也就是 backwardPass
private void backwardPass(LifecycleOwner lifecycleOwner) {
    Iterator<Entry<LifecycleObserver, ObserverWithState>> descendingIterator =
            mObserverMap.descendingIterator();
    while (descendingIterator.hasNext() && !mNewEventOccurred) {
        Entry<LifecycleObserver, ObserverWithState> entry = descendingIterator.next();
        ObserverWithState observer = entry.getValue();
        while ((observer.mState.compareTo(mState) > 0 && !mNewEventOccurred
                && mObserverMap.contains(entry.getKey()))) {
            // 核心逻辑 1 在这里
            Event event = downEvent(observer.mState);
            pushParentState(getStateAfter(event));
            // 核心逻辑 2 在这里
            observer.dispatchEvent(lifecycleOwner, event);
            popParentState();
        }
    }
}
通过状态拿事件
private static Event downEvent(State state) {
    switch (state) {
        case INITIALIZED:
            throw new IllegalArgumentException();
        case CREATED:
            return ON_DESTROY;
        case STARTED:
            return ON_STOP;
        case RESUMED:
            return ON_PAUSE;
        case DESTROYED:
            throw new IllegalArgumentException();
    }
    throw new IllegalArgumentException("Unexpected state value " + state);
}
拿到对应的事件之后,observer.dispatchEvent(lifecycleOwner, event); 将对应的事件分发出去;
void dispatchEvent(LifecycleOwner owner, Event event) {
    State newState = getStateAfter(event);
    mState = min(mState, newState);
    // 核心逻辑在这里
    mLifecycleObserver.onStateChanged(owner, event);
    mState = newState;
}
最终执行到我们前面创建的 ReflectiveGenericLifecycleObserver 的 onStateChanged 方法
public void onStateChanged(LifecycleOwner source, Event event) {
    mInfo.invokeCallbacks(source, event, mWrapped);
}
void invokeCallbacks(LifecycleOwner source, Lifecycle.Event event, Object target) {
    invokeMethodsForEvent(mEventToHandlers.get(event), source, event, target);
    invokeMethodsForEvent(mEventToHandlers.get(Lifecycle.Event.ON_ANY), source, event,
            target);
}
反射执行注解标记的对应的函数,最终根据生命周期执行到对应的函数
interface IPresenter : LifecycleObserver {

    ...

    @OnLifecycleEvent(Lifecycle.Event.ON_RESUME)
    fun onResume()

    ...
}
同理 forwardPass 也是这样的流程,最终反射调用对应的函数
private void forwardPass(LifecycleOwner lifecycleOwner) {
    Iterator<Entry<LifecycleObserver, ObserverWithState>> ascendingIterator =
            mObserverMap.iteratorWithAdditions();
    while (ascendingIterator.hasNext() && !mNewEventOccurred) {
        Entry<LifecycleObserver, ObserverWithState> entry = ascendingIterator.next();
        ObserverWithState observer = entry.getValue();
        while ((observer.mState.compareTo(mState) < 0 && !mNewEventOccurred
                && mObserverMap.contains(entry.getKey()))) {
            pushParentState(observer.mState);
            // 核心逻辑在这里
            observer.dispatchEvent(lifecycleOwner, upEvent(observer.mState));
            popParentState();
        }
    }
}
总结
- 通过创建 ReportFragment 这个空白 Fragment 来监听 Activity 的生命周期
- 监听到 Activity 的 onCreate 方法的时候,执行 onActivityCreate 方法中的 dispatch 方法执行状态流转;
- 通过枚举比大小,判断是前进状态还是回退状态;
- 然后通过状态拿到对应的事件;
- 根据事件反射执行注解标记的对应的函数,最终根据生命周期执行到对应的函数;
好了 Lifycycle 就讲到这里吧;
欢迎三连
来都来了,点个关注,点个赞吧~ 你的支持是我最大的动力


 1069
1069

 被折叠的 条评论
为什么被折叠?
被折叠的 条评论
为什么被折叠?
 到【灌水乐园】发言


