


前言

本章我们继续上一节讲解 WMS 相关知识点,Window 是如何显示以及尺寸计算;
View 的添加过程
View 的添加过程是有两个地方,一个是在 onResume 的时候,一个是在
onResume
Activity 在创建之后,执行 onResume 的时候,把 View 添加到 WMS,然后由 WMS 交给 SurfaceFinger 进行绘制;
startActivity
在 startActivity 中的 startingWindow 的时候 也会有一个添加窗口的过程;

在 Window 的显示次序、窗口尺寸的计算,以及与 AMS 的通信等逻辑中有两个重要的概念,一个是 WindowContainerController 一个是 WindowContainer;我们来看下这两个重要的概念;
WindowContainer
/**
 * Defines common functionality for classes that can hold windows directly or through their
 * children in a hierarchy form.
 * The test class is {@link WindowContainerTests} which must be kept up-to-date and ran anytime
 * changes are made to this class.
 */
class WindowContainer<E extends WindowContainer> extends ConfigurationContainer<E>
        implements Comparable<WindowContainer>, Animatable, SurfaceFreezer.Freezable {
}
可以看下它的定义:主要是用来实现 window 显示次序;它继承了 ConfigurationContainer 这个类,这个类主要是手机的一些设置,它也实现了 Comparable 接口,用来进行排序的,也就是控制显示次序;我们来看下它的 compareTo 方法的具体实现;
public int compareTo(WindowContainer other) {
    if (this == other) {
        return 0;
    }

    if (mParent != null && mParent == other.mParent) {
        final WindowList<WindowContainer> list = mParent.mChildren;
        return list.indexOf(this) > list.indexOf(other) ? 1 : -1;
    }

    final LinkedList<WindowContainer> thisParentChain = mTmpChain1;
    final LinkedList<WindowContainer> otherParentChain = mTmpChain2;
    try {
        getParents(thisParentChain);
        other.getParents(otherParentChain);

        // Find the common ancestor of both containers.
        WindowContainer commonAncestor = null;
        WindowContainer thisTop = thisParentChain.peekLast();
        WindowContainer otherTop = otherParentChain.peekLast();
        while (thisTop != null && otherTop != null && thisTop == otherTop) {
            commonAncestor = thisParentChain.removeLast();
            otherParentChain.removeLast();
            thisTop = thisParentChain.peekLast();
            otherTop = otherParentChain.peekLast();
        }

        // Containers don't belong to the same hierarchy???
        if (commonAncestor == null) {
            throw new IllegalArgumentException("No in the same hierarchy this="
                    + thisParentChain + " other=" + otherParentChain);
        }

        // Children are always considered greater than their parents, so if one of the containers
        // we are comparing it the parent of the other then whichever is the child is greater.
        if (commonAncestor == this) {
            return -1;
        } else if (commonAncestor == other) {
            return 1;
        }

        // The position of the first non-common ancestor in the common ancestor list determines
        // which is greater the which.
        final WindowList<WindowContainer> list = commonAncestor.mChildren;
        return list.indexOf(thisParentChain.peekLast()) > list.indexOf(otherParentChain.peekLast())
                ? 1 : -1;
    } finally {
        mTmpChain1.clear();
        mTmpChain2.clear();
    }
}
当往 WindowContainer 放的时候,就会通过这个方法进行比较,来确定当前这个 window 要插入到什么位置;我们接着来看下 add 方法;
protected void addChild(E child, Comparator<E> comparator) {
    if (!child.mReparenting && child.getParent() != null) {
        throw new IllegalArgumentException("addChild: container=" + child.getName()
                + " is already a child of container=" + child.getParent().getName()
                + " can't add to container=" + getName());
    }

    int positionToAdd = -1;
    if (comparator != null) {
        final int count = mChildren.size();
        for (int i = 0; i < count; i++) {
            // 在这里进行排序的逻辑
            if (comparator.compare(child, mChildren.get(i)) < 0) {
                positionToAdd = i;
                break;
            }
        }
    }

    if (positionToAdd == -1) {
        mChildren.add(child);
    } else {
        mChildren.add(positionToAdd, child);
    }

    // Set the parent after we've actually added a child in case a subclass depends on this.
    child.setParent(this);
}
通过 comparator.compare(child, mChildren.get(i)) < 0 进行比较排序;

上图是 WindowContainer 的一些衍生类;
而 WindowContainer 又继承自 ConfigurationContainer,整体的一个关系图如下:

WindowContainerController
说完 WindowContainer 我们来说一下和它长的比较像的 WindowContainerController 先来上一张继承关系图

WindowContainer 和 WindowContainerController 之间的关系

系统把 Activity 等都抽象成了 WindowContainer 那么这些 container 需要一些显示逻辑,那么系统就把它们提取出一个 WindowContainerController 在这里面控制它;
就像上图的 Task 对应一个 TaskWindowContainerController,TaskStack 对应一个 StackWindowController;
整体的一个关系图就如下图:

通过上图可以看出 DisplayContent -> DisplayWindonwController -> ActivityDisplay -> ActivityRecord 等的这样的一个流程,那么我来看下 ActivityRecord 是怎么创建的;我们先来看下 ActivityDisplay
ActivityDisplay(ActivityStackSupervisor supervisor, Display display) {
    mSupervisor = supervisor;
    mDisplayId = display.getDisplayId();
    mDisplay = display;
    mWindowContainerController = createWindowContainerController();
    updateBounds();
}
这里调用了 createWindowContainerController 它在这里创建了 DisplayWindowController
protected DisplayWindowController createWindowContainerController() {
    return new DisplayWindowController(mDisplay, this);
}
为什么要创建这个 DisplayWindowController 呢?因为它管理的是我们的显示屏,我们进入这个 DisplayWindowController 看下:
public DisplayWindowController(Display display, WindowContainerListener listener) {
        super(listener, WindowManagerService.getInstance());
        mDisplayId = display.getDisplayId();

        synchronized (mWindowMap) {
            final long callingIdentity = Binder.clearCallingIdentity();
            try {
                mRoot.createDisplayContent(display, this /* controller */);
            } finally {
                Binder.restoreCallingIdentity(callingIdentity);
            }

            if (mContainer == null) {
                throw new IllegalArgumentException("Trying to add display=" + display
                        + " dc=" + mRoot.getDisplayContent(mDisplayId));
            }
        }
    }
这里调用了 mRoot.createDisplayContent 我们来看下这个 mRoot 是什么?
final RootWindowContainer mRoot;
mRoot 就是 RootWindowContainer,我们进入这个看下,以及看下它的 createDisplayContent
DisplayContent createDisplayContent(final Display display, DisplayWindowController controller) {
    // 获取屏幕
    final DisplayContent existing = getDisplayContent(displayId);
    if (existing != null) {
        existing.setController(controller);
        return existing;
   }
   // 获取不到对应的屏幕,则创建对应的屏幕
   final DisplayContent dc = new DisplayContent(display, mService, mWallpaperController, controller);
}
我们进入这个 DisplayContent 看下:
class DisplayContent extends WindowContainer<DisplayContent.DisplayChildWindowContainer> {
    private static final String TAG = TAG_WITH_CLASS_NAME ? "DisplayContent" : TAG_WM;

    private final int mDisplayId;

    private final TaskStackContainers mTaskStackContainers = new TaskStackContainers(mService);// 这里面一般是指应用的Activity。实际上也就是我们常说的Activity对应着整个系统栈的管理者

    private final AboveAppWindowContainers mAboveAppWindowsContainers =//这里是指一切在Activity之上的窗体容器,比如说StatusBar状态栏
            new AboveAppWindowContainers("mAboveAppWindowsContainers", mService);

    private final NonAppWindowContainers mBelowAppWindowsContainers =//一切的应该在Activity之下的Window容器,比如wrapper壁纸
            new NonAppWindowContainers("mBelowAppWindowsContainers", mService);

    private final NonMagnifiableWindowContainers mImeWindowsContainers =//这里是指如Dialog,输入键盘的窗体容器
            new NonMagnifiableWindowContainers("mImeWindowsContainers", mService);


}
屏幕的创建就是在这里完成的;
同理 ActivityStack 也是这样的一个创建逻辑,它也是一个 Container,也是继承自 ConfigurationContainer;
同理 TaskRecord 也是这样的一个创建逻辑;
ActivityStarter
Activity 在启动过程中,执行到 startActivityUnChecked 方法中的 mTargetStack.startActivityLocked 的时候
void startActivityLocked(ActivityRecord r, ActivityRecord focusedTopActivity,
            boolean newTask, boolean keepCurTransition, ActivityOptions options) {

    if (!r.mLaunchTaskBehind && (taskForIdLocked(taskId) == null || newTask)) {
        insertTaskAtTop(rTask, r); // 1 将 task 添加到 mTaskHistory 中
    }

    if (r.getWindowContainerController() == null) { // 2 创建 windowContainerController
        r.createWindowContainer();
    }
}
这创建 mWindowContainerController
void createWindowContainer() {
        if (mWindowContainerController != null) {
            throw new IllegalArgumentException("Window container=" + mWindowContainerController
                    + " already created for r=" + this);
        }

        inHistory = true;

        final TaskWindowContainerController taskController = task.getWindowContainerController();

        // TODO(b/36505427): Maybe this call should be moved inside updateOverrideConfiguration()
        task.updateOverrideConfigurationFromLaunchBounds();
        // Make sure override configuration is up-to-date before using to create window controller.
        updateOverrideConfiguration();
        // 创建一个AppWindowToken,并且添加到 DisplayContent 的 mTokenMap 中
        mWindowContainerController = new AppWindowContainerController(taskController, appToken,
                this, Integer.MAX_VALUE /* add on top */, info.screenOrientation, fullscreen,
                (info.flags & FLAG_SHOW_FOR_ALL_USERS) != 0, info.configChanges,
                task.voiceSession != null, mLaunchTaskBehind, isAlwaysFocusable(),
                appInfo.targetSdkVersion, mRotationAnimationHint,
                ActivityManagerService.getInputDispatchingTimeoutLocked(this) * 1000000L);

        task.addActivityToTop(this);

        // When an activity is started directly into a split-screen fullscreen stack, we need to
        // update the initial multi-window modes so that the callbacks are scheduled correctly when
        // the user leaves that mode.
        mLastReportedMultiWindowMode = inMultiWindowMode();
        mLastReportedPictureInPictureMode = inPinnedWindowingMode();
    }
在构造方法中创建了一个 AppWindowToken
public AppWindowContainerController(TaskWindowContainerController taskController,
            IApplicationToken token, AppWindowContainerListener listener, int index,
            int requestedOrientation, boolean fullscreen, boolean showForAllUsers, int configChanges,
            boolean voiceInteraction, boolean launchTaskBehind, boolean alwaysFocusable,
            int targetSdkVersion, int rotationAnimationHint, long inputDispatchingTimeoutNanos,
            WindowManagerService service) {
        super(listener, service);
        mHandler = new H(service.mH.getLooper());
        mToken = token;
        synchronized(mWindowMap) {
            AppWindowToken atoken = mRoot.getAppWindowToken(mToken.asBinder());
            if (atoken != null) {
                // TODO: Should this throw an exception instead?
                Slog.w(TAG_WM, "Attempted to add existing app token: " + mToken);
                return;
            }

            final Task task = taskController.mContainer;
            if (task == null) {
                throw new IllegalArgumentException("AppWindowContainerController: invalid "
                        + " controller=" + taskController);
            }
            //创建了一个 AppWindowToken
            atoken = createAppWindow(mService, token, voiceInteraction, task.getDisplayContent(),
                    inputDispatchingTimeoutNanos, fullscreen, showForAllUsers, targetSdkVersion,
                    requestedOrientation, rotationAnimationHint, configChanges, launchTaskBehind,
                    alwaysFocusable, this);
            if (DEBUG_TOKEN_MOVEMENT || DEBUG_ADD_REMOVE) Slog.v(TAG_WM, "addAppToken: " + atoken
                    + " controller=" + taskController + " at " + index);
            task.addChild(atoken, index);
        }
    }
创建完成之后,最终执行到 showStartingWindow
void showStartingWindow(ActivityRecord prev, boolean newTask, boolean taskSwitch,
            boolean fromRecents) {
        if (mWindowContainerController == null) {
            return;
        }
        if (mTaskOverlay) {
            // We don't show starting window for overlay activities.
            return;
        }

        final CompatibilityInfo compatInfo =
                service.compatibilityInfoForPackageLocked(info.applicationInfo);
        // 通过 addStartingWindow 启动
        final boolean shown = mWindowContainerController.addStartingWindow(packageName, theme,
                compatInfo, nonLocalizedLabel, labelRes, icon, logo, windowFlags,
                prev != null ? prev.appToken : null, newTask, taskSwitch, isProcessRunning(),
                allowTaskSnapshot(),
                mState.ordinal() >= RESUMED.ordinal() && mState.ordinal() <= STOPPED.ordinal(),
                fromRecents);
        if (shown) {
            mStartingWindowState = STARTING_WINDOW_SHOWN;
        }
    }
我们进入 AppWindowContainerController 的 addStartingWindow 看下,这里的启动分为两种,一种是之前启动过在 wms 中存储了快照,则直接使用快照显示,如果没有启动过,使用配置信息启动;
public boolean addStartingWindow(String pkg, int theme, CompatibilityInfo compatInfo,
            CharSequence nonLocalizedLabel, int labelRes, int icon, int logo, int windowFlags,
            IBinder transferFrom, boolean newTask, boolean taskSwitch, boolean processRunning,
            boolean allowTaskSnapshot, boolean activityCreated, boolean fromRecents) {
        synchronized(mWindowMap) {
            if (DEBUG_STARTING_WINDOW) Slog.v(TAG_WM, "setAppStartingWindow: token=" + mToken
                    + " pkg=" + pkg + " transferFrom=" + transferFrom + " newTask=" + newTask
                    + " taskSwitch=" + taskSwitch + " processRunning=" + processRunning
                    + " allowTaskSnapshot=" + allowTaskSnapshot);

            if (mContainer == null) {
                Slog.w(TAG_WM, "Attempted to set icon of non-existing app token: " + mToken);
                return false;
            }

            // If the display is frozen, we won't do anything until the actual window is
            // displayed so there is no reason to put in the starting window.
            if (!mContainer.okToDisplay()) {
                return false;
            }

            if (mContainer.startingData != null) {
                return false;
            }

            final WindowState mainWin = mContainer.findMainWindow();
            if (mainWin != null && mainWin.mWinAnimator.getShown()) {
                // App already has a visible window...why would you want a starting window?
                return false;
            }
		 //使用快照
            final TaskSnapshot snapshot = mService.mTaskSnapshotController.getSnapshot(
                    mContainer.getTask().mTaskId, mContainer.getTask().mUserId,
                    false /* restoreFromDisk */, false /* reducedResolution */);
            final int type = getStartingWindowType(newTask, taskSwitch, processRunning,
                    allowTaskSnapshot, activityCreated, fromRecents, snapshot);

            if (type == STARTING_WINDOW_TYPE_SNAPSHOT) {
                return createSnapshot(snapshot);
            }

            // If this is a translucent window, then don't show a starting window -- the current
            // effect (a full-screen opaque starting window that fades away to the real contents
            // when it is ready) does not work for this.
            if (DEBUG_STARTING_WINDOW) Slog.v(TAG_WM, "Checking theme of starting window: 0x"
                    + Integer.toHexString(theme));
            if (theme != 0) {
                //使用闪屏页面
                AttributeCache.Entry ent = AttributeCache.instance().get(pkg, theme,
                        com.android.internal.R.styleable.Window, mService.mCurrentUserId);
                if (ent == null) {
                    // Whoops!  App doesn't exist. Um. Okay. We'll just pretend like we didn't
                    // see that.
                    return false;
                }
                final boolean windowIsTranslucent = ent.array.getBoolean(
                        com.android.internal.R.styleable.Window_windowIsTranslucent, false);
                final boolean windowIsFloating = ent.array.getBoolean(
                        com.android.internal.R.styleable.Window_windowIsFloating, false);
                final boolean windowShowWallpaper = ent.array.getBoolean(
                        com.android.internal.R.styleable.Window_windowShowWallpaper, false);
                final boolean windowDisableStarting = ent.array.getBoolean(
                        com.android.internal.R.styleable.Window_windowDisablePreview, false);
                if (DEBUG_STARTING_WINDOW) Slog.v(TAG_WM, "Translucent=" + windowIsTranslucent
                        + " Floating=" + windowIsFloating
                        + " ShowWallpaper=" + windowShowWallpaper);
                if (windowIsTranslucent) {
                    return false;
                }
                if (windowIsFloating || windowDisableStarting) {
                    return false;
                }
                if (windowShowWallpaper) {
                    if (mContainer.getDisplayContent().mWallpaperController.getWallpaperTarget()
                            == null) {
                        // If this theme is requesting a wallpaper, and the wallpaper
                        // is not currently visible, then this effectively serves as
                        // an opaque window and our starting window transition animation
                        // can still work.  We just need to make sure the starting window
                        // is also showing the wallpaper.
                        windowFlags |= FLAG_SHOW_WALLPAPER;
                    } else {
                        return false;
                    }
                }
            }

            if (mContainer.transferStartingWindow(transferFrom)) {
                return true;
            }

            // There is no existing starting window, and we don't want to create a splash screen, so
            // that's it!
            if (type != STARTING_WINDOW_TYPE_SPLASH_SCREEN) {
                return false;
            }

            if (DEBUG_STARTING_WINDOW) Slog.v(TAG_WM, "Creating SplashScreenStartingData");
            mContainer.startingData = new SplashScreenStartingData(mService, pkg, theme,
                    compatInfo, nonLocalizedLabel, labelRes, icon, logo, windowFlags,
                    mContainer.getMergedOverrideConfiguration());
            scheduleAddStartingWindow();
        }
        return true;
    }
然后创建 SplashScreenStartingData 调用 scheduleAddStartingWindow 进行添加,这个SplashScreenStartingData 有一个比较重要的知识点
StartingSurface createStartingSurface(AppWindowToken atoken) {
        return mService.mPolicy.addSplashScreen(atoken.token, mPkg, mTheme, mCompatInfo,
                mNonLocalizedLabel, mLabelRes, mIcon, mLogo, mWindowFlags,
                mMergedOverrideConfiguration, atoken.getDisplayContent().getDisplayId());
    }
这里创建了一个 surface,这个 surface 就是需要显示的那块屏幕的画布;mPolicy 这个就是 PhoneWindow;
public StartingSurface addSplashScreen(IBinder appToken, int userId, String packageName,
        int theme, CompatibilityInfo compatInfo, CharSequence nonLocalizedLabel, int labelRes,
        int icon, int logo, int windowFlags, Configuration overrideConfig, int displayId) {
    // 创建 PhoneWindow,并设置一系列参数
    final PhoneWindow win = new PhoneWindow(context);
    // 设置参数代码 省略

    // 添加内容
    addSplashscreenContent(win, context);

    // 获取 decorView
    wm = (WindowManager) context.getSystemService(WINDOW_SERVICE);
    view = win.getDecorView();

    // 最终也是通过 wmd 的 addView 流程
    wm.addView(view, params);
}
通过 addSplashscreenContent 添加内容
private void addSplashscreenContent(PhoneWindow win, Context ctx) {
    final TypedArray a = ctx.obtainStyledAttributes(R.styleable.Window);
    final int resId = a.getResourceId(R.styleable.Window_windowSplashscreenContent, 0);
    a.recycle();
    if (resId == 0) {
        return;
    }
    // 从系统资源获取 drawable
    final Drawable drawable = ctx.getDrawable(resId);
    if (drawable == null) {
        return;
    }

    // new 一个 View 并把它通过 setContentView 设置给 PhoneWindow
    final View v = new View(ctx);
    v.setBackground(drawable);
    win.setContentView(v);
}
ActivityThread -> handleResumeActivity
执行到这里的时候,准备显示 Activity 的内容了,我们来看下怎么显示内容;
public void handleResumeActivity(ActivityClientRecord r, boolean finalStateRequest,
        boolean isForward, String reason) {
    ```
    if (r.window == null && !a.mFinished && willBeVisible) {
        r.window = r.activity.getWindow();
        View decor = r.window.getDecorView();
        decor.setVisibility(View.INVISIBLE);
        ViewManager wm = a.getWindowManager();
        WindowManager.LayoutParams l = r.window.getAttributes();
        a.mDecor = decor;
    }

    // 然后执行 makeVisible
    if (r.activity.mVisibleFromClient) {
        r.activity.makeVisible();
    }

}
makeVisible 方法看下:
void makeVisible() {
    if (!mWindowAdded) {
        ViewManager wm = getWindowManager();
        wm.addView(mDecor, getWindow().getAttributes());
        mWindowAdded = true;
    }
    mDecor.setVisibility(View.VISIBLE);
}
这里用的是 ViewManager 来接收,它是 WindowManager 的父类,是如下的一个继承关系;
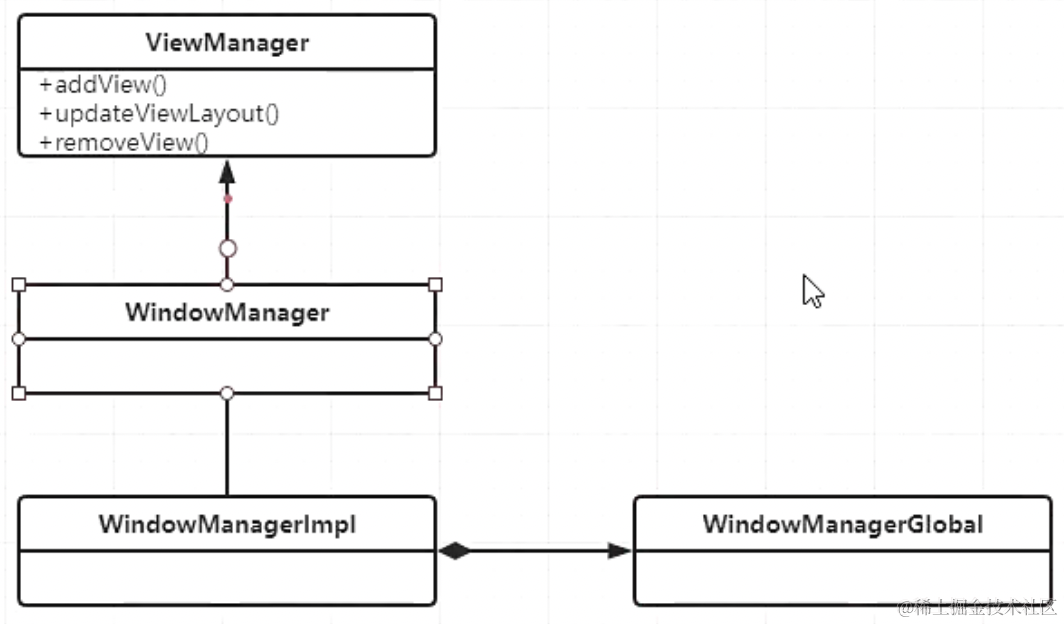
主要做的三件事情就是:addView、updateViewLayout、removeView,通过这里可以了解到我们上层业务的 addView 其实都是添加到了 DecorView,而添加到 WMS 的是 DecorView,只有 DecorView 与 WMS 进行一个对接操作;
我们来看下 WindowManager 的 addView 的逻辑,最终调度到的是 WindowManagerGlobal;
public void addView(View view, ViewGroup.LayoutParams params,
        Display display, Window parentWindow, int userId) {

    // 创建 ViewRootImpl
    root = new ViewRootImpl(view.getContext(), display);

    view.setLayoutParams(wparams);

    mViews.add(view);
    mRoots.add(root);
    mParams.add(wparams);

    // do this last because it fires off messages to start doing things
    try {
        root.setView(view, wparams, panelParentView, userId);
    } catch (RuntimeException e) {
        // BadTokenException or InvalidDisplayException, clean up.
        if (index >= 0) {
            removeViewLocked(index, true);
        }
        throw e;
    }
}
setView 方法进入看下:
public void setView(View view, WindowManager.LayoutParams attrs, View panelParentView,
        int userId) {

    synchronized (this) {
        // 将 ViewRootImpl 与 View 的关联只能做一次,如果赋值过就不再执行
        if (mView == null) {
            mView = view; // 将顶层视图 DecorView 赋值给全局的 mView

            // 省略部分参数获取的逻辑

            // 与 wms 沟通
            res = mWindowSession.addToDisplayAsUser(mWindow, mWindowAttributes,
                    getHostVisibility(), mDisplay.getDisplayId(), userId,
                    mInsetsController.getRequestedVisibility(), inputChannel, mTempInsets, mTempControls);
        }
    }
}
这里通过 mWindowSession.addToDisplayAsUser 与 wms 进行沟通绑定,最终调用到 Session 的 addToDisplay
public int addToDisplay(IWindow window, WindowManager.LayoutParams attrs,
        int viewVisibility, int displayId, InsetsState requestedVisibility,
        InputChannel outInputChannel, InsetsState outInsetsState,
        InsetsSourceControl[] outActiveControls) {
    return mService.addWindow(this, window, attrs, viewVisibility, displayId,
            UserHandle.getUserId(mUid), requestedVisibility, outInputChannel, outInsetsState,
            outActiveControls);
}
通过 WindowManagerService 的 addWindow 方法进行添加;
public int addWindow(Session session, IWindow client, LayoutParams attrs, int viewVisibility,
        int displayId, int requestUserId, InsetsState requestedVisibility,
        InputChannel outInputChannel, InsetsState outInsetsState,
        InsetsSourceControl[] outActiveControls) {
    // 创建 wms ams 通信用的 token
    token = new WindowToken.Builder(this, binder, type)
        .setDisplayContent(displayContent)
        .setOwnerCanManageAppTokens(session.mCanAddInternalSystemWindow)
        .setRoundedCornerOverlay(isRoundedCornerOverlay)
        .setFromClientToken(true)
        .setOptions(options)
        .build();

    // 新的 windowState 对象在其构造函数中根据窗口类型初始化了其主序mBaseLayer和mSubLayer
    WindowState win = new WindowState(this, session, client, token, parentWindow,
        appOp[0], attrs, viewVisibility, session.mUid, userId,
        session.mCanAddInternalSystemWindow);

    // 执行 attach
    win.attach();
}
我们来看下 attach
void attach() {
    if (DEBUG) Slog.v(TAG, "Attaching " + this + " token=" + mToken);
    // wms 并没有真正的去管理绘制,真正的绘制
    mSession.windowAddedLocked();
}
真正的绘制逻辑在 windowAddedLocked 中
void windowAddedLocked() {
    if (mPackageName == null) {
        final WindowProcessController wpc = mService.mAtmService.mProcessMap.getProcess(mPid);
        if (wpc != null) {
            mPackageName = wpc.mInfo.packageName;
            mRelayoutTag = "relayoutWindow: " + mPackageName;
        } else {
            Slog.e(TAG_WM, "Unknown process pid=" + mPid);
        }
    }
    if (mSurfaceSession == null) {
        if (DEBUG) {
            Slog.v(TAG_WM, "First window added to " + this + ", creating SurfaceSession");
        }
        mSurfaceSession = new SurfaceSession();
        ProtoLog.i(WM_SHOW_TRANSACTIONS, "  NEW SURFACE SESSION %s", mSurfaceSession);
        mService.mSessions.add(this);
        if (mLastReportedAnimatorScale != mService.getCurrentAnimatorScale()) {
            mService.dispatchNewAnimatorScaleLocked(this);
        }
    }
    mNumWindow++;
}
当我们要绘制的时候,会创建一个 SurfaceSession 对象,执行一系列的 native 方法来进行绘制;
到这里 window 就绘制上去了,但是显示层次是怎么控制的呢?我们接着回去看下 WindowState 的构造函数;
WindowState(WindowManagerService service, Session s, IWindow c, WindowToken token,
        WindowState parentWindow, int appOp, WindowManager.LayoutParams a, int viewVisibility,
        int ownerId, int showUserId, boolean ownerCanAddInternalSystemWindow,
        PowerManagerWrapper powerManagerWrapper) {
    // 如果是子窗口,使用它依附的窗口类型进行计算
    if (mAttrs.type >= FIRST_SUB_WINDOW && mAttrs.type <= LAST_SUB_WINDOW) {
        // The multiplier here is to reserve space for multiple
        // windows in the same type layer.
        // 计算 mBaseLayer
        mBaseLayer = mPolicy.getWindowLayerLw(parentWindow)
                * TYPE_LAYER_MULTIPLIER + TYPE_LAYER_OFFSET;
        // 计算 mSubLayer
        mSubLayer = mPolicy.getSubWindowLayerFromTypeLw(a.type);
     } else {
         // 非子窗口
         //
        mBaseLayer = mPolicy.getWindowLayerLw(this)
                * TYPE_LAYER_MULTIPLIER + TYPE_LAYER_OFFSET;
        // 仅在子窗口中有效
        mSubLayer = 0;
     }
}
在构造方法中会计算两个 layer,一个是 mBaseLayer 一个是 mSubLayer,通过 getWindowLayerLw 计算 Z 轴顺序,这个方法最终调用到 WindowManagerPolicy 的 getWindowLayerFromTypeLw 方法进行计算
default int getWindowLayerFromTypeLw(int type, boolean canAddInternalSystemWindow,
        boolean roundedCornerOverlay) {
    // 根据 type 返回 层级值
    switch (type) {
        case TYPE_WALLPAPER:
            // wallpaper is at the bottom, though the window manager may move it.
            return  1;
        case TYPE_PRESENTATION:
        case TYPE_PRIVATE_PRESENTATION:
        case TYPE_DOCK_DIVIDER:
        case TYPE_QS_DIALOG:
        case TYPE_PHONE:
            return  3;
        case TYPE_SEARCH_BAR:
        case TYPE_VOICE_INTERACTION_STARTING:
            return  4;
        case TYPE_VOICE_INTERACTION:
            // voice interaction layer is almost immediately above apps.
            return  5;
        case TYPE_INPUT_CONSUMER:
            return  6;
        case TYPE_SYSTEM_DIALOG:
            return  7;
        case TYPE_TOAST:
            // toasts and the plugged-in battery thing
            return  8;
        case TYPE_PRIORITY_PHONE:
            // SIM errors and unlock.  Not sure if this really should be in a high layer.
            return  9;
        case TYPE_SYSTEM_ALERT:
            // like the ANR / app crashed dialogs
            // Type is deprecated for non-system apps. For system apps, this type should be
            // in a higher layer than TYPE_APPLICATION_OVERLAY.
            return  canAddInternalSystemWindow ? 13 : 10;
        case TYPE_APPLICATION_OVERLAY:
            return  12;
        case TYPE_INPUT_METHOD:
            // on-screen keyboards and other such input method user interfaces go here.
            return  15;
        case TYPE_INPUT_METHOD_DIALOG:
            // on-screen keyboards and other such input method user interfaces go here.
            return  16;
        case TYPE_STATUS_BAR:
            return  17;
        case TYPE_STATUS_BAR_ADDITIONAL:
            return  18;
        case TYPE_NOTIFICATION_SHADE:
            return  19;
        case TYPE_STATUS_BAR_SUB_PANEL:
            return  20;
        case TYPE_KEYGUARD_DIALOG:
            return  21;
        case TYPE_VOLUME_OVERLAY:
            // the on-screen volume indicator and controller shown when the user
            // changes the device volume
            return  22;
        case TYPE_SYSTEM_OVERLAY:
            // the on-screen volume indicator and controller shown when the user
            // changes the device volume
            return  canAddInternalSystemWindow ? 23 : 11;
        case TYPE_NAVIGATION_BAR:
            // the navigation bar, if available, shows atop most things
            return  24;
        case TYPE_NAVIGATION_BAR_PANEL:
            // some panels (e.g. search) need to show on top of the navigation bar
            return  25;
        case TYPE_SCREENSHOT:
            // screenshot selection layer shouldn't go above system error, but it should cover
            // navigation bars at the very least.
            return  26;
        case TYPE_SYSTEM_ERROR:
            // system-level error dialogs
            return  canAddInternalSystemWindow ? 27 : 10;
        case TYPE_MAGNIFICATION_OVERLAY:
            // used to highlight the magnified portion of a display
            return  28;
        case TYPE_DISPLAY_OVERLAY:
            // used to simulate secondary display devices
            return  29;
        case TYPE_DRAG:
            // the drag layer: input for drag-and-drop is associated with this window,
            // which sits above all other focusable windows
            return  30;
        case TYPE_ACCESSIBILITY_OVERLAY:
            // overlay put by accessibility services to intercept user interaction
            return  31;
        case TYPE_ACCESSIBILITY_MAGNIFICATION_OVERLAY:
            return 32;
        case TYPE_SECURE_SYSTEM_OVERLAY:
            return  33;
        case TYPE_BOOT_PROGRESS:
            return  34;
        case TYPE_POINTER:
            // the (mouse) pointer layer
            return  35;
        default:
            Slog.e("WindowManager", "Unknown window type: " + type);
            return 3;
    }
}
到这里 window 的添加 显示次序,尺寸计算就讲解结束了;
下一章预告
聊一聊 Fragment;
欢迎三连
来都来了,点个关注点个赞吧,你的支持是我最大的动力~
 1280


 扫一扫


 被折叠的 条评论
为什么被折叠?
 到【灌水乐园】发言


