


引言
Spring Security 是一个功能强大且高度可定制的身份验证和访问控制的框架,提供了完善的认证机制和方法级的授权功能,是一个非常优秀的权限管理框架。其核心是一组过滤器链,不同的功能经由不同的过滤器。本文将通过一个案例将 Spring Security 整合到 SpringBoot中,要实现的功能就是在认证服务器上登录,然后获取Token,再访问资源服务器中的资源。
一、基本介绍
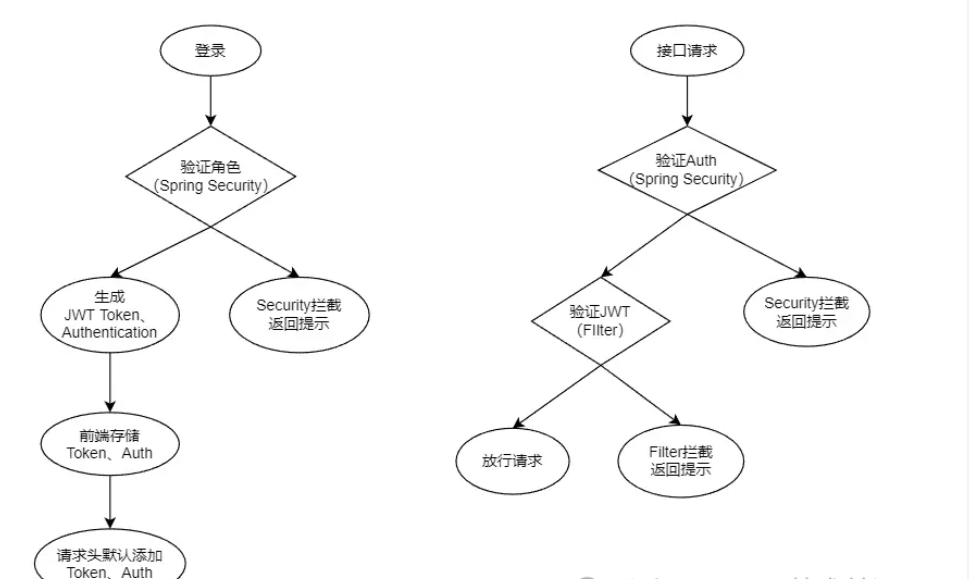
登录验证:
通过 JWT 为每个用户生成一个唯一且有期限的 Token,用户每次请求都会重新生成过期时间,在规定的时间内,用户未进行操作 Token 就会过期,当用户再次请求时则会再次执行登录流程,而 Token 的过期时间应根据实际的业务场景规定。
权限认证:
权限认证通过Spring Security框架来实现,在用户成功登录之后,当尝试访问系统资源时(即发起接口调用),服务端会根据用户所属的角色来判断其是否具备相应的访问权限。若用户未获得该资源的访问权限,则服务端应当返回明确的权限不足提示信息,以确保系统的安全性与用户体验。
通过如图来讲解我们的实现目标:登录验证 和 权限认证
二、环境准备
创建 auth_user 系统用户表,并准备测试数据。
CREATE TABLE `auth_user`(`id` varchar(36) NOT NULL,`username` varchar(100) DEFAULT NULL,`password` varchar(100) DEFAULT NULL,`role` varchar(100) DEFAULT NULL,`account_non_expired` int(11) DEFAULT '0',`account_non_locked` int(11) DEFAULT '0',`credentials_non_expired` int(11) DEFAULT '0',`is_enabled` int(11) DEFAULT NULL,PRIMARY KEY (`id`)) ENGINE=InnoDB DEFAULT CHARSET=utf32;INSERT INTO auth_user (id, username, password, `role`, account_non_expired, account_non_locked,credentials_non_expired, is_enabled)VALUES ('1', 'user', '15tT+y0b+lJq2HIKUjsvvg==', 'USER', 1, 1, 1, 1),('2', 'admin', '15tT+y0b+lJq2HIKUjsvvg==', 'ADMIN', 1, 1, 1, 1);
三、登录代码实现
1.为项目导入相关依赖
在pom.xml 文件中到入依赖,除了 Security 之外 还引入了 AES 和 JWT相关依赖
<dependencies><dependency><groupId>org.springframework.boot</groupId><artifactId>spring-boot-starter-security</artifactId></dependency><!-- AES加密 --><dependency><groupId>org.apache.directory.studio</groupId><artifactId>org.apache.commons.codec</artifactId><version>1.8</version></dependency><!-- JWT --><dependency><groupId>io.jsonwebtoken</groupId><artifactId>jjwt</artifactId><version>0.9.0</version></dependency></dependencies>
创建项目所需实体类:
在工程中创建一个新的实体类AuthUser,该实体类需要实现Spring Security的UserDetails接口,并特别地,需要重写getAuthorities()方法来从数据库中动态读取并设置用户的角色权限。此外,为了确保用户账户处于正常激活状态,isAccountNonExpired()、isAccountNonLocked()、isCredentialsNonExpired()、isEnabled()这四个方法也必须被重写,并且应该基于数据库查询的结果或业务逻辑,无条件地返回true(假设在这个场景下,所有用户账户都被视为有效、未过期、未锁定且凭据未过期)。
这样的设计确保了AuthUser类能够准确地反映用户的安全状态和权限信息,同时允许Spring Security框架利用这些信息进行访问控制。通过从数据库动态加载权限信息,系统能够灵活地适应不同用户的权限需求,提升系统的安全性和灵活性。
public class AuthUser implements Serializable, UserDetails {private static final long serialVersionUID = 1L;private String id;private String username;private String password;private String role;private Integer accountNonExpired;private Integer accountNonLocked;private Integer credentialsNonExpired;private Integer isEnabled;@Overridepublic Collection<? extends GrantedAuthority> getAuthorities() {// 获取用户所有权限String[] roles = role.split(",");// 遍历 roles,取出每一个权限进行认证,添加到简单的授予认证类List<SimpleGrantedAuthority> authorities = new ArrayList<>();for (String role : roles) {authorities.add(new SimpleGrantedAuthority("ROLE_" + role));}// 返回到已经被授予认证的权限集合, 这里面的角色所拥有的权限都已经被 spring security 所知道return authorities;}@Overridepublic boolean isAccountNonExpired() {return this.accountNonExpired != null && this.accountNonExpired == 1;}@Overridepublic boolean isAccountNonLocked() {return this.accountNonLocked != null && this.accountNonLocked == 1;}@Overridepublic boolean isCredentialsNonExpired() {return this.credentialsNonExpired != null && this.credentialsNonExpired == 1;}@Overridepublic boolean isEnabled() {return this.isEnabled != null && this.isEnabled == 1;}// 略去其它 Get、Set 方法}
创建 Service 服务
创建名为 AuthUserService 的接口,并实现 UserDetailsService 类,重写 loadUserByUsername() 方法( Security 认证登录调用的接口)。
public interface AuthUserService extends UserDetailsService {}@Service("authUserService")public class AuthUserServiceImpl implements AuthUserService {@Resourceprivate AuthUserDao authUserDao;@Overridepublic UserDetails loadUserByUsername(String username) throws UsernameNotFoundException {AuthUser authUser = authUserDao.queryByName(username);if (authUser == null) {throw new IllegalArgumentException("User [" + username + "] doesn't exist.");}return authUser;}}
AutUserDao 是用来解读数据库信息的类, queryByName() 是通过 username 从 auth_user 数据表进行精准查询。
Congtroller 层方法
创建两个接口分别供不同角色测试。
@RestController@RequestMapping("api/resource")public class ResourceController {@GetMapping("user")public String demo1() {return "User demo.";}@GetMapping("admin")public String demo2() {return "Admin demo.";}}
四、工具类
AES加密
在前后端数据传输过程中明文密码传输存在相当大的隐患,可以采用加密的方式,对信息进行隐藏,话不多说上代码。
public class AESUtil {private final static String ALGORITHM = "AES/CBC/NoPadding";private final static String DEFAULT_IV = "1234567890123456";private final static String DEFAULT_KEY = "1234567890123456";public static String encrypt(String data) throws Exception {return encrypt(data, DEFAULT_KEY, DEFAULT_IV);}public static String desEncrypt(String data) throws Exception {return desEncrypt(data, DEFAULT_KEY, DEFAULT_IV);}public static String encrypt(String data, String key, String iv) throws Exception {Cipher cipher = Cipher.getInstance(ALGORITHM);int blockSize = cipher.getBlockSize();byte[] dataBytes = data.getBytes();int length = dataBytes.length;if (length % blockSize != 0) {length = length + (blockSize - (length % blockSize));}byte[] plaintext = new byte[length];System.arraycopy(dataBytes, 0, plaintext, 0, dataBytes.length);SecretKeySpec keySpec = new SecretKeySpec(key.getBytes(), "AES");IvParameterSpec ivSpec = new IvParameterSpec(iv.getBytes());cipher.init(Cipher.ENCRYPT_MODE, keySpec, ivSpec);byte[] encrypted = cipher.doFinal(plaintext);return new Base64().encodeToString(encrypted);}public static String desEncrypt(String data, String key, String iv) throws Exception {byte[] encrypted1 = new Base64().decode(data);Cipher cipher = Cipher.getInstance(ALGORITHM);SecretKeySpec keySpec = new SecretKeySpec(key.getBytes(), "AES");IvParameterSpec ivSpec = new IvParameterSpec(iv.getBytes());cipher.init(Cipher.DECRYPT_MODE, keySpec, ivSpec);byte[] bytes = cipher.doFinal(encrypted1);return new String(bytes);}}
JWT生成
通过引入JWT(JSON Web Tokens),我们可以高效地管理用户的登录状态。JWT能够生成一串包含过期时间的Token值,该值以字符串形式存在。当Token达到其设定的过期时间时,尝试对其进行解析将会触发ExpiredJwtException异常。通过捕获这个ExpiredJwtException异常,我们能够有效地判断用户的登录状态是否已经过期。在上述描述中,createJWT()函数负责生成Token,而parseJWT()函数则负责解析Token。这样的机制既方便了Token的生成与管理,也简化了用户登录状态的验证过程。
public class TokenUtil {/*** 密钥*/public static final String JWT_KEY = "ibudai";/*** 过期时间*/public static final Long JWT_TTL = TimeUnit.MINUTES.toMillis(5);/*** 生成 Token*/public static String createJWT(String data, Long ttlMillis) {String uuid = UUID.randomUUID().toString().replaceAll("-", "");JwtBuilder builder = getJwtBuilder(data, ttlMillis, uuid);return builder.compact();}/*** 解析 Token*/public static Claims parseJWT(String token) {SecretKey secretKey = generalKey();return Jwts.parser().setSigningKey(secretKey).parseClaimsJws(token).getBody();}/*** 生成加密后的秘钥*/private static SecretKey generalKey() {byte[] encodedKey = Base64.getDecoder().decode(JWT_KEY);return new SecretKeySpec(encodedKey, 0, encodedKey.length, "AES");}private static JwtBuilder getJwtBuilder(String subject, Long ttlMillis, String uuid) {SignatureAlgorithm algorithm = SignatureAlgorithm.HS256;SecretKey secretKey = generalKey();long nowMillis = System.currentTimeMillis();Date now = new Date(nowMillis);if (ttlMillis == null) {ttlMillis = JWT_TTL;}long expMillis = nowMillis + ttlMillis;Date expDate = new Date(expMillis);return Jwts.builder().setId(uuid)// 计算内容.setSubject(subject)// 签发者.setIssuer("budai")// 签发时间.setIssuedAt(now)// 加密算法签名.signWith(algorithm, secretKey).setExpiration(expDate);}}
五、权限配置
接下来正式配置 Security 权限模块。
新建SecurityConfig类,并使其继承自WebSecurityConfigurerAdapter,随后在该类中重写configure(AuthenticationManagerBuilder auth)方法。在这个方法内部,我们将利用AuthUserService(即之前创建的用于从数据库中读取用户角色数据的类)来配置用户认证信息。这样的配置确保了Spring Security能够基于数据库中存储的用户和角色信息来执行身份验证。
@Configurationpublic class SecurityConfig extends WebSecurityConfigurerAdapter {@Autowiredprivate AuthUserService authUserService;@Overrideprotected void configure(AuthenticationManagerBuilder auth) throws Exception {// 动态读取数据库信息auth.userDetailsService(authUserService)// 自定义 AES 方式加密.passwordEncoder(new AESEncoder());}}
配置好上述代码,首先来手动配置两个角色 budia , admian 以及相应的角色权限和密码。
@Overrideprotected void configure(AuthenticationManagerBuilder auth) throws Exception {// 手动配置auth.inMemoryAuthentication().withUser("budai").password("123456").roles("USER").and().withUser("admin").password("123456").roles("ADMIN", "USER").and()// 自定义账号信息解析方式.passwordEncoder(new AESEncoder());}
自定义加密
Security 中默认提供了强哈希加密方式 BCryptPasswordEncoder,但也可根据实际需求自定义加密逻辑,这通过实现 PasswordEncoder 接口并重写其方法来完成。在自定义的 PasswordEncoder 实现中,matches 方法的 charSequence 参数实际上是用户登录时传入的密码(明文),该密码在验证前可能已经过解密处理(如果前端使用了AES等加密方式)。而 matches 方法的另一个参数 s(或根据具体实现可能命名为其他变量),则是从数据库中读取的、已经加密存储的用户密码值。由于前端工程中实施了AES数据加密,因此在服务器端进行密码验证之前,需要先对接收到的加密密码进行解密操作。
public class AESEncoder implements PasswordEncoder {@Overridepublic String encode(CharSequence charSequence) {String str = charSequence.toString();try {String plain;if (!Objects.equals(str, "userNotFoundPassword")) {plain = AESUtil.desEncrypt(str);} else {plain = str;}return AESUtil.encrypt(plain);} catch (Exception e) {throw new RuntimeException(e);}}@Overridepublic boolean matches(CharSequence charSequence, String s) {try {String plain = AESUtil.desEncrypt(charSequence.toString());String result = AESUtil.encrypt(plain);return Objects.equals(result, s);} catch (Exception e) {throw new RuntimeException(e);}}}
权限分配
完成用户角色的创建之后,接下来的步骤是为不同的角色分配相应的资源权限。这通常在SecurityConfig类中通过重写configure(HttpSecurity http)方法来实现。在该方法中,可以配置哪些接口(如freeAPI、userAPI和adminAPI)可以被特定用户角色访问。这些接口的配置信息可以存储在yml文件中,并通过Spring的注解机制动态获取。
当未认证用户尝试访问受保护的资源时,Spring Security会自动将请求重定向到登录页面,但在这里,我们通过formLogin().loginProcessingUrl("/api/auth/verify")指定了一个自定义的登录接口地址/api/auth/verify,以支持通过API请求方式进行用户认证。用户提交登录请求后,AuthUserService中的loadUserByUsername()方法将被调用,以验证用户的用户名和密码,并确定其角色。
对于认证成功、认证失败以及无权限访问的情况,我们采用了匿名函数(或Lambda表达式,具体取决于实现方式)来处理这些事件的逻辑。这些处理逻辑可能包括重定向到特定页面、返回错误信息或执行其他自定义操作。
@Configurationpublic class SecurityConfig extends WebSecurityConfigurerAdapter {/*** 免认证资源*/@Value("${auth.api.free}")private String freeAPI;/*** 普通用户资源*/@Value("${auth.api.user}")private String userAPI;/*** 超级用户资源*/@Value("${auth.api.admin}")private String adminAPI;@Overrideprotected void configure(HttpSecurity http) throws Exception {String[] freeResource = freeAPI.trim().split(",");String[] userResource = userAPI.trim().split(",");String[] adminResource = adminAPI.trim().split(",");http.authorizeRequests()// 设置免认证资源.antMatchers(freeResource).permitAll()// 为不同权限分配不同资源.antMatchers(userResource).hasRole("USER").antMatchers(adminResource).hasRole("ADMIN")// 默认无定义资源都需认证.anyRequest().authenticated()// 自定义认证访问资源.and().formLogin().loginProcessingUrl("/api/auth/verify")// 认证成功逻辑.successHandler(this::successHandle)// 认证失败逻辑.failureHandler(this::failureHandle)// 未认证访问受限资源逻辑.and().exceptionHandling().authenticationEntryPoint(this::unAuthHandle).and().httpBasic()// 允许跨域.and().cors()// 关闭跨站攻击.and().csrf().disable();}}
六、逻辑处理
成功处理
用户成功通过认证后,系统会执行两个关键步骤来管理登录状态和权限控制。首先,会生成一个JWT(JSON Web Token)Token值,该Token用于后续请求的登录状态管理。JWT是基于登录用户的用户名、密码(通常是密码的哈希值,而非明文)及角色信息序列化后的JSON数据计算得出的,确保了数据的安全性和可验证性。其次,用户的角色信息会被封装成一个Authentication认证码,该认证码是username:password(注意:这里的password部分应替换为更安全的信息,如用户ID或角色的哈希值,因为直接包含密码是不安全的)经过Base64编码后的值,用于后续的权限过滤。
这两个认证信息——JWT Token和Authentication认证码——都会通过HTTP响应的请求头返回给前端。前端接收到这些信息后,会将其存储起来,并在后续发出的所有请求中,在请求头中携带这两个参数。后端则通过配置过滤器与Spring Security框架,实现对这些请求头的解析,从而验证用户的登录状态和访问权限,完成登录状态的管理与权限访问控制。
失败处理
用户未通过 Security 认证时,需要通过验证码状态等信息来响应给前端, 在这里我们通过新建的返回类 来返回结果给前端。
private void failureHandle(HttpServletRequest request, HttpServletResponse response, AuthenticationException exception) throws IOException {String msg;if (exception instanceof LockedException) {msg = "Account has been locked, please contact the administrator.";} else if (exception instanceof BadCredentialsException) {msg = "Account credential error, please recheck.";} else {msg = "Account doesn't exist, please recheck.";}response.setContentType("application/json;charset=UTF-8");response.setStatus(203);ResultData<Object> result = new ResultData<>(203, msg, null);response.getWriter().write(objectMapper.writeValueAsString(result));}
无权拦截
在用户没有经过 权限认证的情况下访问资源,则需要进行拦截并返回响应的状态信息。
private void unAuthHandle(HttpServletRequest request, HttpServletResponse response, AuthenticationException exception) throws IOException {String msg = "Please login and try again.";response.setContentType("application/json;charset=UTF-8");response.setStatus(203);ResultData<Object> result = new ResultData<>(203, msg, null);response.getWriter().write(objectMapper.writeValueAsString(result));}
七、Filter配置
Bean注入
@Configurationpublic class FilterConfig {/*** 设置放行资源** 例:/api/auth/verify*/@Value("${auth.api.verify}")private String verifyAPI;@Beanpublic FilterRegistrationBean<AuthFilter> orderFilter1() {FilterRegistrationBean<AuthFilter> filter = new FilterRegistrationBean<>();filter.setName("auth-filter");// Set effect urlfilter.setUrlPatterns(Collections.singleton("/**"));// Set ignore url, when multiply the value spilt with ","filter.addInitParameter("excludedUris", verifyAPI);filter.setOrder(-1);filter.setFilter(new AuthFilter());return filter;}}
拦截逻辑
我们新建一个名为AuthFilter的自定义过滤器类并实现Filter接口时,我们需要重点关注doFilter()方法的实现。如之前所述,一旦用户通过登录认证成功,系统会将JWT Token和Authentication认证信息写入HTTP响应的请求头中,并返回给前端。之后,前端在发起任何需要认证或权限验证的请求时,都应在请求头中包含这两个参数。
在请求到达后端时,首先会触发Spring Security的认证流程。Spring Security会使用请求头中的Authentication认证信息(尽管通常不直接使用username:password格式的Base64编码,而是可能使用更安全的认证令牌,如预共享密钥生成的Token或基于HTTP头部的认证方式)进行初步的身份验证。这一部分是Spring Security内部自动处理的,我们无需直接操作。
一旦通过Spring Security的身份验证,请求将继续流向我们配置的AuthFilter。在AuthFilter的doFilter()方法中,我们需要编写逻辑来解析请求头中的JWT Token。这个Token包含了用户的会话信息,如用户名、角色以及Token的签发和过期时间等。我们将验证这个Token是否有效(比如检查它是否未过期),如果Token已过期,我们需要构造一个包含相应错误信息的响应,并通过HTTP状态码(如401 Unauthorized)返回给前端。前端接收到这个响应后,可以根据需要重定向用户到登录页面。
public void doFilter(ServletRequest servletRequest, ServletResponse servletResponse, FilterChain filterChain) throws IOException, ServletException {HttpServletRequest req = (HttpServletRequest) servletRequest;HttpServletResponse response = (HttpServletResponse) servletResponse;int status;String msg;String token = req.getHeader("Token");if (StringUtils.isNotBlank(token)) {boolean isExpired = false;try {TokenUtil.parseJWT(token);} catch (ExpiredJwtException e) {isExpired = true;}if (!isExpired) {filterChain.doFilter(req, servletResponse);return;} else {status = 203;msg = "Login expired.";}} else {status = 203;msg = "Please login and try again.";}response.setContentType("application/json;charset=UTF-8");response.setStatus(status);ResultData<Object> result = new ResultData<>(status, msg, null);response.getWriter().write(objectMapper.writeValueAsString(result));}
八、跨域处理
在工程中新建 CorsConfig 类实现 WebMvcConfigurer 接口并重写 addCorsMappings() 方法配置跨域信息
@Configuration
public class CorsConfig implements WebMvcConfigurer {
/*** 设置跨域访问地址,逗号分隔** 例:http://localhost:8080,http://127.0.0.1:8080*/@Value("${auth.host.cors}")private String hosts;@Overridepublic void addCorsMappings(CorsRegistry registry) {String[] crosHost = hosts.trim().split(",");// 设置允许跨域的路径registry.addMapping("/**")// 设置允许跨域请求的域名.allowedOriginPatterns(crosHost)// 是否允许cookie.allowCredentials(true)// 设置允许的请求方式.allowedMethods("GET", "POST", "DELETE", "PUT")// 设置允许的header属性.allowedHeaders("*")// 跨域允许时间.maxAge(TimeUnit.SECONDS.toMillis(5));}}


 2355
2355

 被折叠的 条评论
为什么被折叠?
被折叠的 条评论
为什么被折叠?
 到【灌水乐园】发言


