


应用Web Socket
目前,网络上的即时通信App有很多,如QQ、微信和飞书等,按照以往的技术来说,即时功能通常会采用服务器轮询和Comet技术来解决。
HTTP是非持久化、单向的网络协议,在建立连接后只允许浏览器向服务器发出请求后,服务器才能返回相应的数据。当需要即时通信时,在固定时间间隔(2s)通过轮询内由浏览器向服务器发送Request请求,再把最新的数据返回浏览器进行展示。这种方法最大的缺点就是要不断地向服务器发送请求,访问频率过高但是更新的数据量可能很小,这样就造成了资源浪费,增大了服务器的压力。
Web Socket技术的出现弥补了这一缺点,在Web Socket中,只需要服务器和浏览器通过HTTP完成一个“握手”的动作,然后单独建立一条TCP的通信通道即可进行数据的双向传送了,不需要再轮询服务器。
Web Socket简介
Web Socket是用在Web浏览器和服务器之间进行双向数据传输的一种协议,Web Socket协议出现在2008年,2011年成为国际标准,并且所有浏览器都支持。Web Socket基于TCP实现,包含初始的握手过程和后续的多次数据帧双向传输过程,其的目的是在Web Socket应用和Web Socket服务器进行多次双向通信时,避免服务器打开多个HTTP连接以节约资源,提高工作效率和资源利用率。
Web Socket技术的优点如下:
通过第一次HTTP Request建立了连接之后,后续的数据交换无须再重新发送HTTP Request,节省了带宽资源。
Web Socket的连接是双向通信的连接,在同一个TCP连接上既可以发送请求也可以接收请求。具有多路复用的功能(multiplexing),即几个不同的URI可以复用同一个Web Socket连接。这种访问方式与TCP连接非常相似,因为它借用了HTTP的一些概念,所以被称为Web Socket。
Web Socket协议不是一个全新的网络协议,而是利用了HTTP来建立连接。Web Socket创建连接的过程如下:
(1)Web Socket连接由浏览器发起,因为请求协议是一个标准的HTTP请求,请求的格式如下:
GET ws://localhost:3600/ws/chat HTTP/1.1
Host: localhost
Upgrade: websocket
Connection: Upgrade
Origin: http://localhost:3600
Sec-WebSocket-Key: client-random-string
Sec-WebSocket-Version: 13
注意,Web Socket请求和普通的HTTP请求有几点不同:
GET请求的地址不是类似/path/格式,而是以ws://开头的地址;
请求头Upgrade:websocket和Connection:Upgrade表示这个连接将要被转换为Web Socket连接;
Sec-WebSocket-Key用于标识该连接,并非用于加密数据;
Sec-WebSocket-Version指定了Web Socket的协议版本。
(2)服务器收到请求后会返回如下响应:
HTTP/1.1 101 Switching Protocols
Upgrade: websocket
Connection: Upgrade
Sec-WebSocket-Accept: server-random-string响应代码101表示本次连接的HTTP即将被更改,更改后的协议就是Upgrade:websocket指定的Web Socket协议。版本号和子协议规定了双方能理解的数据格式以及是否支持压缩等。
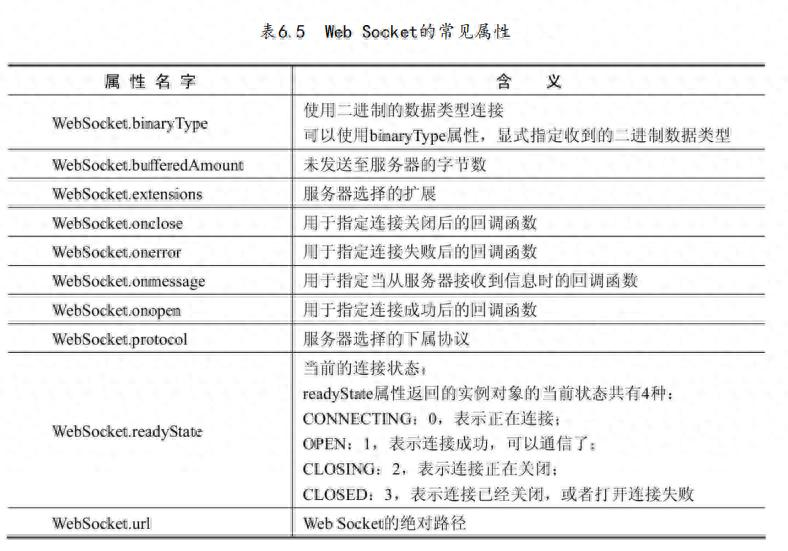
Web Socket的属性和方法
Web Socket的常见属性如表6.5所示。
Web Socket的常见方法有:
(1)WebSocket.close([code[, reason]]),关闭当前连接,使用示例如下:
ws.addEventListener("close", function(event) {
var code = event.code; var reason = event.reason;
var wasClean = event.wasClean;
// handle close event
});
(2)WebSocket.send(data),对要传输的数据进行排序,发送数据:
//发送文本
ws.send(“text message”);
//发送Blob
var file = document
.querySelector('input[type="file"]')
.files[0];
ws.send(file);
//发送图像数据或者ArrayBuffer
var img = canvas_context.getImageData(0, 0, 400, 320);
var binary = new Uint8Array(img.data.length);
for (var i = 0; i < img.data.length; i++) {
binary[i] = img.data[i];
}
//发送ArrayBuffer对象
ws.send(binary.buffer);
实战:Web Socket通信
新建一个Websocket-demo模块,进行Web Socket通信演练。
(1)添加Web Socket依赖到pom.xml中,代码如下:
<properties>
<java.version>11</java.version>
</properties> <dependencies>
<dependency>
<groupId>org.springframework.boot</groupId>
<artifactId>spring-boot-starter</artifactId>
</dependency>
<dependency>
<groupId>org.springframework.boot</groupId>
<artifactId>spring-boot-starter-web</artifactId>
</dependency>
<dependency>
<groupId>org.springframework.boot</groupId>
<artifactId>spring-boot-starter-test</artifactId>
<scope>test</scope>
</dependency>
<dependency>
<groupId>org.springframework.boot</groupId>
<artifactId>spring-boot-starter-thymeleaf</artifactId>
</dependency>
<dependency>
<groupId>org.springframework.boot</groupId>
<artifactId>spring-boot-starter-websocket</artifactId>
</dependency>
<dependency>
<groupId>com.alibaba</groupId>
<artifactId>fastjson</artifactId>
<version>1.2.46</version>
</dependency>
<dependency>
<groupId>org.springframework.boot</groupId>
<artifactId>spring-boot-starter-test</artifactId>
<scope>test</scope>
<exclusions>
<exclusion>
<groupId>org.junit.vintage</groupId>
<artifactId>junit-vintage-engine</artifactId>
</exclusion>
</exclusions>
</dependency>
</dependencies>
<build> <plugins>
<plugin>
<groupId>org.springframework.boot</groupId>
<artifactId>spring-boot-maven-plugin</artifactId>
</plugin>
</plugins>
</build>
(2)在application.properties中添加Web访问的配置文件如下:
#排除静态文件夹
spring.devtools.restart.exclude=static/**,public/**
#关闭 Thymeleaf 的缓存
spring.thymeleaf.cache = false
#设置thymeleaf页面的编码
spring.thymeleaf.encoding=UTF-8
spring.thymeleaf.mode=HTML5
#设置thymeleaf页面的后缀
spring.thymeleaf.suffix=.html
#设置thymeleaf页面的存储路径
spring.thymeleaf.prefix=classpath:/templates/
#文件上传的配置
spring.servlet.multipart.max-file-size=10MB
spring.servlet.multipart.max-request-size=10MB
(3)新建一个Web Socket配置文件:
package com.example.websocketdemo.config;
import org.springframework.context.annotation.Bean;
import org.springframework.context.annotation.Configuration;
import
org.springframework.web.socket.server.standard.ServerEndpointExporter;@Configuration
public class WebSocketConfig {
/**
* ServerEndpointExporter的作用
*
* 这个Bean会自动注册使用@ServerEndpoint注解声明的websocket endpoint
*
* @return
*/
@Bean
public ServerEndpointExporter serverEndpointExporter() {
return new ServerEndpointExporter();
}
}
(4)新建一个Web Socket服务类,建立Web Socket连接、消息处理和返回:
package com.example.websocketdemo.server;
import org.springframework.stereotype.Component;
import javax.websocket.*;
import javax.websocket.server.PathParam;
import javax.websocket.server.ServerEndpoint;
import java.io.IOException;
import java.util.concurrent.ConcurrentHashMap;
import java.util.concurrent.atomic.AtomicInteger;
@ServerEndpoint("/webSocket/{sid}")
@Component
public class WebSocketServer {
/**
* 静态变量,用来记录当前在线连接数。应当把它设计为线程安全的。
*/
private static AtomicInteger onlineNum = new AtomicInteger(); /**
* 存放每个客户端对应的Web SocketServer对象。
*/
private static ConcurrentHashMap<String,Session> sessionPools =
new ConcurrentHashMap<>();
/**
* 成功建立连接时调用
*/
@OnOpen
public void onOpen(Session session, @PathParam(value = "sid")
String userName) {
sessionPools.put(userName, session);
addOnlineCount();
System.out.println(userName + "连接上Web Socket,连接人数为:" +
onlineNum);
try {
sendMessage(session, "欢迎:" + userName + "加入连接!");
} catch (IOException e) {
e.printStackTrace();
}
}
/**
* 关闭连接时调用
*/
@OnClose
public void onClose(@PathParam(value = "sid") String userName) {
sessionPools.remove(userName);
subOnlineCount();
System.out.println(userName + ",已经断开webSocket连接");
}
/**
* 收到客户端信息
*/
@OnMessage
public void onMessage(String message) throws IOException {
message = "客户端:" + message + ",已收到请求"; System.out.println(message);
for (Session session : sessionPools.values()) {
try {
sendMessage(session, message);
} catch (Exception e) {
e.printStackTrace();
continue;
}
}
}
/**
* 错误时调用
*/
@OnError
public void onError(Session session, Throwable throwable) {
throwable.printStackTrace();
}
private static void addOnlineCount() {
onlineNum.incrementAndGet();
}
private static void subOnlineCount() {
onlineNum.decrementAndGet();
}
/**
* 发送消息
*/
private void sendMessage(Session session, String message) throws
IOException {
if (session != null) {
synchronized (session) {
session.getBasicRemote().sendText(message);
}
}
}
/**
* 给指定用户发送信息 */
private void sendInfo(String userName, String message) {
Session session = sessionPools.get(userName);
try {
sendMessage(session, message);
} catch (Exception e) {
e.printStackTrace();
}
}
}
(5)新建Web Socket的Web入口Controller:
package com.example.websocketdemo.controller;
import com.example.websocketdemo.server.WebSocketServer;
import org.springframework.beans.factory.annotation.Autowired;
import org.springframework.stereotype.Controller;
import org.springframework.web.bind.annotation.GetMapping;
import org.springframework.web.servlet.ModelAndView;
@Controller
public class SocketController {
@Autowired
private WebSocketServer webSocketServer;
@GetMapping("/webSocket")
public ModelAndView socket() {
ModelAndView modelAndView = new ModelAndView("/webSocket");
return modelAndView;
}
}
(6)新建一个Spring Boot启动类:
package com.example.websocketdemo;
import org.springframework.boot.SpringApplication;
import org.springframework.boot.autoconfigure.SpringBootApplication;
@SpringBootApplication
public class WebsocketDemoApplication {
public static void main(String[] args) {
SpringApplication.run(WebsocketDemoApplication.class, args);
}
}
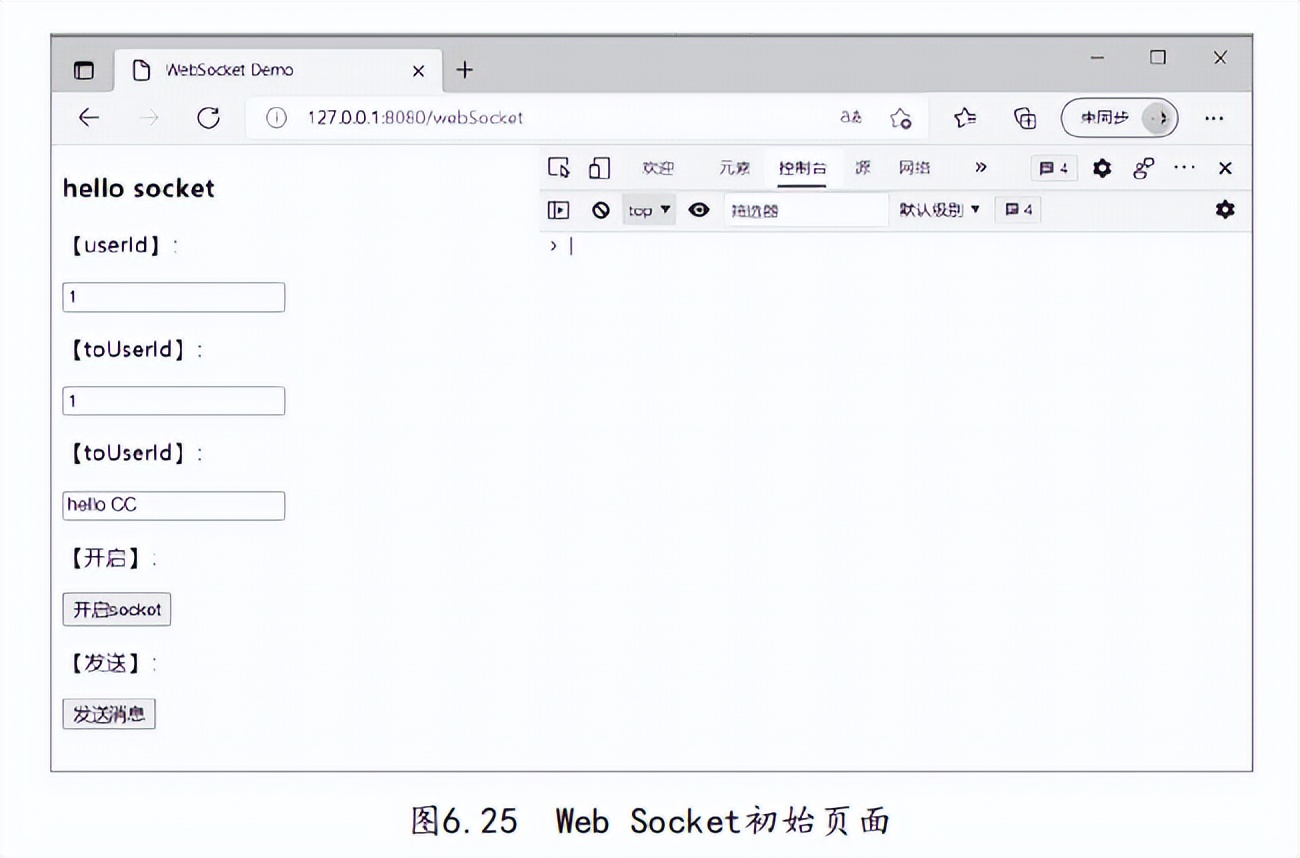
启动项目,在浏览器中访问
http://127.0.0.1:8080/webSocket,打开控制台,可以看到显示结果如图6.25所示。
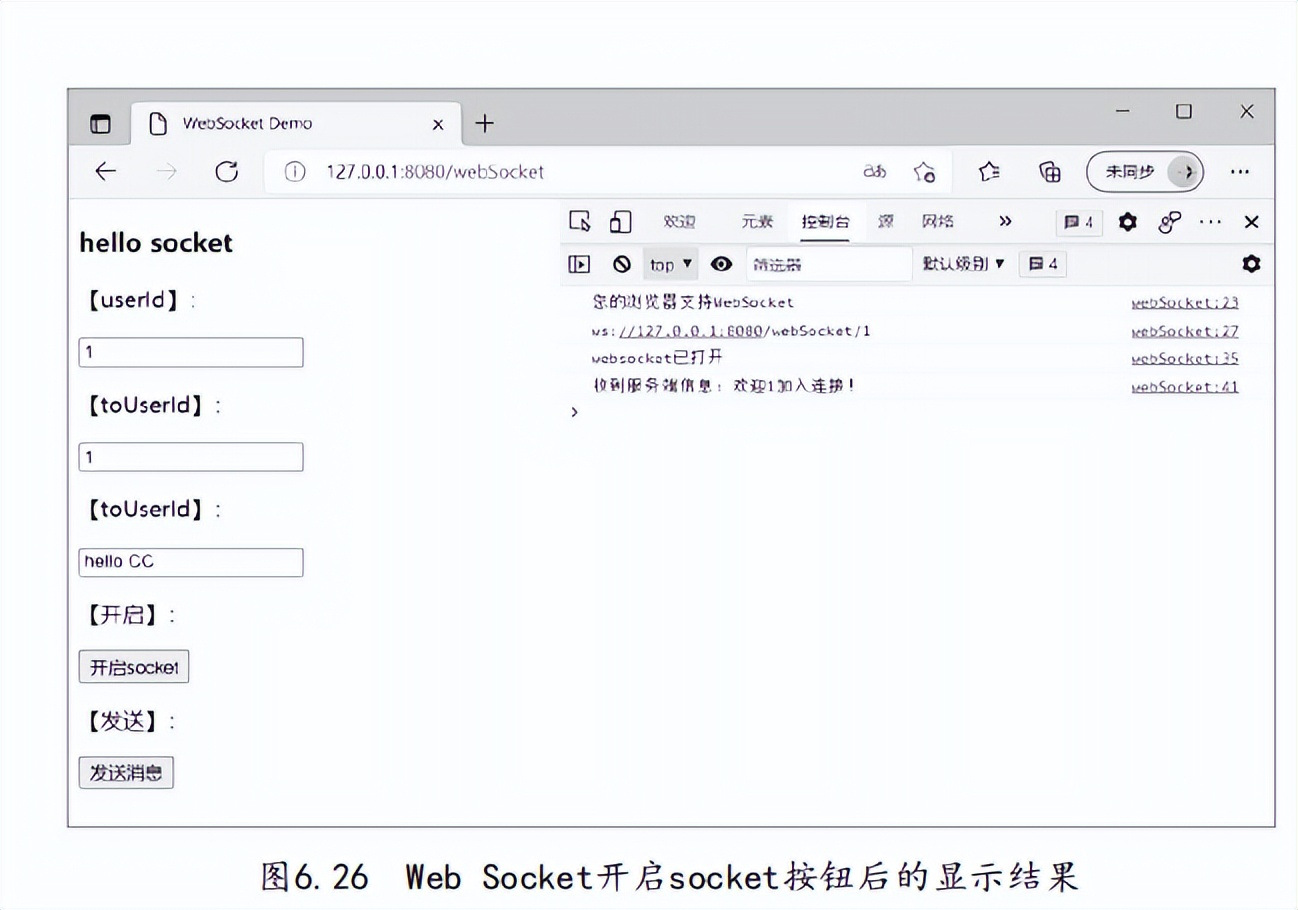
单击“开启socket”按钮,表明页面已经与服务器通过Web Socket建立了连接,打开浏览器的调试工具,如图6.26所示。
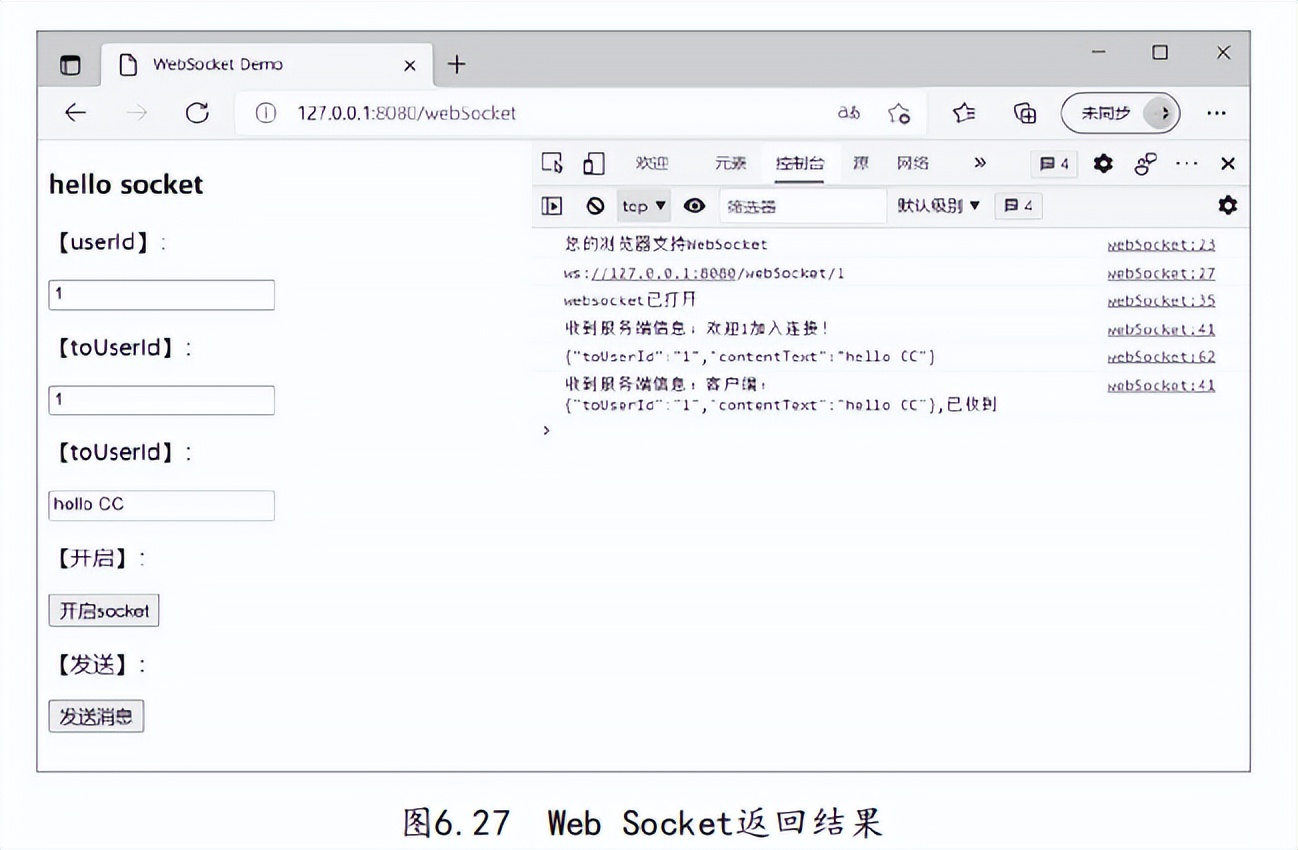
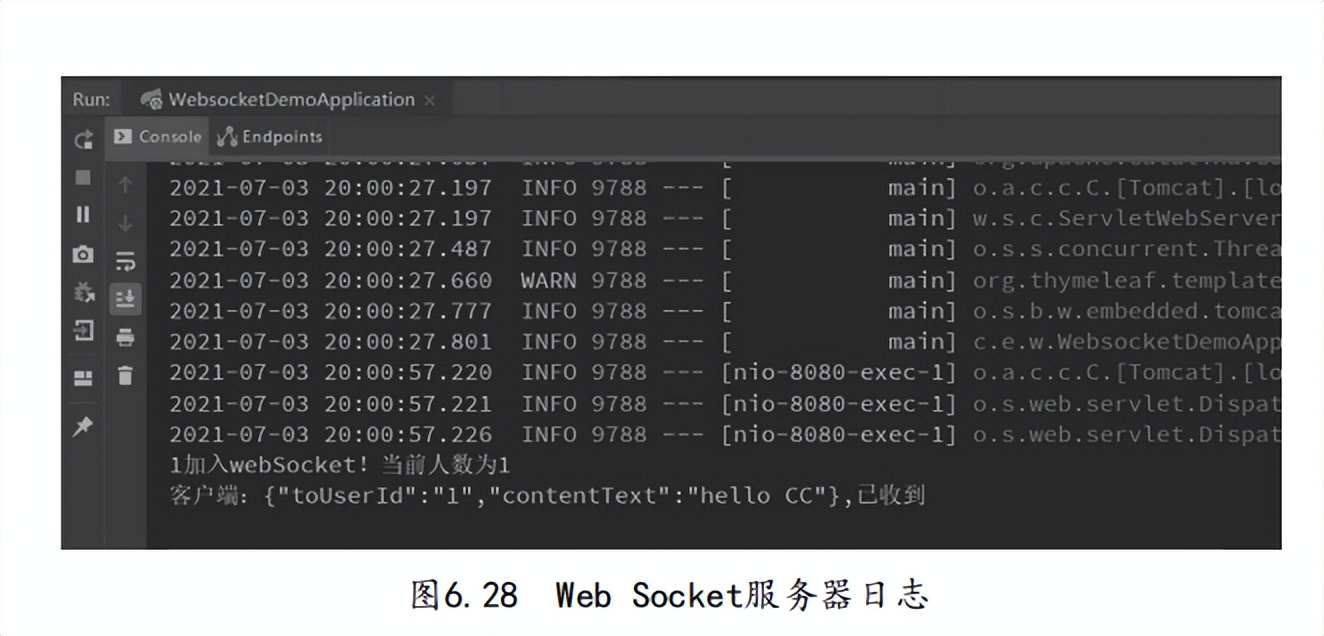
建立连接之后就可以在Web网页和服务器之间通信了。单击“发送消息”按钮,可以看到控制台上打印的消息日志,如图6.27所示。查看IDEA控制台可以看到,服务器已经收到消息并且把消息发送出去了,如图6.28所示。
至此即完成了Web Socket的通信。当浏览器和Web Socket服务端连接成功后,服务端会执行onOpen()方法;如果连接失败,发送、接收数据失败或者处理数据出现错误,则服务端会执行onError()方法;当浏览器接收到WebSocket服务端发送过来的数据时,会执行onMessage()方法。当前所有的操作都是采用异步回调的方式触发,可以获得更快的响应时间和更好的用户体验。


 260
260

 被折叠的 条评论
为什么被折叠?
被折叠的 条评论
为什么被折叠?
 到【灌水乐园】发言


