


文章目录
Java内置线程池-ExecutorService
方法
newCachedThreadPool
public static ExecutorService newCachedThreadPool() {}
- 每次执行任务的时候,如果之前的线程可用,则复用之前的线程,否则创建新线程
- 对线程的数量不做限制
- 线程默认空闲60s后会被销毁
public class Test1 {
public static void main(String[] args) {
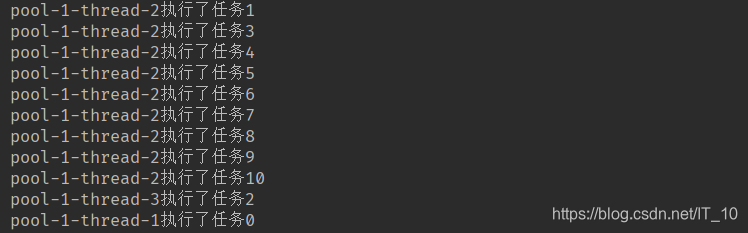
ExecutorService es = Executors.newCachedThreadPool();
for(int i = 0; i <= 20; i++) {
es.submit(new MyRunnable(i));
}
}
}
class MyRunnable implements Runnable {
private int id;
public MyRunnable(int id) {
this.id = id;
}
@Override
public void run() {
System.out.println(Thread.currentThread().getName() + "执行了任务" + id);
try {
Thread.sleep(1000);
} catch (InterruptedException e) {
e.printStackTrace();
}
}
}
public static ExecutorService newCachedThreadPool(ThreadFactory threadFactory) {}
- 支持自定义创建线程的类
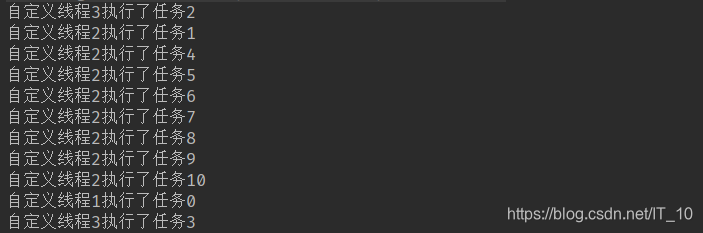
public class Test2 {
    public static void main(String[] args) {
        ExecutorService es = Executors.newCachedThreadPool(new ThreadFactory() {
            // 自定义线程工厂创建线程
            int n = 1;
            @Override
            public Thread newThread(Runnable r) {
                return new Thread(r, "自定义线程" + n++);
            }
        });
        for(int i = 0; i <= 10; i++) {
            es.submit(new MyRunnable2(i));
        }
    }
}

class MyRunnable2 implements Runnable {
    private int id;
    public MyRunnable2(int id) {
        this.id = id;
    }

    @Override
    public void run() {
        System.out.println(Thread.currentThread().getName() + "执行了任务" + id);
        try {
            Thread.sleep(1000);
        } catch (InterruptedException e) {
            e.printStackTrace();
        }
    }
}
newFixedThreadPool
public static ExecutorService newFixedThreadPool(int nThreads) {}
- 指定线程数量
public class Test3 {
    public static void main(String[] args) {
        ExecutorService es = Executors.newFixedThreadPool(3);
        for(int i = 0; i <= 10; i++) {
            es.submit(new MyRunnable3(i));
        }
    }
}

class MyRunnable3 implements Runnable {
    private int id;
    public MyRunnable3(int id) {
        this.id = id;
    }

    @Override
    public void run() {
        System.out.println(Thread.currentThread().getName() + "执行了任务" + id);
    }
}
public static ExecutorService newFixedThreadPool(int nThreads, ThreadFactory threadFactory) {}
- 支持自定义线程创建类
- 线程数固定
public class Test4 {
    public static void main(String[] args) {
        ExecutorService es = Executors.newFixedThreadPool(3, new ThreadFactory() {
            // 自定义线程工厂创建线程
            int n = 1;
            @Override
            public Thread newThread(Runnable r) {
                return new Thread(r, "自定义线程" + n++);
            }
        });
        for(int i = 0; i <= 10; i++) {
            es.submit(new MyRunnable4(i));
        }
    }
}

class MyRunnable4 implements Runnable {
    private int id;
    public MyRunnable4(int id) {
        this.id = id;
    }

    @Override
    public void run() {
        System.out.println(Thread.currentThread().getName() + "执行了任务" + id);
    }
}
newSingleThreadExecutor
public static ExecutorService newSingleThreadExecutor() {}
- 只有一个线程执行任务,以无界队列方式运行线程
public class Test5 {
    public static void main(String[] args) {
        ExecutorService es = Executors.newSingleThreadExecutor();
        for(int i = 0; i <= 10; i++) {
            es.submit(new MyRunnable5(i));
        }
    }
}

class MyRunnable5 implements Runnable {
    private int id;
    public MyRunnable5(int id) {
        this.id = id;
    }

    @Override
    public void run() {
        System.out.println(Thread.currentThread().getName() + "执行了任务" + id);
    }
}
public static ExecutorService newSingleThreadExecutor(ThreadFactory threadFactory) {}
- 支持自定义线程创建类
Java内置线程池-ScheduledExecutorService
ScheduledExecutorService是ExecutorService的子接口,具备了延迟运行或者定期执行任务的能力
ScheduledExecutorService提供的方法
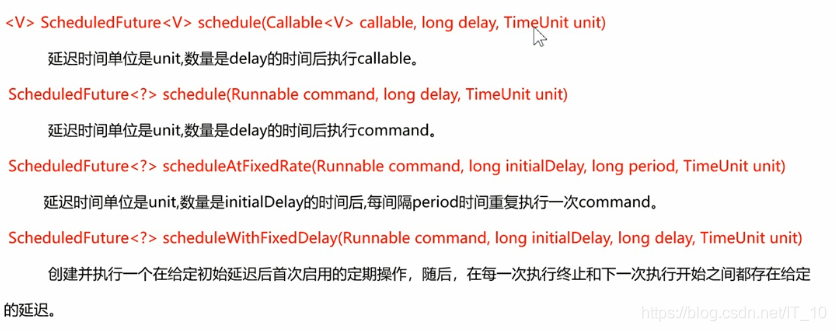
说明:第三个和第四个方法不同点在于第三个方法中,时间间隔是从上一次任务启动开始计时,每个时间间隔是固定的。而第四个方法是从上次任务执行完了,才计时间隔时间,所以两个任务开始的时间间隔不固定。
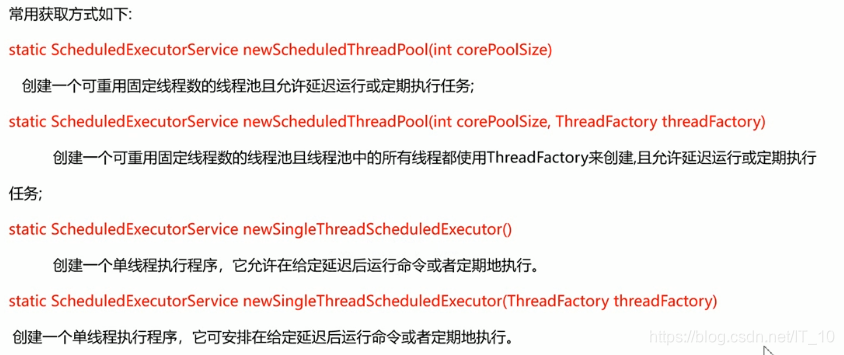
获取ScheduledExecutorService的方法
例子
public class Test1 {
public static void main(String[] args) {
ScheduledExecutorService ses = Executors.newScheduledThreadPool(3);
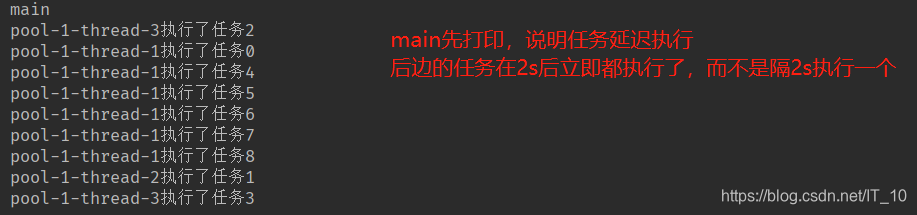
// 延迟2s执行任务
// 注意这里是延迟2s后开始执行所有任务,而不是每个任务都延迟2s后执行
for(int i = 0; i < 9; i++) {
ses.schedule(new MyRunnable1(i), 2, TimeUnit.SECONDS);
}
System.out.println("main");
}
}
class MyRunnable1 implements Runnable {
private int id;
public MyRunnable1(int id) {
this.id = id;
}
@Override
public void run() {
System.out.println(Thread.currentThread().getName() + "执行了任务" + id);
}
}
public class Test2 {
public static void main(String[] args) {
ScheduledExecutorService ses = Executors.newScheduledThreadPool(3, new ThreadFactory() {
int n = 0;
@Override
public Thread newThread(Runnable r) {
return new Thread(r, "自定义线程" + n++);
}
});
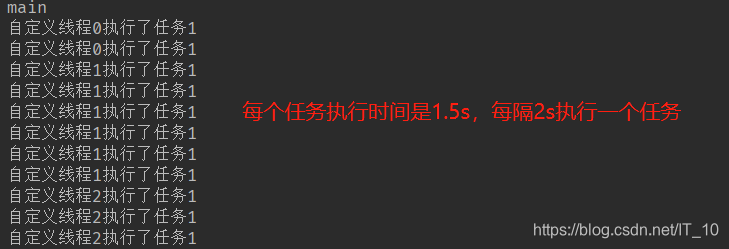
// 1s后,每隔2s执行一次任务
ses.scheduleAtFixedRate(new MyRunnable2(1), 1, 2, TimeUnit.SECONDS);
System.out.println("main");
}
}
class MyRunnable2 implements Runnable {
private int id;
public MyRunnable2(int id) {
this.id = id;
}
@Override
public void run() {
System.out.println(Thread.currentThread().getName() + "执行了任务" + id);
try {
Thread.sleep(1500);
} catch (InterruptedException e) {
e.printStackTrace();
}
}
}
Java内置线程池-异步计算结果Future
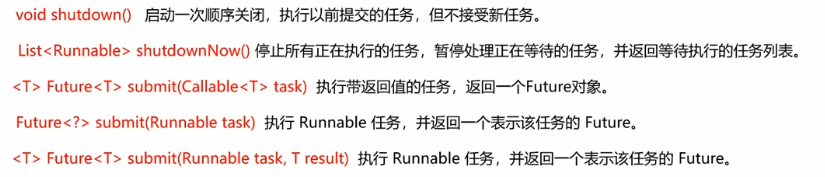
有些场景中,我们需要利用线程进行一些计算,然后获取计算结果,Future接口就是专门用于描述异步计算结果的,我们可以通过Future对象获取线程计算的结果。Future常用方法如下;
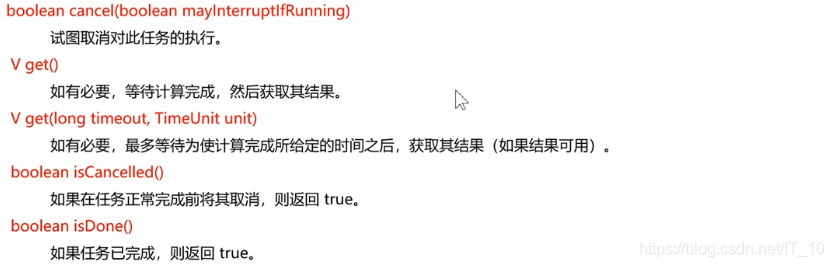
- boolean cancel(boolean mayInterruptIfRunning)
取消任务的执行,如果成功取消,则返回true,如果取消失败(如任务已经执行完了), 则返回false。参数为true,表示如果当前任务正在执行,则中断任务,false则不中断任务。
例子
public class Test1 {
    public static void main(String[] args) throws ExecutionException, InterruptedException, TimeoutException {
        ExecutorService es = Executors.newCachedThreadPool();
        Future<Integer> res = es.submit(new MyCallable(1, 2));

        System.out.println("任务是否已经完成" + res.isDone());
        System.out.println("任务是否已经取消" + res.isCancelled());
        // 一直等到任务执行完成为止
        //System.out.println("任务执行结果是" + res.get());
        // 只等待1s,如果1s任务还没完成,就抛出TimeoutException
        System.out.println("任务执行结果是" + res.get(1, TimeUnit.SECONDS));
        System.out.println("任务是否已经完成" + res.isDone());
    }
}

class MyCallable implements Callable<Integer> {
    private int a;
    private int b;

    public MyCallable(int a, int b) {
        this.a = a;
        this.b = b;
    }

    @Override
    public Integer call() {
        String name = Thread.currentThread().getName();
        System.out.println(name + "准备开始计算");
        try {
            Thread.sleep(2000);
        } catch (InterruptedException e) {
            e.printStackTrace();
        }
        System.out.println(name + "计算完成");
        return a + b;
    }
}

案例1
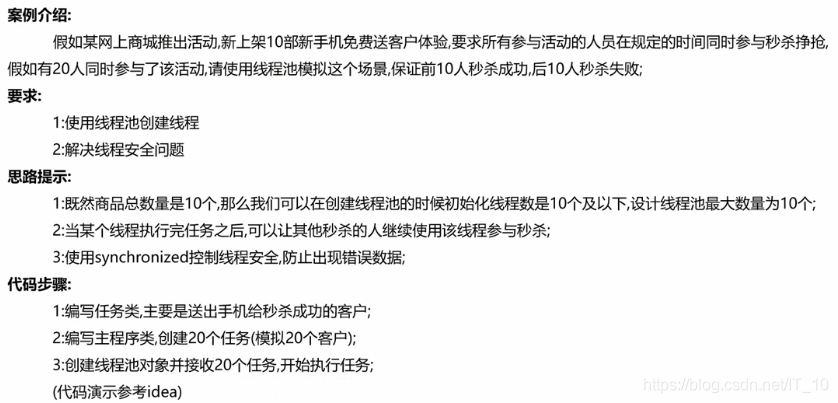
// 任务类:包含商品数量、客户名、送手机的行为
public class MyTask implements Runnable{

    // 商品数量
    private static int id = 10;
    // 用户名
    private String userName;

    public MyTask(String userName) {
        this.userName = userName;
    }

    @Override
    public void run() {
        String name = Thread.currentThread().getName();
        System.out.println(userName + "正在使用" + name + "参与秒杀");
        try {
            Thread.sleep(200);
        } catch (InterruptedException e) {
            e.printStackTrace();
        }
        synchronized (MyTask.class) {
            if(id > 0) {
                System.out.println(userName + "秒杀商品" + id-- + "成功");
            }else{
                System.out.println(userName + "秒杀商品" + id-- + "失败");
            }
        }
    }
}
public class MyTest {
    public static void main(String[] args) {
        ThreadPoolExecutor pool = new ThreadPoolExecutor(3, 5, 1, TimeUnit.SECONDS, new LinkedBlockingDeque<>(15));
        for(int i = 1; i <= 20; i++) {
            pool.submit(new MyTask("客户" + i));
        }
        pool.shutdown();
    }
}
案例2
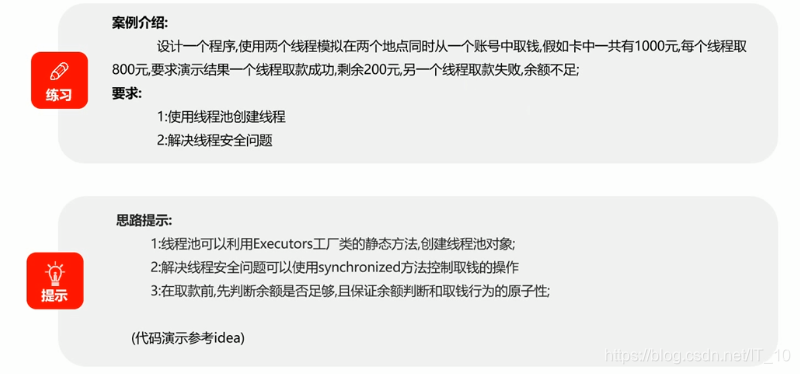
public class MyTask implements Runnable{

    // 用户名
    private String username;
    // 取款金额
    private double money;

    // 总金额
    private static double total = 1000d;


    public MyTask(String username, double money) {
        this.username = username;
        this.money = money;
    }

    @Override
    public void run() {
        String name = Thread.currentThread().getName();
        System.out.println(username + "准备使用线程" + name + "取款" + money + "元");
        try {
            Thread.sleep(200);
        } catch (InterruptedException e) {
            e.printStackTrace();
        }
        synchronized (MyTask.class) {
            if(total - money > 0) {
                System.out.println(username + "取款" + money + "元成功");
            }else{
                System.out.println(username + "取款" + money + "元失败");
            }
            total -= money;
        }
    }
}
public class MyTest {
    public static void main(String[] args) {
        ExecutorService pool = Executors.newFixedThreadPool(2, new ThreadFactory() {
            int id = 1;

            @Override
            public Thread newThread(Runnable r) {
                return new Thread(r, "ATM" + id++);
            }
        });

        for(int i = 1; i <= 2; i++) {
            pool.submit(new MyTask("客户" + i, 800));
        }
        pool.shutdown();
    }
}


 1585
1585

 被折叠的 条评论
为什么被折叠?
被折叠的 条评论
为什么被折叠?
 到【灌水乐园】发言


