


CGContextAddArc(CGContextRef c, CGFloat x, CGFloat y, // 圆心(x,y) CGFloat radius, // 半径 CGFloat startAngle, CGFloat endAngle, // 开始、结束弧度 int clockwise // 绘制方向,0:顺时针; 1:逆时针)
中心点右侧: 弧度为 0中心点下方: 弧度为 M_PI_2
中心点左侧: 弧度为 M_PI
中心点上方: 弧度为 -M_PI_2
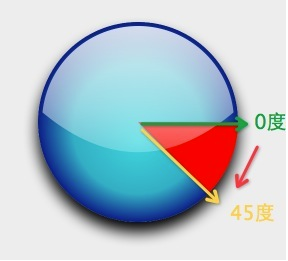
clockwise == 0时
- startAngle为0,绿色箭头的地方。endAngle为M_PI_4,黄色箭头的地方。
- clockwise为0,按照红色箭头往下绘制图形。所以效果就是红色的扇形。
如果clockwise为1,则是蓝色部分区域。
作者:Jackson_Z
链接:https://www.jianshu.com/p/a6e93291cc4c
CGContextAddArcToPoint:
- CGContextRef context=UIGraphicsGetCurrentContext();
- CGContextSetRGBStrokeColor(context,1,0,0,1);
- CGContextMoveToPoint(context,150,50);
- CGContextAddLineToPoint(context,100,80);
- CGContextAddLineToPoint(context,130,150);
- CGContextMoveToPoint(context,150,50);//圆弧的起始点
- CGContextAddArcToPoint(context,100,80,130,150,50);
- CGContextStrokePath(context);
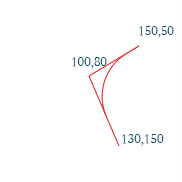
CGContextMoveToPoint(context,150,50);//圆弧的起始点
CGContextAddArcToPoint(context,100,80,130,150,50);
是说从(150,50)到(100,80)画一条线,然后再从(100,80)到(130,150)画一条线,从这两条线(无限延伸的) 和半径50可以确定一条弧,
转自:https://www.cnblogs.com/xitang/p/3929180.html


 3341
3341

 被折叠的 条评论
为什么被折叠?
被折叠的 条评论
为什么被折叠?
 到【灌水乐园】发言


