


编写:HorinJsor
前言
本文介绍基础的SpringBoot框架搭建
提示:以下是本篇文章正文内容,下面案例可供参考
一、使用步骤
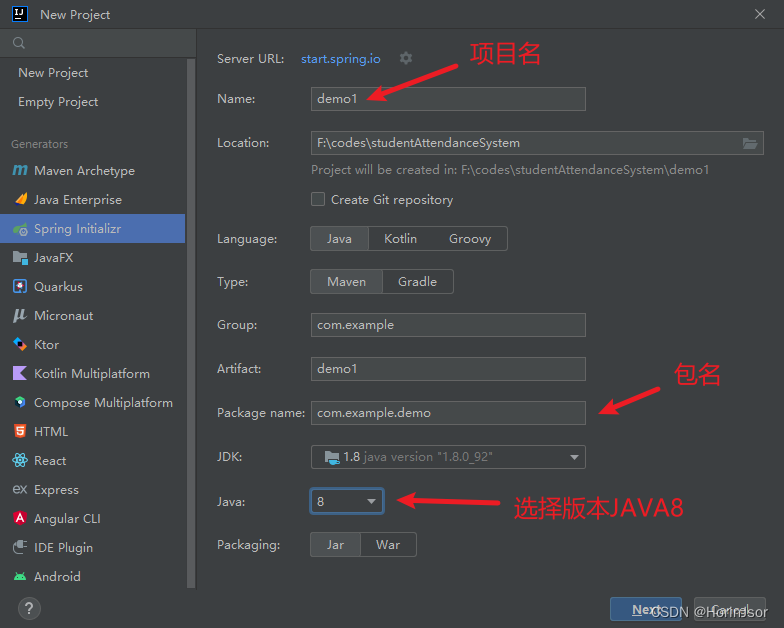
1.新建项目(Spring Initializr方式)
在新建项目中选中如图所示内容:
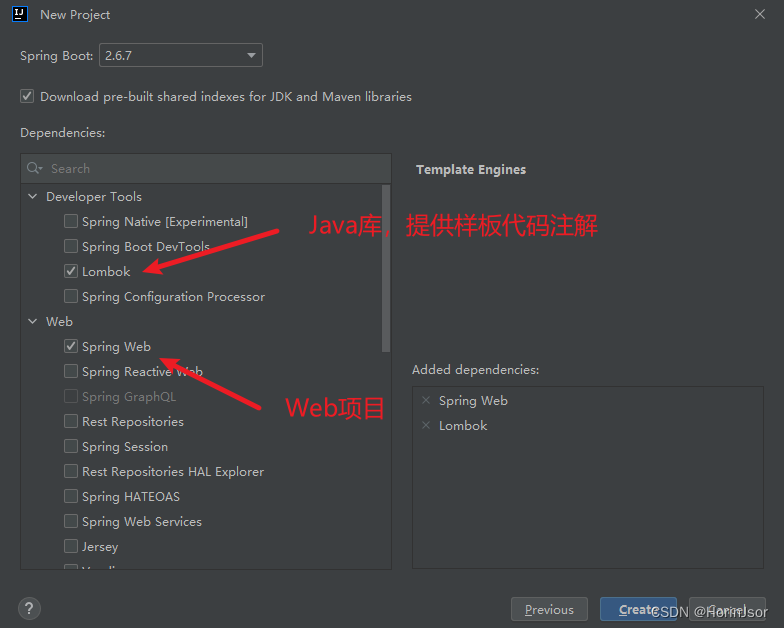
2.选择依赖
根据实际要求选择。
3.完善依赖文件
图一中,若截图中报红,添加上方项目版本即可解决问题。

完整pom文件:
<?xml version="1.0" encoding="UTF-8"?>
<project xmlns="http://maven.apache.org/POM/4.0.0" xmlns:xsi="http://www.w3.org/2001/XMLSchema-instance"
         xsi:schemaLocation="http://maven.apache.org/POM/4.0.0 https://maven.apache.org/xsd/maven-4.0.0.xsd">
    <modelVersion>4.0.0</modelVersion>
    <parent>
        <groupId>org.springframework.boot</groupId>
        <artifactId>spring-boot-starter-parent</artifactId>
        <version>2.6.7</version>
        <relativePath/> <!-- lookup parent from repository -->
    </parent>
    <groupId>com.example</groupId>
    <artifactId>TheToken</artifactId>
    <version>0.0.1-SNAPSHOT</version>
    <name>TheToken</name>
    <description>TheToken</description>
    <properties>
        <java.version>1.8</java.version>
    </properties>
    <dependencies>
        <dependency>
            <groupId>org.springframework.boot</groupId>
            <artifactId>spring-boot-starter-web</artifactId>
        </dependency>

        <dependency>
            <groupId>org.projectlombok</groupId>
            <artifactId>lombok</artifactId>
            <optional>true</optional>
        </dependency>
        <!--      Spring boot 热部署 导入一个依赖即可-->
        <dependency>
            <groupId>org.springframework.boot</groupId>
            <artifactId>spring-boot-devtools</artifactId>
        </dependency>
        <dependency>
            <groupId>org.springframework.boot</groupId>
            <artifactId>spring-boot-starter-test</artifactId>
            <scope>test</scope>
        </dependency>
        <!-- mybatis-->
        <dependency>
            <groupId>org.mybatis.spring.boot</groupId>
            <artifactId>mybatis-spring-boot-starter</artifactId>
            <version>2.2.0</version>
        </dependency>
        <dependency>
            <groupId>org.springframework.boot</groupId>
            <artifactId>spring-boot-starter-jdbc</artifactId>
        </dependency>
        <!-- mysql -->
        <dependency>
            <groupId>mysql</groupId>
            <artifactId>mysql-connector-java</artifactId>
            <scope>runtime</scope>
        </dependency>
    </dependencies>

    <build>
        <plugins>
            <plugin>
                <groupId>org.springframework.boot</groupId>
                <artifactId>spring-boot-maven-plugin</artifactId>
                <version>2.6.7</version>
                <configuration>
                    <excludes>
                        <exclude>
                            <groupId>org.projectlombok</groupId>
                            <artifactId>lombok</artifactId>
                        </exclude>
                    </excludes>
                </configuration>
            </plugin>
        </plugins>
    </build>

</project>
4.配置文件application.yaml
图一中,若截图中报红,添加上方项目版本即可解决问题。
mybatis:
  mapper-locations: classpath:mapper/*.xml
  type-aliases-package: com.domain
spring:
  datasource:
    url: jdbc:mysql://localhost:3306/数据库名
    username: 数据库账号
    password: "数据库密码"
    driver-class-name: com.mysql.cj.jdbc.Driver

server:
  port: 9092
  servlet:
    context-path: /路径名
总结
最后自行写上Controller测试,就可以开始使用了!


 被折叠的 条评论
为什么被折叠?
被折叠的 条评论
为什么被折叠?
 到【灌水乐园】发言


