


基本概念
窗口沉浸式能力:指对状态栏、导航栏等系统窗口进行控制,减少状态栏导航栏等系统界面的突兀感,从而使用户获得最佳体验的能力。
沉浸式能力只在应用主窗口作为全屏窗口时生效。通常情况下,应用子窗口(弹窗、悬浮窗口等辅助窗口)和处于自由窗口下的应用主窗口无法使用沉浸式能力。
说明
当前沉浸式界面开发仅支持window级别的配置,暂不支持Page级别的配置。若有Page级别切换的需要,可以在页面生命周期开始,例如onPageShow中设置沉浸模式,然后在页面退出,例如onPageHide中恢复默认设置来实现。
场景介绍
在FA模型下,管理应用窗口的典型场景有:
-
设置应用子窗口属性及目标页面
-
体验窗口沉浸式能力
以下分别介绍具体开发方式。
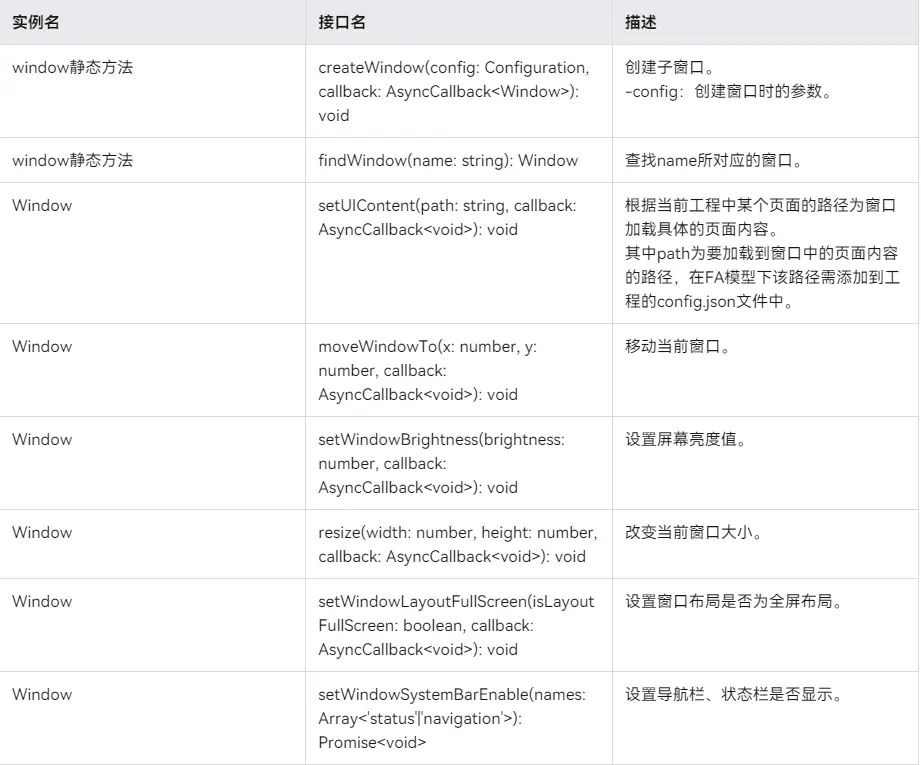
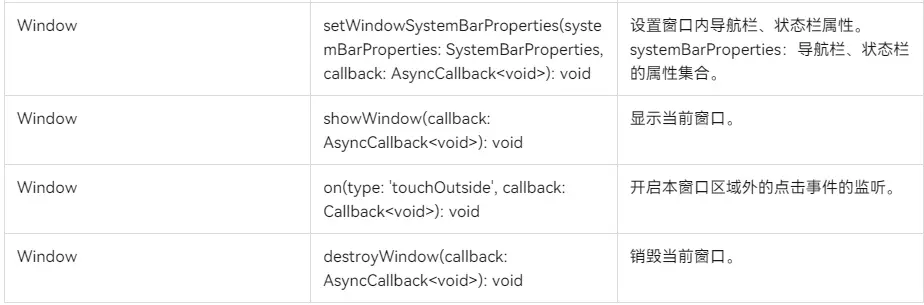
接口说明
上述场景涉及的常用接口如下表所示。更多API说明请参见API参考。
开发步骤
-
创建/获取子窗口对象。
- 可以通过window.createWindow接口创建子窗口。
- 也可以通过window.findWindow接口来查找已经创建的窗口从而得到子窗口。
 import { window } from '@kit.ArkUI';
import { BusinessError } from '@kit.BasicServicesKit';

let windowClass: window.Window | null = null;
// 方式一:创建子窗口。
let config: window.Configuration = { name: "subWindow", windowType: window.WindowType.TYPE_APP };
window.createWindow(config, (err: BusinessError, data) => {
  let errCode: number = err.code;
  if (errCode) {
    console.error('Failed to create the subWindow. Cause: ' + JSON.stringify(err));
    return;
  }
  console.info('Succeeded in creating subWindow. Data: ' + JSON.stringify(data));
  windowClass = data;
});
// 方式二:查找得到子窗口。
try {
  windowClass = window.findWindow('subWindow');
} catch (exception) {
  console.error('Failed to find the Window. Cause: ' + JSON.stringify(exception));
}
-
设置子窗口属性。
子窗口创建成功后,可以改变其大小、位置等,还可以根据应用需要设置窗口背景色、亮度等属性。
// 移动子窗口位置。
let windowClass: window.Window = window.findWindow("test");
windowClass.moveWindowTo(300, 300, (err: BusinessError) => {
  let errCode: number = err.code;
  if (errCode) {
    console.error('Failed to move the window. Cause:' + JSON.stringify(err));
    return;
  }
  console.info('Succeeded in moving the window.');
});
// 改变子窗口大小。
windowClass.resize(500, 500, (err: BusinessError) => {
  let errCode: number = err.code;
  if (errCode) {
    console.error('Failed to change the window size. Cause:' + JSON.stringify(err));
    return;
  }
  console.info('Succeeded in changing the window size.');
});
-
加载显示子窗口的具体内容。
使用setUIContent和showWindow接口加载显示子窗口的具体内容。
// 移动子窗口位置。
let windowClass: window.Window = window.findWindow("test");
windowClass.moveWindowTo(300, 300, (err: BusinessError) => {
  let errCode: number = err.code;
  if (errCode) {
    console.error('Failed to move the window. Cause:' + JSON.stringify(err));
    return;
  }
  console.info('Succeeded in moving the window.');
});
// 改变子窗口大小。
windowClass.resize(500, 500, (err: BusinessError) => {
  let errCode: number = err.code;
  if (errCode) {
    console.error('Failed to change the window size. Cause:' + JSON.stringify(err));
    return;
  }
  console.info('Succeeded in changing the window size.');
});
-
销毁子窗口。
当不再需要某些子窗口时,可根据场景的具体实现逻辑,使用destroyWindow接口销毁子窗口。
// 销毁子窗口。当不再需要某些子窗口时,可根据场景的具体实现逻辑,使用destroy接口销毁子窗口。
let windowClass: window.Window = window.findWindow("test");
windowClass.destroyWindow((err: BusinessError) => {
  let errCode: number = err.code;
  if (errCode) {
    console.error('Failed to destroy the subwindow. Cause:' + JSON.stringify(err));
    return;
  }
  console.info('Succeeded in destroying the subwindow.');
});
体验窗口沉浸式能力
在看视频、玩游戏等场景下,用户往往希望隐藏状态栏、导航栏等不必要的系统窗口,从而获得更佳的沉浸式体验。此时可以借助窗口沉浸式能力(窗口沉浸式能力都是针对应用主窗口而言的),达到预期效果。从API version 10开始,沉浸式窗口默认配置为全屏大小并由组件模块控制布局,状态栏、导航栏背景颜色为透明,文字颜色为黑色;应用窗口调用setWindowLayoutFullScreen接口,设置为true表示由组件模块控制忽略状态栏、导航栏的沉浸式全屏布局,设置为false表示由组件模块控制避让状态栏、导航栏的非沉浸式全屏布局。
开发步骤
-
获取主窗口对象。
说明
沉浸式能力需要在成功获取应用主窗口对象的前提下进行。
确保应用内最后显示的窗口为主窗口,然后再使用window.getLastWindow接口来获取得到主窗口。
import { window } from '@kit.ArkUI';
import { BusinessError } from '@kit.BasicServicesKit';

let mainWindowClass: window.Window | null = null;

// 获取主窗口。
class BaseContext {
  stageMode: boolean = false;
}

let context: BaseContext = { stageMode: false };
window.getLastWindow(context, (err: BusinessError, data) => {
  let errCode: number = err.code;
  if (errCode) {
    console.error('Failed to get the subWindow. Cause: ' + JSON.stringify(err));
    return;
  }
  console.info('Succeeded in getting subWindow. Data: ' + JSON.stringify(data));
  mainWindowClass = data;
});
-
实现沉浸式效果。有以下两种方式:
- 方式一:应用主窗口为全屏窗口时,调用setWindowSystemBarEnable接口,设置导航栏、状态栏不显示,从而达到沉浸式效果。
- 方式二:调用setWindowLayoutFullScreen接口,设置应用主窗口为全屏布局;然后调用setWindowSystemBarProperties接口,设置导航栏、状态栏的透明度、背景/文字颜色以及高亮图标等属性,使之保持与主窗口显示协调一致,从而达到沉浸式效果。
// 实现沉浸式效果。方式一:设置导航栏、状态栏不显示。
let names: Array<'status' | 'navigation'> = [];
let mainWindowClass: window.Window = window.findWindow("test");
mainWindowClass.setWindowSystemBarEnable(names, (err: BusinessError) => {
  let errCode: number = err.code;
  if (errCode) {
    console.error('Failed to set the system bar to be visible. Cause:' + JSON.stringify(err));
    return;
  }
  console.info('Succeeded in setting the system bar to be visible.');
});
// 实现沉浸式效果。
// 方式二:设置窗口为全屏布局,配合设置状态栏、导航栏的透明度、背景/文字颜色及高亮图标等属性,与主窗口显示保持协调一致。
let isLayoutFullScreen: boolean = true;
mainWindowClass.setWindowLayoutFullScreen(isLayoutFullScreen, (err: BusinessError) => {
  let errCode: number = err.code;
  if (errCode) {
    console.error('Failed to set the window layout to full-screen mode. Cause:' + JSON.stringify(err));
    return;
  }
  console.info('Succeeded in setting the window layout to full-screen mode.');
});
let sysBarProps: window.SystemBarProperties = {
  statusBarColor: '#ff00ff',
  navigationBarColor: '#00ff00',
  // 以下两个属性从API Version8开始支持。
  statusBarContentColor: '#ffffff',
  navigationBarContentColor: '#ffffff'
};
mainWindowClass.setWindowSystemBarProperties(sysBarProps, (err: BusinessError) => {
  let errCode: number = err.code;
  if (errCode) {
    console.error('Failed to set the system bar properties. Cause: ' + JSON.stringify(err));
    return;
  }
  console.info('Succeeded in setting the system bar properties.');
});
-
加载显示沉浸式窗口的具体内容。
使用setUIContent和showWindow接口加载显示沉浸式窗口的具体内容。
// 为沉浸式窗口加载对应的目标页面。
let mainWindowClass: window.Window = window.findWindow("test");
mainWindowClass.setUIContent("pages/page3", (err: BusinessError) => {
  let errCode: number = err.code;
  if (errCode) {
    console.error('Failed to load the content. Cause: ' + JSON.stringify(err));
    return;
  }
  console.info('Succeeded in loading the content.');
  // 显示沉浸式窗口。
  mainWindowClass.showWindow((err: BusinessError) => {
    let errCode: number = err.code;
    if (errCode) {
      console.error('Failed to show the window. Cause: ' + JSON.stringify(err));
      return;
    }
    console.info('Succeeded in showing the window.');
  });
});
写在最后
有很多小伙伴不知道学习哪些鸿蒙开发技术?不知道需要重点掌握哪些鸿蒙应用开发知识点?而且学习时频繁踩坑,最终浪费大量时间。所以有一份实用的鸿蒙(HarmonyOS NEXT)文档用来跟着学习是非常有必要的。
希望这一份鸿蒙学习文档能够给大家带来帮助,有需要的小伙伴自行领取,限时开源,先到先得~无套路领取!!
如果你是一名有经验的资深Android移动开发、Java开发、前端开发、对鸿蒙感兴趣以及转行人员,可以直接领取这份资料
鸿蒙(HarmonyOS NEXT)5.0最新学习路线

路线图适合人群:
IT开发人员:想要拓展职业边界
零基础小白:鸿蒙爱好者,希望从0到1学习,增加一项技能。
技术提升/进阶跳槽:发展瓶颈期,提升职场竞争力,快速掌握鸿蒙技术
获取以上完整版高清学习路线,请点击→纯血版全套鸿蒙HarmonyOS学习文档
《鸿蒙 (HarmonyOS)开发入门教学视频》

《鸿蒙生态应用开发V3.0白皮书》

《鸿蒙 (OpenHarmony)开发基础到实战手册》
OpenHarmony北向、南向开发环境搭建

《鸿蒙开发基础》
●ArkTS语言
●安装DevEco Studio
●运用你的第一个ArkTS应用
●ArkUI声明式UI开发
.……

《鸿蒙开发进阶》
●Stage模型入门
●网络管理
●数据管理
●电话服务
●分布式应用开发
●通知与窗口管理
●多媒体技术
●安全技能
●任务管理
●WebGL
●国际化开发
●应用测试
●DFX面向未来设计
●鸿蒙系统移植和裁剪定制
……

《鸿蒙进阶实战》
●ArkTS实践
●UIAbility应用
●网络案例
……

获取以上完整鸿蒙HarmonyOS学习文档,请点击→纯血版全套鸿蒙HarmonyOS学习文档


 1万+
1万+

 被折叠的 条评论
为什么被折叠?
被折叠的 条评论
为什么被折叠?
 到【灌水乐园】发言


