


 本文介绍了如何使用IDEA创建第一个Spring Boot程序,涉及Spring Boot介绍、项目创建、文件结构、pom依赖解析,以及从数据库准备、实体类、DAO层、业务逻辑层到控制层的编写过程。通过实例演示了Spring Boot集成MyBatis和MySQL,使用Druid数据源,以及Spring Boot的Web和测试支持。
IDEA创建第一个spring boot程序——用户注册
spring boot介绍
Spring Boot makes it easy to create stand-alone, production-grade Spring based Applications that you can “just run”.
We take an opinionated view of the Spring platform and third-party libraries so you can get started with minimum fuss. Most Spring Boot applications need very little Spring configuration.
从spring boot的官网中的介绍情况可以了解到,spring boot可以很容易地创建自主的、企业级的应用程序,并且spring boot添加了很多第三方库,这样简化了我们初始化构建和配置spring的工作。
创建项目
打开IDEA,创建工程 ;


接着就选择好路径及文件名就可以了,搭建非常快速,而且由maven自动添加jar包,省去很多事情。
说到maven,有些同学可能对它又爱又恨,爱是因为它确实方便了我们手动添加jar包的过程,恨的是从远方仓库下载jar包非常缓慢。我介绍两种方法给大家:
- 使用VPN的情况下下载jar包(废话)
- 在maven配置中添加阿里云镜像,这样速度会很可观
只需要在maven安装地址的conf文件夹下的setting.xml添加几行代码就行。
		// 阿里云的maven镜像
		<mirrors>
		    <mirror>
		      <id>alimaven</id>
		      <name>aliyun maven</name>
		      <url>http://maven.aliyun.com/nexus/content/groups/public/</url>
		      <mirrorOf>central</mirrorOf>
		    </mirror>
		  </mirrors>
接着,所有jar包都准备好了,就可以着手编写程序。
文件结构及pom依赖介绍
文件目录结构

刚搭建好的spring boot项目就是如此清新简洁,最大的特色是有一个Application类,它是程序的入口。
还记的我们前面创建项目时,点了web、MySQL、mybatis吗?选择了它们,框架就会自动帮我们准备好这些的jar包。
spring-boot-starter-web
		<dependency>
			<groupId>org.springframework.boot</groupId>
			<artifactId>spring-boot-starter-web</artifactId>
		</dependency>
Starter for building web, including RESTful, applications using Spring MVC. Uses Tomcat as the default embedded container
也就是说,这个jar包的功能是使用Spring MVC构建Web(包括RESTful)应用程序,并且默认使用内嵌的Tomcat服务器作为容器。
内嵌的tomcat服务器的端口号可以通过 application.properties文件 进行修改
server.port=8081
当然,如果你不喜欢用tomcat,而是想要用jetty作为容器,也可以选择 spring-boot-starter-jetty 包。
		<dependency>
            <groupId>org.springframework.boot</groupId>
            <artifactId>spring-boot-starter-web</artifactId>
            <exclusions>
                <exclusion>
                    <groupId>org.springframework.boot</groupId>
                    <artifactId>spring-boot-starter-tomcat</artifactId>
                </exclusion>
            </exclusions>
        </dependency>

        <dependency>
            <groupId>org.springframework.boot</groupId>
            <artifactId>spring-boot-starter-jetty</artifactId>
        </dependency>
spring-boot-starter-test
Starter for testing Spring Boot applications with libraries including JUnit, Hamcrest and Mockito
可以使用 JUnit、Hamcrest、Mockito 等库测试spring boot应用程序。
编写测试类时,我们在测试类头部添加 @RunWith(SpringRunner.class)、@SpringBootTest 注释,再在测试方法上添加 @Test 。
@RunWith() 可以看作是是一个运行器,而SpringRunner是SpringJUnit4ClassRunner的别名,我们可以通过注释@RunWith(SpringRunner.class)来实现JUnit测试。
@RunWith(SpringRunner.class)
@SpringBootTest
public class helloWordTest {
    @Test
    public void helloWorld() {
        System.out.println("hello world");
    }
}
mybatis-spring-boot-starter
        <dependency>
            <groupId>org.mybatis.spring.boot</groupId>
            <artifactId>mybatis-spring-boot-starter</artifactId>
            <version>2.0.0</version>
        </dependency>
MyBatis Spring-Boot-Starter will help you use MyBatis with Spring Boot
就是mybatis和spring的整合包,添加了这个包后需要在 appliaction.properties 配置一下。
spring.datasource.driver-class-name=com.mysql.cj.jdbc.Driver
spring.datasource.url=jdbc:mysql://localhost:3306/springbootdemo?serverTimezone=GMT%2B8
spring.datasource.username=root
spring.datasource.password=root
这里说明一下,因为我的MySQL是 8.x 版本的,所以driver按照规定需要换成 com.mysql.cj.jdbc.Driver ,并且url还需要添加 serverTimezone 属性。
有些同学配置完 spring.datasource.driver-class-name 后发现IDEA报错,没关系,这是因为添加的 mysql-connector-java 包的范围是 runtime ,所以虽然看着红红的,但是运行时是没有问题的。如果你有强迫症,也有办法解决,只需要把runtime注释掉就可以了。
		<dependency>
            <groupId>mysql</groupId>
            <artifactId>mysql-connector-java</artifactId>
            <!--<scope>runtime</scope>-->
        </dependency>
mysql-connector-java
		<dependency>
            <groupId>mysql</groupId>
            <artifactId>mysql-connector-java</artifactId>
        </dependency>
JDBC Type 4 driver for MySQL
这个包是MySQL的jdbc驱动包
druid
最后了,数据池我用的是阿里的德鲁伊,毕竟用过德鲁伊的人都说好!
        <dependency>
            <groupId>com.alibaba</groupId>
            <artifactId>druid</artifactId>
            <version>1.1.10</version>
        </dependency>
再application.properties中配置好
spring.datasource.type=com.alibaba.druid.pool.DruidDataSource
好啦,以上就是我们编写程序前的准备工作,接下来,终于到了展现真正实力的时候了。
编写程序
我是这样计划的,先写一个普通的用户注册登陆程序,只包括控制层、业务层、实体类和dao层。
- 首先先创建好文件夹
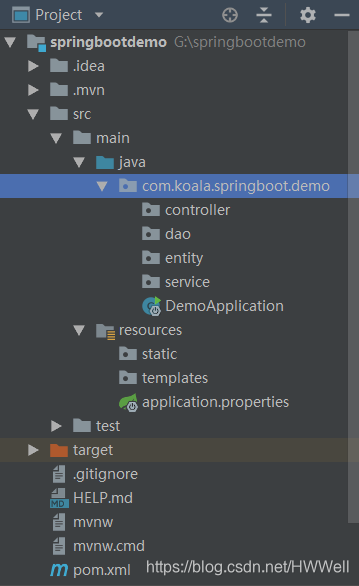
需要注意的是,Application类必须同这些文件夹同级,因为程序从Application进入后,需要扫面同级目录和下级目录的文件,并不会扫描上级目录的文件。
准备数据库
DROP TABLE IF EXISTS `user`;
CREATE TABLE `user`  (
 `id` bigint(20) NOT NULL AUTO_INCREMENT,
 `username` varchar(10) NOT NULL,
 `password` varchar(16) NOT NULL,
 `createdate` datetime(0) NOT NULL COMMENT '创建时间',
 `status` int(1) NOT NULL COMMENT '状态',
 PRIMARY KEY (`id`) USING BTREE
);
编写实体类
/**
 * @Author: 黄文伟
 * @description: 用户实体类
 * @Date:Created in 19:57 2019/3/1
 */
public class User implements Serializable {
    private static final long serialVersionUID = 666666L;

    private long id;
    private String username;
    private String password;
    private String createdate;
    private int status;

    public long getId() {
        return id;
    }

    public void setId(long id) {
        this.id = id;
    }

    public String getUsername() {
        return username;
    }

    public void setUsername(String username) {
        this.username = username;
    }

    public String getPassword() {
        return password;
    }

    public void setPassword(String password) {
        this.password = password;
    }

    public String getCreatedate() {
        return createdate;
    }

    public void setCreatedate(String createdate) {
        this.createdate = createdate;
    }

    public int getStatus() {
        return status;
    }

    public void setStatus(int status) {
        this.status = status;
    }
}
实体类要实现序列化接口,主要是为了方便数据存储和传输,具体的解释请自行百度
编写dao层
/**
 * @Author: 黄文伟
 * @description: 用户相关dao层
 * @Date:Created in 20:01 2019/3/1
 */
@Mapper
public interface UserMapper {
    String TABLE_NAME = "user";
    String INSERT_USER_FIELD = "username, password, createdate, status";
    String SELECT_ID = "id";

    /**
     * 用户注册
     * @param user
     * @return int
     */
    @Insert({"insert into", TABLE_NAME, "(", INSERT_USER_FIELD, ")",
    "values (#{username}, #{password}, #{createdate}, #{status})"})
    Integer insertUser(User user);

    /**
     * 根据用户名查询id
     * @param username
     * @return long
     */
    @Select({"select", SELECT_ID , "from", TABLE_NAME, "where username = #{username}"})
    Long selectIdByName(String username);
}
编写业务逻辑层接口
/**
 * @Author: 黄文伟
 * @description: 用户相关业务逻辑层接口
 * @Date:Created in 20:21 2019/3/1
 */
public interface UserService {
    Map<String, Integer> userRegister(User user) throws Exception;
}
编写业务逻辑层接口实现类
/**
 * @Author: 黄文伟
 * @description: 用户相关业务逻辑层实现类
 * @Date:Created in 20:23 2019/3/1
 */
@Service
public class UserServiceImpl implements UserService {
    @Autowired
    private UserMapper userMapper;

    /**
     * 实现用户注册的业务逻辑
     * @param user
     * @throws Exception
     */
    @Override
    public Map<String, Integer> userRegister(User user) throws Exception {
        Long id = userMapper.selectIdByName(user.getUsername());
        if (id != null) {
            throw new Exception("用户已注册");
        } else {
            // 规定状态0为正常
            user.setStatus(0);

            // 获取当前系统时间作为用户注册时间
            SimpleDateFormat simpleDateFormat = new SimpleDateFormat("yyyy-MM-dd HH-mm-ss");
            Date date = new Date();
            String createdate = simpleDateFormat.format(date);
            user.setCreatedate(createdate);

            Integer ok = userMapper.insertUser(user);

            if (ok != 1) {
                throw new Exception("注册失败");
            } else {
                Map<String, Integer> result = new HashMap<>(1);
                result.put("err_code", 200);
                return result;
            }
        }
    }
}
最后,编写控制层
/**
 * @Author: 黄文伟
 * @description: 用户相关控制层
 * @Date:Created in 20:36 2019/3/1
 */
@RestController
public class UserController {
    @Autowired
    UserService userService;

    /**
     * 用户注册控制层
     * @param param
     * @return String
     * @throws Exception
     */
    @RequestMapping(value = "/register", method = RequestMethod.POST, produces = "application/json;charset=utf-8")
    public Map userRegister(@RequestBody User param) throws Exception {
        Map<String, Integer> response = userService.userRegister(param);
        return response;
    }
}
@RestController 注解功能类似于 @Controller 和 @ResponseBody ,所以使用了 @RestController 就不需要再而外添加 @ResponseBody ,具体功能介绍请自行百度
代码写到这里就结束了,接下来启动postman进行测试一下,看看结果如何。
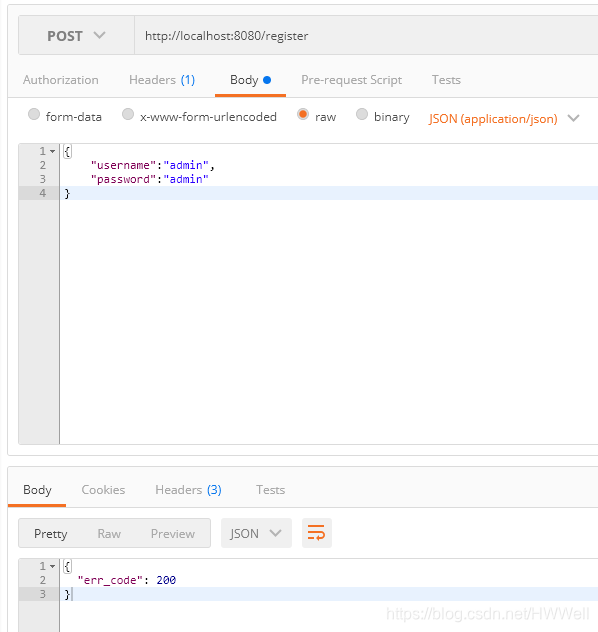
没有报错,数据传输也正常,再看看数据库是否更新。
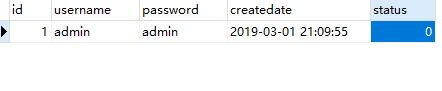
perfect!数据库一切正常。
再重复使用相同的用户名及密码注册,看看有什么反应。
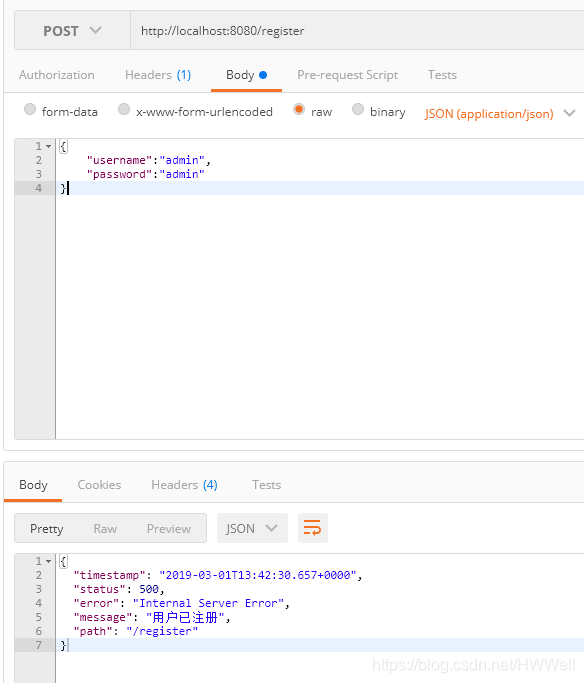
报错!而且提示 用户已注册
完成到这里spring boot已经入门了,如果你还需要继续进阶学习,推荐你看纯洁的微笑大大的博客。


 1275
1275

 被折叠的 条评论
为什么被折叠?
被折叠的 条评论
为什么被折叠?
 到【灌水乐园】发言


